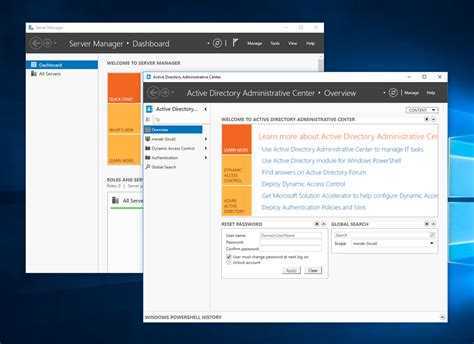
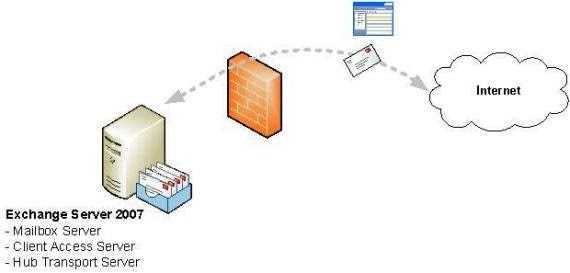
Шаг 3. Настройка политики электронных адресов по умолчанию
Для выполнения этих процедур необходимы соответствующие разрешения. Сведения о необходимых разрешениях см. в статье запись «Политики адресов электронной почты» в статье Разрешения для электронных адресов и адресных книг.
Если вы добавили обслуживаемый домен на предыдущем этапе и хотите, чтобы он добавился для каждого получателя в организации, необходимо обновить политику электронных адресов по умолчанию. Инструкции см. в статьях и .
Примечание
Рекомендуем настроить имя участника-пользователя, которое совпадает с основным адресом электронной почты каждого пользователя. Если не указать имя участника-пользователя, совпадающее с электронным адресом пользователя, пользователь будет вынужден вручную указать домен и имя пользователя или имя участника-пользователя в дополнение к электронному адресу. Если его UPN соответствует электронному адресу, Outlook в Интернете (прежнее название — Outlook Web App), ActiveSync и Outlook автоматически сопоставят электронный адрес с UPN.
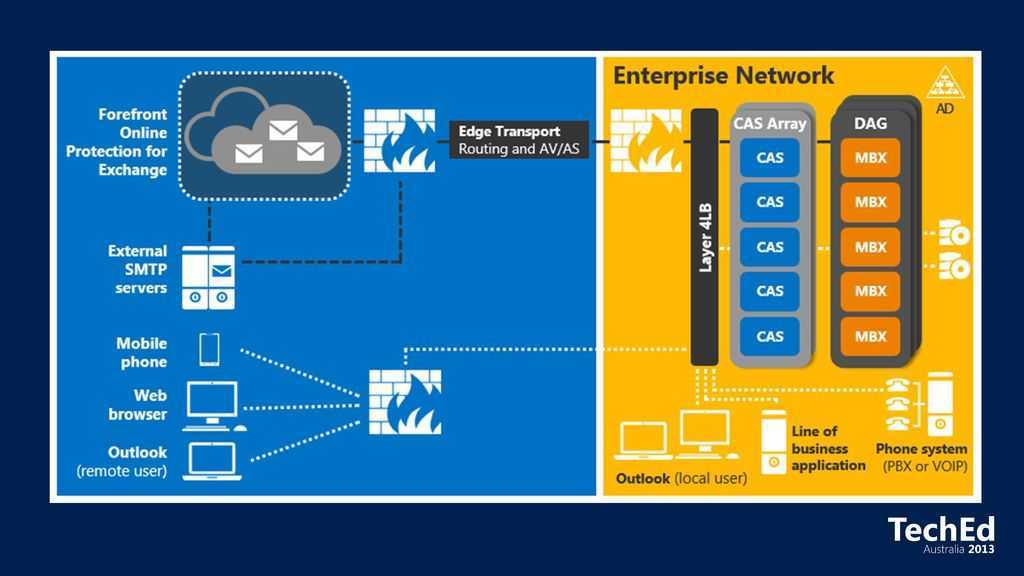
High Availability for Exchange 2010 Client Access Server Arrays
As I mentioned earlier one of the benefits of the CAS Array is that is enables the RPC Client Access Server service to be made highly available.
The configuration of the CAS Array itself is the same, however instead of pointing the DNS record at the IP address of a single Client Access server you would point it at the virtual IP of a load balanced array of servers.
 Exchange 2010 load balanced CAS Array
The load balancing can be achieved in multiple ways:
- By deploying a Windows Network Load Balancing (NLB) cluster for the Client Access Servers
- By deploying a virtual or hardware-based load balancer appliance
История
Ранее Microsoft продавала ряд более простых почтовых продуктов, но первый выпуск Exchange (Exchange Server 4.0 в марте 1996 г.) был полностью новой системой группового программного обеспечения клиент-сервер на основе X.400 с одним хранилищем базы данных, которая также поддерживала X. 500 справочных служб. Каталог, используемый Exchange Server, в конечном итоге стал службой Microsoft Active Directory , совместимой с LDAP службой каталогов, которая была интегрирована в Windows 2000 в качестве основы доменов Windows Server .
По состоянию на 2020 год выпущено десять релизов.
Текущая версия
Текущая версия Exchange Server 2019 была выпущена в октябре 2018 года. В отличие от других продуктов Office Server 2019, таких как SharePoint и Skype для бизнеса, Exchange Server 2019 можно развернуть только на Windows Server 2019. Одной из ключевых особенностей нового выпуска является этот Exchange Server может быть впервые развернут на Windows Server Core. Кроме того, Microsoft удалила функцию единой системы обмена сообщениями Exchange, а это означает, что локальные клиенты Skype для бизнеса должны будут использовать альтернативные решения для голосовой почты, такие как облачная голосовая почта Azure. Единая система обмена сообщениями продолжает существовать в Exchange Online, для чего требуется лицензия Exchange Plan 2.
Новые особенности
- Безопасность: поддержка установки Exchange Server 2019 на Windows Server Core
- Производительность: поддерживает запуск Exchange Server с количеством процессорных ядер до 48 и оперативной памятью 256 ГБ
Проверка корректности клиентских подключений
Теперь, когда у нас практически подготовлена исходная инфраструктура Exchange 2010 мы можем подключиться к нашему пока единственному почтовому ящику через Outlook:

Сначала проверим подключение через нашу тестовую рабочую станцию с Windows 7 и Office 2010:

На этапе подключения мы можем получить предупреждение о том, что у нас нет доверия к сертификату, который предоставил Exchange сервер. Это так. Мы еще не конфигурировали сертификаты. Соглашаемся на не доверенный сертификат.

В целом подключение устанавливается успешно:
Теперь проверим подключение через нашу тестовую рабочую станцию с Windows 10 и Office 2019. Да, да, именно с Office 2019 Exchange 2010 конечно же официально не поддерживает Office 2019, но по факту подключение работает. Естественно, без каких-либо гарантий на корректную работу:
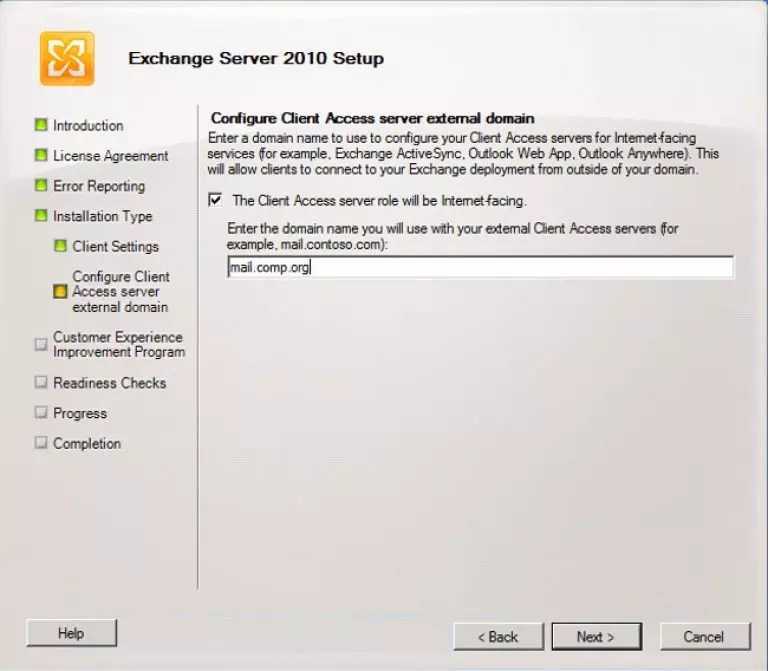
Client Access Server Array Pre-Requisites
Two or more Exchange Server 2010 Client Access Servers can be configured as a CAS array using NLB as long they are not also installed as Mailbox servers that are members of a Database Availability Group (DAG).
The reason is that DAG members utilize Windows Failover Clustering, which can’t co-exist with NLB.
To demonstrate the setup of a CAS array the following servers have been provisioned.
Server #1
- Operating System: Windows Server 2008 64-bit R2
- Name: EX3.exchangeserverpro.local
- Primary Interface: 192.168.0.34/24
- Secondary Interface: 192.168.0.36/24
Server #2
- Operating System: Windows Server 2008 64-bit R2
- Name: EX4.exchangeserverpro.local
- Primary Interface: 192.168.0.35/24
- Secondary Interface: 192.168.0.37/24
The IP address allocated to the NLB cluster will be 192.168.0.38.


Installing the Exchange Server 2010 Client Access Server Pre-Requisites
On each server, from an elevated Windows PowerShell prompt, run the following commands.
PS C:\> Import-Module ServerManager
| 1 | PSC\>Import-Module ServerManager |
Note: In my lab the servers are also Hub Transport servers, and so I installed both sets of pre-requisites. I also use the -Restart switch to automate the restart of the servers, however you can remove this if you wish to control when the servers are restarted.
For only the Client Access Server pre-requisites:
PS C:\> Add-WindowsFeature NET-Framework,RSAT-ADDS,Web-Server,Web-Basic-Auth,Web-Windows-Auth,Web-Metabase,Web-Net-Ext,Web-Lgcy-Mgmt-Console,WAS-Process-Model,RSAT-Web-Server,Web-ISAPI-Ext,Web-Digest-Auth,Web-Dyn-Compression,NET-HTTP-Activation,RPC-Over-HTTP-Proxy -Restart
| 1 | PSC\>Add-WindowsFeature NET-Framework,RSAT-ADDS,Web-Server,Web-Basic-Auth,Web-Windows-Auth,Web-Metabase,Web-Net-Ext,Web-Lgcy-Mgmt-Console,WAS-Process-Model,RSAT-Web-Server,Web-ISAPI-Ext,Web-Digest-Auth,Web-Dyn-Compression,NET-HTTP-Activation,RPC-Over-HTTP-Proxy-Restart |
For the Client Access Server and Hub Transport Server pre-requisites:
Add-WindowsFeature NET-Framework,RSAT-ADDS,Web-Server,Web-Basic-Auth,Web-Windows-Auth,Web-Metabase,Web-Net-Ext,Web-Lgcy-Mgmt-Console,WAS-Process-Model,RSAT-Web-Server,Web-ISAPI-Ext,Web-Digest-Auth,Web-Dyn-Compression,NET-HTTP-Activation,RPC-Over-HTTP-Proxy -Restart
| 1 | Add-WindowsFeature NET-Framework,RSAT-ADDS,Web-Server,Web-Basic-Auth,Web-Windows-Auth,Web-Metabase,Web-Net-Ext,Web-Lgcy-Mgmt-Console,WAS-Process-Model,RSAT-Web-Server,Web-ISAPI-Ext,Web-Digest-Auth,Web-Dyn-Compression,NET-HTTP-Activation,RPC-Over-HTTP-Proxy-Restart |
After the servers are restarted run the following command, again from an elevated PowerShell window.
Set-Service NetTcpPortSharing -StartupType Automatic
| 1 | Set-Service NetTcpPortSharing-StartupType Automatic |
Installing the Exchange Server 2010 Client Access Server Role
From an elevated command prompt run the following unattended setup command.
Note: Again, my lab servers are also Hub Transport servers.
For only the Client Access Server role with Management Tools:
C:adminExchange Server 2010> setup /m:install /r:ca,mt
| 1 | CadminExchange Server2010>setupminstallrca,mt |
For both the Client Access and Hub Transport Server roles with Management Tools:
C:adminExchange Server 2010> setup /m:install /r:ca,ht,mt
| 1 | CadminExchange Server2010>setupminstallrca,ht,mt |
Installing Windows Network Load Balancing
On each of the servers, from an elevated PowerShell window run the following commands.
PS C:\> Import-Module servermanager
| 1 | PSC\>Import-Module servermanager |
PS C:\> Add-WindowsFeature NLB
| 1 | PSC\>Add-WindowsFeature NLB |
Службы автообнаружения и Active Directory
Exchange в Active Directory сохраняет конфигурацию Exchange серверов в организации, а также сведения о почтовых ящиках пользователей. Перед установкой Exchange Server необходимо подготовить лес Active Directory и его домены. Если вы не знакомы с Exchange или доменами, см. в доменов Active Directory.
Exchange автоматически создает при установке виртуальный каталог в IIS, веб-сайте frontend client Access services, к который подключаются клиенты. Это позволяет Outlook обнаруживать параметры почтовых ящиков Exchange, чтобы пользователям не приходилось вручную настраивать дополнительные параметры.
Одновременно с виртуальным каталогом службы автообнаружения в Active Directory создается объект точки подключения службы (SCP). Он хранит и предоставляет заслуживающие доверия URL-адреса службы автообнаружения для компьютеров, присоединенных к домену.
Вам нужно обновить объект SCP, чтобы он указывал на сервер Exchange. Это требуется потому, что серверы Exchange предоставляют клиентам дополнительные сведения автообнаружения для улучшения процесса обнаружения. Дополнительные сведения см. в статье Set-ClientAccessService.
Важно!
Для запуска командлета Set-ClientAccessService требуются специальные разрешения. Сведения о необходимых разрешениях для запуска командлетов и использования параметров в организации см. в статье Find the permissions required to run any Exchange cmdlet.


Автообнаружение упрощает получение информации, необходимой для подключения к почтовым ящикам на серверах Exchange Server. Объекты SCP находят подходящие серверы или конечные точки автообнаружения для пользователей, для которых вы получаете параметры. Объекты SCP в AD DS упрощают поиск серверов автообнаружения для присоединенных к домену клиентов.
Exchange публикует два типа объектов SCP для службы автообнаружения:
-
Указатели SCP. Содержит сведения, указыватели на определенные серверы LDAP, которые должны использоваться для обнаружения объектов SCP автооткрытки для домена пользователя. GUID указателей SCP: 67661d7F-8FC4-4fa7-BFAC-E1D7794C1F68.
-
URL-адреса SCP. Содержит URL-адреса для конечных точек автооткрытия. URL-адреса SCP штампуются с помощью следующего GUID: 77378F46-2C66-4aa9-A6A6-3E7A48B19596
Объект SCP содержит заслуживающий доверия список URL-адресов службы автообнаружения для леса. Дополнительные сведения о поиске конечных точек службы автообнаружения см. в статье Как создать список конечных точек службы автообнаружения.
Подключение клиентов в Exchange 2016 и Exchange 2019 г. подобно Exchange 2013 г. и отличается от Exchange 2010 г. В Exchange 2016 и 2019 гг. MAPI над HTTP включен по умолчанию, когда ранее Outlook клиенты использовали Outlook в любом месте (RPC над HTTP). Exchange 2016 и 2019 годов для решений, устойчивых к сайту, требуется меньше имен, чем Exchange 2010 г., что сокращается до двух из ранее необходимых семи пространств имен. Дополнительные информацию о пространстве имен и Exchange Server см. в блоге Планирование пространства имен в Exchange 2016 г..
В зависимости от настройки службы автооткрытия на отдельном сайте URL-адрес службы автооткрытия будет одним из следующих значений, где находится основной домен SMTP:
Например, если электронный адрес пользователя vitaly@contoso.com, основной адрес домена SMTP contoso.com.
Клиентские приложения используют службу автообнаружения при первом запуске приложения. Например, при первом запуске приложения веб-служб Exchange (EWS) оно настраивается с помощью службы автообнаружения. Для компьютера пользователя, подключенного к домену contoso.com и размещенного на региональном сайте Active Directory Longview, приложение создает список этих конечных точек службы автообнаружения.
| Конечная точка | Создана на основе |
|---|---|
| https://longview.contoso.com/autodiscover/autodiscover.xml | Результаты SCP |
| https://email.contoso.com/autodiscover/autodiscover.xml | Результаты SCP |
| https://newark.contoso.com/autodiscover/autodiscover.xml | Результаты SCP |
| https://contoso.com/autodiscover/autodiscover.exc | Электронный адрес |
| https://autodiscover.contoso.com/autodiscover/autodiscover | Электронный адрес |
Дополнительные сведения о объектах SCP см. в публикации с точками подключения к службе.
Client Access Rule conditions and exceptions
Conditions and exceptions in Client Access Rules identify the client connections that the rule is applied to or not applied to. For example, if the rule blocks access by remote PowerShell clients, you can configure the rule to allow remote PowerShell connections from a specific range of IP addresses. The syntax is the same for a condition and the corresponding exception. The only difference is conditions specify client connections to include, while exceptions specify client connections to exclude.
This table describes the conditions and exceptions that are available in Client Access Rules:
| Condition parameter in the Exchange Management Shell | Exception parameter in the Exchange Management Shell | Description |
|---|---|---|
| AnyOfAuthenticationTypes | ExceptAnyOfAuthenticationTypes | Valid values in Exchange Server are:
You can specify multiple values separated by commas. You can use quotation marks around each individual value («value1″,»value2»), but not around all values (don’t use «value1,value2»). |
| AnyOfClientIPAddressesOrRanges | ExceptAnyOfClientIPAddressesOrRanges | IPv4 and IPv6 addresses are supported. Valid values are:
You can specify multiple values separated by commas. For more information about IPv6 addresses and syntax, see this Exchange 2013 topic: . |
| AnyOfProtocols | ExceptAnyOfProtocols | Valid values in Exchange Server are:
You can specify multiple values separated by commas. You can use quotation marks around each individual value (» value1″,»value2″), but not around all values (don’t use «value1,value2»). Note: If you don’t use this condition in a rule, the rule is applied to both protocols. |
| Scope | n/a | Specifies the type of connections that the rule applies to. Valid values are:
|
| UsernameMatchesAnyOfPatterns | ExceptUsernameMatchesAnyOfPatterns | Accepts text and the wildcard character (*) to identify the user’s account name in the format (for example, or , but not ). Non-alphanumeric characters don’t require an escape character.
You can specify multiple values separated by commas. |
| UserRecipientFilter | n/a | Uses OPath filter syntax to identify the user that the rule applies to. For example, .
The filterable attributes are:
The search criteria uses the syntax .
You can chain multiple search criteria together using the logical operators and . For example, or . For more information about OPATH filter syntax, see . |
Preparing the NLB Cluster for Updates
The first step is to remove the server that is about to be updated from the Network Load Balancing (NLB) cluster.
There are two ways to take a CAS array member our of the NLB cluster:
- Issue a Stop command to the server
- Issue a Drainstop command to the server
The difference between the two is that Stop will immediately stop the server regardless of who is currently connected to it, while Drainstop will put the server in a state where it will not accept new connections but will continue serving existing connections until they disconnect.
For urgent updates a Stop command may be necessary, but for planned maintenance a Drainstop has the least potential impact on active client connections to the CAS array.
To issue a Drainstop launch Network Load Balancing Manager, right-click on the desired server, choose Control Host and then Drainstop.

When the server has no more active connections it will be in a stopped state.
Right click the server and choose Properties. Set the default state of the server to Stopped. This will prevent it from automatically starting and accepting client connections after any reboots that the updates require, to allow you time to verify the updates were successful first before rejoining the NLB cluster.


Updating Existing Mailbox Databases
When the CAS array has been established any new mailbox databases created on servers in that Active Directory Site will be configured with the CAS array as their RpcClientAccessServer.
You can see here that the existing mailbox database on server EX2 is still configured with a standalone Client Access server as its RpcClientAccessServer.
C:\>Get-MailboxDatabase -Server EX2 | fl name, rpc*
Name : Mailbox Database 02
RpcClientAccessServer : EX3.exchangeserverpro.local
|
1 2 3 4 |
PSC\>Get-MailboxDatabase-Server EX2|fl name,rpc* NameMailbox Database02 RpcClientAccessServerEX3.exchangeserverpro.local |
To update all databases on the server with the new RpcClientAccessServer run the following command.
C:\>Get-MailboxDatabase -Server EX2 | Set-MailboxDatabase -RpcClientAccessServer casarray.exchangeserverpro.local
| 1 | PSC\>Get-MailboxDatabase-Server EX2|Set-MailboxDatabase-RpcClientAccessServer casarray.exchangeserverpro.local |
The change can be seen by running the same command as earlier.
C:\>Get-MailboxDatabase -Server EX2 | fl name, rpc*
Name : Mailbox Database 02
RpcClientAccessServer : casarray.exchangeserverpro.local
|
1 2 3 4 |
PSC\>Get-MailboxDatabase-Server EX2|fl name,rpc* NameMailbox Database02 RpcClientAccessServercasarray.exchangeserverpro.local |
Note that any existing Outlook profiles will not automatically update from the single Client Access Server to the new CAS array name. Those clients will not automatically failover to an alternate member of the CAS array when there is a server failure. You will need to update those profiles for them to receive the high availability benefits of the CAS array. This is one reason that it is important to establish CAS arrays prior to migrating user mailboxes to Exchange Server 2010.
Связанные темы
Дополнительные сведения об интеграции локального сервера Exchange:
Что произойдет, если отключить интеграцию Exchange?
Отключение интеграции с локальным сервером Exchange приведет к невозможности использовать панель мониторинга Windows Server Essentials для просмотра, создания и управления почтовыми ящиками Exchange Server.
Что нужно знать об учетных записях электронной почты?
Хостинг электронной почты настраивается на вашем сервере. решение из размещенного поставщика электронной почты, например Microsoft 365, может предоставлять индивидуальные учетные записи электронной почты для пользователей сети. При запуске мастер добавления учетных записей пользователей в Windows Server Essentials пытается добавить учетную запись пользователя с помощью доступной службы хостинга электронной почты. Одновременно мастер назначает пользователю имя (псевдоним) электронной почты и задает максимальный размер почтового ящика (квоту). Максимальный размер почтового ящика зависит от выбранного поставщика электронной почты. После добавления учетной записи пользователя, вы можете в дальнейшем управлять псевдонимом и информацией о квоте почтового ящика на странице настроек пользователя. Полное управление учетными записями пользователей и службой хостинга электронной почты осуществляется с помощью консоли управления. В зависимости от провайдера доступ к консоли управления осуществляется или через веб-портал, или через закладку в панели мониторинга.
Псевдоним, указанный вами при запуске мастера добавления учетных записей пользователей, отправляется провайдеру как предлагаемое имя для псевдонима пользователя. Например, если псевдоним пользователя — франкм, то адрес электронной почты пользователя может быть FrankM@Contoso.com .
Кроме того, пароль, который вы установите для пользователя в мастере добавления учетных записей пользователей, будет использоваться в качестве исходного пароля пользователя в хостинге электронной почты.
Наконец, при удалении пользователя на сервере с помощью мастера удаления учетных записей пользователя мастер одновременно отправит запрос провайдеру хостинга электронной почты на удаление пользователя из системы. Поставщик может удалить учетную запись пользователя и электронное письмо, связанное с этой учетной записью.
Дополнительные сведения об установке необходимых клиентских приложений электронной почты, а также о доступе к учетной записи электронной почты, содержатся в справочной документации, предоставляемой провайдером хостинга электронной почты.
Что такое квота электронной почты?
объем дискового пространства, выделяемый для данных Exchange почтового ящика пользователя сети, называется квотой почтового ящика.
При выборе раздела Настройки интеграции сервера Exchange Server на панели мониторинга мастер добавляет страницу мастера добавления учетных записей пользователей, что позволяет в дальнейшем вводить квоты почтовых ящиков и устанавливать размер квот. По умолчанию параметр Применять квоты почтовых ящиков установлен (включен), и для почтовых ящиков пользователей предоставляется 2 ГБ дискового пространства. Администраторы Exchange могут настраивать размер квоты почтовых ящиков с учетом бизнес-потребностей.
Parameters
-DomainController
The DomainController parameter specifies the domain controller that’s used by this cmdlet to read data from or write data to Active Directory. You identify the domain controller by its fully qualified domain name (FQDN). For example, dc01.contoso.com.
| Type: | Fqdn |
| Position: | Named |
| Default value: | None |
| Accept pipeline input: | False |
| Accept wildcard characters: | False |
| Applies to: | Exchange Server 2010, Exchange Server 2013, Exchange Server 2016, Exchange Server 2019 |
-Identity
The Identity parameter specifies the server with the Client Access server role installed that you want to view.
You can use any value that uniquely identifies the server. For example:
- Name (for example, Exchange01)
- Distinguished name (DN) (for example, CN=Exchange01,CN=Servers,CN=Exchange Administrative Group (FYDIBOHF23SPDLT),CN=Administrative Groups,CN=First Organization,CN=Microsoft Exchange,CN=Services,CN=Configuration,DC=contoso,DC=com)
- Exchange Legacy DN (for example, /o=First Organization/ou=Exchange Administrative Group (FYDIBOHF23SPDLT)/cn=Configuration/cn=Servers/cn=Exchange01)
- GUID (for example, bc014a0d-1509-4ecc-b569-f077eec54942)
| Type: | ClientAccessServerIdParameter |
| Position: | 1 |
| Default value: | None |
| Accept pipeline input: | True |
| Accept wildcard characters: | False |
| Applies to: | Exchange Server 2010, Exchange Server 2013, Exchange Server 2016, Exchange Server 2019 |
-IncludeAlternateServiceAccountCredentialPassword
The IncludeAlternateServiceAccountCredentialPassword switch specifies whether to include the password of the alternate service account in the results. You don’t need to specify a value with this switch.


The password is visible in the AlternateServiceAccountConfiguration property. To see this property, use the Format-List cmdlet. For example, .
| Type: | SwitchParameter |
| Position: | Named |
| Default value: | None |
| Accept pipeline input: | False |
| Accept wildcard characters: | False |
| Applies to: | Exchange Server 2010, Exchange Server 2013, Exchange Server 2016, Exchange Server 2019 |
-IncludeAlternateServiceAccountCredentialStatus
The IncludeAlternateServiceAccountCredentialStatus parameter specifies whether to include the status of the alternate service account in the results. You don’t need to specify a value with this switch.
The status is visible in the AlternateServiceAccountConfiguration property. To see this property, use the Format-List cmdlet. For example, .
| Type: | SwitchParameter |
| Position: | Named |
| Default value: | None |
| Accept pipeline input: | False |
| Accept wildcard characters: | False |
| Applies to: | Exchange Server 2010, Exchange Server 2013, Exchange Server 2016, Exchange Server 2019 |
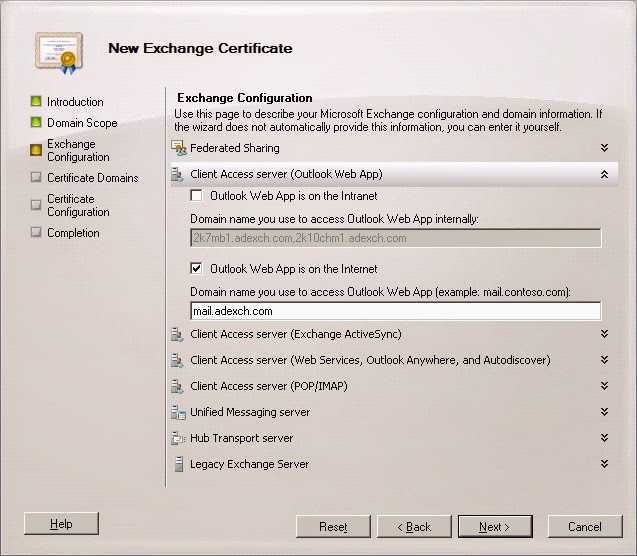
Step 6: Configure an SSL certificate
Some services, such as Outlook Anywhere and Exchange ActiveSync, require certificates to be configured on your Exchange server. The following steps show you how to configure an SSL certificate from a third-party certificate authority (CA):
-
-
You should request a certificate from a third-party CA so your clients automatically trust the certificate. For more information, see .
-
If you configured your internal and external URLs to be the same, Outlook on the web (when accessed from the internet) and Outlook on the web (when accessed from the Intranet) should both show owa.contoso.com. OAB (when accessed from the internet) and OAB (when accessed from the Intranet) should show mail.contoso.com.
-
If you configured the internal URLs to be internal.contoso.com, Outlook on the web (when accessed from the internet) should show owa.contoso.com and Outlook on the web (when accessed from the Intranet) should show internal.contoso.com.
-
-
-
At minimum, you should select SMTP and IIS.
-
If you receive the warning Overwrite the existing default SMTP certificate?, click Yes.
-
How do you know this step worked?
To verify that you’ve successfully added a new certificate, do the following steps:
-
In the EAC, go to Servers > Certificates.
-
Select the new certificate and then, in the certificate details pane, verify that the following are true:
-
Status shows Valid
-
Assigned to services shows, at minimum, IIS and SMTP.
-
Настройка балансировки сетевого траффика клиентских подключений через CAS Array
После того, как мы завершили основные шаги по конфигурации CAS array у нас остался последний шаг для завершения настройки массива – настройка балансировки сетевого траффика. Про балансировку SMTP и HTTP/HTTPS траффика мы поговорим в одной из следующих публикаций. Сейчас же мы займемся настройкой балансировки траффика MAPI подключений.
Предварительно немного теории.
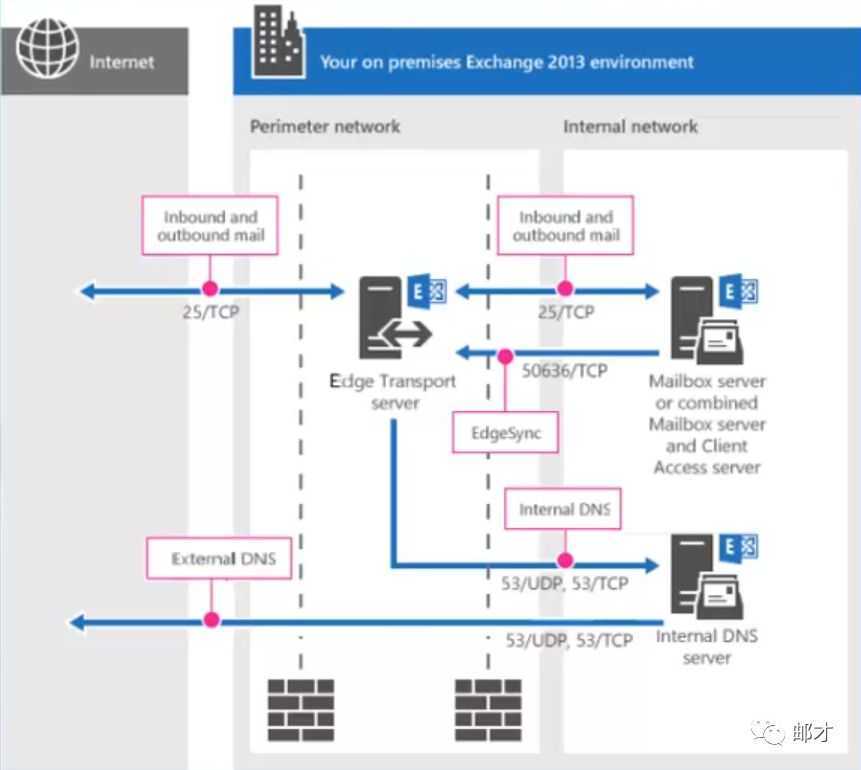
RPC подключения для CAS Array не используют статический порт (по умолчанию), а используют динамический диапазон TCP портов с 6005 до 59530. Единственный статический порт – это TCP End Point Mapper (TCP 135). Итого, в конфигурации по умолчанию нам необходимо балансировать следующие порты клиентских подключений к серверам клиентского доступа:
- TCP 135.
- TCP 6005-59530.
Однако, можно настроить статические порты. Подробности настройки и теория есть в следующей документации.
Что нам необходимо сделать для настройки балансировки клиентских подключений по MAPI:
1. Зайти на веб-интерфейс управления нашим балансировщиком:
2. В меню слева перейдем по следующим пунктам “Virtual Services” – “Add New” и укажем параметры IP-адреса виртуального сервиса, параметры шаблона, протокола и используемых портов, как указано на скриншоте ниже:
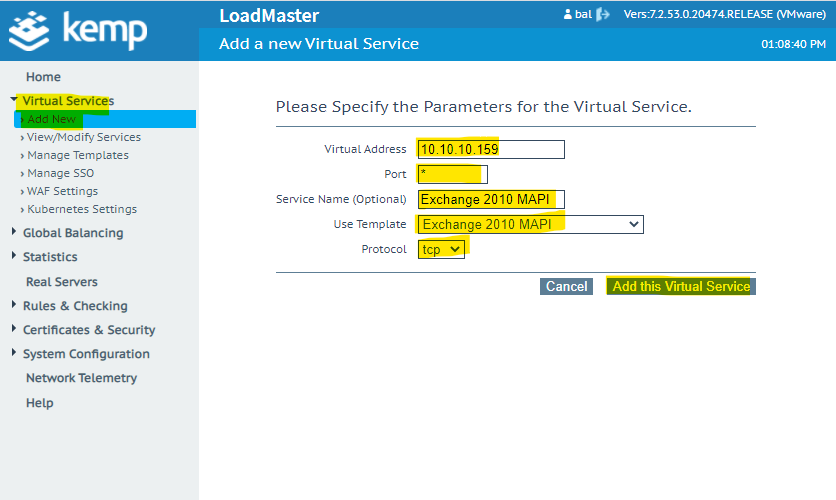
Небольшие комментарии:
Virtual Address – это именно тот адрес, который сопоставлен имени нашего CAS Array (mapi.itproblog.ru).
Port – звездочка обозначает балансировку не какого-то конкретного порта, а всех портов, т.к. мы не знаем заранее какой будет использован порт. При настройке балансировки для SMTP и HTTPS траффика мы уже будем указывать конкретные порты – 25 и 443 соответственно.


Servie Name – имя, которое KEMP LoadMaster будет отображать в качестве имени сервиса.
Use Template – необходимо выбрать шаблон “Exchange 2010 MAPI”. В шаблоне уже присутствуют все необходимые настройки для балансировки траффика CAS Array.
Protocol – используемый протокол. В нашем случае это TCP.
3. После того, как мы создали виртуальный сервис необходимо добавить в него оба наших сервера клиентского доступа:

4. Добавляем первый сервер клиентского доступа:
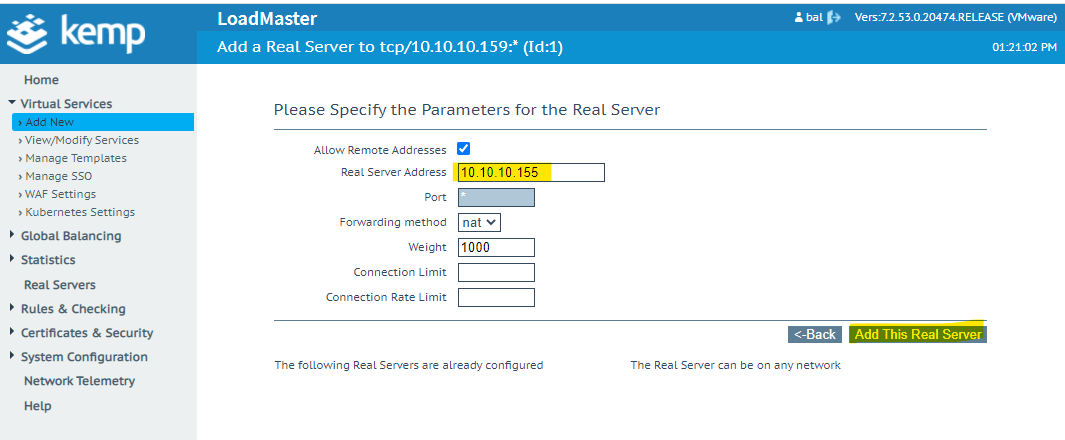
5. И добавляем второй сервер клиентского доступа:
6. Теперь мы можем проверить общее состояние нашего виртуального сервиса для MAPI подключений и его отдельных реальных серверов. Для этого в меню слева перейдите по следующим пунктам “Virtual Services” – “View/Modify Services”.
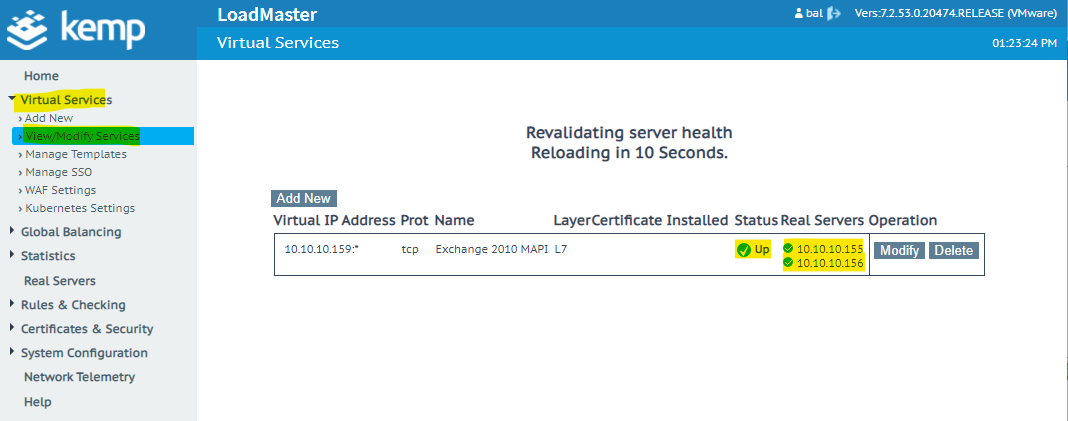
Зеленая галочка в колонке “Status” говорит о том, что виртуальных сервис работает и с ним все хорошо. Зеленые галочки в колонке “Real Servers” показывают состояние каждого из серверов клиентского доступа в отдельности. С ними у нас тоже все хорошо.
У вас может назреть вопрос “а как же KEMP определяет все ли хорошо с серверами CAS?”. Он проверяет возможность подключения к серверу CAS по порту TCP 135. Если подключение есть, то сервер считается доступным. Если нет, то KEMP перестанет балансировать на него траффик.

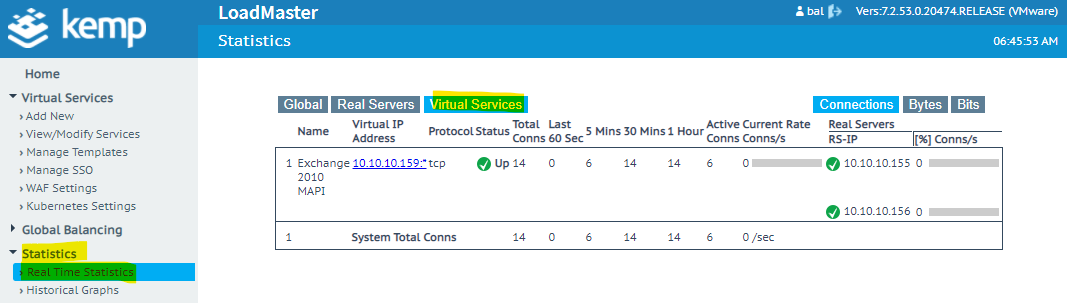
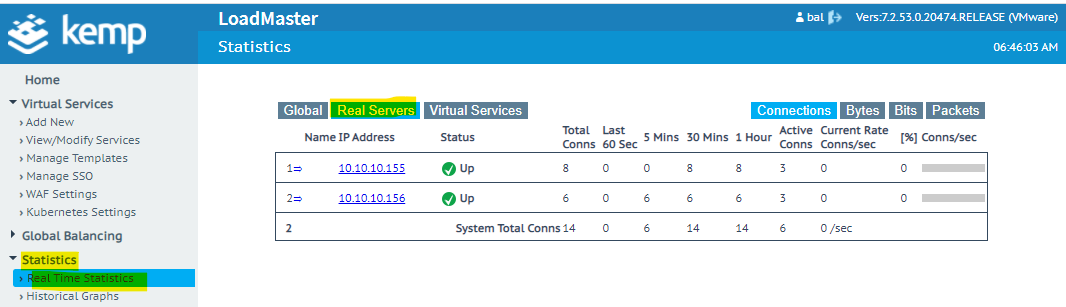
При верно выполненной настройке балансировки клиентских подключений в статистике мы можем увидеть, что наш виртуальный сервер принимает клиентские подключения и балансировщик распределяет клиентские подключения между серверами. Скрины ниже были сделано уже после установки почтовых серверов и проверки клиентских подключений:
На этом настройка балансировки MAPI подключений и настройка CAS Array завершена.