VCSA 6.5
First, shut down the VCSA and take a snapshot.
1. Start the appliance up and press the space bar to freeze the GRUB menu. Note that you need to be somewhat quick here.
2. Press e to enable edit mode.
3. Append rw init=/bin/bash to the list of options as shown in Fig. 2.
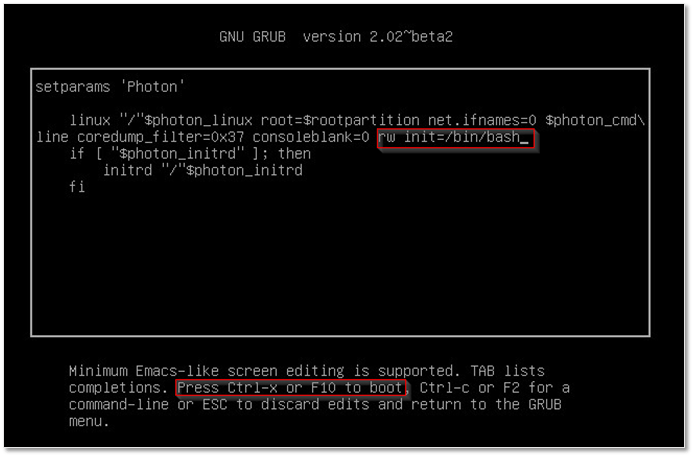
Figure 2 – Setting the boot options in GRUB
4. Press F10 to reboot. The appliance will now boot up in bash or root shell.
5. Type passwd to change the root password. Type it twice and press Enter to confirm.
6. Optionally, you can unmount the file system using umount /
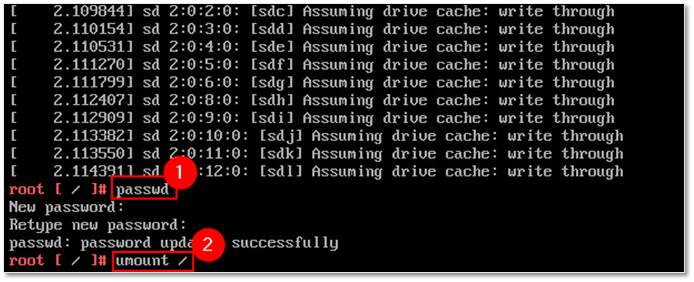
Figure 3 – Changing the root password and unmounting the file system
7. Reboot the appliance using the power options from the VMRC or vSphere client menu.
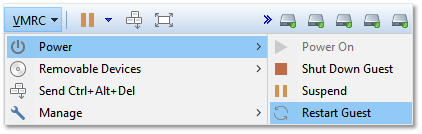
Figure 4 – Rebooting the appliance from VMRC
You should now be able to log in with root using the new password as shown in this next video.
Проблемы при установке ESXi
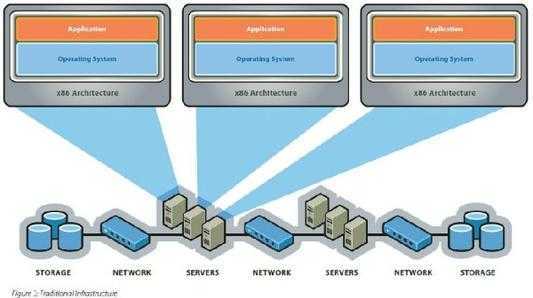
Больше всего проблем возникает у тех, кто пытается произвести установку на несовместимое оборудование. Как я уже писал раньше, дистрибутив гипервизора имеет очень небольшой размер и драйверов в нем помещается немного. В основном VMwareподдерживает брендовых производителей, но иногда и на серверы известных марок, скачанный с официального сайта образ не устанавливается. Узнать точно совместим ли ваш сервер с гипервизором ESXiопределенной версии можно на специальной странице http://vmware.com/go/hcl Для тех кто планирует создание инфраструктуры с нуля, особенно для тех кто собирается экономить и покупать серверное оборудование по отдельным компонентам, эта страничка должна быть в закладках. Здесь можно найти информацию не только по совместимости с серверами, но и по совместимости с моделями определенных сетевых карт, PCI контроллеров, по поддерживаемым способам подключения между сервером и системой хранения и многое другое.
Для собственных серверов производители выпускают специальные сборки VMwareESXi, их чаще всего, можно найти на официальных сайтах вендоров. В этих сборках расширенный, обновленный до последних версий набор драйверов для устройств, устанавливаемых в серверное оборудование. Конечно, если есть такая сборка для вашего сервера, то лучше использовать ее.
Для встраивания своих драйверов в образ ESXiраньше использовалась программка VMware Image Builder, но я давно про нее ничего не слышал. То что вы встроили драйвер образ и он установился-запустился еще не означает его корректную работу. Поэтому все эксперименты на свой страх и риск.
Чаще всего на несовместимом оборудовании ESXiне устанавливается из-за отсутствия драйверов на сетевую карту, тогда есть вариант купить отдельно сетевую карту из листа совместимости, например, Intel PRO/1000, установить ее в сервер и, скорее всего, после этого установка завершится удачно.
Бывает, что установщик ESXi не находит дисков для установки. Возможен вариант, когда не видны диски, находящиеся не в рейде, тогда нужно собрать RAID, даже если диск в сервере один из него можно собрать RAID-0. А бывает наоборот, видны только диски, находящиеся не в рейде. Тогда есть вариант установить на один из дисков или для надежности на оба ESXi, а потом собрать RAID-1. Несколько раз на серверах Intelданный способ спасал.
И главное, получив ошибку при установке не унывайте раньше времени, воспользуйтесь поиском в Google, вы 100% не первый, кто наступает на эти грабли.
Для тех, кто собирается использовать оборудование, которого нет в листе совместимости и платные лицензии VMware. При обращении в службу технической поддержки вам откажут в решении проблемы, если узнают про несовместимость, а они узнают после того, как вы пришлете им логи.
Как массово удалить виртуальную машину через PowerCLI
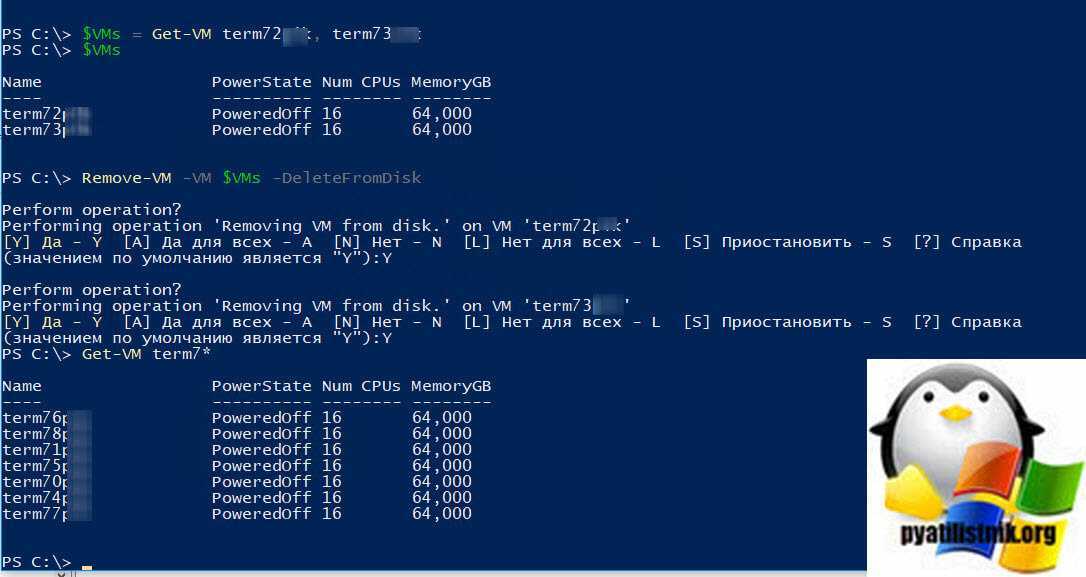
После знакомства с командлетами нужно научиться автоматизировать наши задания и посмотреть, как сделать все то же самое, но с большим количеством серверов. Тут есть несколько простых конструкций. Создадим переменную с двумя серверами:
$VMs = Get-VM term72, term73
Удостоверимся, что в нее попадают наши два виртуальных сервера и произведем удаление $VMs.
Remove-VM -VM $VMs -DeleteFromDisk
Как видим при удалении переменной $VMs, у нас идет запрос на удаление двух виртуальных серверов, term72 и term73.
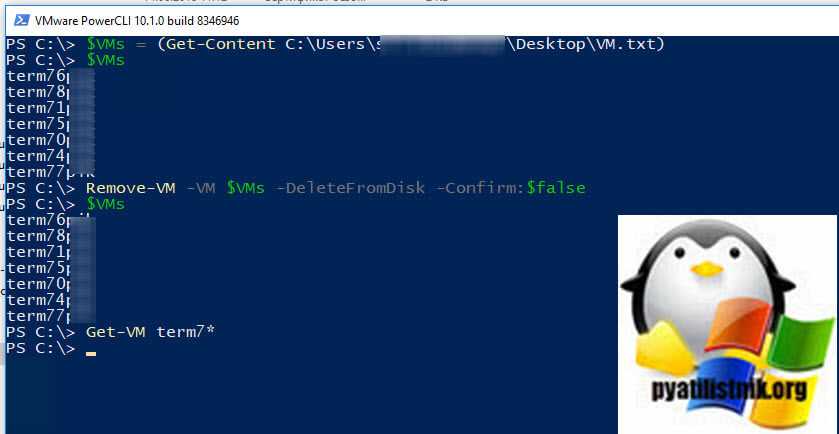
То же самое можно сделать имя файл со списком серверов, который так же помещается в переменную. Вам нужно заранее подготовить обычный txt файл, где каждый сервер будет находится на новой строке. Далее есть такой командлет Get-Content. Пишем:
$VMs = (Get-Content C:\Users\sem\Desktop\VM.txt)
Проверяем, что в переменную $VMs попали сервера из файла.
Далее выполняем команду по удалению виртуалок.
Remove-VM -VM $VMs -DeleteFromDisk -Confirm:$false
После выполнения команды, если вывести запрос по поиску всех серверов с именем term*, то мы ничего не обнаруживаем.
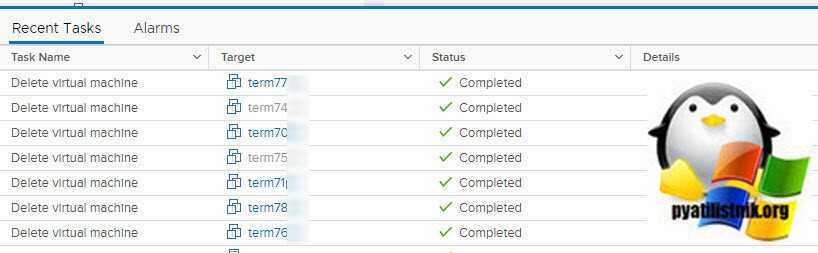
Если в этот момент посмотреть vCenter, то тут вы увидите массовые задания по удалению.
Так же я могу с вами поделиться полезным скриптом, который проверяет статус виртуальной машины, если она работает, то идет выключение, а уже потом удаление.
# Загружаем список виртуальных машин из файла
$VMs = (Get-Content servers.txt) $vmObj = Get-vm $vms
# Проверяем статус виртуальных машин, если что то выключаем их foreach($active in $vmObj){ if($active.PowerState -eq «PoweredOn»){ Stop-VM -VM $active -Confirm:$false -RunAsync | Out-Null} } Start-Sleep -Seconds 7
# Производим удаление виртуальных машин
foreach($delete in $vmObj){ Remove-VM -VM $delete -DeleteFromDisk -Confirm:$false -RunAsync | Out-Null}
Wrap-up ^
VMware supports the first two methods but not the third. VMware clearly does not want us to go and modify files on ESXi installations. VMware says that the only supported way to reset an ESXi password is by reinstalling the host. This way you can preserve the local datastore with some VMs running there if you wish. However, you’ll lose every other configuration setting, such as networking, storage, and so on.
Subscribe to 4sysops newsletter!
After a quick reinstallation and configuration, you’ll regain access to such a host, and you can add this host to Active Directory just in case you lose the root password in the future.
+9
Changing the pass with vCenter
Let’s start with some bright scenario: you forgot the ESXi root password but there’s vCenter installed. I’d say that’s a pretty common issue. Admins manage the host through vCenter, but one day, they lose the password. Fortunately, that’s not a big deal to restore the password.
![Оптимизация операционной системы vmware esxi 6 для работы с схд [colobridge wiki]](https://smartshop124.ru/wp-content/uploads/3/7/8/378400f38bb23dd4823fa06841363cd4.jpeg)
First, let’s look at how to change the password via the flash vCenter Webclient. Note that things I write here do not work in the html one! Also note that you need your ESXi edition to be not lower than Enterprise Plus.
In order to reset the password, you need to extract, edit, and upload Host Profile. Here’s how you do that.
Go to vCenter, and extract the host profile exactly how I do in the screenshot below.
While extracting, specify the host name and add some description if needed.
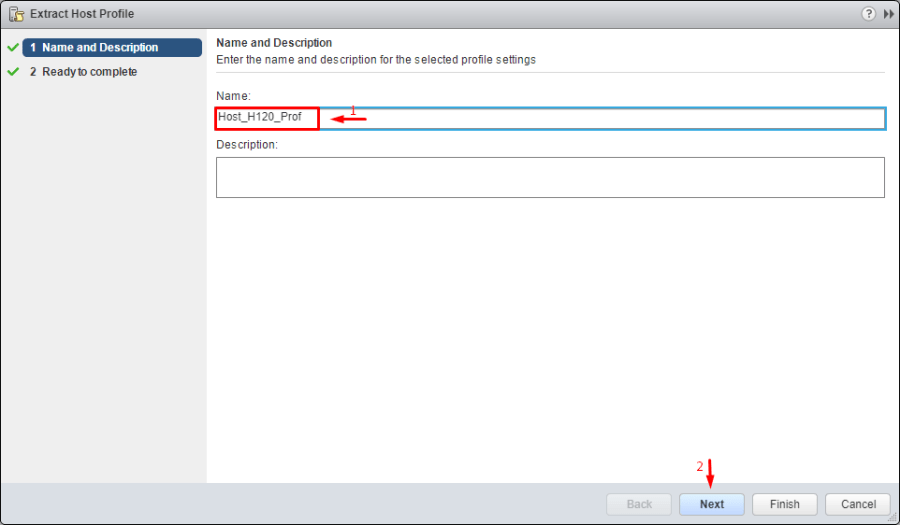
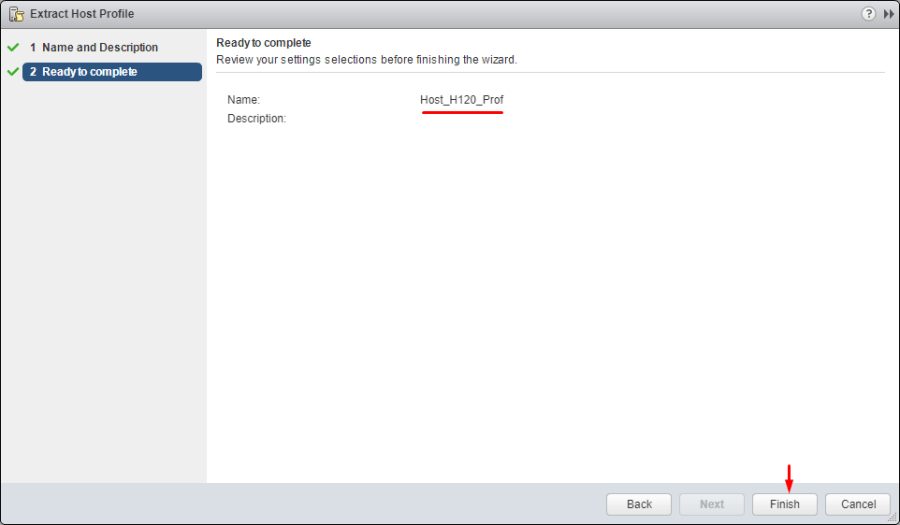
Check the entered information and press Finish
.
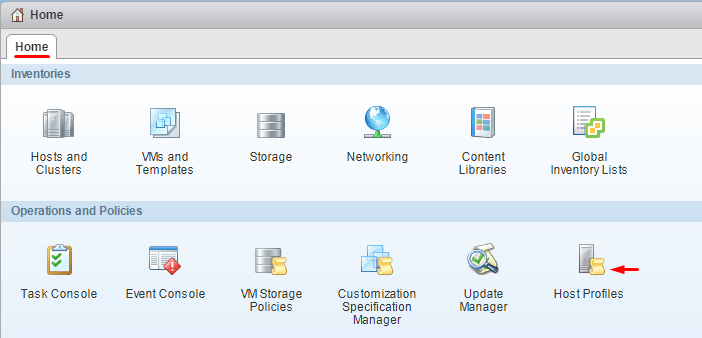
In vCenter, navigate to the Home tab and go to Host Profiles there.

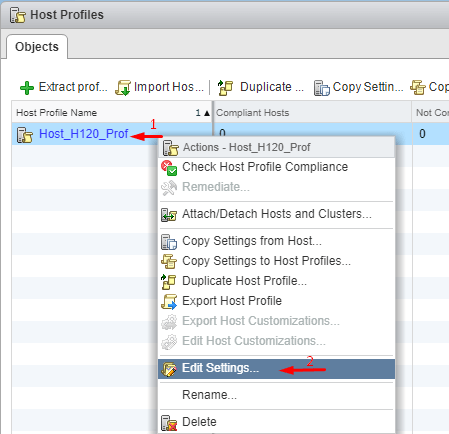
Right-click the Host Profile and edit its settings.

There, you can specify the new name and description if needed.
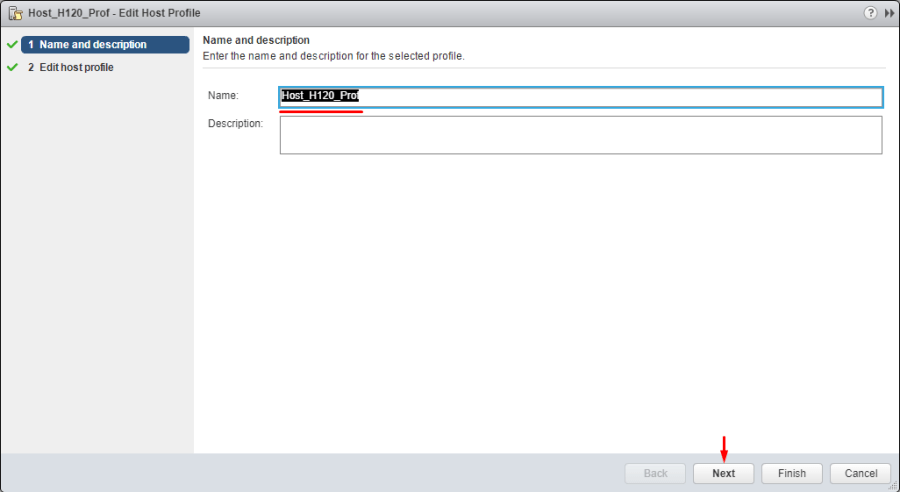
Once you are done with changing Name and host description, go to the Edit host profile
tab itself. Actually, you can change a bunch of settings there, but let’s stick to the initial plan and change only root password, ok? To accomplish this task, type the new password and confirm it in the self-titled fields.
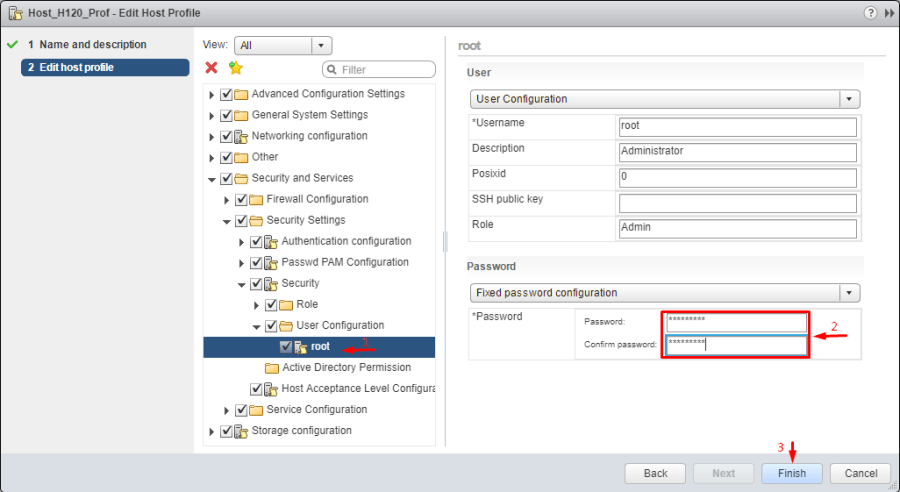
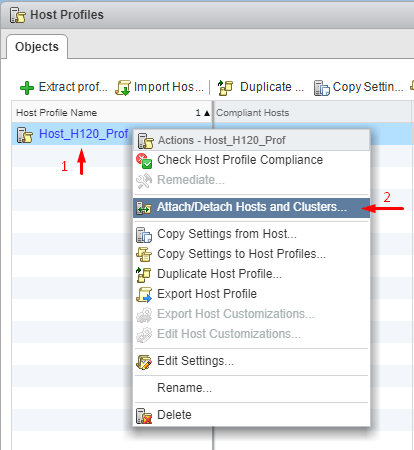
Congratulations, you have changed the password! Let’s add the the host to the cluster now and apply the settings.

In the Attach/Detach Hosts and Clusters
menu, select the host where you have changed the password. At this point, I’d like to mention that you can apply the changes to multiple hosts.
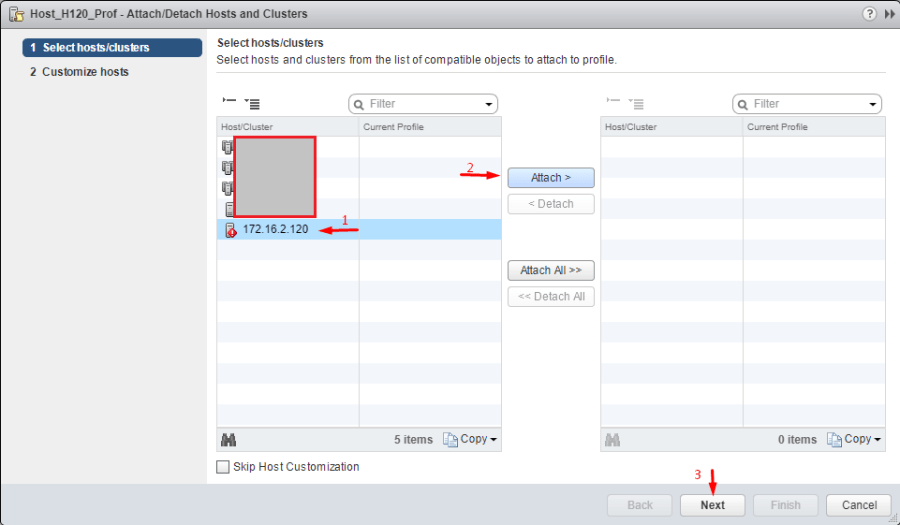
Right after adding the host, you can play around with the network settings, if you need it. Well, you can just click Finish
to have the settings applied.
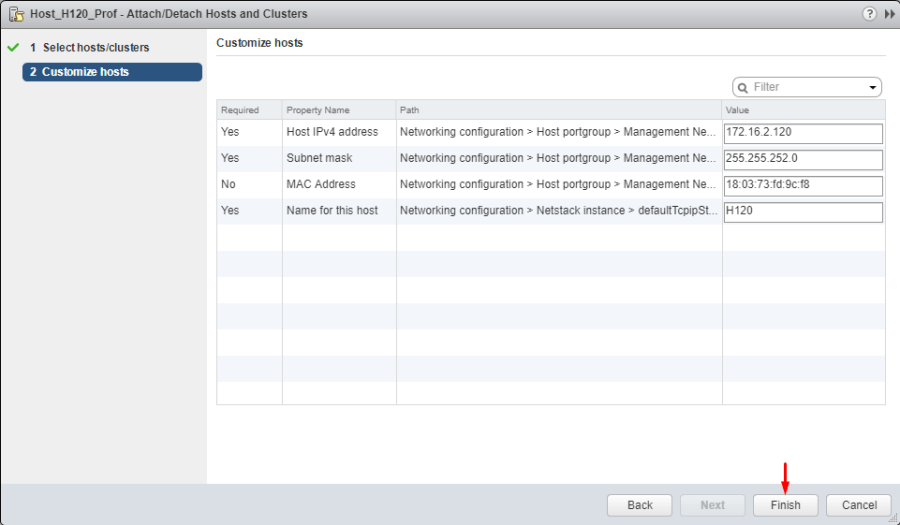
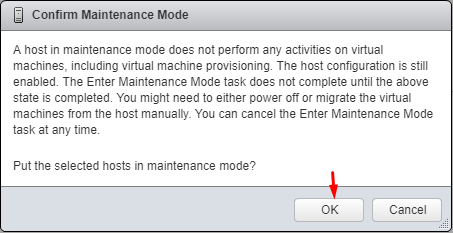
Next, you need to put the node in the maintenance mode, otherwise you won’t be able to apply any settings at all!
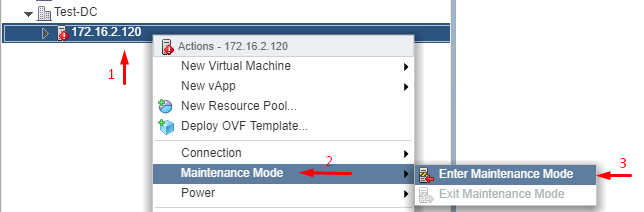
Confirm putting the selected host (or hosts, whatever) in maintenance mode. Note that you need to migrate your VMs unless you can shut down them for a while. In my case, there are no mission critical VMs on the host, so I’ve just powered them off beforehand.

Now, go back to the Objects tab and, finally, implement the host settings. Right-click the Host Profile and press Remediate
.
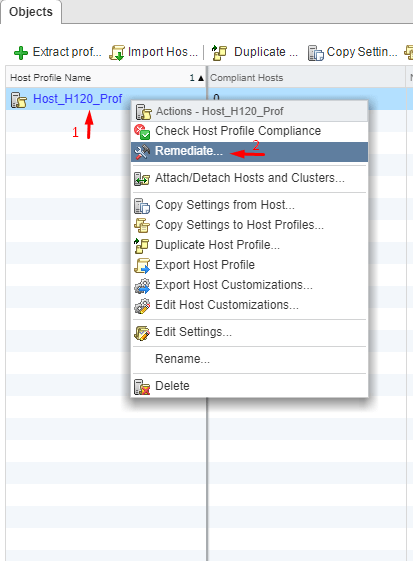
Select the required host.
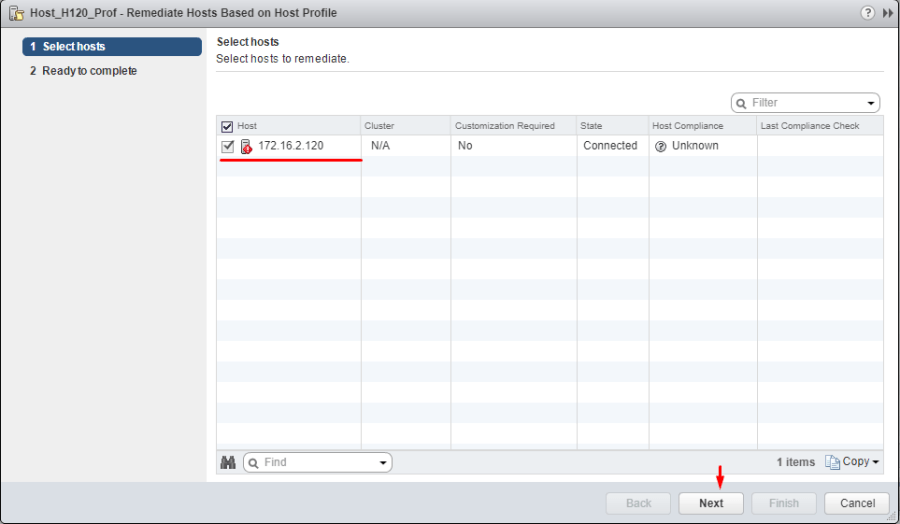
Verify all the settings and check whether you can apply the changes at all. Press Finish
.
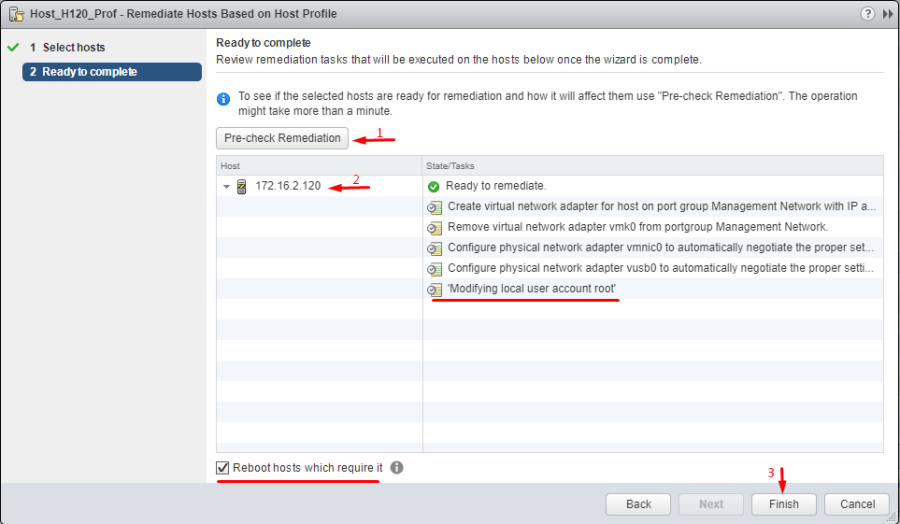
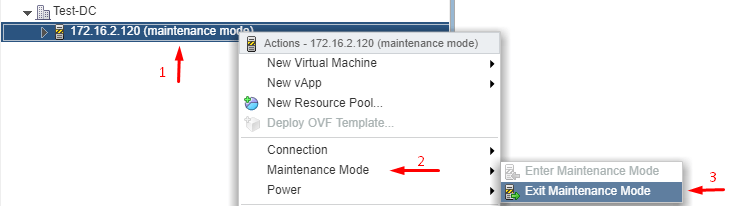
After the host reboots, exit the maintenance mode.

Now, let’s check whether the password reset has run smoothly. For that purpose, log in at the ESXi node via the Web Console, or the terminal using the new password.
Консолидация и удаление снапшотов / Удаление snapshot vmware
И так рассмотрим процедуру удаления снапшота. Выше мы узнали, что это снимки это зло, и вот еще почему. Не совсем понятное поведение снапшота при его удалении и слиянии с основным виртуальным диском vm машины. Для удаления и слияния вам потребуется свободное место на вашем дисковом массиве VMFS, это еще более актуально когда снимков несколько. Выше я привет снапшот как это может выглядеть. Предположим у вас виртуальная машина с тремя снимками вот таких вот размеров.
- 10 гб
- 20 гб
- 30 гб

Вы допустим хотите удалить все снапшоты и нажимаете «Delete All в Snapshot Manager», далее идет вот такая операция Snapshot 3 сливается со Snapshot 2, но при этом сам Snapshot 3 остается на томе VMFS

В итоге первого шага мы получаем уже 90 гб (60+30). Теперь Snapshot 2 который весит уже 50 гб сливается с Snapshot 1, при этом Snapshot 2 и 3 не удаляются пока. Из этого следует что у нас уже занято 140 гб на хранилище.
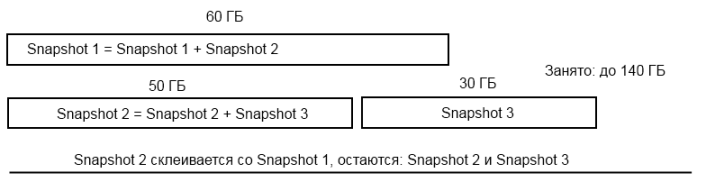
Как только результирующий Snaphot 1 в 60 гб сольется с основным виртуальным диском при этом сам виртуальный диск flat в размере не меняется, поскольку он фиксирован (изменяется только содержимое блоков). И только затем все снапшоты удаляются (все 140 ГБ).
так что видите запас нужно всегда иметь, минимум 10 процентов.
Консолидация snapshot vmware
И так consolidation или консолидация, это по сути удаление снапшота со слиянием дисков, чаще всего оставленного каким нибудь средством резервного копирования, например veeam. Процесс consolidation vm я уже описывал, там все просто, но не понятно на сколько это влияет на датастор в плане производительности.
Что влияет на время консолидации в виртуальной машине
- Размер delta-дисков — очень важный параметр. Чем больше данных в дельта-диске, тем дольше их нужно применять к основному (базовому) диску.
- Число снимков и их размеры. Чем их больше, тем все будет дольше идти по времени. Кроме того, при нескольких снапшотах консолидация происходит в несколько этапов, описано выше.
- Производительность подсистемы хранения, включая FC-фабрику, Storage Processor хранилищ, LUN (число дисков в группе, тип RAID массива).
- Тип данных в файлах снапшотов (нули или случайные данные).
- Нагрузка на хост-сервер ESXi при создании снапшота.
- Нагрузка виртуальной машины на подсистему хранения в процессе консолидации. Например, почтовый сервер, работающий на полную мощность, может очень долго находится в процессе консолидации снапшотов.
Хочется подчеркнуть, что процесс консолидации — это очень требовательный к подсистеме ввода-вывода процесс, поэтому не рекомендуется делать это в рабочие часы, когда производственные виртуальные машины нагружены.
Замирание stun виртуальной машины в VMware vSphere
Если вы как и я долго уже работаете с гипервизором Vmware ESXI 5.5, то наверняка обращали внимание, что бывают случаи, что виртуальная машина подвисает на какое то время, или дико тормозит, а потом работает как ни в чем не бывало. За это в vmware отвечает параметр stun или как мы выше смотрели quiescence
Когда это происходит виртуалка не может ничего делать, она чаще всего падает по Ping и недоступна, и перестает отвечать на операции ввода/вывода. Если сказать по простому то ее как будто поставили на паузу, а на уровне ввода-вывода совершаются только операции, касающиеся выполняемой задачи (например, закрытие прежнего VMDK-диска и переключение операций чтения-записи на новый диск при операциях со снапшотами).
Параметр Stun в виртуальной машины нужен, в большинстве случаев, для того, чтобы сделать ее на время изолированной от окружающего мира для выполнения значимых дисковых операций, например, консолидация. Это может занимать несколько секунд (и даже десятков), но часто это происходит на время около секунды и даже меньше, все зависит от нагрузки хранилища, у меня бывали случаи, что если виртуалка толстая и снапшот здоровый, то время stun доходило и до минуты, что сразу вызывало бурю паники, что у нас все сломалось и что вообще блин происходит, паникеры одним словом, просто не знающие как это работает.
Что такое Network-Aware DRS enhancements
Как вам хорошо известно, DRS использовал в работе балансировку нагрузки с использованием ресурсов процессора и памяти. Метрики использования сети до сих пор не учитывались, что могло привести к проблемным размещениям виртуальных машин на интенсивно загруженных в плане сети хостах. В vSphere 6.0 в рамках Network IO Control (v3) можно было установить резервирование для виртуальной машины с точки зрения пропускной способности сети, и DRS учитывает это. В vSphere 6.5 DRS теперь учитывается использование pNIC хостов при размещении виртуальной машины во время миграции DRS.
Когда загрузка хоста превышает 80%, он будет считать этот хост поднагруженным и не будет рассматривать размещение на нем новых виртуальных машин. DRS также перенесет виртуальные машины с хоста, на котором интенсивно используются физические сетевые адаптеры (pNIC), и попытается сбалансировать кластер.
Давайте представим следующую ситуацию. Предположим, у вас есть три ESXI хоста в кластере с 6-ю включенными виртуальными машинами. Если вы включите другую виртуальную машину, она будет размещена на первом хосте DRS.
Хотя 1 хост интенсивно использует своей сетью, работающие на нем виртуальные машины не потребляют большое количество ЦП/памяти, и следующая виртуальная машина будет размещена на нем же. Это вызовет еще большие проблемы с сетью.
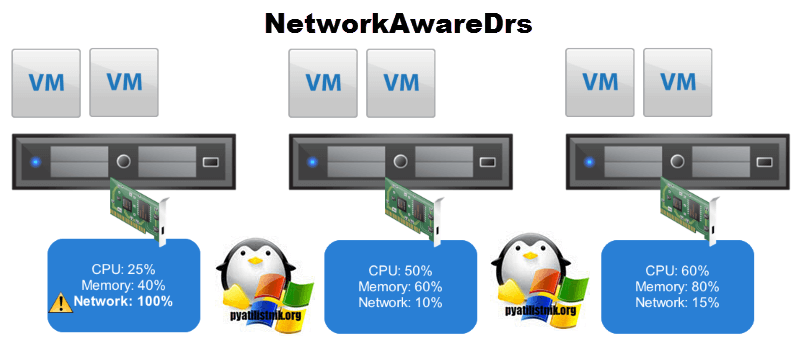
К счастью, в vSphere 6.5 функция DRS поможет вам избежать подобных ситуаций. Это связано с новой функцией, называемой «Network-Aware DRS enhancements», в которой используется новый алгоритм DRS. Теперь он будет учитывать пропускную способность сети при составлении рекомендаций по размещению. Он будет вычислять Tx и Rx подключенных физических интерфейсов и избегать размещения новых виртуальных машин на хостах, которые используются более чем на 80% своей пропускной способности. Это дополнительное рассмотрение размещения после принятия всех других решений о размещении.
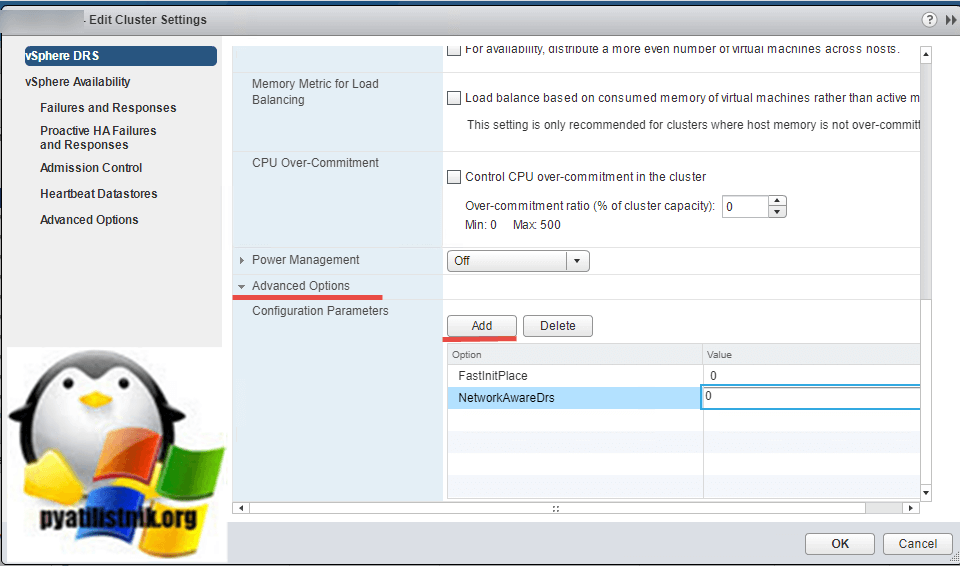
Теперь, что ваш режим «Manual» давал выбор хостов при старте, вам нужно для параметров «FastInitPlace» и «NetworkAwareDrs» выставить значения «0». Открываем настройки RDS кластера и переходим в раздел «Advanced Options» и с помощью кнопки «Add» добавляете оба ключа, в значении (Value) ставите «0».
Данные настройки применяться моментально после сохранения
Почему так дорого?
На сайте VMware уже давно можно найти стоимость продуктов и меня часто спрашивают, почему там такие высокие цены. Все дело в том, что там опубликованы рекомендуемые цены, которые и сама компания и ее партнеры должны транслировать своим заказчикам. Естественно, закупочная цена для партнера существенно ниже и озвучивать ее никто не имеет права. Поэтому на сайте ITsave будут публиковаться цены, доступные в OEM канале. Это те лицензии, которые обычно продаются вместе с оборудованием и тоже доступны в открытом доступе.
Лицензии VMware OEM отличаются от тех, которые продаются в коммерческом канале:
Changing the pass with vCenter
Let’s start with some bright scenario: you forgot the ESXi root password but there’s vCenter installed. I’d say that’s a pretty common issue. Admins manage the host through vCenter, but one day, they lose the password. Fortunately, that’s not a big deal to restore the password.
First, let’s look at how to change the password via the flash vCenter Webclient. Note that things I write here do not work in the html one! Also note that you need your ESXi edition to be not lower than Enterprise Plus.
In order to reset the password, you need to extract, edit, and upload Host Profile. Here’s how you do that.
Go to vCenter, and extract the host profile exactly how I do in the screenshot below.
While extracting, specify the host name and add some description if needed.

Check the entered information and press Finish
.

In vCenter, navigate to the Home tab and go to Host Profiles there.
Right-click the Host Profile and edit its settings.
There, you can specify the new name and description if needed.
Once you are done with changing Name and host description, go to the Edit host profile
tab itself. Actually, you can change a bunch of settings there, but let’s stick to the initial plan and change only root password, ok? To accomplish this task, type the new password and confirm it in the self-titled fields.
Congratulations, you have changed the password! Let’s add the the host to the cluster now and apply the settings.
In the Attach/Detach Hosts and Clusters
menu, select the host where you have changed the password. At this point, I’d like to mention that you can apply the changes to multiple hosts.

Right after adding the host, you can play around with the network settings, if you need it. Well, you can just click Finish
to have the settings applied.
Next, you need to put the node in the maintenance mode, otherwise you won’t be able to apply any settings at all!

Confirm putting the selected host (or hosts, whatever) in maintenance mode. Note that you need to migrate your VMs unless you can shut down them for a while. In my case, there are no mission critical VMs on the host, so I’ve just powered them off beforehand.
Now, go back to the Objects tab and, finally, implement the host settings. Right-click the Host Profile and press Remediate
.

Select the required host.

Verify all the settings and check whether you can apply the changes at all. Press Finish
.
After the host reboots, exit the maintenance mode.
Now, let’s check whether the password reset has run smoothly. For that purpose, log in at the ESXi node via the Web Console, or the terminal using the new password.


Resetting root password on the standalone ESXi hosts
Now, as we know how to reset the password with vCenter, let’s look at some tough cases. Let’s say, you don’t have vCenter installed on the host. Once again, I do not want to re-install the server OS as VMware says. Seriously, that’s not fun! Let’s look at something more interesting instead. Well, let’s say, what about changing the password right on the node itself?
Before I start, I’d like to mention that you won’t be able to trick ESXi security and change the root password on the node without shutting it down. This means that you, like it or not, do need to shut down each VM from the inside! If you screw things up, you won’t be able to start VMs without ESXi re-installation.
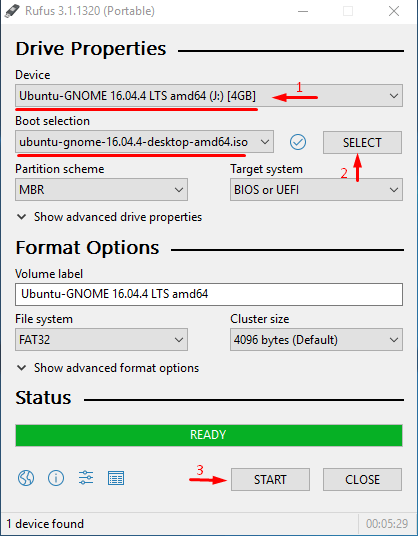
Also, you need the boot the CD image. I used Ubuntu GNOME in this article. Find out how to create a boot CD and download Ubuntu GNOME . You also need Rufus to write the boot CD image on the flash drive.
So, you need to boot from the flash disk, mount the required ESXi datastore, unpack the archive, and edit the file with passwords. Next, you upload the file back into the initial directory, and, after rebooting the host, you can access the it without the password.
Изменение пароля root через графический интерфейс
Если вы не любите терминальные команды, то большинство LIVE-CD имеют графический интерфейс, в LIVE-CD CentOS для сброса пароля root, делаем следующее. На рабочем столе находим кнопку «Home»
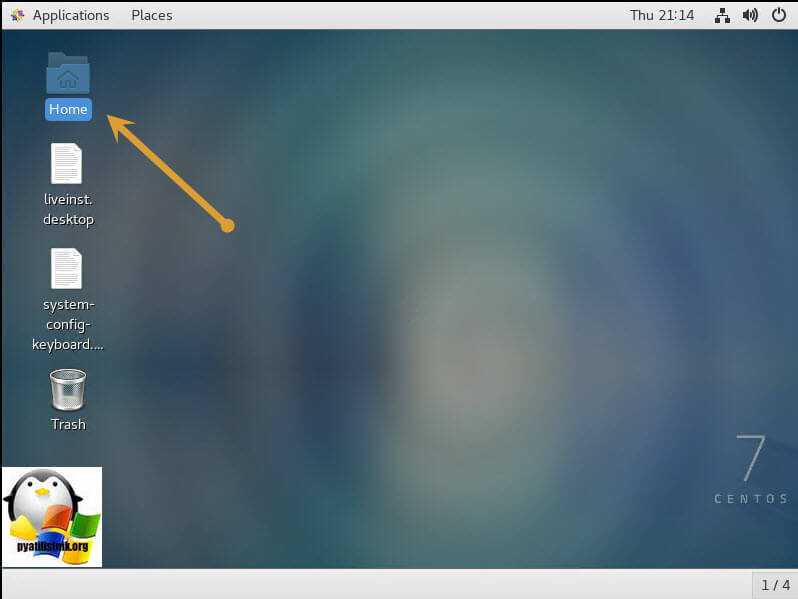
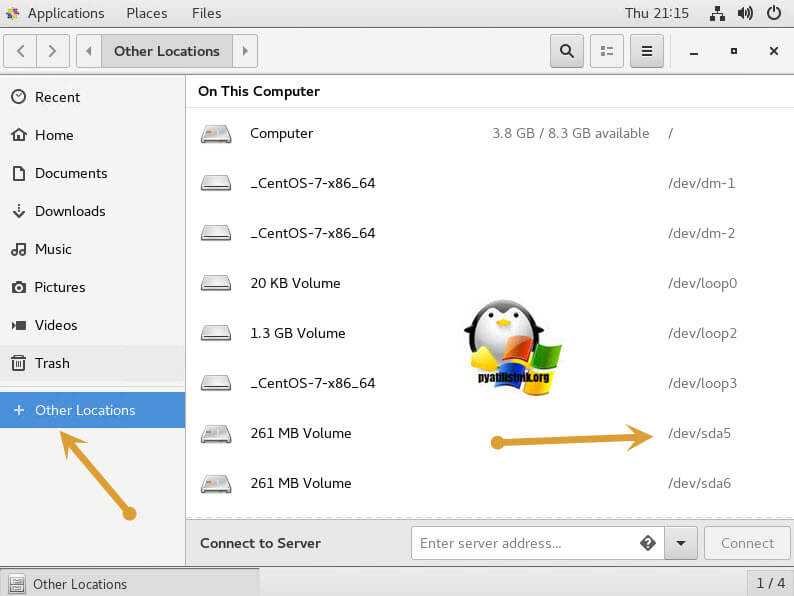
Переходим в пункт «Other Location» и среди списка разделов найдите ваш VMware ESXi 6.5, у меня это /dev/sda5, щелкаем по нему и он у вас будет смонтирован.
На рабочем столе у вас появится значок смонтированного раздела.
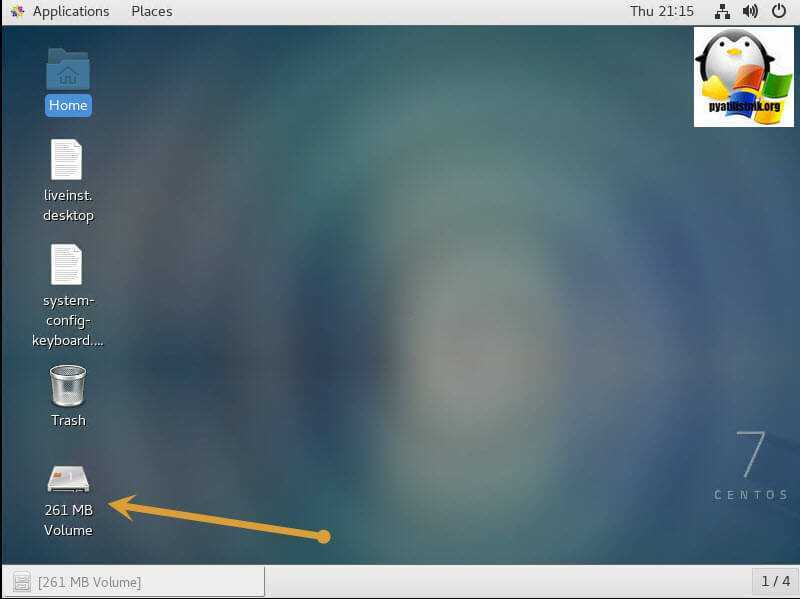
Для поиска файла state.tgz, можно воспользоваться формой поиска.
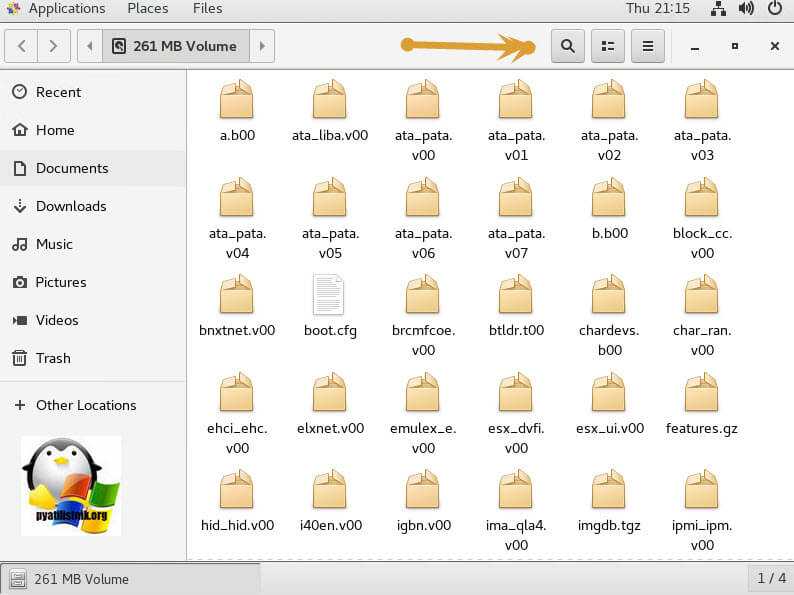
Напомню, что именно с помощью файла state.tgz, вы сможете изменить пароль от ESXI хоста.
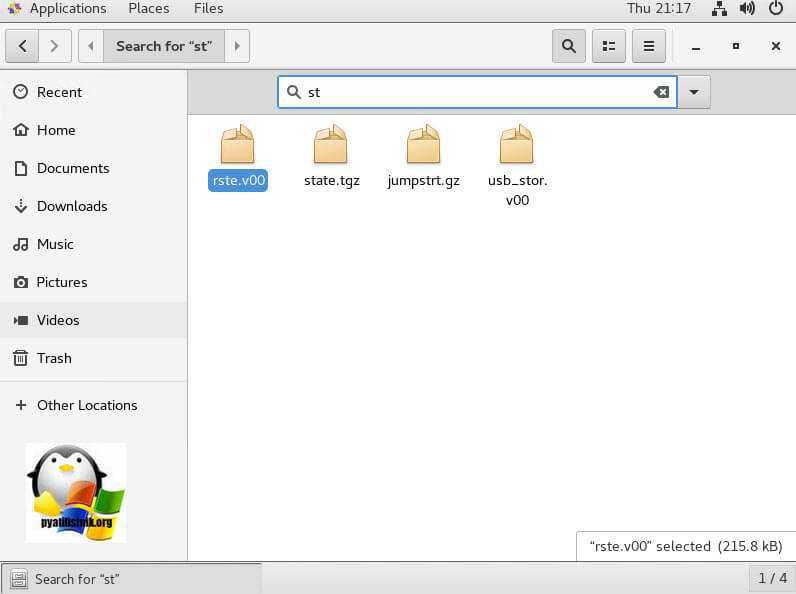
Копируем файл state.tgz, например в папку Downloads.
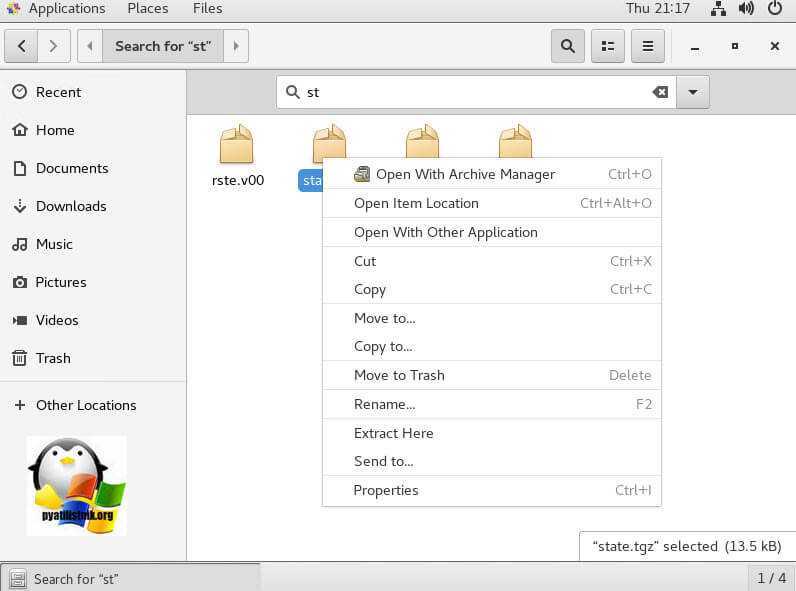
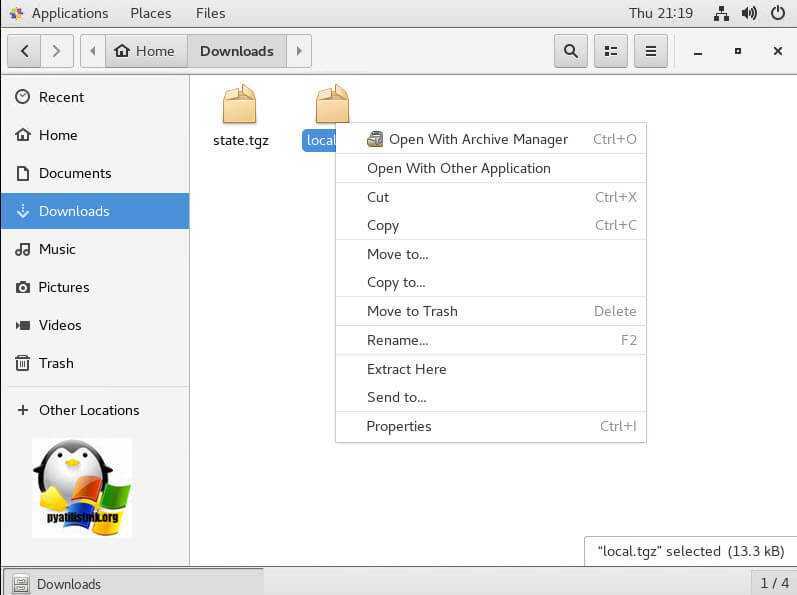
Произведем извлечение содержимого архива state.tgz в папку Downloads, делается это через контекстное меню и пункт «Extract Here».
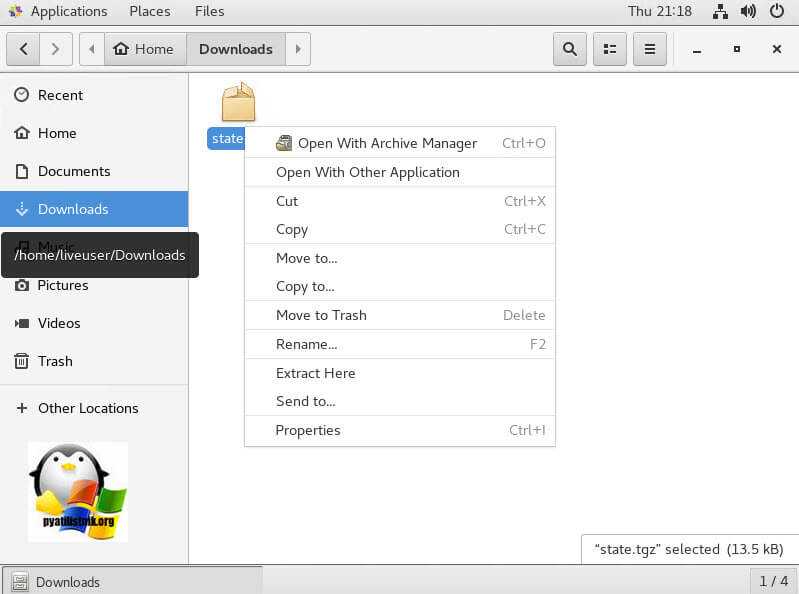
У нас появится файл local.tgz, распакуем и его.
Открываем файлик shadow, для обнуления пароля у root пользователя на ESXI хосте.

Удаляем хэш-пароля он находится в первой строке между первым и вторым двоеточием (:)

Удаляем его и приводим вот к такому виду.
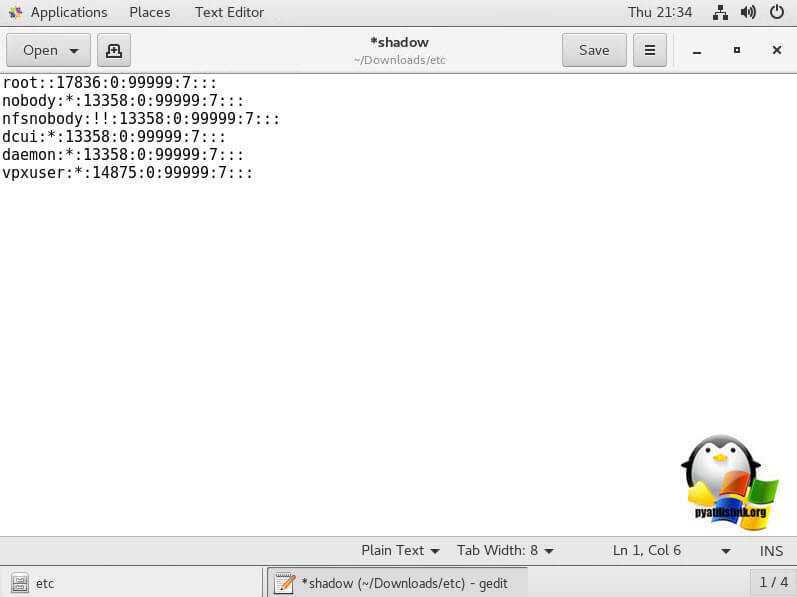
Сохраняем изменения в файле shadow.
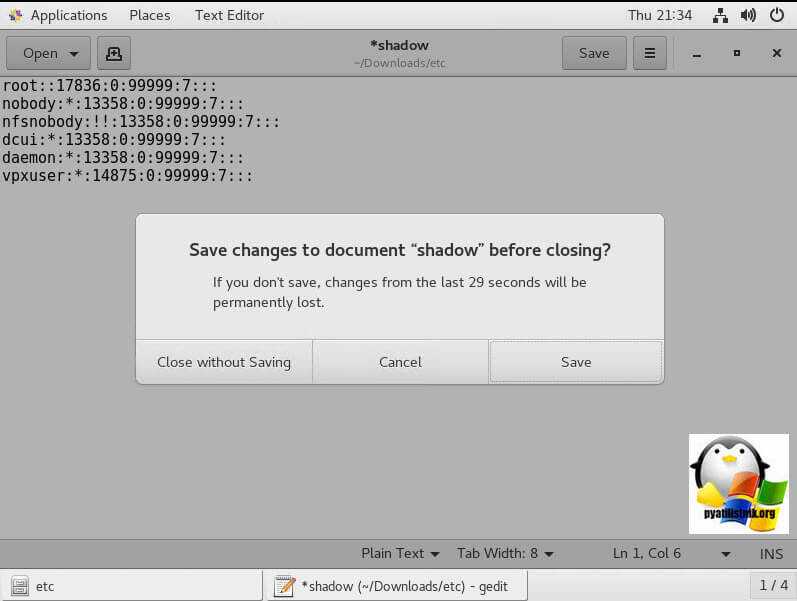
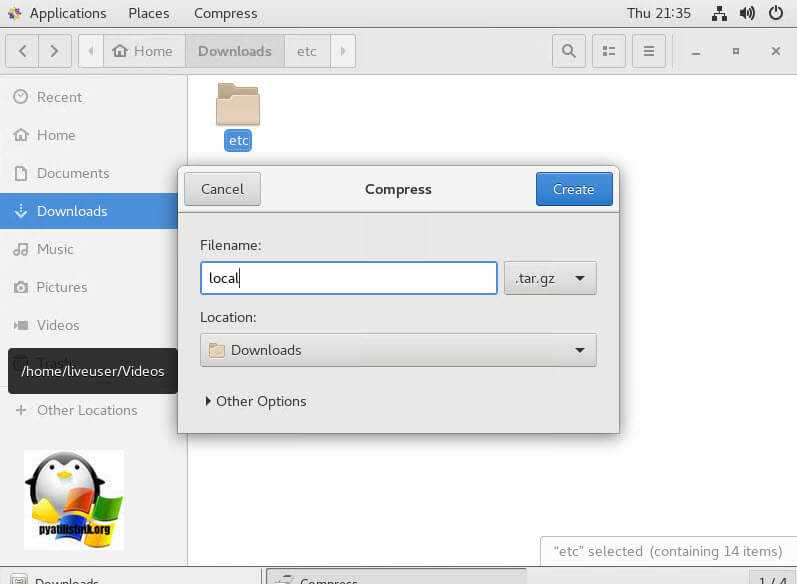
Переходим на один уровень выше, в папку Downloads. Удалите из папки файл local.tgz и щелкаем правым кликом по папке etc и запаковываем ее, через пункт «Compress».
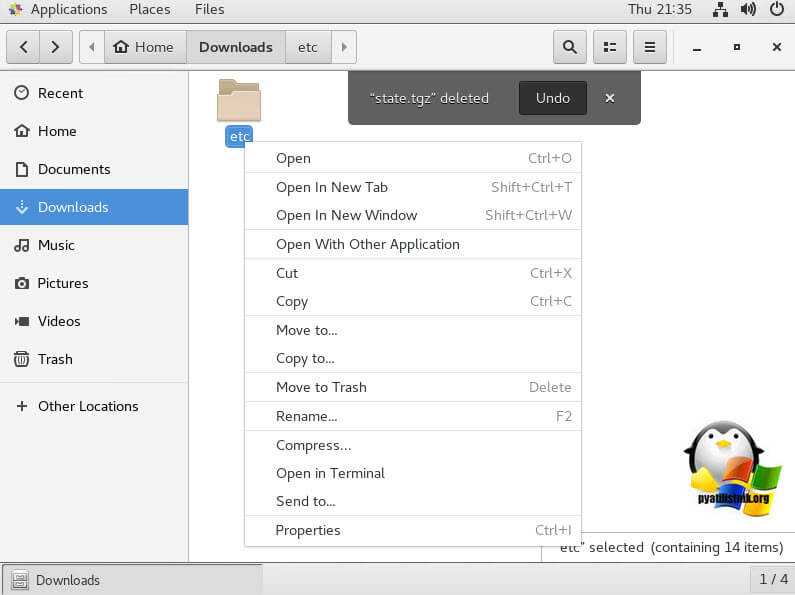
Задаем имя архиву local.tgz
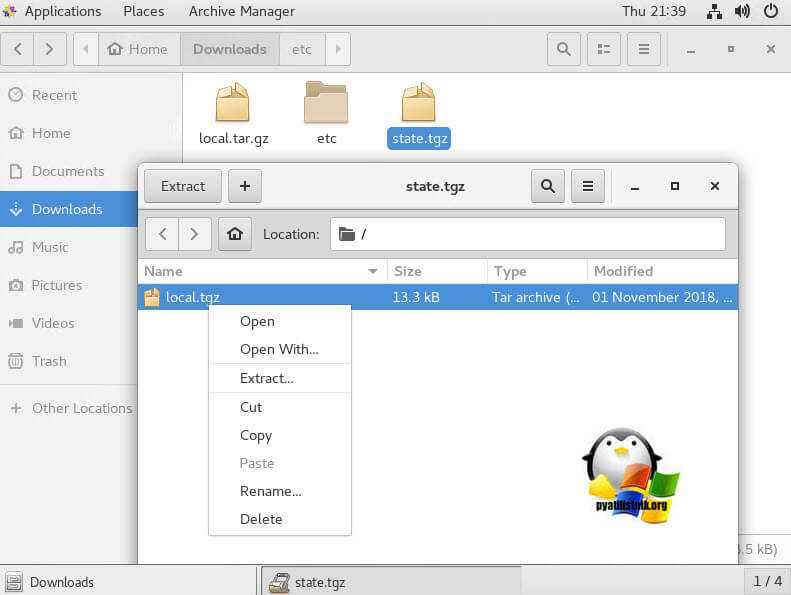
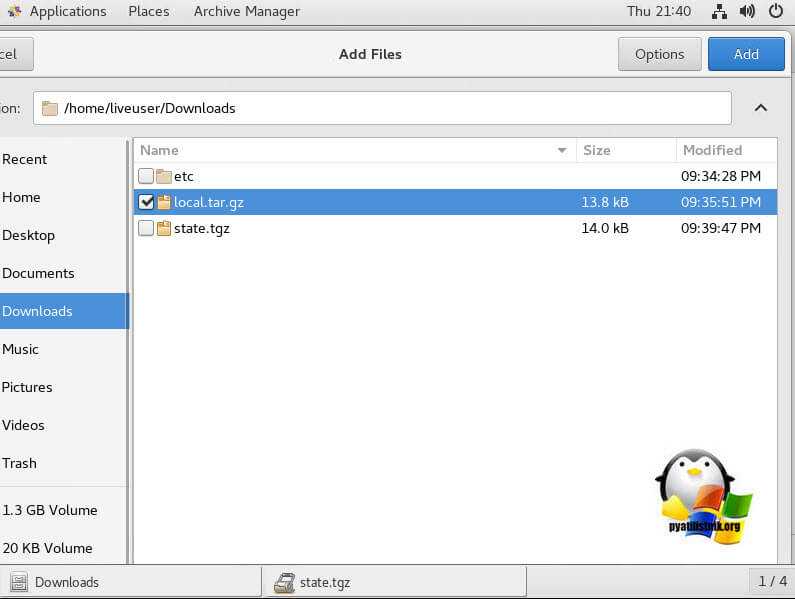
Через кнопку +, добавляем в пустой архив state.tgz, наш новый архив local.tgz.
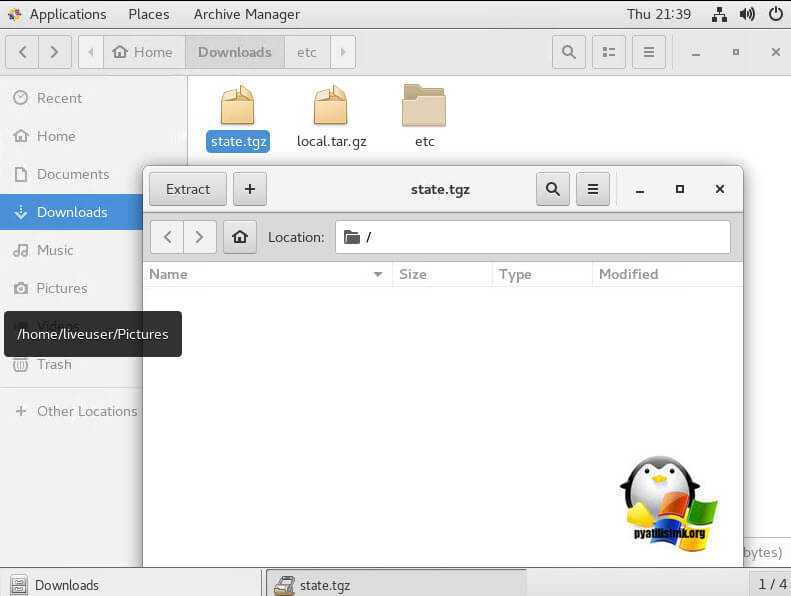
Выбираем новый local.tgz и нажимаем Add.
В итоге получилось вот так.
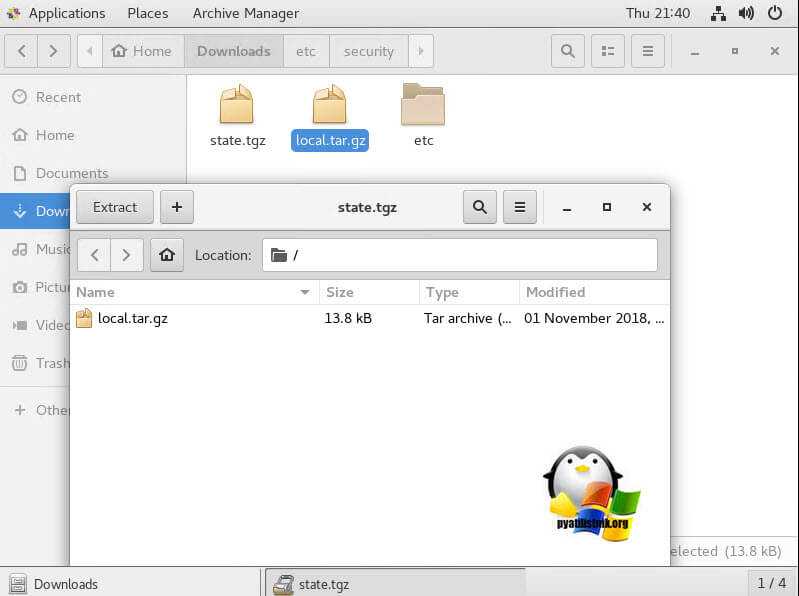
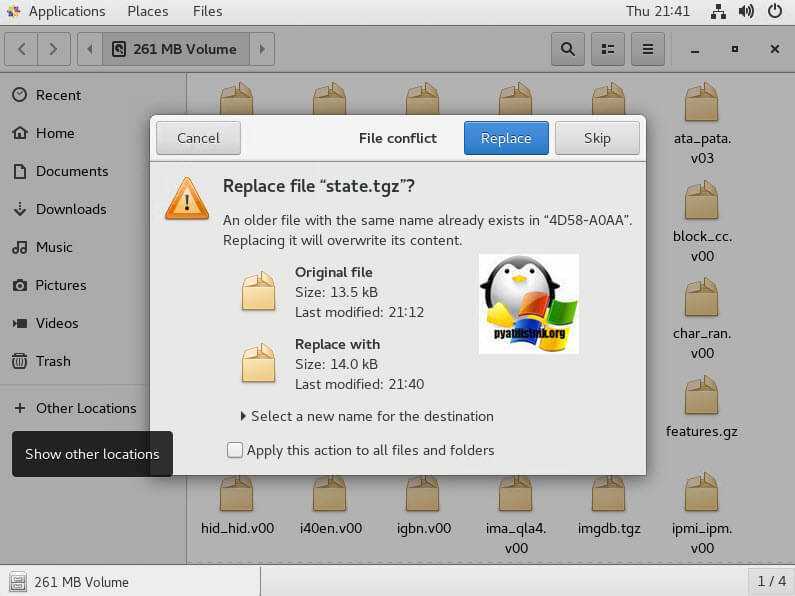
Заменяем старый state.tgz в примантированном разделе /dev/sda5 с заменой, после чего перезагружаем ваш сервер и проверяем, что у вас стал пустым пароль от VMware ESXI 6.5 хоста.
Смена пароля из DCUI меню
Direct Console User Interface (DCUI) — это первый инструмент после установки гипервизора, который видит администратор. Серо-желтый интерфейс с минимализмом, но с большой функциональностью. И так залогиньтесь через DCUI интерфейс и перейдите в меню «Configure Password». Нажмите Enter.
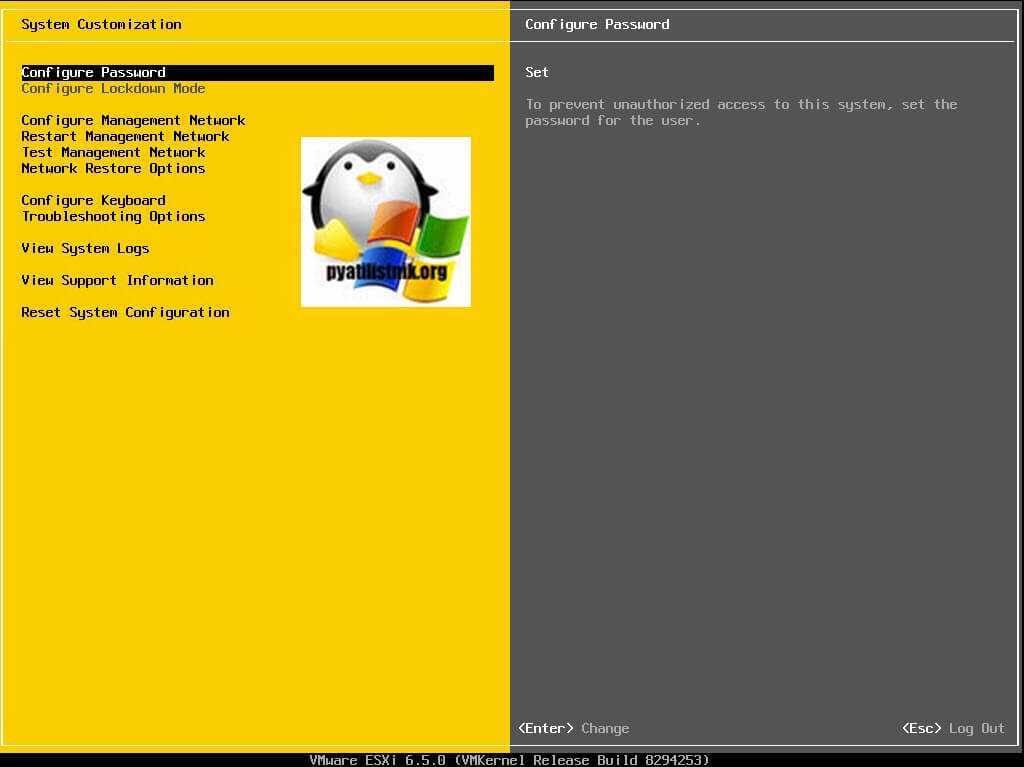
У вас появится окно предлагающее изменить текущий пароль от учетной записи root. В первом поле «Old Password» вам необходимо ввести текущий пароль, без этого никуда. Далее в в поле «New Password т Confirm Password» новый пароль. Старайтесь чтобы в пароле присутствовала большая буква, маленькая, цифра и спецсимвол, чтобы он был стойким.

Если пароль будет не соответствовать требованиям к безопасности, то вы получите уведомление:
The password change operation failed. Please ensure that your password meets the complexity criteria set by the system
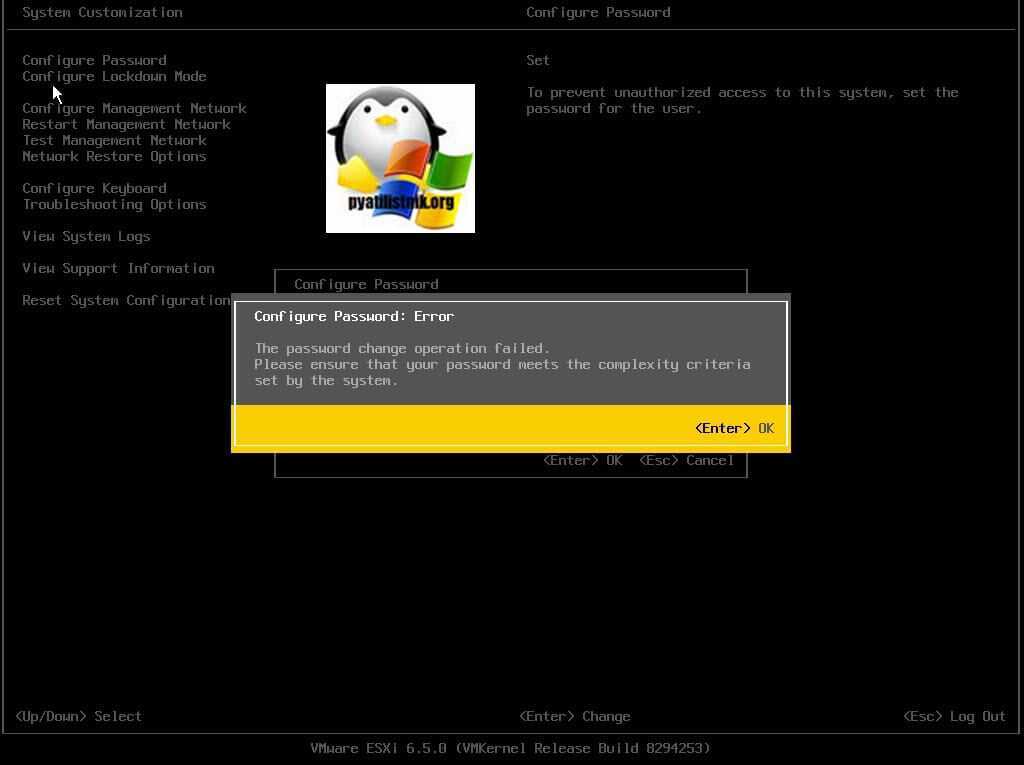
Это такой аналог политики PSO в Windows Server у Microsoft. К данному методу, обычно прибегают в самую последнюю очередь, так как для этого нужно иметь физический доступ к серверу или порту управления, такому, как ILO или IPMI.
![Оптимизация операционной системы vmware esxi 6 для работы с схд [colobridge wiki]](https://smartshop124.ru/wp-content/uploads/0/9/a/09a9236717512238a12de32577b419e0.jpeg)
Frequently Asked Questions
What is the default ESXi root password?
There is no default root password in ESXi, you set it during the installation sequence. Make sure the keyboard mapping is configured correctly, especially if you go through an out-of-band management card.
How do I reset my ESXi root password?
The ESXi root password can be changed in several different ways such as using the DCUI management console, the shell with passwd, using host profiles, AD integration.
How do I change ESXi root password from Console?
From the console, the root password can be changed in the DCUI using the “Configure Password” choice or in the shell using the “passwd root” command.
How to reset ESXi root password
The following procedure documents how one would go about resetting the password for root on ESXi 6.5 host. This should work on earlier versions of ESXi though I only tested it on 6.x. It also makes no difference whatsoever if the host is physical or nested.
It is of utmost importance to note that you will not be able to ‘deceive’ ESXi’s security and change the node’s root password without powering it off. Meaning you need to evacuate the VMs to other hosts in the cluster or shut them down to place the host in maintenance mode.
For this post, in order to reset the ESXi root password, I’m using a nested host for convenience’s sake alone. And, yes, I carried out this same procedure a number of times on physical ESXi hosts. Note also, that the host must be powered down for this to work so unless migrated, all hosted VMs will obviously stop working.
Step 1 – Insert the bootable Live CD, make sure your server can boot off CD/DVD or USB and power it up. If you’re using the Gparted LiveCD, just follow the on-screen instructions as it is loading.
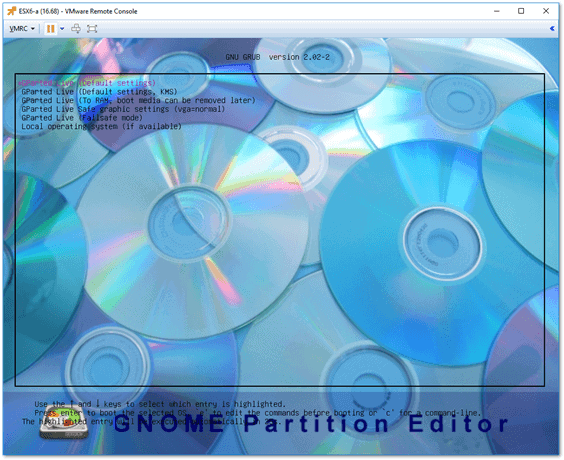
Booting off the GParted LiveCD
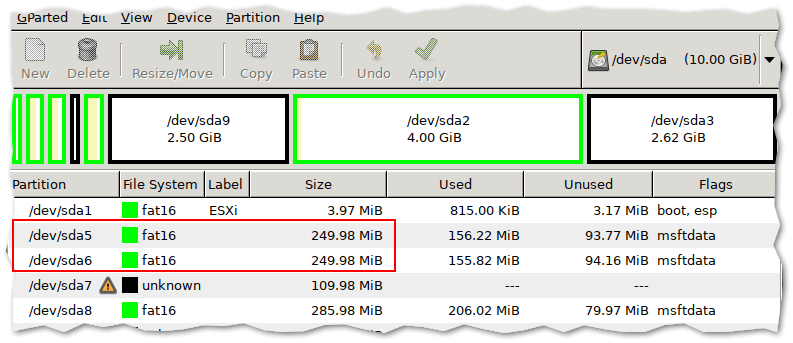 Step 2 – Locate the 2 partitions sized 250MB. As mentioned, /dev/sda5 is what we’re after assuming you installed ESXi on the first available disk. This may differ if, for instance, you installed ESXi on a USB device.
GParted listing the ESXi partitions found on the primary disk. Your mileage may vary according to the size of the boot drive and the medium (SD, USB, drive…).
|
ID |
Name |
Description |
Size |
|
1 |
System boot |
Used to boot the OS. |
4MB |
|
2 |
Scratch |
Persistent storage of VMware support bundles. Created if media is larger than 8.5GB. |
4GB (Dynamic) |
|
3 |
VMFS datastore |
Any remaining unallocated space is used to create a local datastore. Created if media is larger than 8.5GB. |
Remaining space. (Dynamic) |
|
5 |
Bootbank (bootbank 0) |
Store the current ESXi image. |
250MB |
|
6 |
Altbootbank (bootbank 1) |
Stores the previous ESXi image after an upgrade. Used for rollback operations. |
250MB |
|
7 |
vmkDiagnostic (small core-dump) |
Capture the output of a purple diagnostic screen in case of ESXi crash. |
110MB |
|
8 |
Store (locker) |
Storage of ISOs for VMware tools. |
286MB |
|
9 |
2nd diagnostic partition (large core-dump) |
Additional space for coredumps to avoid logs truncation. Created if media is larger than 3.4GB. |
2.5GB |

“vSphere 6.x partitions layout.”
Note that the partition layout changed dramatically in vSphere 7 compared to vSphere 6.x. It is now consolidated in fewer partitions leveraging dynamic sizing and VMFS-L.
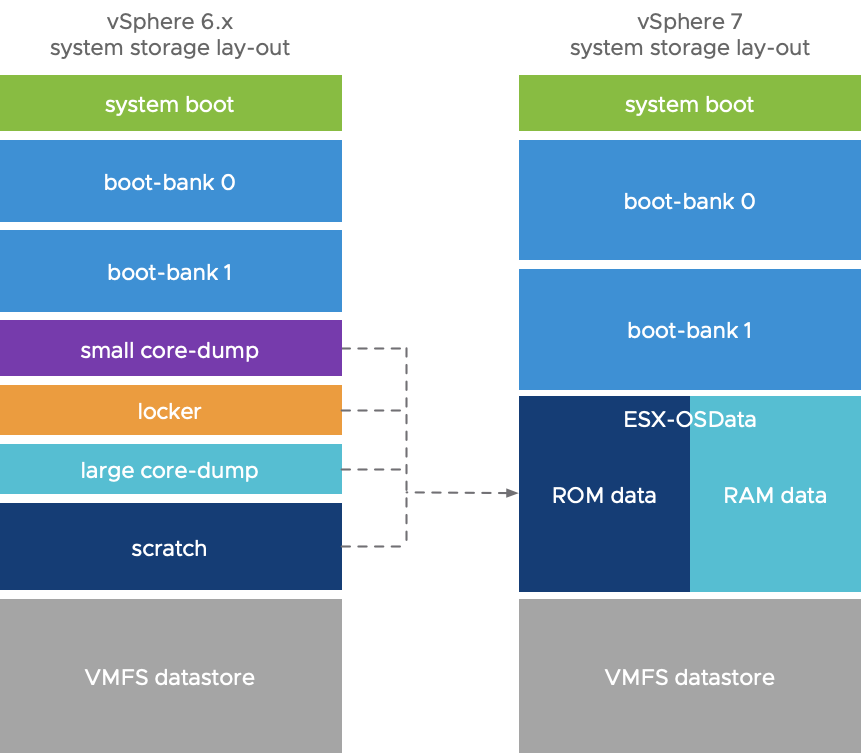
vSphere 6.x vs vSphere 7 partitions layout
Step 3 – Open a terminal window and run the following commands in the exact order as listed.
sudo su
mkdir /boot /temp
mount /dev/sda5 /boot
cd /boot
cp state.tgz /temp
cd /temp
tar -xf state.tgz
tar -xf local.tgz
rm *.tgz
cd etc
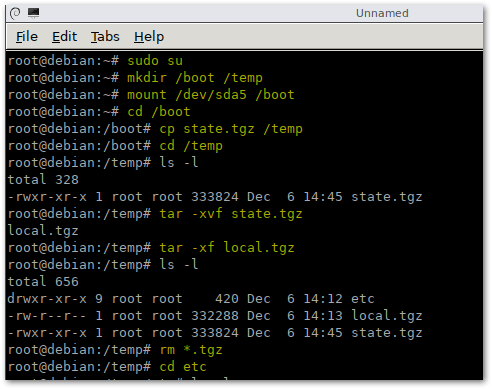
The first batch of commands that need to be run to get to the shadow password file
We’re going to use vi to edit the shadow password file. Just move to the line starting with the root and delete the string between the first 2 colons. Use the [Delete] key. When done press and type wq followed by [Enter
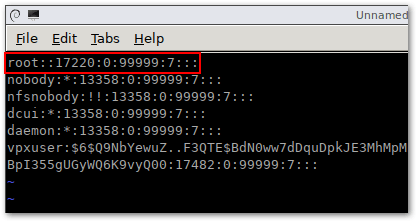
Delete the encrypted root password to reset it to null i.e. the root account will not have a set password
Continue by running the following batch of commands.
cd ..
tar -cf local.tgz etc/
tar -cf state.tgz local.tgz
mv state.tgz /boot
umount /boot
reboot
Step 4 – Once the ESXi host is back online, try logging in as root either from the DCUI (console) or via SSH using putty or similar. You should be able to log in without keying in a password although you will be reminded to set one which is what you should do.
How do I recover my root password?
Here’s a video demonstrating how to carry out the password recovery procedure from start to finish and reset the root password.
:0
Resetting root password on the standalone ESXi hosts
Now, as we know how to reset the password with vCenter, let’s look at some tough cases. Let’s say, you don’t have vCenter installed on the host. Once again, I do not want to re-install the server OS as VMware says. Seriously, that’s not fun! Let’s look at something more interesting instead. Well, let’s say, what about changing the password right on the node itself?
Before I start, I’d like to mention that you won’t be able to trick ESXi security and change the root password on the node without shutting it down. This means that you, like it or not, do need to shut down each VM from the inside! If you screw things up, you won’t be able to start VMs without ESXi re-installation.
Also, you need the boot the CD image. I used Ubuntu GNOME in this article. Find out how to create a boot CD and download Ubuntu GNOME here. You also need Rufus to write the boot CD image on the flash drive.

So, you need to boot from the flash disk, mount the required ESXi datastore, unpack the archive, and edit the file with passwords. Next, you upload the file back into the initial directory, and, after rebooting the host, you can access the it without the password.
![Оптимизация операционной системы vmware esxi 6 для работы с схд [colobridge wiki]](http://smartshop124.ru/wp-content/uploads/e/e/5/ee5ae5780bed4513eda67c2cc6c318ce.jpeg)