
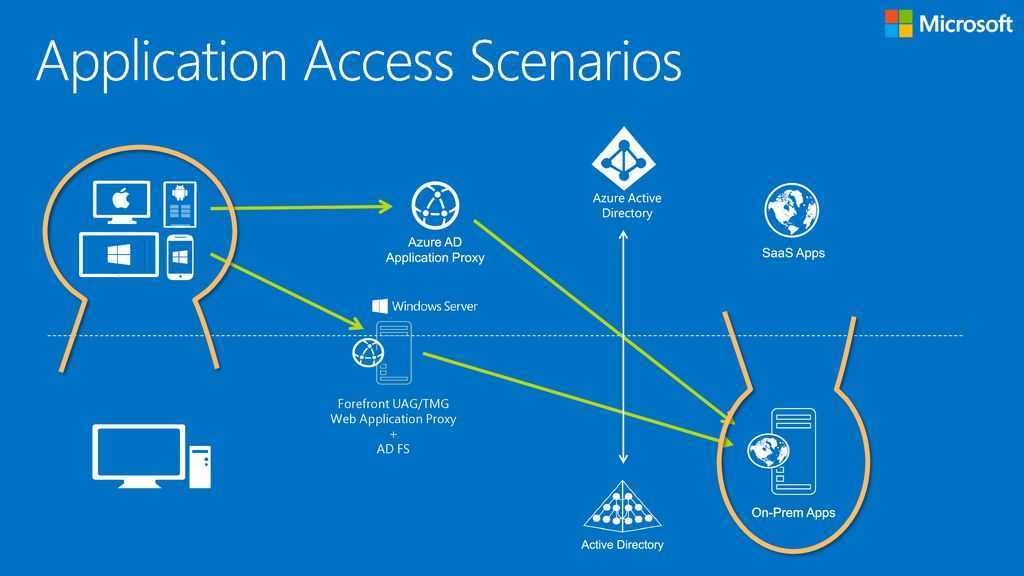
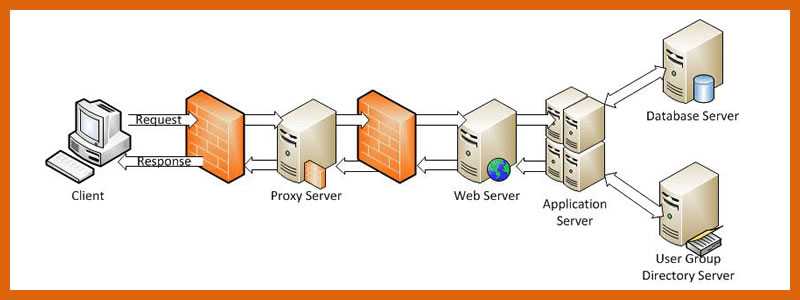
Plan Network Location
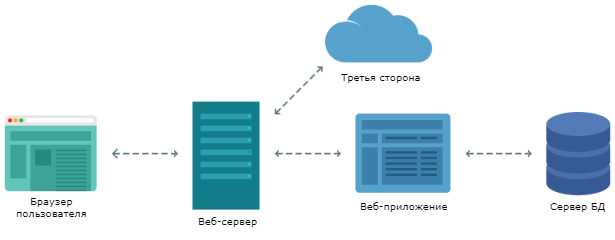
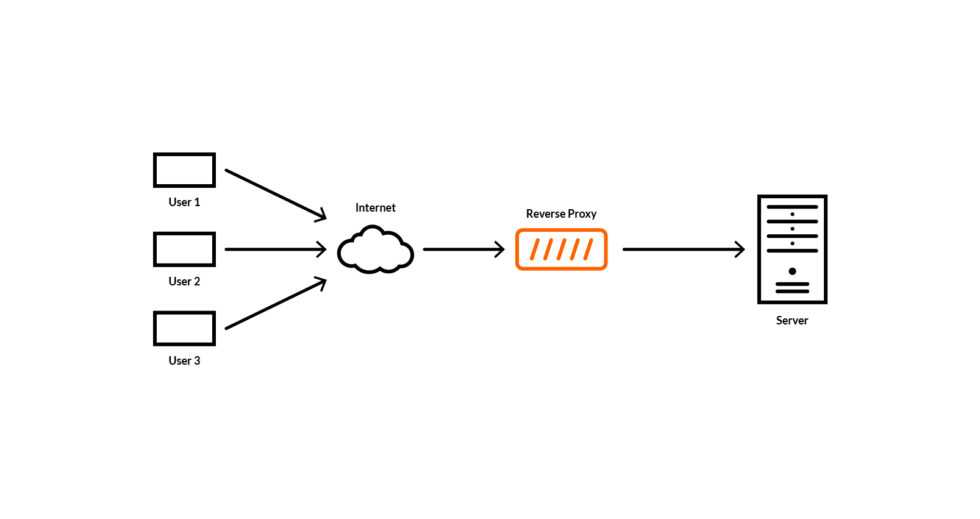
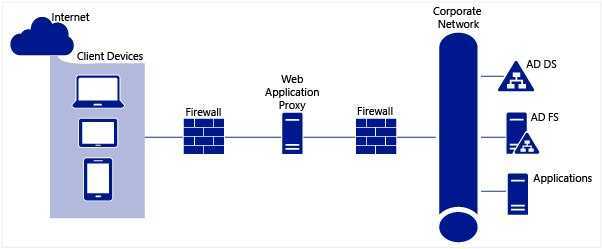
Web Application Proxy can be deployed in several topologies. For example, you can deploy Web Application Proxy behind a frontend firewall to separate it from the Internet, or between two firewalls; a frontend firewall to separate it from the Internet, a backend firewall to separate it from the corporate network. In both topologies, Web Application Proxy provides a protection layer against malicious HTTP requests that originate from the Internet through the following features:
-
Preauthentication—Make sure that only authenticated traffic can get into the corporate network.
-
Network Isolation—Incoming web traffic cannot directly access backend servers.
-
Selective Publishing—Only specific applications and paths within these applications are accessible.
-
DDoS Protection—Incoming traffic arrives at Web Application Proxy before entering the corporate network. Because Web Application Proxy acts as a buffer, many DDoS attacks can be prevented from reaching the backend servers.
Plan Firewalls
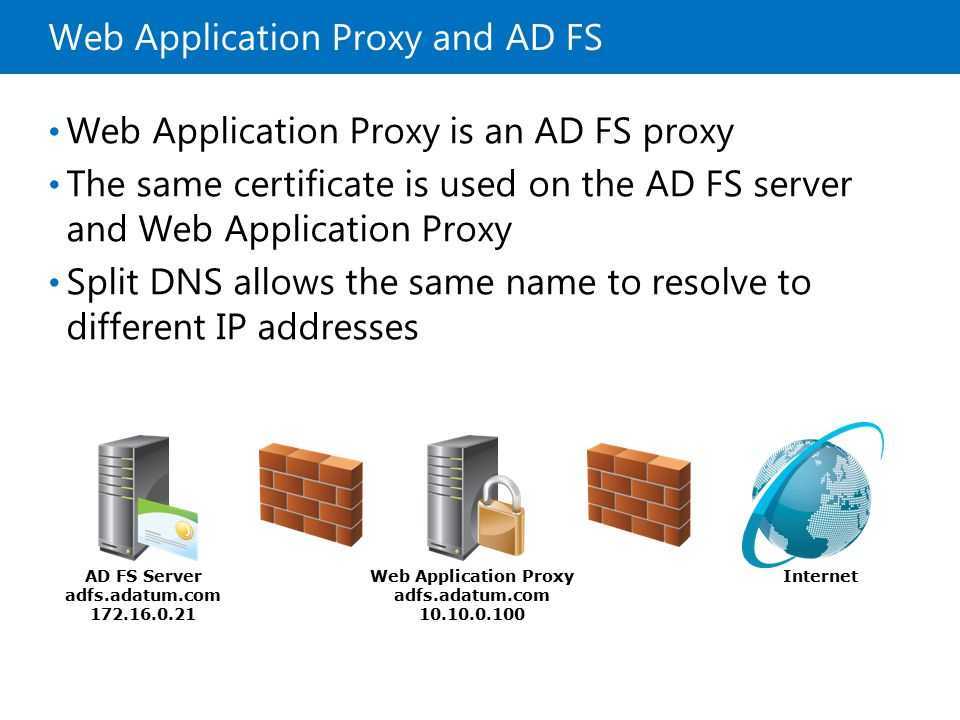
Deploying Web Application Proxy behind a firewall adds network level protection and reduces the attack surface of the Web Application Proxy servers. If the Web Application Proxy server is located in front of a firewall that separates it from the corporate network, you must make sure that the firewall does not block traffic to URLs configured for the backend servers. This could be over HTTP or HTTPS and on any specified port. Note that if you deploy Web Application Proxy on a domain-joined server, it must have connectivity to the domain controller, see 1.3. Plan Active Directory.
All firewall servers must be configured to allow HTTPS traffic because the firewall servers must publish Web Application Proxy using port 443 so that Web Application Proxy in the perimeter network can access the federation server in the corporate network. Port 443 is also required for device registration using Workplace Join.
Note
All federation server communications to and from client devices also occur over HTTPS.
In the federated world of AD FS, client requests are typically made to a specific URL, for example, a federation server identifier URL such as https://fs.fabrikam.com. Because these client requests originate from the Internet, the Internet-facing firewall server must be configured to publish the federation server identifier URL for each Web Application Proxy server that is deployed in the perimeter network.
If you want to use client certificate authentication, you must also configure the firewall to allow traffic on port 49443.
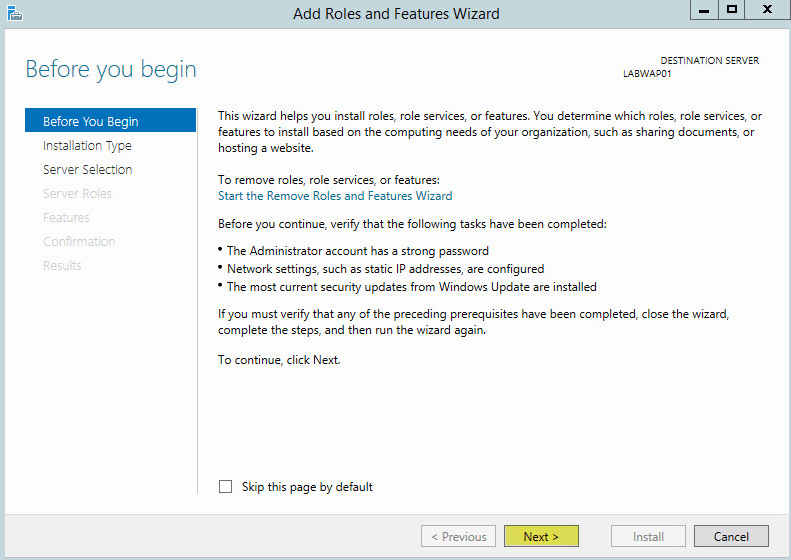
Installing the Web Application Proxy Server Role
To begin, Open up Server Managerand clickManage clickAdd Roles and Features
Click Next:
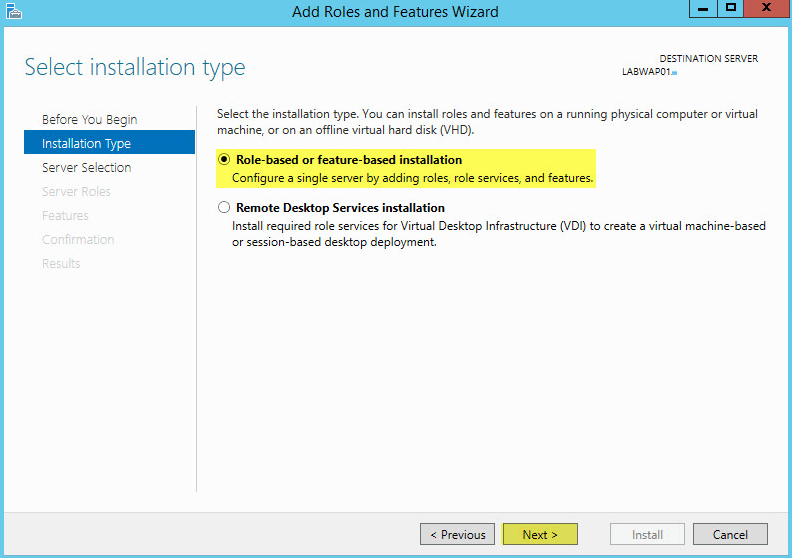
Select Role-based or feature-based installation, click Next:
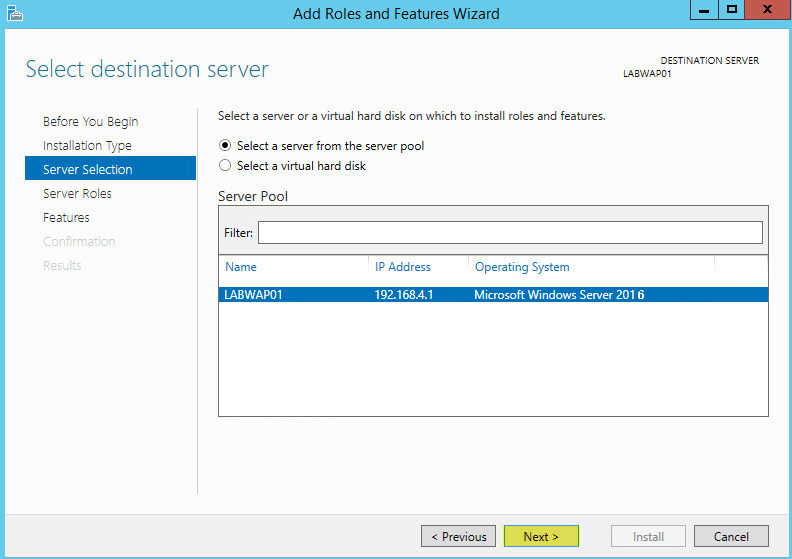
Select the server you want to install this role on to and then click Next:
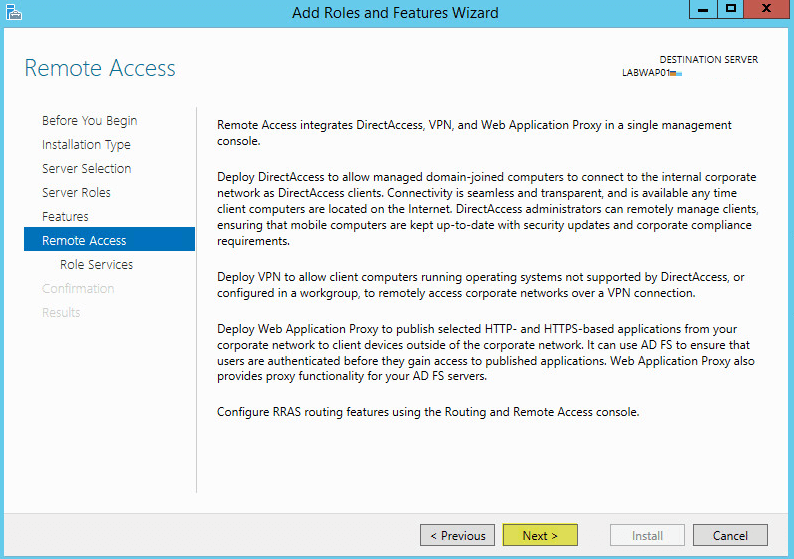
Select Remote Access then click Next:

No additional Features are needed. Click Next:

Click Next:
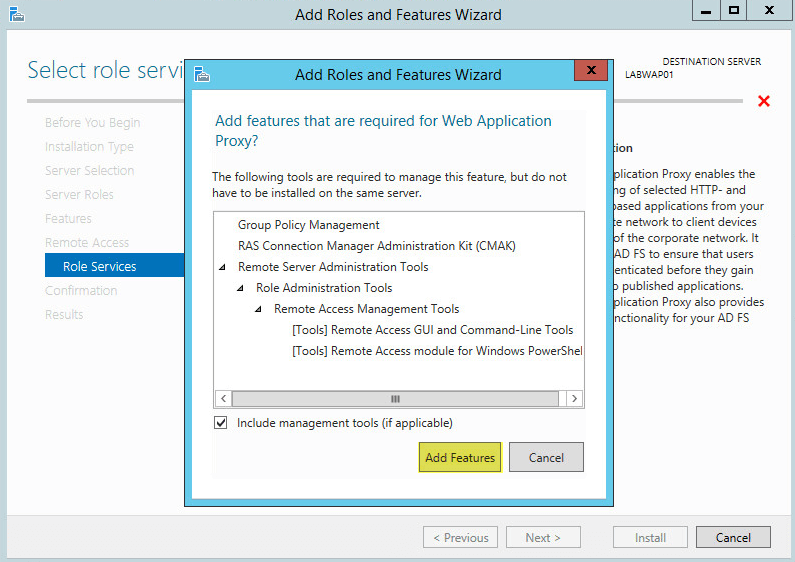
Select Web Application Proxy:
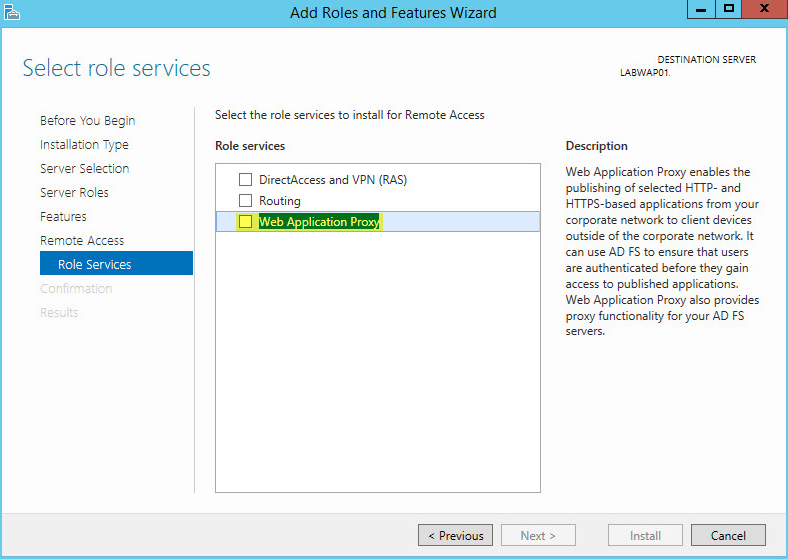
On the pop up click Add Features
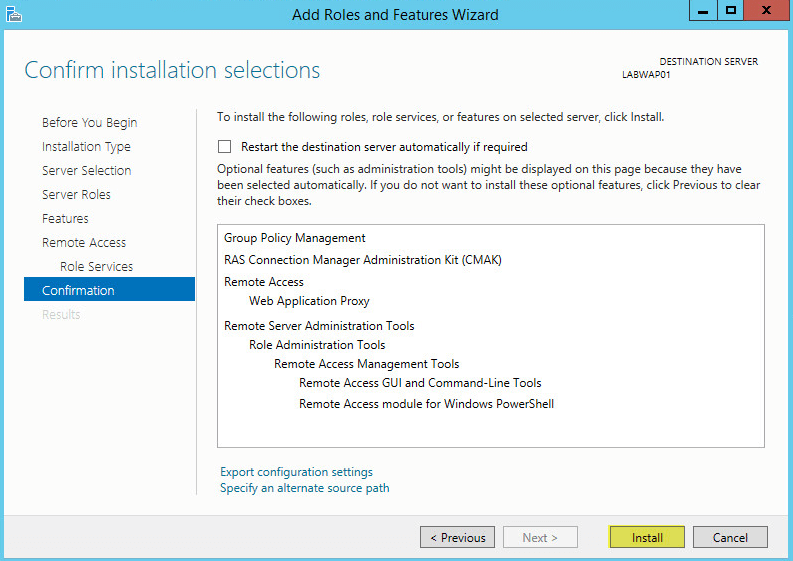
The Web Application Proxy role does not required a reboot. Click Install
Once complete click Close
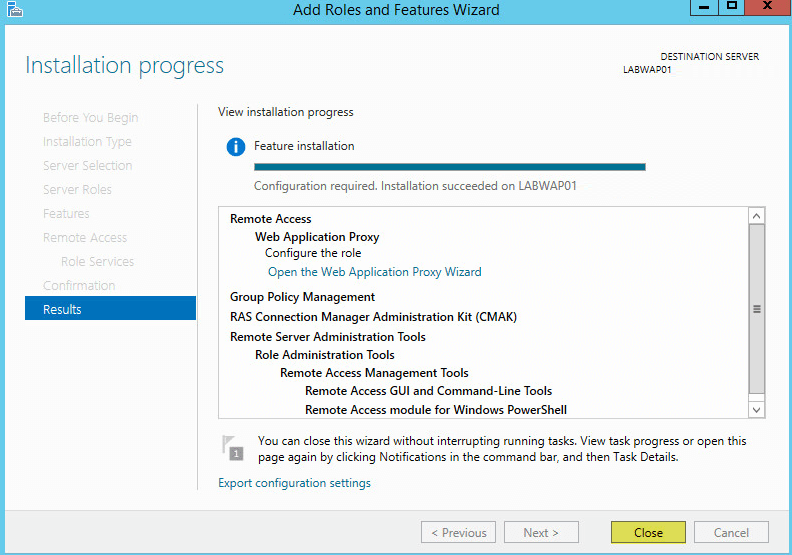
Web Application Proxy is now installed but you need the AD FS certificate to continue.
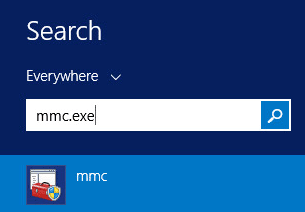
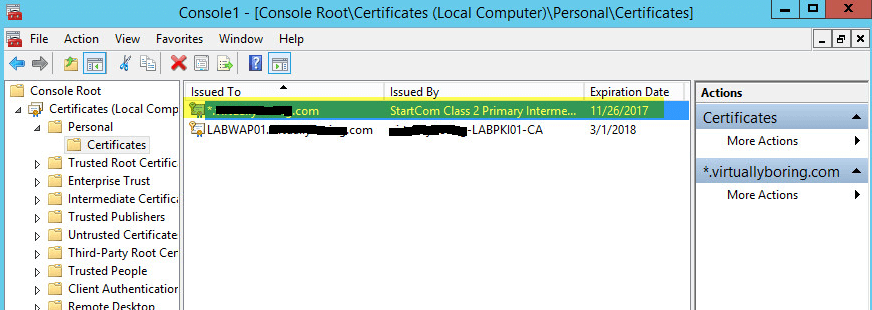
You need the certificate from your AD FS server added to your Web Application Proxy server. Login to your AD FS server and open MMC.exe:
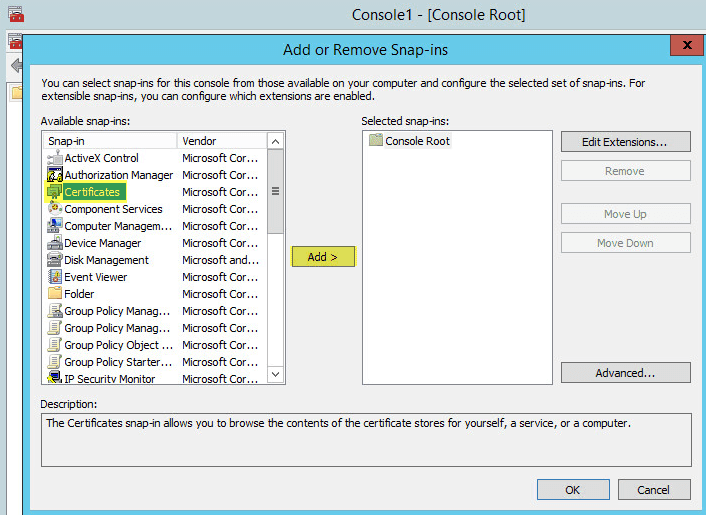
Go to File > Add/Remove Snap-ins > select Certificates then click Add:
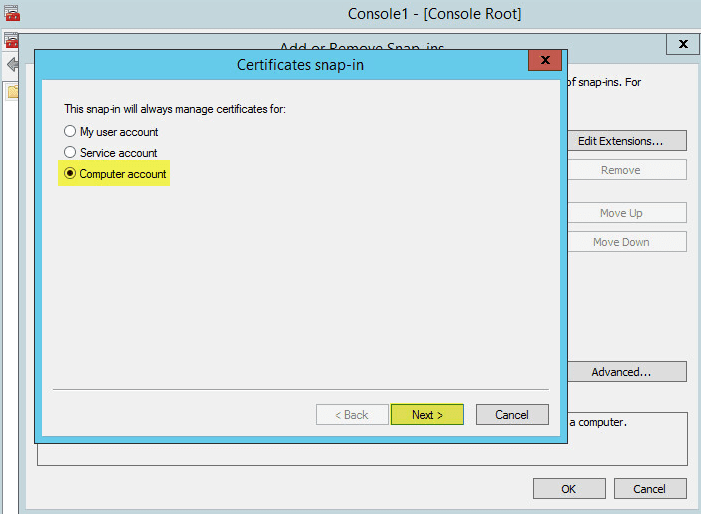
When you click OK you will get the following pop up. Select Computer account then click Next:
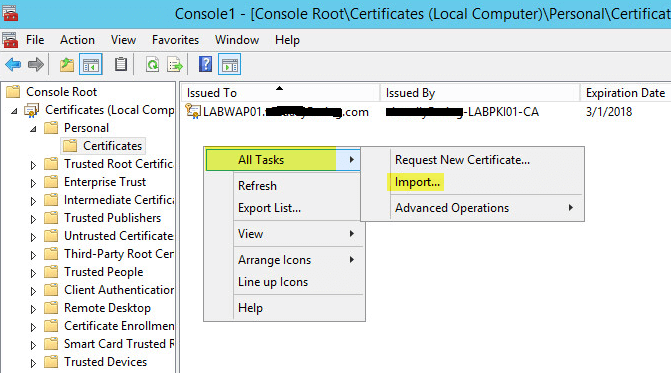
On AD FS Server: Scroll down to Personal > Certificates then right click the SSL certificate you used during setup of AD FS. Go to All Tasks > Export. Save to a location that your Web Application Proxy can access. Make sure you export the Private Key and certificate as a .pfx file format.

On Web Application Proxy: Right click on Personal > Certificates then go to All Tasks > Import:
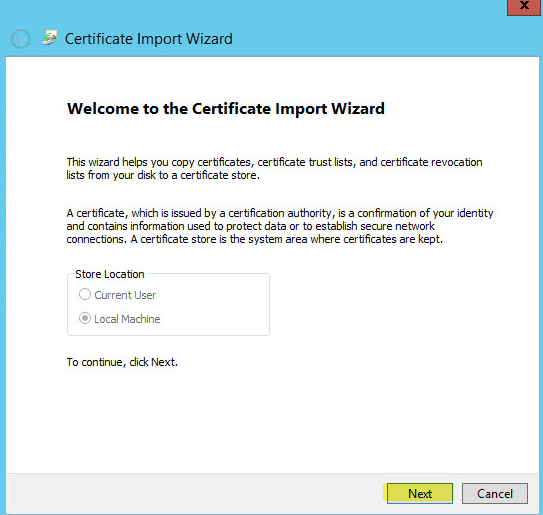
This will bring up the Certificate Import Wizard. Click Next
Browse to the certificate that you exported from your AD FS server and select it. Click Next

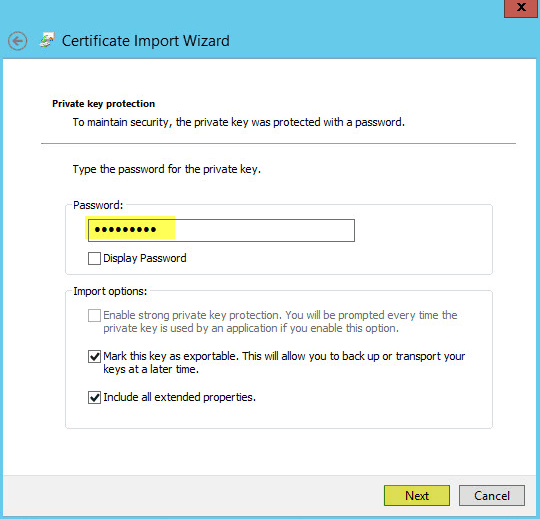
Enter the password for the private key and check the box to make the key exportable. Click Next
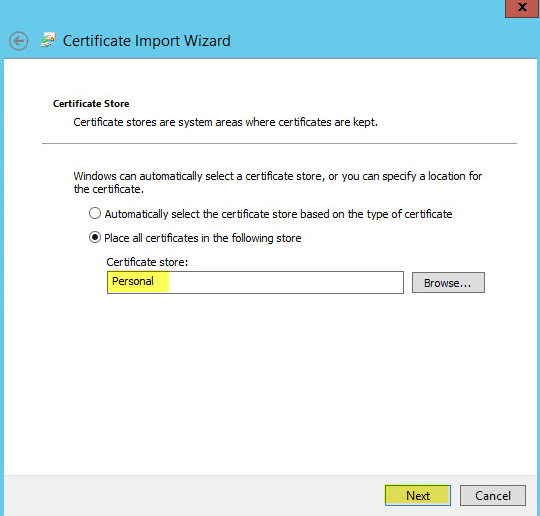
Leave the default certificate store as Personal. Click Next
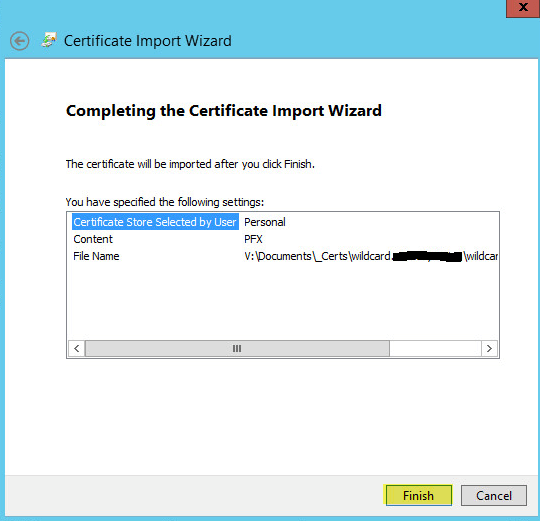
Click Finish
You should now see the certificate from your AD FS servers on your Web Application Proxy server
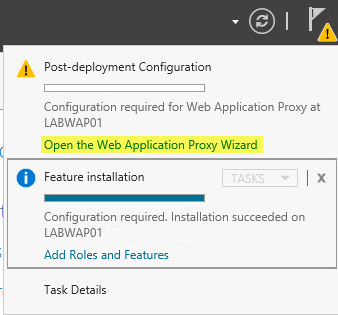
Now you are ready to start the Post Configuration settings.
Back on your Web Application Server open Server Manager then click Notifications then the message Open the Web Application Proxy Wizard:
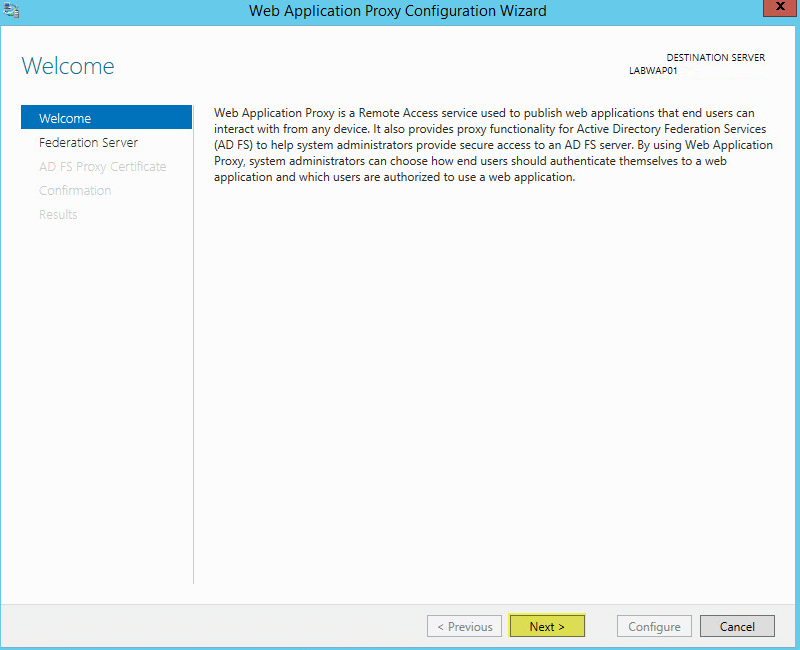
Click Next:
Enter the FQDN of your AD FS name and the Service Account you created during AD FS setup. Click Next:

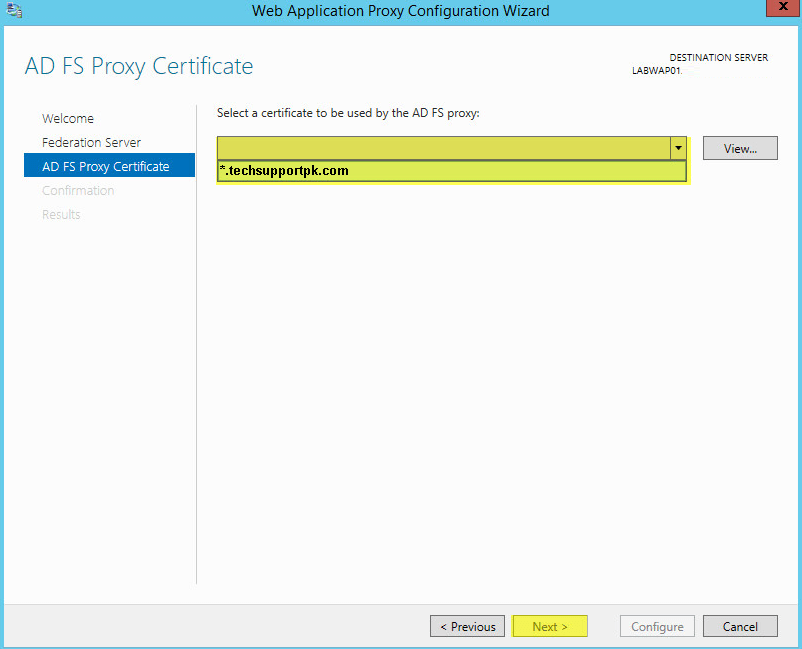
On the drop down menu select the certificate you imported from your AD FS server. Click Next
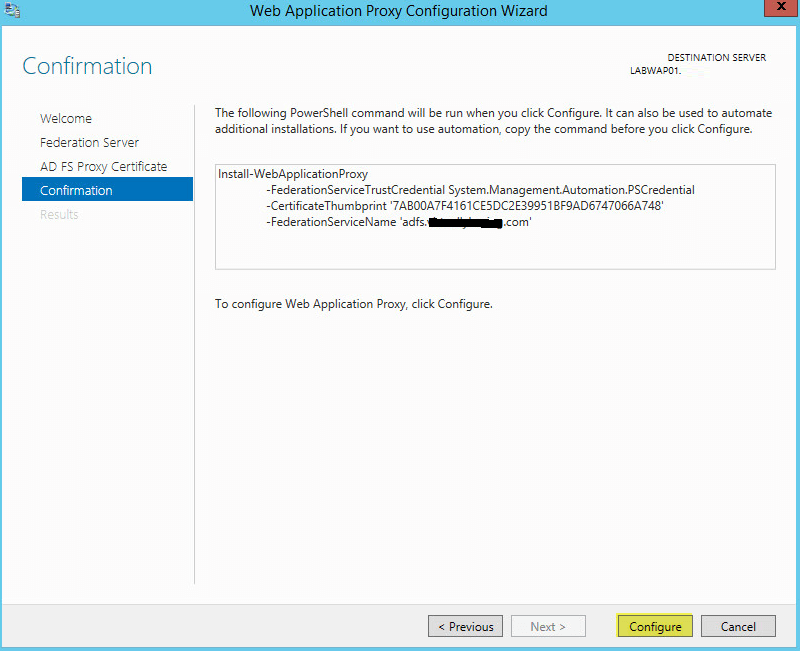
Click Configure
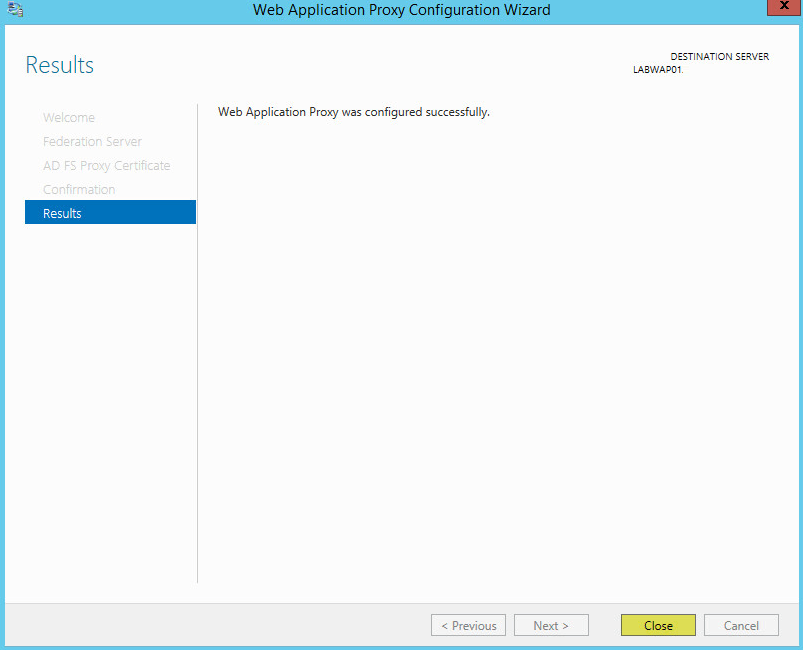
Once finished click Close
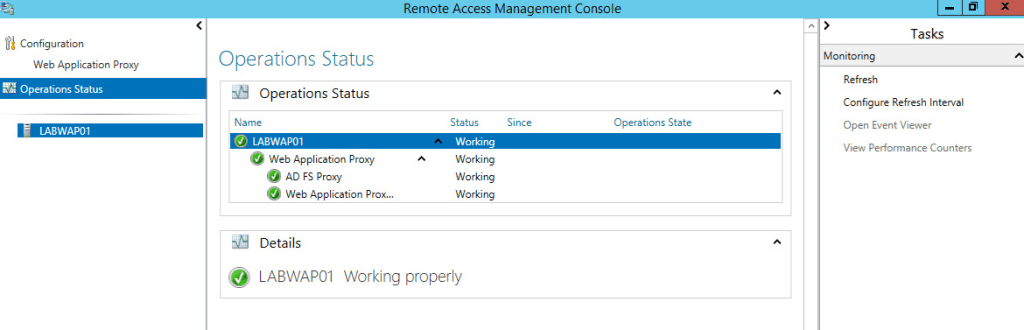
Remote Access Management Console should open when you clicked Close. On Operations Status you should see all the objects as green
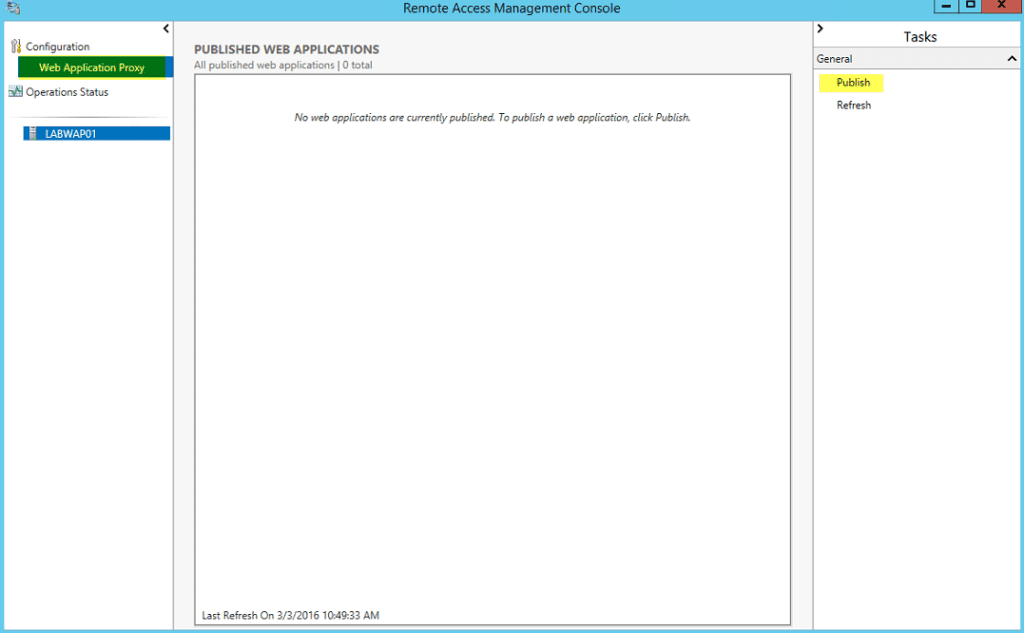
Finally, its time to publish apps. In the Remote Access Management Console click Web Application Proxy then Publish
Click Next:

Pass-through will let WAP act like a reverse proxy.
Here you have two options: (AD FS and Pass-through) self-explanatory. I have already set up AD FS in your environment then go with the first option otherwise 2nd is my choice since at the moment I don’t have AD FS.
Select Pass-through and click Next
Name: Enter a display name
External URL: Enter the URL that will be coming in your the WAP server externally
External Certificate: The drop down menu will show certificates that are added on the WAP server. Select the same certificate that you used while setting up your application. In my case I used my wildcard certificate.
Backend server URL: Enter the web URL of the server you want the external URL forwarded
Click Next:
Copy the PowerShell command down and with some minor edits you can easily add additional PassThrough applications with ease.
Click Publish:
Click Close to finish:
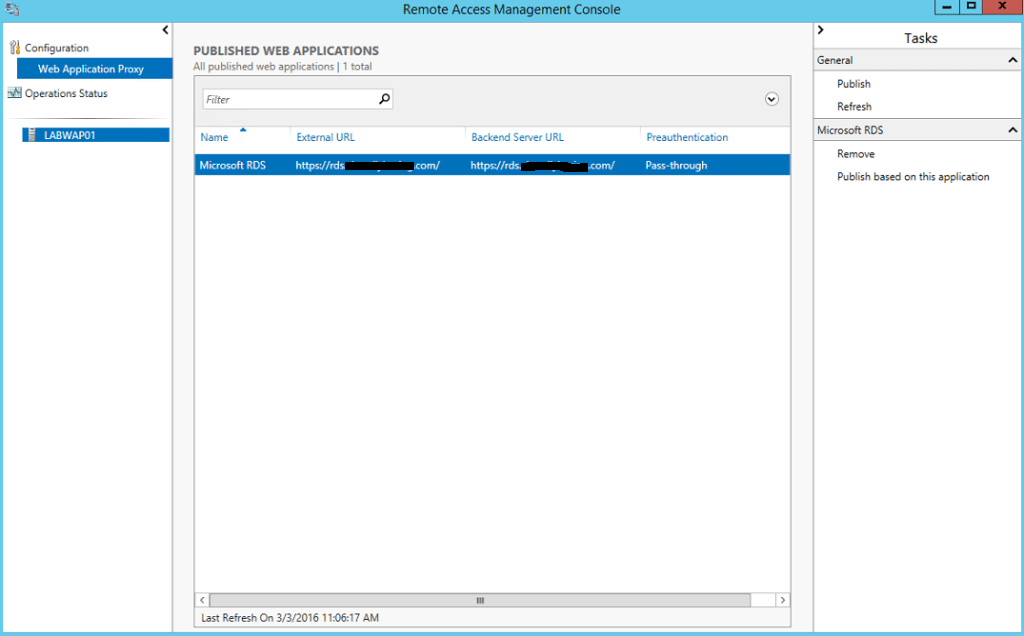
Here you can see the published web application is ready for testing.
Before you move to test your published app, ask your network guy to set up 443 port redirection to WAP server on firewall to make it possible to access web applications from the external network.
Once done.
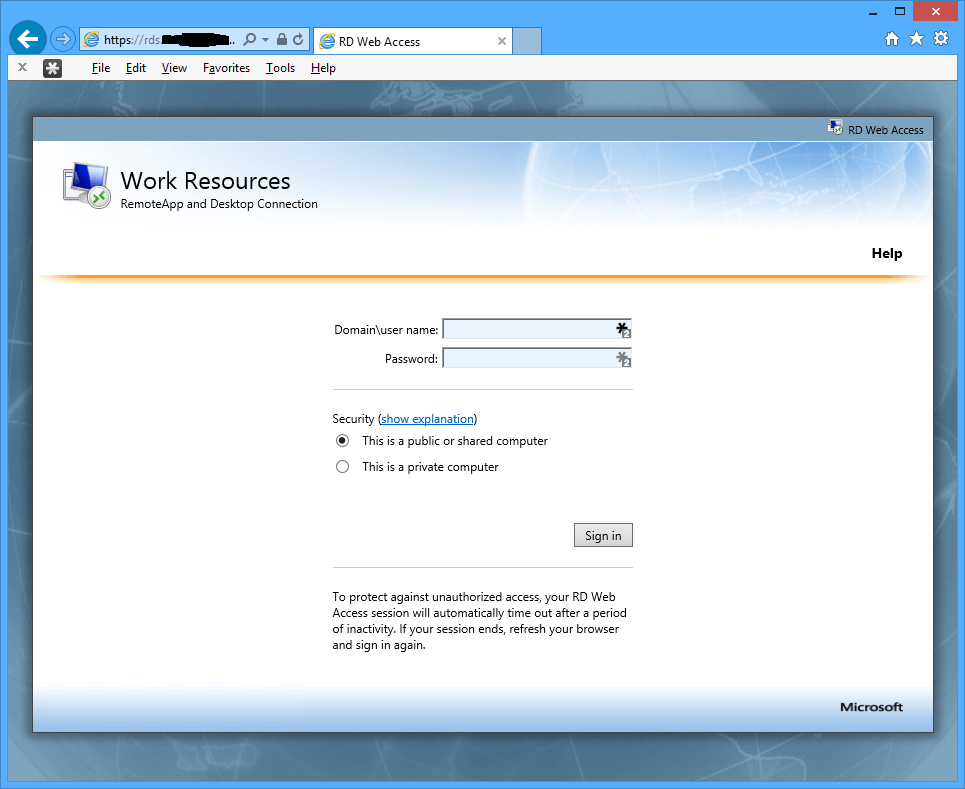
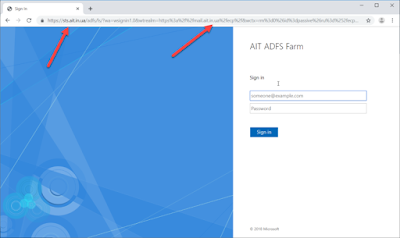
Then from the external network (for example on your smartphone or a PC) from home, try to access your web link like https://rds.techsupportpk.com and the following page will show up.
Подготовка служб ADFS к публикации Exchange
Первый шаг состоит в подготовке служб ADFS к публикации Exchange. Но, перед тем как начинать, в Exchange инфраструктуре должны быть корректно настроены URL адреса веб-каталогов OWA и ECP.
В самом ADFS потребуется создать два новых отношения доверия с проверяющей стороной (Relying Party Trust) для OWA и ECP. В этом поможет PowerShell скрипт, который необходимо выполнить на master ноде:
$owaURL=»https://mail.ithelpspb.blogspot.com/owa» # URL веб-каталога OWA
$ecpURL=»https://mail.ithelpspb.blogspot.com/ecp» # URL веб-каталога ECP
$IssuanceAuthorizationRules=@’
@RuleTemplate = «AllowAllAuthzRule»
=> issue(Type = «http://schemas.microsoft.com/authorization/claims/permit»,
Value = «true»);
‘@
$IssuanceTransformRules=@’
@RuleName = «ActiveDirectoryUserSID»
c:[Type == «http://schemas.microsoft.com/ws/2008/06/identity/claims/windowsaccountname», Issuer == «AD AUTHORITY»]

=> issue(store = «Active Directory», types = («http://schemas.microsoft.com/ws/2008/06/identity/claims/primarysid»), query = «;objectSID;{0}», param = c.Value);
@RuleName = «ActiveDirectoryGroupSID»
c:[Type == «http://schemas.microsoft.com/ws/2008/06/identity/claims/windowsaccountname», Issuer == «AD AUTHORITY»]
=> issue(store = «Active Directory», types = («http://schemas.microsoft.com/ws/2008/06/identity/claims/groupsid»), query = «;tokenGroups(SID);{0}», param = c.Value);
@RuleName = «ActiveDirectoryUPN»
c:[Type == «http://schemas.microsoft.com/ws/2008/06/identity/claims/windowsaccountname», Issuer == «AD AUTHORITY»]
=> issue(store = «Active Directory», types = («http://schemas.xmlsoap.org/ws/2005/05/identity/claims/upn»), query = «;userPrincipalName;{0}», param = c.Value);
‘@
Add-ADFSRelyingPartyTrust -Name «Outlook Web App» -Enabled $true -WSFedEndpoint $owaURL -Identifier $owaURL -IssuanceTransformRules $IssuanceTransformRules -IssuanceAuthorizationRules $IssuanceAuthorizationRules
Add-ADFSRelyingPartyTrust -Name «Exchange Control Panel» -Enabled $true -WSFedEndpoint $ecpURL -Identifier $ecpURL -IssuanceTransformRules $IssuanceTransformRules -IssuanceAuthorizationRules $IssuanceAuthorizationRules
Не забудьте поменять переменные URL адресов OWA и ECP на собственные.
Результат его работы:
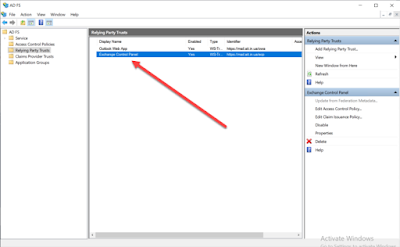
Интеграция Exchange инфраструктуры с ADFS
На каждом сервере Exchange c Client Access Services необходимо выполнить еще один PowerShell скрипт:
$ADFSSigningCertificateThumbprint=»2F4A8553226E3AC3BCDBA171A4F73E9B23A486DD» # Thumbprint
$owaURL=»https://mail.ithelpsb.blogspot.com/owa»
$ecpURL=»https://mail.ithelpsb.blogspot.com/ecp»
$ADFSIssuerURL=»https://sts.ithelpsb.blogspot.com/adfs/ls/» # URL ADFS фермы
$uris = @($owaURL,$ecpURL)
Set-OrganizationConfig -AdfsIssuer $ADFSIssuerURL -AdfsAudienceUris $uris -AdfsSignCertificateThumbprint $ADFSSigningCertificateThumbprint
Get-EcpVirtualDirectory | Set-EcpVirtualDirectory -AdfsAuthentication $true -BasicAuthentication $false -DigestAuthentication $false -FormsAuthentication $false -WindowsAuthentication $false
Get-OwaVirtualDirectory | Set-OwaVirtualDirectory -AdfsAuthentication $true -BasicAuthentication $false -DigestAuthentication $false -FormsAuthentication $false -WindowsAuthentication $false
Обратите внимание, что указаны переменные ADFSSigningCertificateThumbprint и ADFSIssuerURL. Значение первой можно получить в оснастке ADFS:. Открыв свойства сертификата ADFS Signing.

Открыв свойства сертификата ADFS Signing.
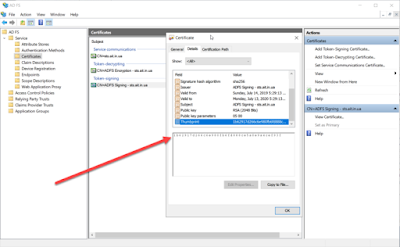
Этот сертификат необходимо экспортировать и импортировать в доверенные ЦС каждого Exchange сервера.
Значение второй переменной можно получить подставить FQDN фермы ADFS. Выполняем его в Exchange Management Shell.


Перегружаем IIS командой IISReset.
После перезагрузки веб сервера и его инициализации можно выполнить проверку работоспособности. Перейдем на URL ECP.
Автоматически отработает перенаправление на страницу входа ADFS, где необходимо пройти аутентификацию.
В случае если ADFS Signing сертификат не был импортирован в доверенные ЦС Exchange сервера, будет получена ошибка WrongAudienceUriOrBadSigningCert:

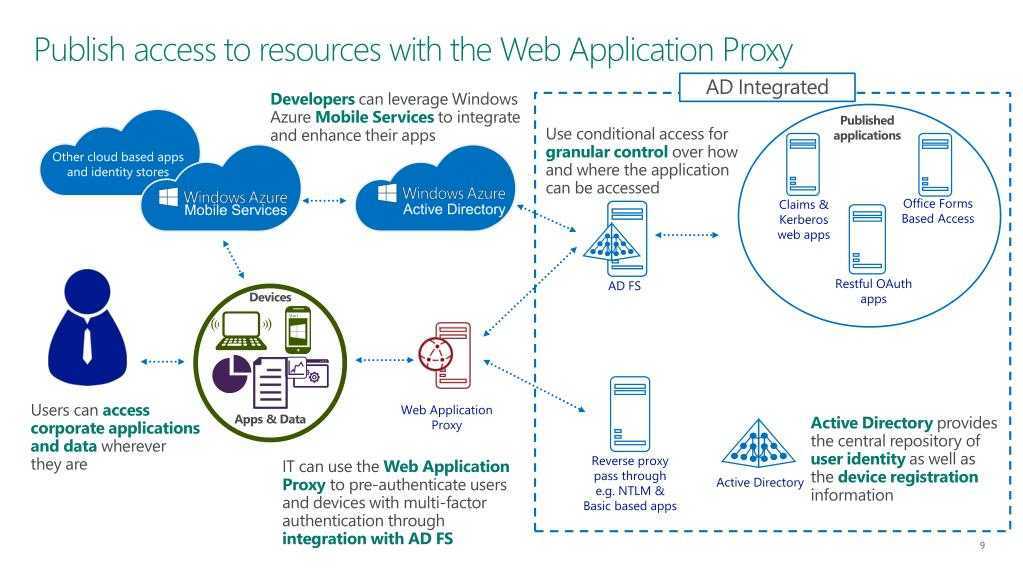
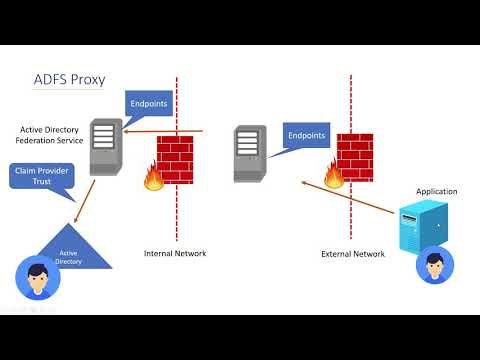
Using Active Directory Federation Services
This scenario describes the additions and changes that you must make to your AD FS servers to provide the following functionality:
-
Application publishing—For all applications and services that you want to publish through Web Application Proxy, you must configure a relying party on the AD FS server.
-
Authentication—No specific configuration is required to provide authentication for published applications. However, to use workplace join, MFA, or multifactor access control in your deployment, you must perform additional configuration as described in the following guides:
-
Workplace Join—Join to Workplace from Any Device for SSO and Seamless Second Factor Authentication Across Company Applications
-
MFA—Manage Risk with Additional Multi-Factor Authentication for Sensitive Applications
-
Multifactor access control—Manage Risk with Conditional Access Control.
-
Prerequisites
Web Application Proxy and Active Directory Federation Services can not be deployed on same server. You need an additional server to set up web proxy. We assume that the following services are already installed and configured accordingly.
- Active Directory Domain Services
- Active Directory Federation Services
Installing the Web Application Proxy Server Role
To begin, Open up Server Managerand clickManage clickAdd Roles and Features
Click Next:
Select Role-based or feature-based installation, click Next:
Select the server you want to install this role on to and then click Next:
Select Remote Access then click Next:
No additional Features are needed. Click Next:
Click Next:
Select Web Application Proxy:
On the pop up click Add Features
The Web Application Proxy role does not required a reboot. Click Install
Once complete click Close
Web Application Proxy is now installed but you need the AD FS certificate to continue.
You need the certificate from your AD FS server added to your Web Application Proxy server. Login to your AD FS server and open MMC.exe:
Go to File > Add/Remove Snap-ins > select Certificates then click Add:
When you click OK you will get the following pop up. Select Computer account then click Next:
On AD FS Server: Scroll down to Personal > Certificates then right click the SSL certificate you used during setup of AD FS. Go to All Tasks > Export. Save to a location that your Web Application Proxy can access. Make sure you export the Private Key and certificate as a .pfx file format.
On Web Application Proxy: Right click on Personal > Certificates then go to All Tasks > Import:
This will bring up the Certificate Import Wizard. Click Next
Browse to the certificate that you exported from your AD FS server and select it. Click Next
Enter the password for the private key and check the box to make the key exportable. Click Next
Leave the default certificate store as Personal. Click Next
Click Finish
You should now see the certificate from your AD FS servers on your Web Application Proxy server
Now you are ready to start the Post Configuration settings.
Back on your Web Application Server open Server Manager then click Notifications then the message Open the Web Application Proxy Wizard:
Click Next:
Enter the FQDN of your AD FS name and the Service Account you created during AD FS setup. Click Next:
On the drop down menu select the certificate you imported from your AD FS server. Click Next
Click Configure
Once finished click Close
Remote Access Management Console should open when you clicked Close. On Operations Status you should see all the objects as green
Finally, its time to publish apps. In the Remote Access Management Console click Web Application Proxy then Publish
Click Next:
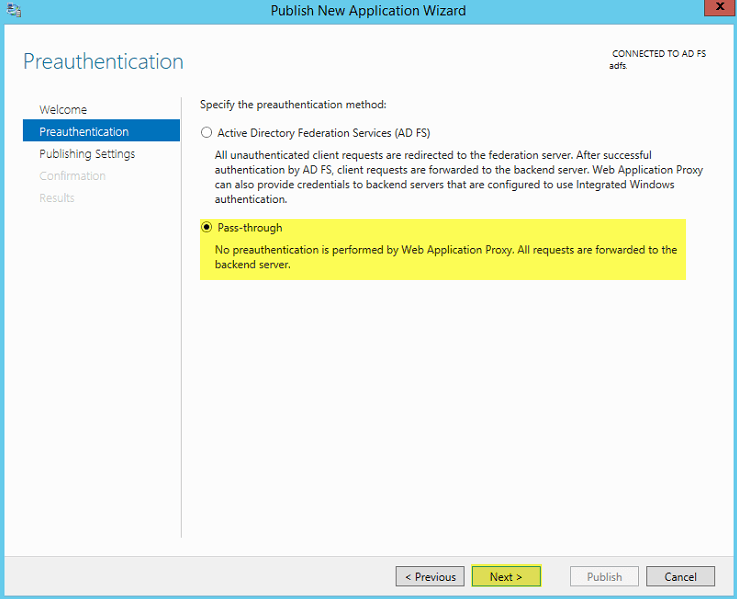
Pass-through will let WAP act like a reverse proxy.
Here you have two options: (AD FS and Pass-through) self-explanatory. I have already set up AD FS in your environment then go with the first option otherwise 2nd is my choice since at the moment I don’t have AD FS.
Select Pass-through and click Next
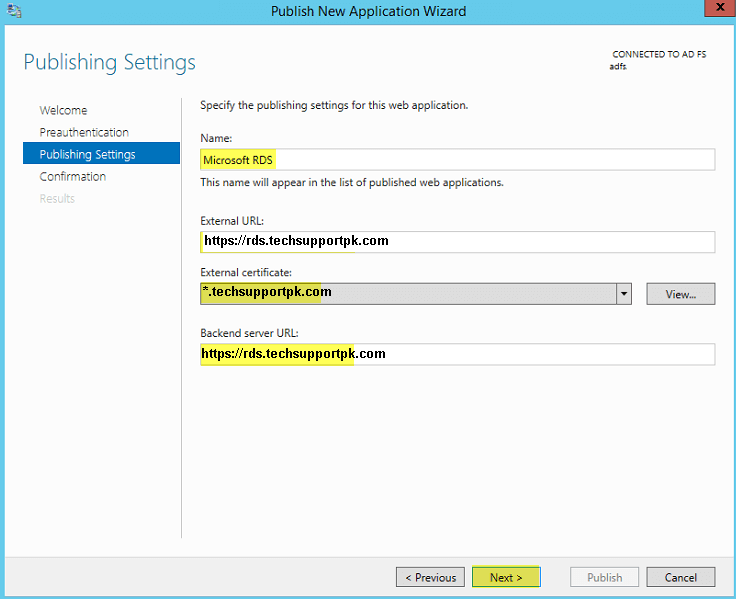
Name: Enter a display name
External URL: Enter the URL that will be coming in your the WAP server externally
External Certificate: The drop down menu will show certificates that are added on the WAP server. Select the same certificate that you used while setting up your application. In my case I used my wildcard certificate.
Backend server URL: Enter the web URL of the server you want the external URL forwarded
Click Next:
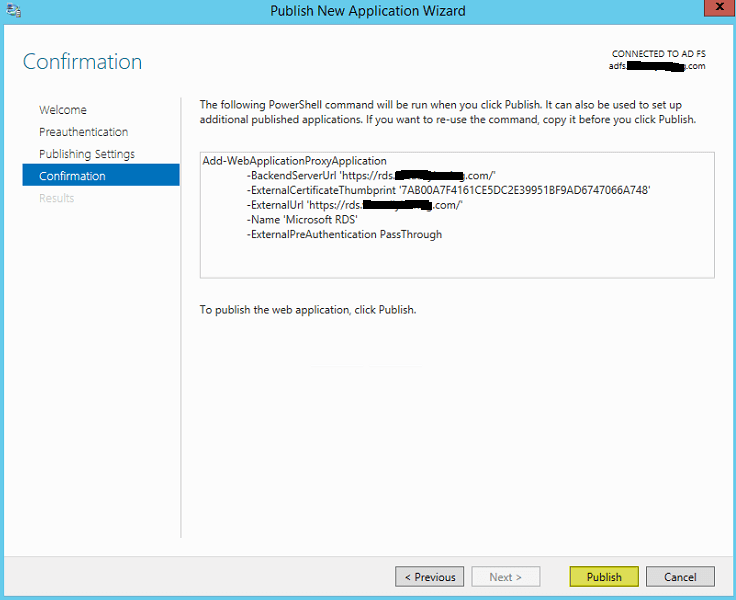
Copy the PowerShell command down and with some minor edits you can easily add additional PassThrough applications with ease.
Click Publish:
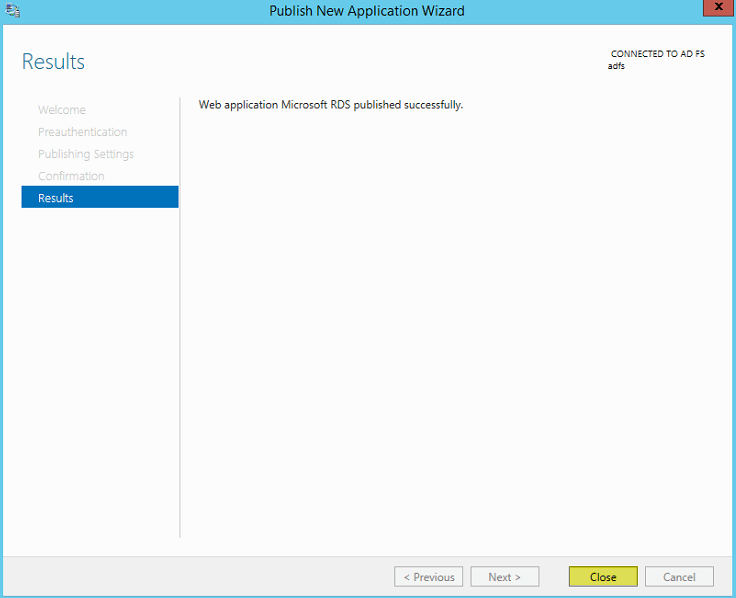
Click Close to finish:
Here you can see the published web application is ready for testing.
Before you move to test your published app, ask your network guy to set up 443 port redirection to WAP server on firewall to make it possible to access web applications from the external network.
Once done.
Then from the external network (for example on your smartphone or a PC) from home, try to access your web link like https://rds.techsupportpk.com and the following page will show up.
You have successfully deployed Web Application Proxy in your environment.
Resolution
When you publish an application through Web Application Proxy, a valid certificate with the private key is required to be stored in the Personal certificates store on each Web Application Proxy server. If the certificate used by an application has no private key, users will not be able to secure their access to the application and sensitive data will not be encrypted. Some browsers might block access to such sites. To resolve this issue, you must obtain a new certificate for this application. After obtaining the new certificate, you can either change the certificate using the Set-WebApplicationProxyApplication cmdlet with the ExternalCertificateThumbprint parameter, or remove the application and republish it using the new certificate.
Membership in the local Administrators group, or equivalent, is the minimum required to complete this procedure.
To remove a published application
-
On the Web Application Proxy server, open the Remote Access Management console: On the Start screen, click the Apps arrow. On the Apps screen, type RAMgmtUI.exe, and then press ENTER. If the User Account Control dialog box appears, confirm that the action it displays is what you want, and then click Yes.
-
In the Remote Access Management console, in the navigation pane, click Web Application Proxy.
-
In the details pane, select the application identified in the BPA, and then in the Tasks pane, click Remove.
-
On the Remove Applications dialog box, click Yes.
After removing the application, you can republish it.
To publish an application
-
In the Remote Access Management console, in the Navigation pane, click Web Application Proxy, and then in the Tasks pane, click Publish.
-
On the Publish New Application Wizard, on the Welcome page, click Next.
-
On the Preauthentication page, select the required preauthentication, and then click Next.
-
If you selected Active Directory Federation Services (AD FS), on the Relying Party page, in the list of relying parties select the relying party for the application that you want to publish, and then click Next.
-
On the Publishing Settings page, do the following, and then click Next:
-
In the Name box, enter a friendly name for the application.
-
In the External URL box, enter the external URL for this application; for example, https://apps.contoso.com/.
-
-
In the External certificate list, select a certificate whose subject covers the external URL.
-
In the Backend server URL box, enter the URL of the backend server. Note that this value is automatically entered when you enter the external URL and you should change it only if the backend server URL is different; for example, http://apps/.
-
In the Backend server SPN box, enter the service principal name for the backend server; for example, HTTP/apps.contoso.com.
-
-
On the Confirmation page, review the settings, and then click Publish. You can copy the PowerShell command set up additional published applications.
-
On the Results page, make sure that the application published successfully, and then click Close.


To change the certificate using PowerShell
-
Obtain a new certificate for the application as described above.
-
To obtain the application ID of the required application, use the following PowerShell command to show the ID and externalURL of all applications whose name matches the application name. Locate the application ID in the command output of the relevant application:
-
Use the following PowerShell command to change the certificate used for the published application:
Настройка доменных служб Active Directory
После установки роли, закрыть окно — Close. Теперь необходимо перейти к настройке роли AD.
В окне Server Manager нажать пиктограмму флага с уведомлением и нажать Promote this server to a domain controller (Повысить роль этого сервера до уровня контроллера домена) на плашке Post-deploiment Configuration.

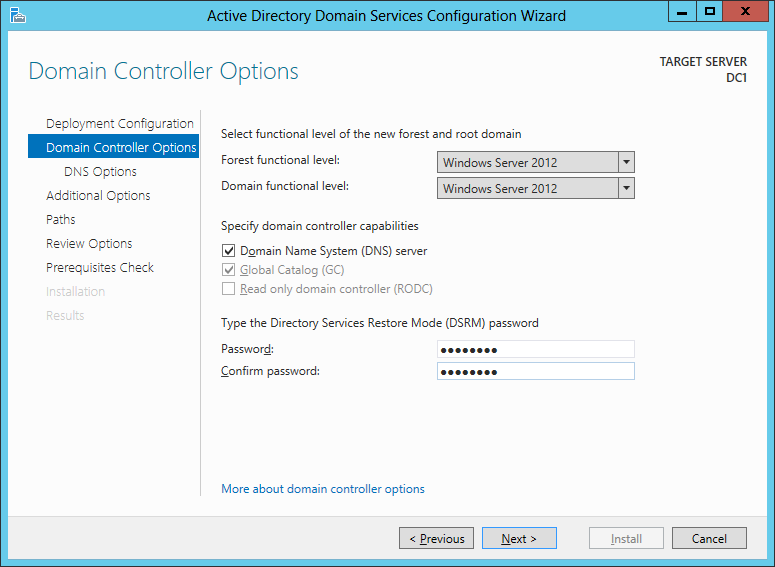
Выбрать Add a new forest (Добавить новый лес), ввести название домена и нажать Далее.

Можете выбрать совместимость режима работы леса и корневого домена. По умолчанию устанавливается Windows Server 2012.
На этой вкладке можно будет отключить роль DNS Server. Но, в нашем случае, галочку оставляем.
Далее ввести пароль для DSRM (Directory Service Restore Mode — режим восстановления службы каталога) и нажимаем Далее.
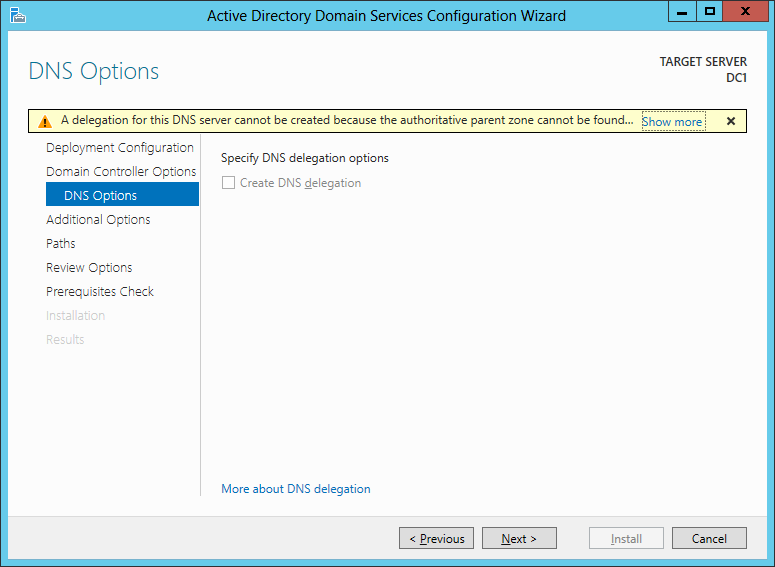
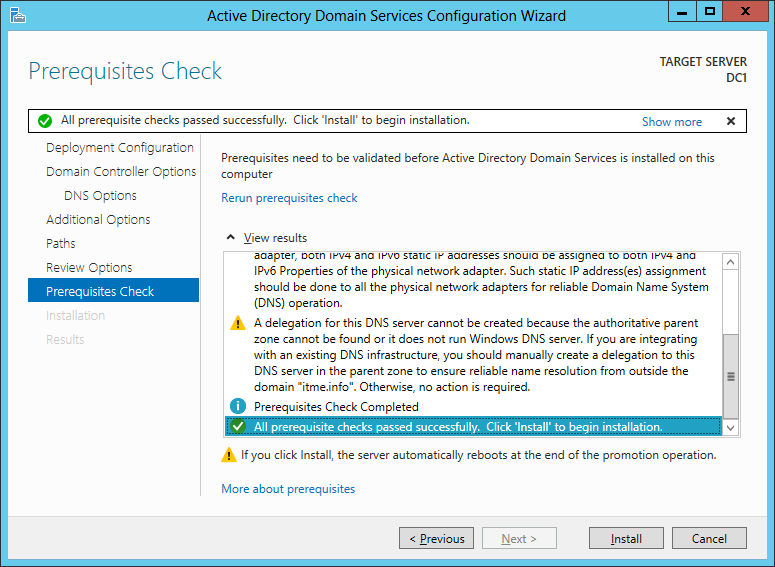
На следующем шаге мастер предупреждает о том, что делегирование для этого DNS-сервера создано не было (A delegation for this DNS server cannot be created because the authoritative parent zone cannot be found or it does not run Windows DNS server. If you are integrating with an existing DNS infrastructure, you should manually create a delegation to this DNS server in the parent zone to ensure reliable name resolution from outside the domain «ithz.ru». Otherwise, no action is required.).
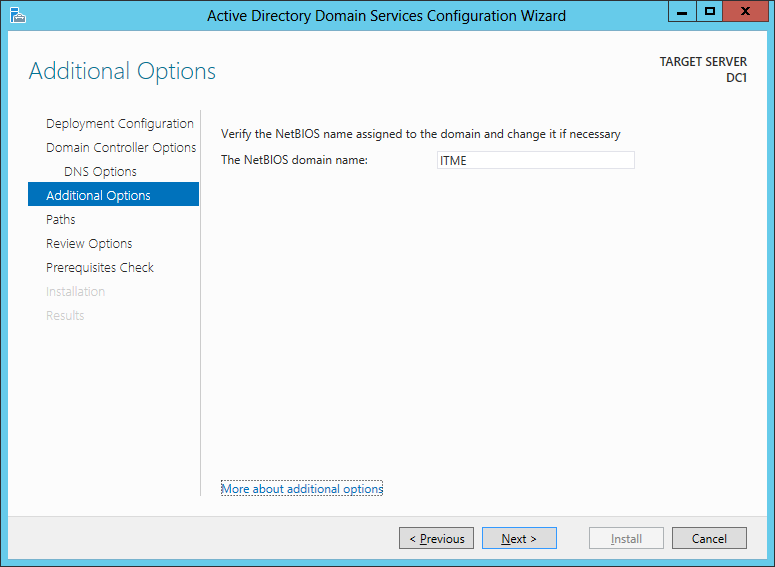
На следующем шаге можно изменить NetBIOS имя, которое было присвоено домену. Мы этого делать не будем. Просто нажимаем Далее.
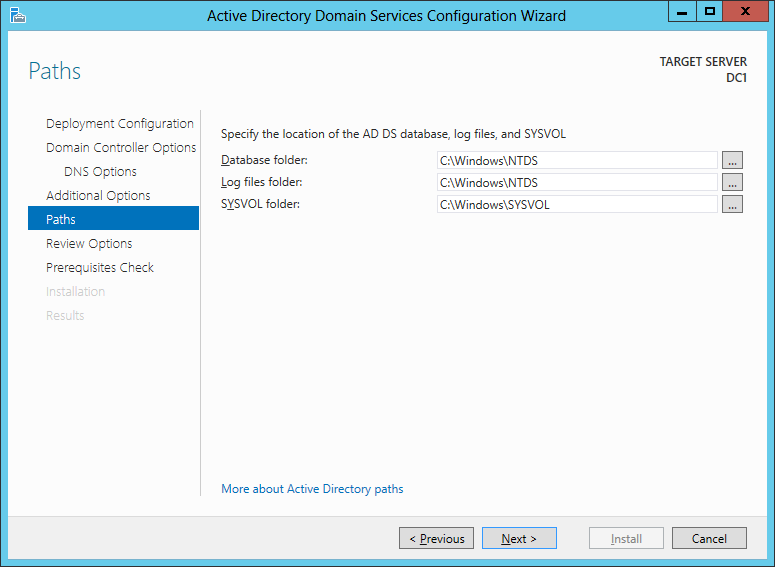
На следующем шаге можно изменить пути к каталогам базы данных AD DS (Active Directory Domain Services – доменная служба Active Directory), файлам журнала, а так же папке SYSVOL. Мы менять ничего не будем. Нажимаем кнопку Далее.
На следующем шаге отображается сводная информация по настройке. Нажав кнопку View Script, можно посмотреть Powershell скрипт, который произведет настройку доменных служб Active Directory.


# Windows PowerShell script for AD DS Deployment
Убедившись, что все указано верно, нажимаем на кнопку Next.
На следующем шаге производится проверка, все ли предварительные требования соблюдены. После чего покажет нам отчёт. Одно из обязательных требований — это установленный пароль локального администратора. В самом низу можно прочитать предупреждение о том, что после того, как будет нажата кнопка Install уровень сервера будет повышен до контроллера домена и будет произведена автоматическая перезагрузка.
Должна появиться надпись All prerequisite checks are passed successfully. Click «install» to begin installation.
Нажимаем кнопку Install.
После завершения всех настроек, сервер перезагрузится, и вы совершите первый ввод компьютера в ваш домен. Для этого необходимо ввести логин и пароль администратора домена.
На этом базовая настройка служб каталога Active Directory завершена. Конечно же еще предстоит проделать огромный объем работы по созданию подразделений, созданию новых пользователей, настройке групповых политик безопасности, …
Roles and Features Included in this Scenario
The following table lists the roles and features that are part of this scenario and describes how they support it.
|
Role/feature |
How it supports this scenario |
|---|---|
|
AD FS is required to provide authentication and authorization services to Web Application Proxy and to store the Web Application Proxy configuration. |
|
|
Web Application Proxy is the technology that can be used to publish applications and services running on servers inside the organization so they can then be accessed by end users located outside of an organization. |
|
|
Active Directory Domain Services is required as a prerequisite before you can deploy AD FS. |
|
|
The Web Server (IIS) role is used in this scenario to host a sample application that can be published by Web Application Proxy. |
Publish Exchange Server
The following table describes the Exchange services that you can publish through Web Application Proxy and the supported pre-authentication for these services:
| Exchange service | Pre-authentication | Notes |
|---|---|---|
| Outlook Web App | — AD FS using non-claims-based authentication- Pass-through- AD FS using claims-based authentication for on-premises Exchange 2013 Service Pak 1 (SP1) | For more information see: Using AD FS claims-based authentication with Outlook Web App and EAC |
| Exchange Control Panel | Pass-through | |
| Outlook Anywhere | Pass-through | You must publish three URLs for Outlook Anywhere to work correctly:
— The autodiscover URL.- The external host name of the Exchange Server; that is, the URL that is configured for clients to connect to.- The internal FQDN of the Exchange Server. |
| Exchange ActiveSync | Pass-through AD FS using HTTP Basic authorization protocol |
To publish Outlook Web App using Integrated Windows authentication, you must use the Add Non-Claims-Based Relying Party Trust Wizard to configure the relying party trust for the application.
To allow users to authenticate using Kerberos constrained delegation the Web Application Proxy server must be joined to a domain.
You must configure the application to support Kerberos authentication. Additionally you need to register a service principal name (SPN) to the account that the web service is running under. You can do this on the domain controller or on the backend servers. In a load balanced Exchange environment this would require using the Alternate Service Account, see Configuring Kerberos authentication for load-balanced Client Access servers
You can also configure the application directly on the backend server if it is running on Windows Server 2012 R2 or Windows Server 2012. For more information, see What’s New in Kerberos Authentication. You must also make sure that the Web Application Proxy servers are configured for delegation to the service principal names of the backend servers.
Plan DNS
DNS planning requirements include the following:
-
Web Application Proxy requires internal name resolution to resolve the names of backend servers, and of infrastructure servers such as the AD FS server.
-
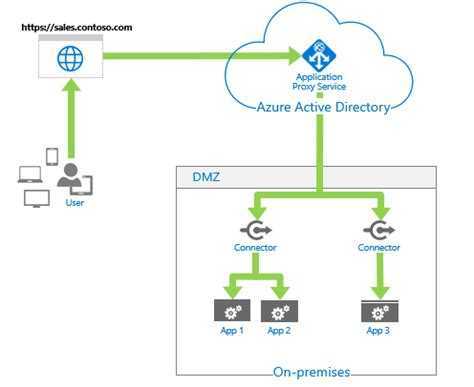
When publishing web applications via Web Application Proxy, every web application you publish requires an external URL. For clients to reach these web applications, a public DNS server must be able to resolve each external URL that you configure. Note that the external URL must resolve to the external IP address of the Web Application Proxy server, or the external IP address of a firewall or load-balancer placed in front of the Web Application Proxy server.
-


Parameters
-CertificateThumbprint
Specifies the certificate thumbprint, as a string, of the certificate that Web Application Proxy presents to users to identify the Web Application Proxy as a proxy for the Federation Service.
The thumbprint is 40 hexadecimal characters.
The certificate must be in the Personal store for the local computer.
You can use a simple certificate, a subject alternative name (SAN) certificate, or a wildcard certificate.
| Type: | String |
| Position: | Named |
| Default value: | None |
| Accept pipeline input: | False |
| Accept wildcard characters: | False |
-FederationServiceName
Specifies the name of a Federation Service.
This is the Federation Service for which Web Application Proxy provides AD FS proxy functionality and stores the configuration of the Federation Service.
| Type: | String |
| Position: | Named |
| Default value: | None |
| Accept pipeline input: | False |
| Accept wildcard characters: | False |
-FederationServiceTrustCredential
Specifies a PSCredential object that contains the credentials of the AD FS identity that is authorized to register new Federation server proxies.
Specify an account that has permissions to manage the Federation Service.
To obtain a PSCredential object, use the Get-Credential cmdlet.
For more information, type .
| Type: | PSCredential |
| Position: | Named |
| Default value: | None |
| Accept pipeline input: | False |
| Accept wildcard characters: | False |
-ForwardProxy
Specifies the DNS name and port number of an HTTP proxy that this federation server proxy uses to obtain access to the federation service.
Specify the value for this parameter in the following format: FQDN:PortNumber.
For example, to specify a forward proxy with a host name of «proxy01» that is located within the corp.contoso.com domain and that can be reached using the HTTP port of 8080 would be «proxy-01.corp.contoso.com:8080».
Note: This parameter applies only to Federation Services proxy.
It does not apply for application publishing.
| Type: | String |
| Position: | Named |
| Default value: | None |
| Accept pipeline input: | False |
| Accept wildcard characters: | False |
-HttpsPort
Specifies the HTTPS port for the Web Application Proxy server.
The default value is 443.
| Type: | Int32 |
| Position: | Named |
| Default value: | None |
| Accept pipeline input: | False |
| Accept wildcard characters: | False |
-TlsClientPort
Specifies the port for the TLS client.
Web Application Proxy uses this port for user certificate authentication.
The default value is 49443.
| Type: | Int32 |
| Position: | Named |
| Default value: | None |
| Accept pipeline input: | False |
| Accept wildcard characters: | False |

![Installation of clearos [clearos documentation]](http://smartshop124.ru/wp-content/uploads/9/8/d/98d2934d2092f6a91bb623e7c5fbf29a.jpeg)
