
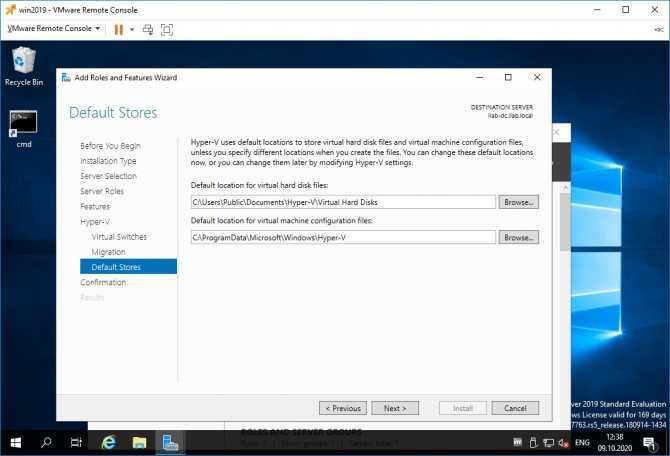
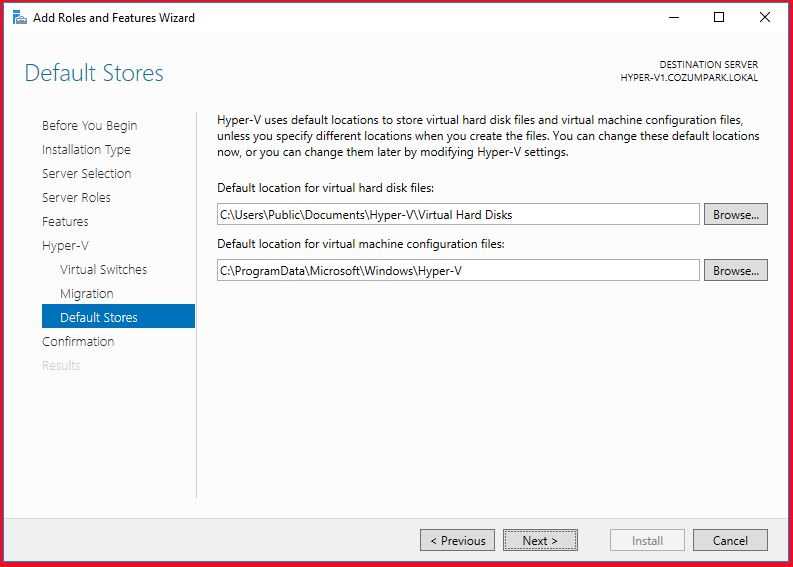
Hyper-V Cannot Passthrough Non-Disk USB
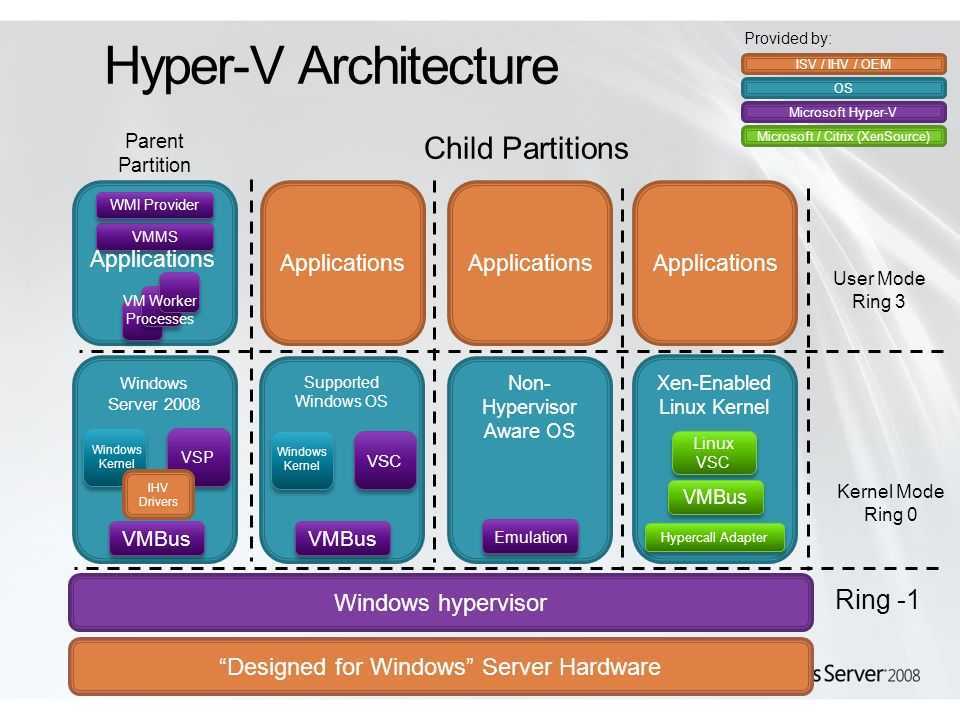
I often read complaints that Hyper-V cannot perform passthrough operations for USB devices. The complaint typically accompanies a negative comparison to applications such as VMware Workstation and Oracle VirtualBox, which can perform USB passthrough. The very sharp distinction to be made here is that Hyper-V is a type 1 hypervisor whereas the products that provide simple USB passthrough are type 2 hypervisors. In a type 2 hypervisor, the management operating system is installed directly to the hardware and the hypervisor is just another application that runs within it. Applications have the ability to exclusively capture a USB port to prevent other applications from using it if they like; this is why it’s so easily done in a type 2 hypervisor. If you’ve ever used a type 2 hypervisor in this way, you’ll notice that they explicitly tell you that the USB device can be attached to the parent or a guest — there’s no sharing or divvying up resource access or anything of the sort.
Type 1 hypervisors are not applications. They are kernels firmly entrenched within partitions. A type 2 hypervisor is essentially an application shim that is pretending to provide a root hardware device, which is fine because it doesn’t require the same degree of isolation as a type 1 hypervisor. Hyper-V can’t do this because one operating system instance locking a USB port from all other operating system instances is just not how type 1 virtualization works. Could there be a way for a type 1 hypervisor to assign a USB port to a specific guest by doing the same thing that a type 2 does? I don’t know. In theory, it sounds like something that could be done. But, technological feasibility is beside the point. Hyper-V doesn’t do it. If you want more information, Microsoft has published a thorough article regarding passing through hardware on the 2016 platform that describes some of the challenges and possibilities.
If true USB passthrough is a requirement for whatever you’ve got in mind, then Hyper-V is a poor solution. If you’re using the emulators in Visual Studio, you’re sort of forced into it. For most everyone else, I’d say to turn your eye to a type 2 hypervisor. I personally like VirtualBox. It’s not perfect by any stretch, but the licensing terms are favorable for most and it gets the job done.
All of that said, it is entirely possible to use USB devices inside a Hyper-V guest, even Client Hyper-V.
Note: a fourth option not explored in this article is software-based solutions. I’ve never personally used any, which is why they’re not in the text. Check the comments section, though. Reader Tim has suggested one such application and recounted his own experiences with it.
KVM — решение с открытым исходным кодом
KVM (Kernel-based Virtual Machine) — полное решение виртуализации для платформ Linux/x86, поддерживающее аппаратные расширения (Intel VT и AMD-V).
Изначально KVM поддерживал только процессоры x86, но современные версии KVM поддерживают самые различные процессоры и гостевые ОС, в том числе Linux, BSD, Solaris, Windows и др.
KVM — простой в использовании, легкий, нетребовательный к ресурсам и довольно функциональный гипервизор. KVM позволяет в минимальные сроки развернуть площадку виртуализации. Все Wiki-ресурсы (MediaWiki, Wikimedia Foundation, Wikipedia, Wikivoyage, Wikidata, Wikiversity) используют именно это решение виртуализации.
Поскольку гостевые операционные системы взаимодействуют с гипервизором, который интегрирован в ядро Linux, у них есть возможность обращаться напрямую к оборудованию без нужды изменения гостевой ОС. Благодаря этому KVM считается довольно быстрым решением.
Конечно, KVM — не идеален, и у него есть тоже свои недостатки, и их надо учесть, прежде чем выбрать именно его. Начнем с того, что нет мощных средств для управления виртуальными машинами и сервером KVM. Средства, конечно, есть, но они не соответствуют по функционалу аналогичным средствам для других систем. Одно из лучших решений — SolusVM — универсальная панель управления виртуальными серверами KVM, Xen и OpenVZ.
Также часто отмечают не лучшую стабильность KVM при выполнении разнообразных задач с интенсивным вводом-выводом. Именно поэтому некоторые эксперты в сфере виртуализации при обзорах и сравнении гипервизоров называют KVM сырым решением, которое больше подходит для экспериментов, чем для корпоративного применения.
Если спросить у профессионалов о том, какой выбрать гипервизор, то все они посоветуют Hyper-V. Он более стабилен, специальные средства миграции виртуальной машины в нем надежнее, эффективнее применяется оборудование, нежели в Linux-KVM. Платформа Microsoft Azure построена на Hyper-V и это говорит о многом.
Hyper-V USB Passthrough with Enhanced Session Mode
Enhanced Session Mode enables redirection of local devices and resources to a virtual machine session using the Virtual Machine Connection tool. If your computer runs Windows 10 or Windows 8.1, Enhanced Session Mode will be available by default. However, if your Hyper-V host runs Windows Server 2012 R2 or Windows Server 2016, you have to manually enable the Enhanced Session Mode functionality. Note that using this approach, you don’t need to ensure network connectivity to the guest OS, only to the host.
To perform Hyper-V USB passthrough with Enhanced Session Mode, you need to take the following steps:
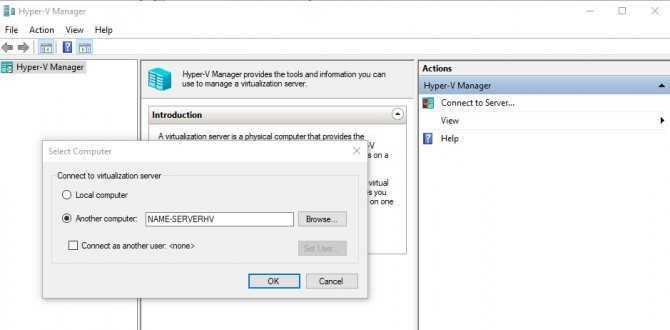
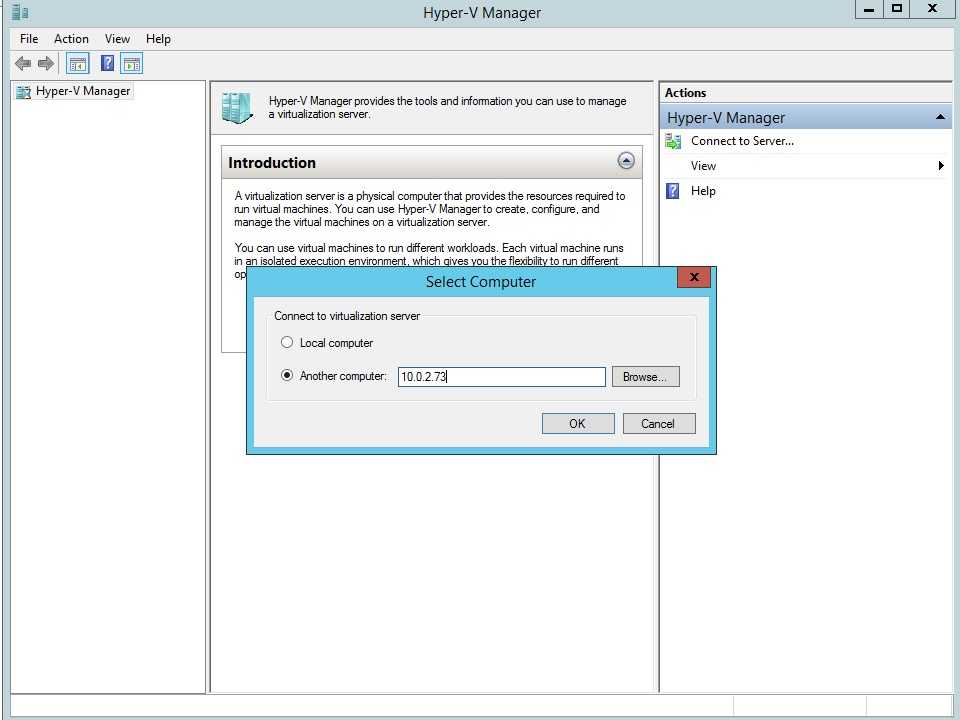
- Connect to a computer hosting the VM.
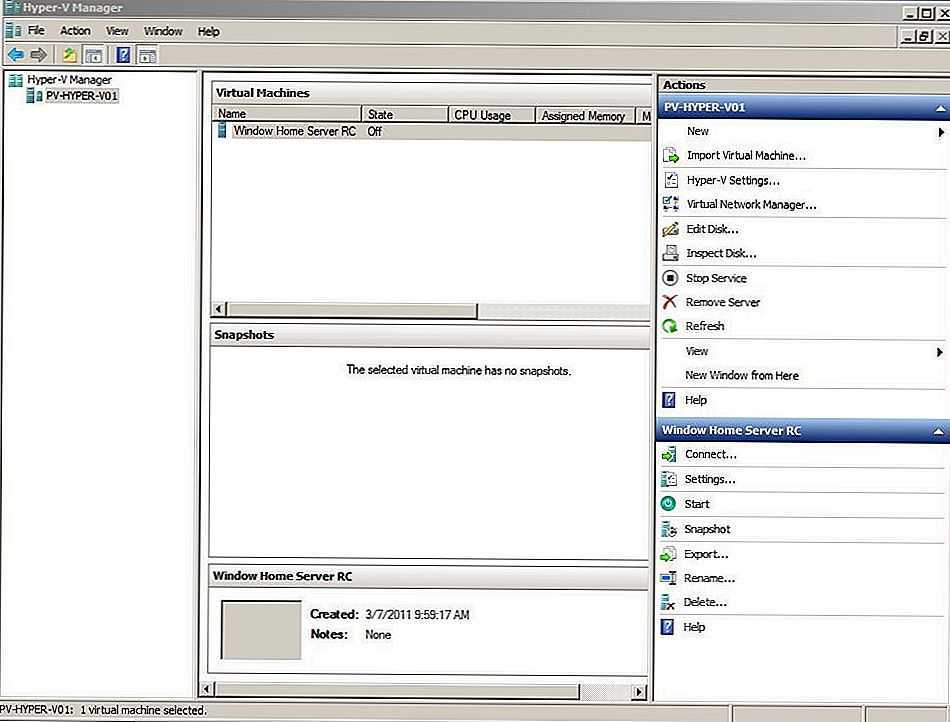
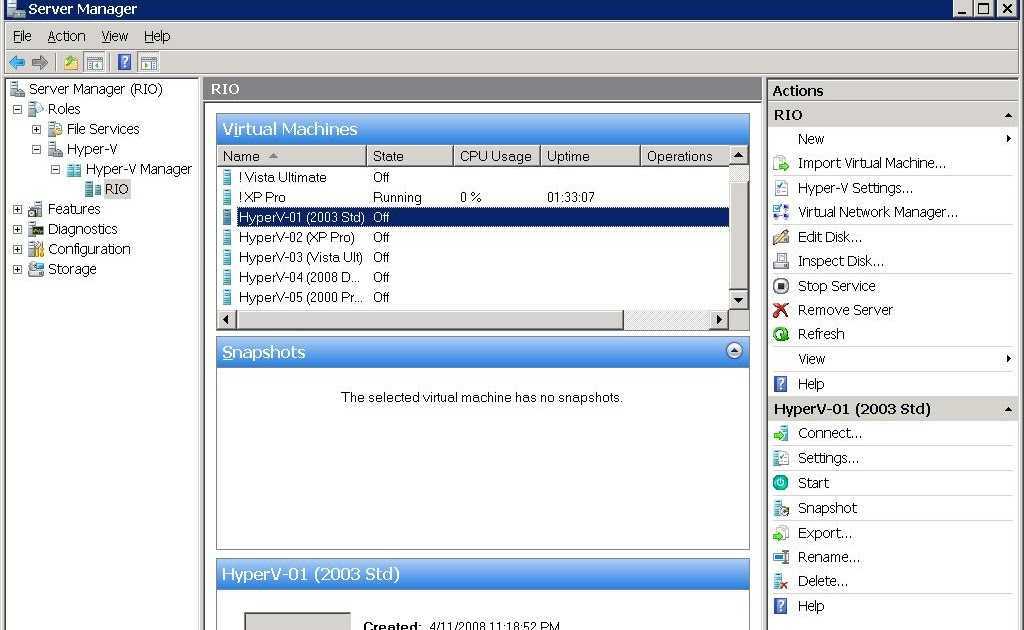
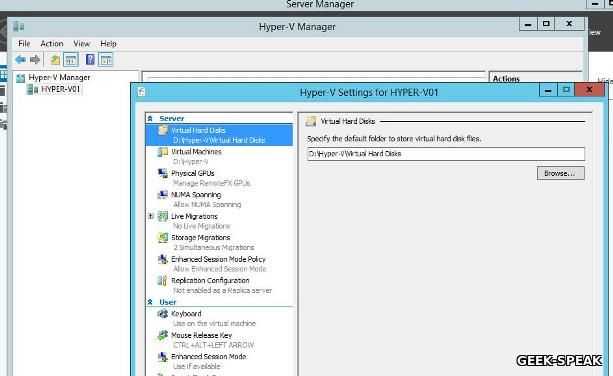
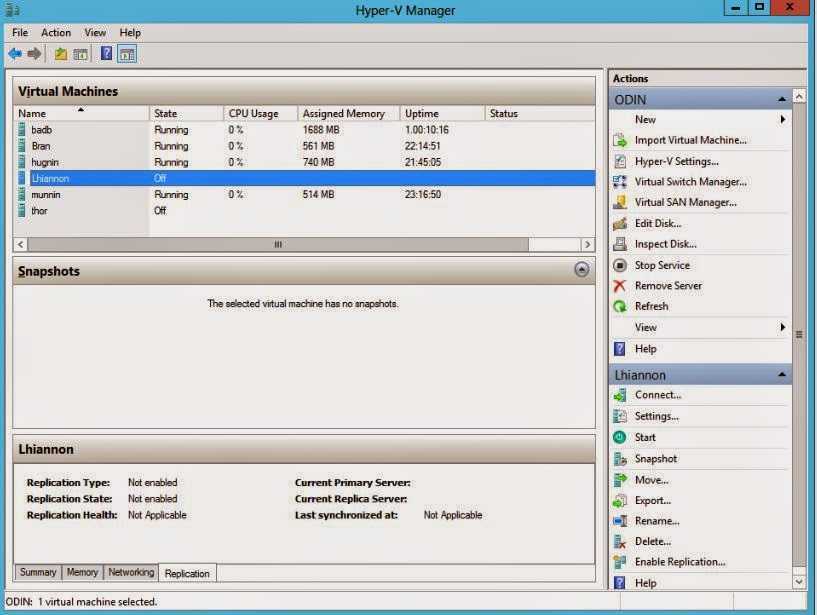
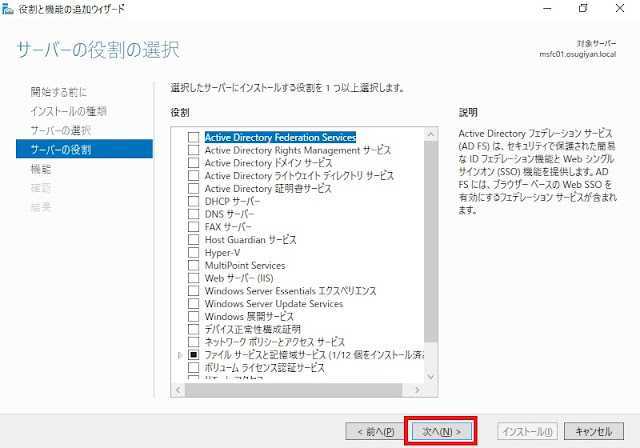
- Open Hyper-V Manager. Right-click the host’s name and select Hyper-V Settings.
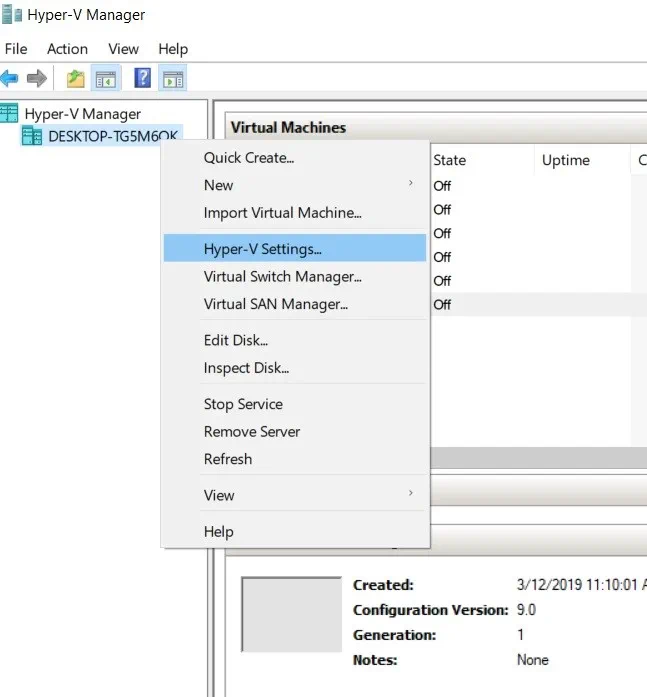
3. In the Server section, click Enhanced Session Mode Policy and check the box Allow enhanced session mode.
4. In the User section, click Enhanced Session Mode and check the box Use enhanced session mode.
5. Click OK to save changes.
The next stage is to choose the local resource you would like to connect to. Local resources include printers, local drives, audio devices, and USB drives, which constitute the main topic of our blog post. For this purpose, you should do the following:
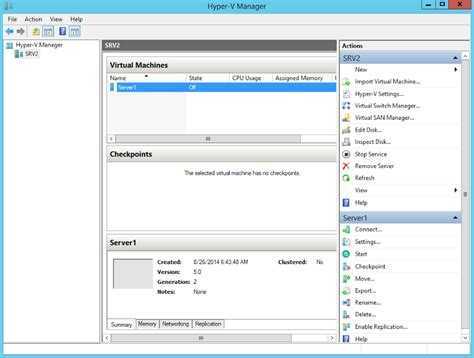
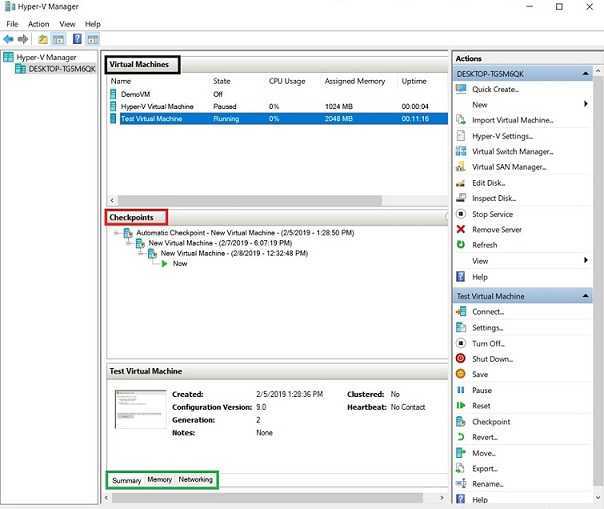
- Open Hyper-V Manager and start the VM by double-clicking its name.
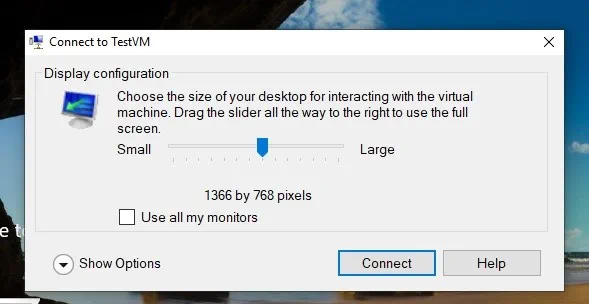
- Before you can log into your VM, a configuration window will pop up. Click Show Options to extend the set of configurations for future connections to this VM.
3. Select the Local Resources section. Under Local devices and resources, click More.
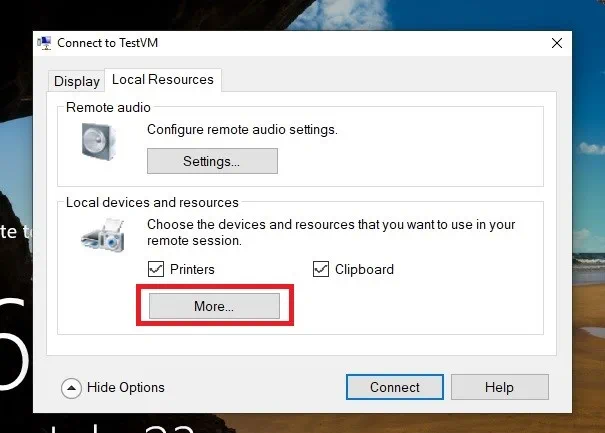
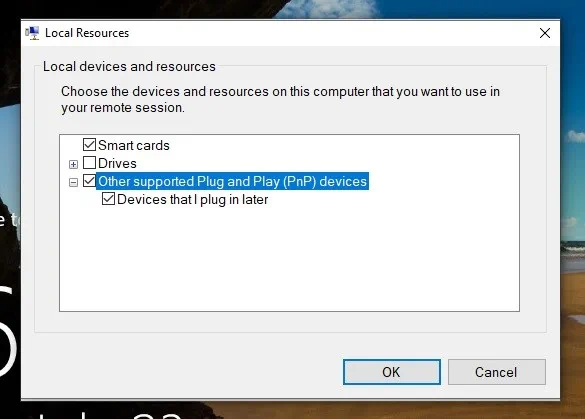
4. If you want to enable VM access to a local USB device, check the box Other supported Plug and Play (PnP) devices, as well as the box Devices that I plug in later beneath it. Click OK.
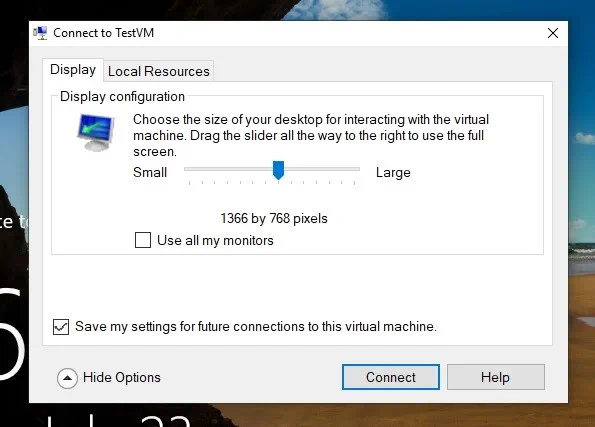
5. In the Display section, you can also select Save my settings for future connections to this virtual machine. Click Connect if you wish to implement any changes.
With these two approaches, you can make a USB device available for use within any Hyper-V VM that you choose.
Data Protection with NAKIVO Backup & Replication
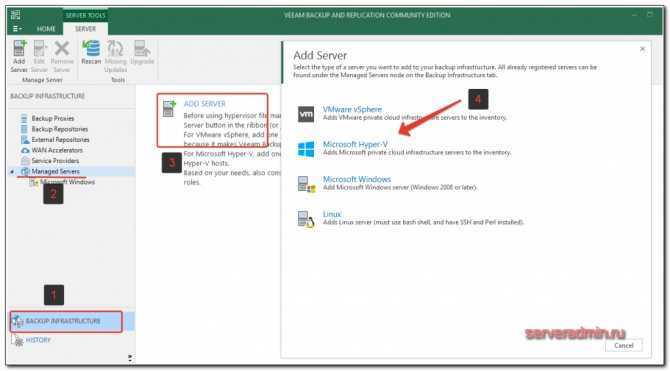
As already mentioned above, NAKIVO Backup & Replication is a fast, flexible, cost-effective data protection solution, capable of protecting virtual, physical, and cloud environments without taking a lot of your time and effort. NAKIVO Backup & Replication can provide you with the following data protection options:
- Create agentless, image-based, incremental, and application-aware backups and replicas of running Hyper-V, VMware, AWS EC2, and Nutanix AHV VMs.
- Save up to 1,000 recovery points for each VM backup and rotate them on a daily, weekly, monthly, and yearly basis using the GFS retention scheme.
- Swap data is automatically excluded from VM backups, backed-up data also gets deduplicated and compressed, which can significantly reduce storage space requirements.
- Create copies of VM backups and store these copies offsite or in the Cloud (Azure or AWS), eliminating a single point of failure.
- Automate and orchestrate disaster recovery activities by creating Site Recovery (SR) workflows, each of which is designed to address a specific DR scenario.
- Run non-disruptive recovery testing of existing SR jobs, allowing you to verify that your DR plan is effective and that expected recovery objectives can be met. If any issues have been detected, you can easily update a SR job to meet your demands.
- Put data protection activities on autopilot by setting up policies that can regularly scan your virtual infrastructure and automatically add/remove the VMs which match the established policy rules.
Request a live demo by one of our engineers or download a full-featured free trial to test the product in your virtual environment today and see for yourself the multiple benefits that NAKIVO Backup & Replication provides.
What Is Hyper-V USB Passthrough?
The USB passthrough functionality allows you to access the USB device from within a VM. Unfortunately, USB passthrough is not natively supported in Hyper-V environments, but you can still perform Hyper-V USB passthrough using the following approaches:
- Enable Enhanced Session Mode
- Run the Remote Desktop Protocol (RDP) session
- Install network-based USB solutions
- Install software-based USB solutions
Below, I am going to describe how the first two approaches work, since they do not require the installation of a third-party software, and can be manually configured in a few steps.
Requirements for Hyper-V USB passthrough
In a nutshell, to enable the VM access to a local resource, you need to meet the following requirements:
- The Enhanced session mode policy and Enhanced session mode settings should be enabled. Enhanced Session Mode is only supported on generation 2 VMs.
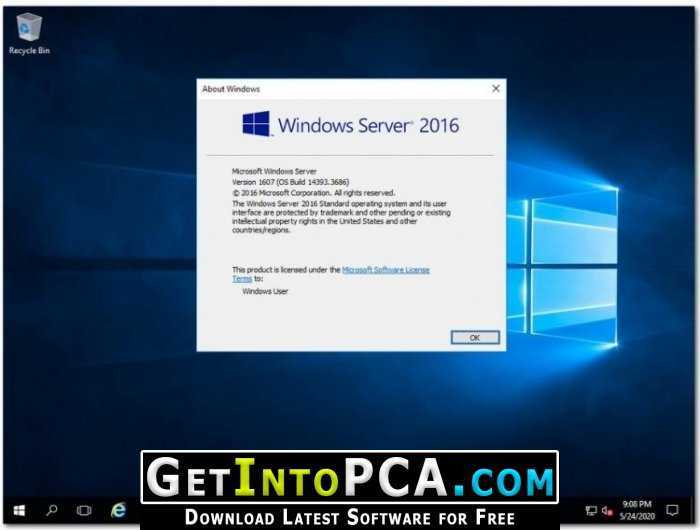
- For Virtual Machine Connection (VMConnect) to work, your computer should run Windows Server 2016, Windows 10, Windows 8.1, Windows Server 2012 R2, Windows Server 2012, Windows 8.
- The VM from which we want to connect to a USB drive must run Windows Server 2016, Windows Server 2012 R2, Windows 10, or Windows 8.1.
- Remote Desktop Services must be enabled on the VM which you would like to connect to.
Data Protection with NAKIVO Backup & Replication
NAKIVO Backup & Replication delivers high-end data protection for SMBs and enterprises with multiple backup, replication and recovery features, including VMware Backup, Hyper-V Backup, Office 365 Backup and more.
Frequently Asked Questions
Should Hyper-V Have USB Passthrough?
First and foremost, Hyper-V is a server-based solution. Beyond that, Microsoft is wholeheartedly embracing cloud concepts, even (in my opinion) to the detriment of a great many other technologies. If you envision a cloud based on virtualization, even an on-premises cloud, you can see fairly quickly that host-based USB is a terrible idea. You never have any guarantee of any kind where a virtual machine will be running from moment to moment. With Shared Nothing Live Migration, even the lack of a cluster no longer locks a virtual machine to a specific host. Host-based USB just doesn’t make a lot of sense in a cloud.

How to Enable Enhanced Session Mode
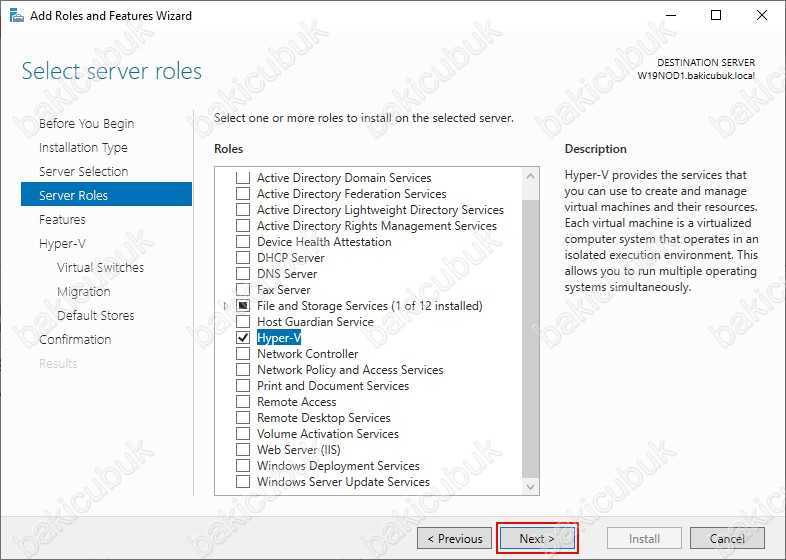
Client Hyper-V installations automatically enable Enhanced Session Mode. For the server SKUs, you need to enable it manually. Afterward, you need to restart the Hyper-V Virtual Machine Management service (vmms). The quickest way is with PowerShell:
Set-VMHost -EnableEnhancedSessionMode $true
That cmdlet includes the -ComputerName parameter if you’re running it remotely.
If you prefer Hyper-V Manager:
Right-click on the host in the left pane. Click Hyper-V Settings.
In the left-side tabs, click Enhanced Session Mode Policy.
Check the box for Allow enhanced session mode and click OK.
Known issues with Hyper-V USB device passthrough organized with native methods
Here is what you have to keep in mind before opting for native methods of USB passthrough to Hyper-V:
- Platform restrictions: said methods rely upon Windows storage subsystem so using them to set up Hyper-V USB passthrough on Linux (or any other OS that’s not Windows) is out of question, sadly.
- An extremely limited list of supported devices: for the native methods to work, your USB peripheral must be recognized as a “Mass Storage Device”. No exceptions.
- No sharing: once your device is set in passthrough mode, you can access it only from the guest OS. That’s why using these methods to permanently connect a USB to Hyper-V is definitely not the best idea.
- Poor choice for a cloud: with these methods, the USB device is always locked to a specific host PC while there’s no way to anchor a cloud-based Hyper-V guest system or preestimate where it’s going to run for your next session.
Alternative ways of setting up USB device redirection in Hyper-V
Another way to solve the problem of a VM powered by the Hyper-V hypervisor not seeing local SCSI and USB devices is by using the enhanced session mode. To enable it, use the Hyper-V Manager to change the settings of your server (look for the Allow enhanced session mode setting). After that, guest VM should be able to access ay leas some of your host’s resources.
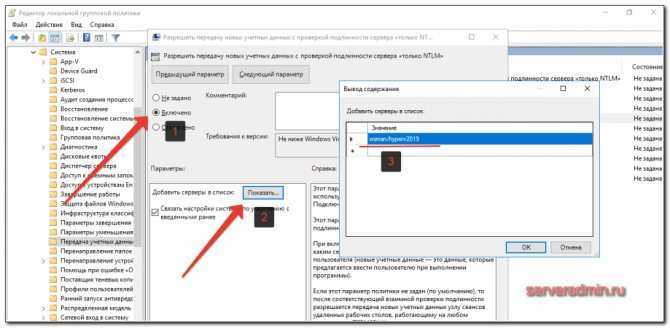
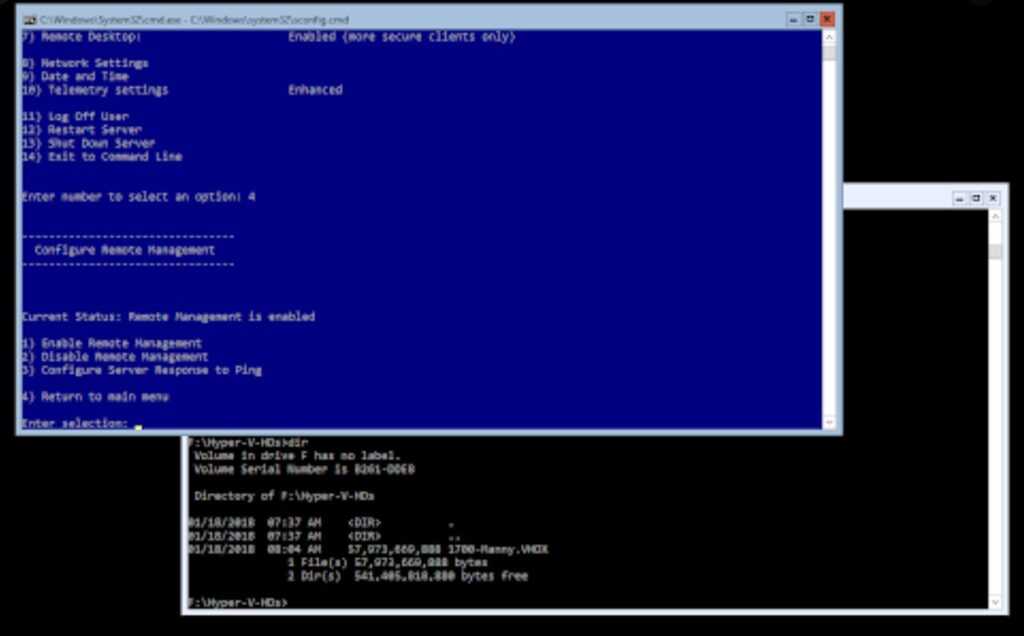
The following method is for Windows users only, more specifically for those who have Server 2012 R2 edition. You can redirect a USB dongle or other local devices to a Hyper-V or VMware workstation VM via the Microsoft Hyper-V Client. To do that, you’ll have to change some group policy settings on your host to grant remote users access to USB device redirection and then allow redirection of PnP devices on the VM.
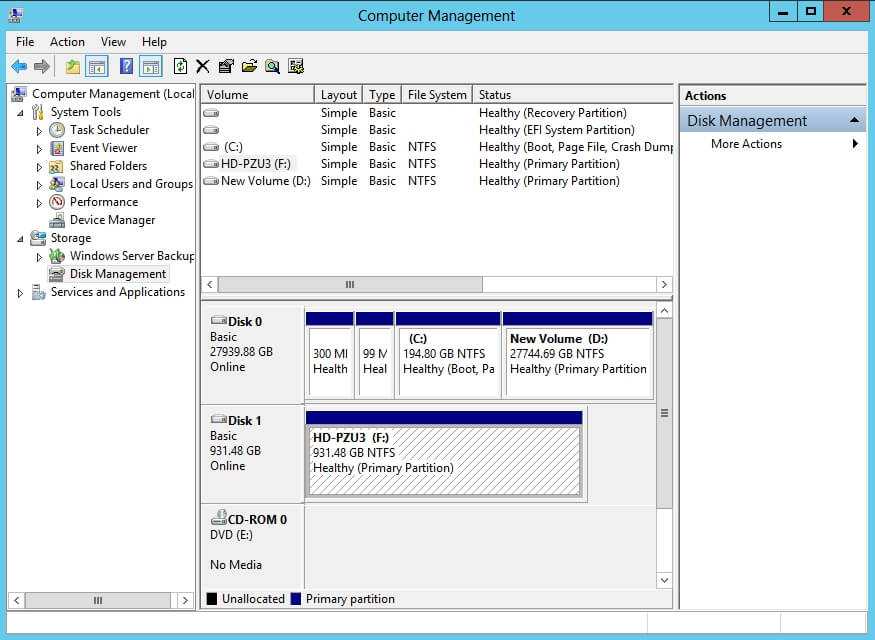
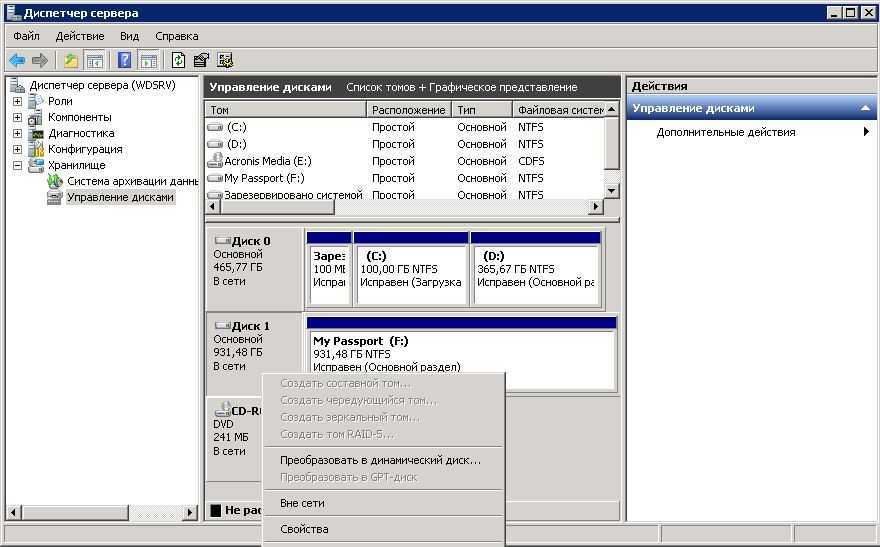
Or you can try server-side Hyper-V USB Passthrough to share USB over Ethernet. This works for local USB storage devices only, but it is definitely worth trying if that’s your case. First, you disconnect the device from your host system, then go to your VM’s Disk Management Console, look for a new device there, and assign it a disk volume letter.
Bottom Line
So, does Hyper-V support USB devices? As we have demonstrated, the answer is yes. You can enable USB support in a few different ways, but we believe using the USB Network Gate USB redirector application is the easiest and most effective solution. It will save time when compared to using Hyper-V enhanced session mode and any other solution.
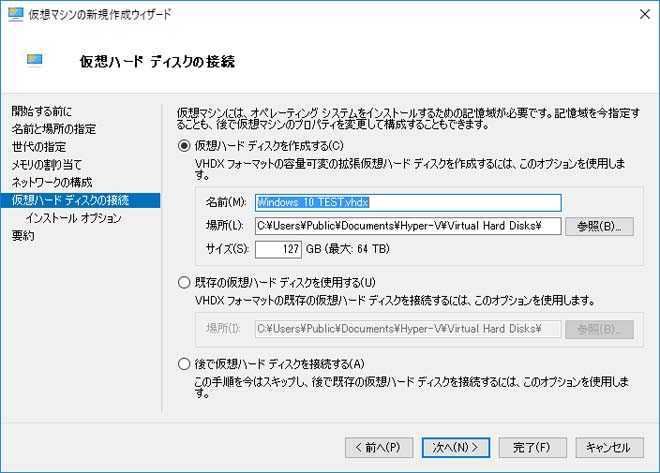
How to Add Hyper-V Passthrough Support for USB Drives
Hyper-V can set up most USB disk drives in passthrough mode, but it does so via Windows’ storage subsystem. As I said in the opening paragraph, only one component can communicate with a USB device, so the Windows disk subsystem brokers I/O for all USB storage devices. For this reason, Windows must identify your USB drive as a “Mass Storage Device” in order for it to connect in passthrough mode. Other USB storage devices will not work.
I would like to reiterate that I am fundamentally opposed to permanently mounting any disk in passthrough mode. However, this is a how-to article, so I will show you how to. If you have problems, expect all responses from me to be, “I told you so”. I do not have any USB drives to test this with, so my screenshots will not line up well, unfortunately.
-
Ensure that the disk is visible in Disk Management. Take it Offline. If the Offline option is not available, the disk cannot be used as a passthrough.
-
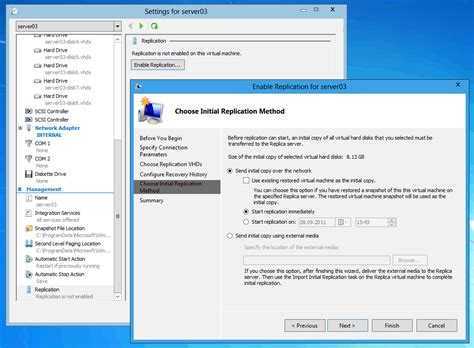
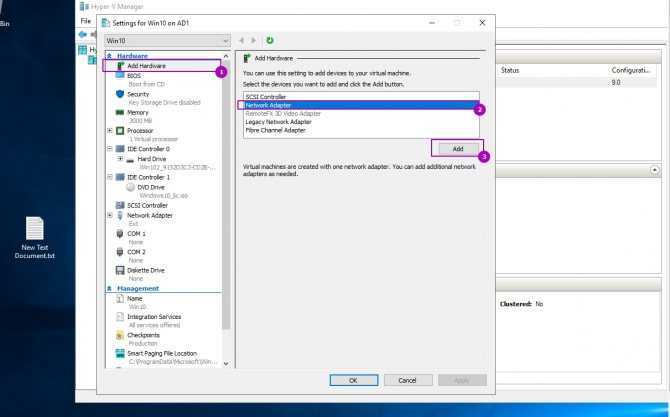
In the target virtual machine’s properties dialog, click the virtual controller where you want to add your passthrough disk. Make sure that Hard Drive is selected on the right and click Add. Remember that you cannot add any drive to a virtual IDE controller while the virtual machine is turned on, but you can add a drive to a virtual SCSI controller if the VM is off or on.
-
Change the selection dot to Physical Hard Disk and then select the drive to attach from the drop-down. Click OK.
Method 1: Network-Based USB Solutions
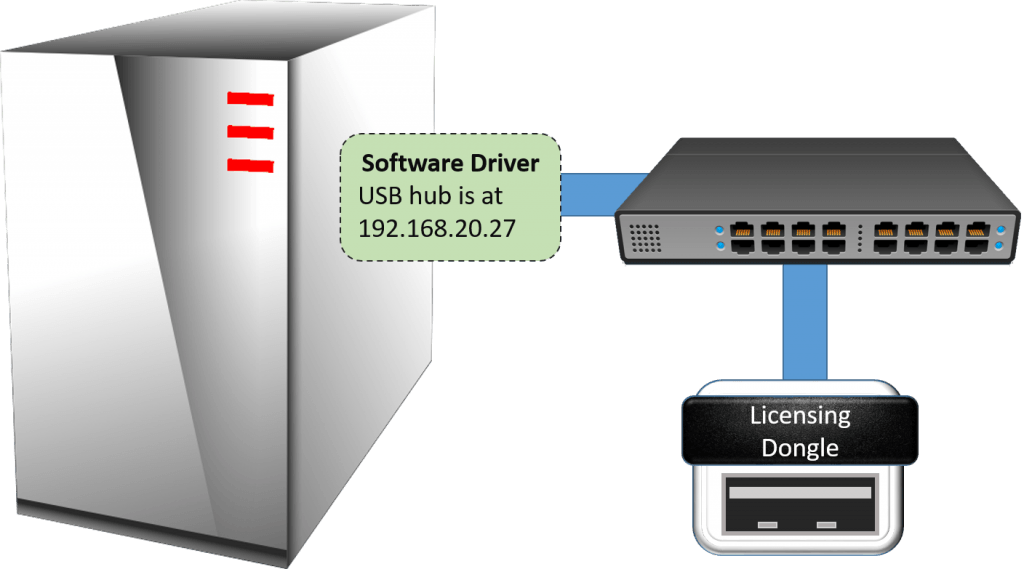
If you need to make a USB device available in your virtualized datacenter, I prefer network-based solutions. Years ago, I used a product sold by Digi. This is not an endorsement per se because I only ever used the one device and have not used any of their current technology, but they’re still around so they must be doing something right. Remember that USB hubs, not ports, match up with operating systems at a one-to-one ratio. Don’t buy a single device with a lot of ports and expect to connect lots of virtual machines.
Pros of network-based USB hubs:
- Can remain connected to their assigned virtual machine no matter where it moves and whether or not anyone is logged in, provided network connectivity remains constant
- Allows for concentration and management of networked USB devices in administrator-defined locations. For instance, you might purchase a rack shelf and use it to hold all of your network USB hubs, all connected to a switch provisioned just for connecting those devices.
- A perfect solution for nuisance devices such as licensing dongles.
- Widest range of host and guest operating system support.
Cons of network-based USB hubs:
- A 1-to-1 ratio of hubs to virtual machines often means purchasing many empty USB slots
- Gigabit Ethernet is much slower than USB 3+
- Unless your wiring, addressing, routing, and firewall infrastructure allows for it, you may not be able to provide physical device access to end-users
- Drivers for the network-connected USB hub must be available for your guest operating system, as well as for the USB devices plugged into it
- The guest must be connected to the network (could be a limiting factor for VMs that you wish to be isolated)
What I want to make most clear with this technique is that the virtual machine connects to the USB hub via TCP/IP. Hyper-V has no part in it beyond providing fundamental network connectivity via the virtual switch.
Hyper-V USB passthrough in 3 clicks
USB over Network (aka USB Network Gate) is a USB redirector software tool that provides an easy way for Hyper-V USB dongles passthrough, USB drive redirection, and using a USB hub and other devices in Hyper-V or VMware ESX. This specialized communication app enables you to attach USB devices in Hyper-V by sharing a USB over the network.
USB Network Gate is a client-server solution, meaning that its server-side gives access to USB devices to other computers on the network or to Virtual Machines, and the client-side allows using them as local resources. You can use any computer connected to the network as a server.


Here’s how to access USB in Hyper-V by employing USB Network Gate. This solution requires just a few easy steps to implement a Hyper-V USB device passthrough to a Hyper-V or VMware workstation via RDP. And you won’t have to buy any other extra gadgets, apps, or wires.
Here is what you need to do:
- Install USB_Network_Gate.exe on the host and guest operating systems.
- Use the app to share a device physically attached to the host over Ethernet.
- On the VM, locate the shared peripheral in the application and click ‘Connect.’
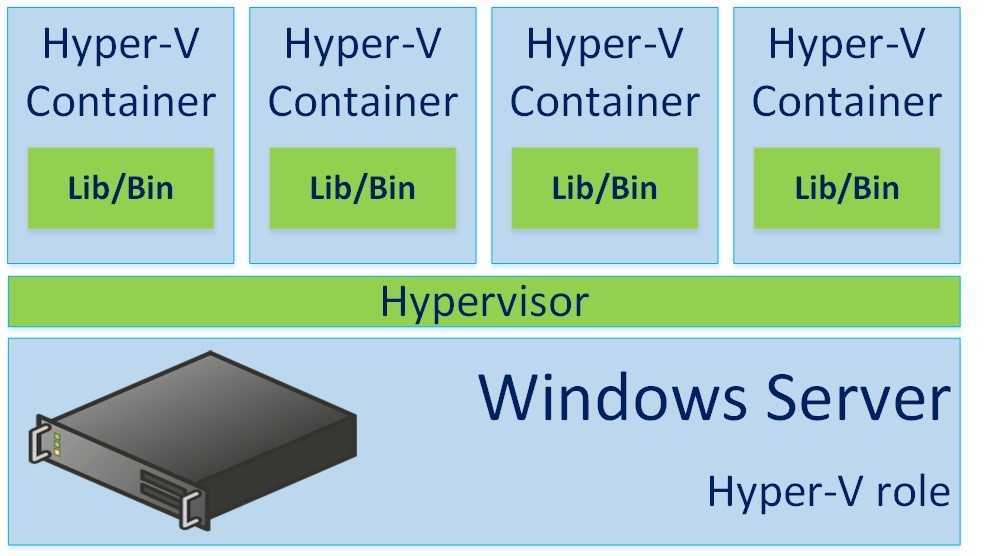
Типы гипервизоров
Существует два типа гипервизоров. Гипервизоры первого типа запускаются непосредственно на «железе» и не требуют установки какой-либо операционной системы. Для работы монитора виртуальных машин второго типа нужна операционная система — через нее производится доступ к аппаратной части. Лучшим гипервизором считается тот, что относится к первому типу, т. к. его производительность выше, поскольку они работают напрямую с оборудованием.
Рис. 1. Принцип работы гипервизора 1-го типа
Рис. 2. Принцип работы гипервизора 2-го типа
Примеры гипервизоров 1-го типа: Hyper-V, KVM, ESXi. Гипервизоры 2-го типа: VMware Workstation, Oracle Virtual Box, OpenVZ. Нас интересуют только системы виртуализации первого типа, так как вторые больше подходят для индивидуального использования, чем в качестве решений уровня предприятия.
Отметим, что Hyper-V и WMware — это проприетарные решения, поэтому мы подготовили обзор и сравнение гипервизоров этих моделей. Мы также поговорим и о решении с открытым исходным кодом — KVM. Многие предприятия выбирают именно его, не смотря, что некоторые независимые эксперты считают это решение довольно сырым и непригодным на корпоративной кухне. Однако, согласно отчету IT Central Station за январь 2018 года, 25% операторов связи и 11% финансовых организаций считают именно KVM лучшим гипервизором. Так что при рассуждениях о том, какой гипервизор выбрать, это решение исключать нельзя.
Рис. 3. Немного статистики от IT Central Station
Сначала мы рассмотрим проприетарные решения, а затем попытаемся выяснить, стоит ли использовать KVM.
How to enable USB device in Hyper-V with the Enhanced Session Mode
The Enhanced Session Mode makes it possible to redirect USB device to Hyper-V on Windows 10 and 8.1 (available by default), Windows Server 2012 R2 and Windows Server 2016 (can be enabled manually). This mode allows you to forward local resources to your Hyper-V VM using the Virtual Machine Connection tool. What’s important is that this method requires only the host computer to be connected to the network and doesn’t need network connectivity to the guest OS.
Here’s how it works:
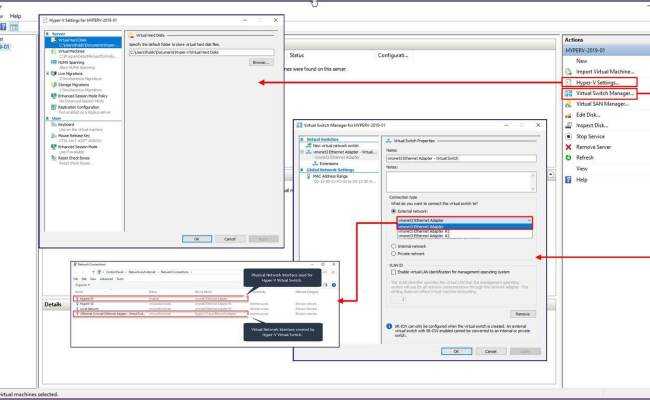
- On a host computer, you go to the Hyper-V Manager, right-click the name of the host and choose Hyper-V Settings.
- In the Setting window, you will see the Server and User sections. Select Enhanced Session Mode Policy in the Server section and allow the enhanced session mode by checking the corresponding box.
- Now, choose “Enhanced Session Mode” in the User section and check the “Use enhanced session mode” box.
- Click OK and the changes will be saved.
What you should do next is select a local resource to connect to. These can be printers, smart cards, USB drives, etc.
To allow Hyper-V access to attached USB devices, take the following steps:
- Start the Hyper-V Manager and double-click the name of your virtual machine.
- In the pop-up window, click “Show Options” to configure your VM’s future connections.
- After that, go to the tab “Local resources” and click “More” in the section “Local devices and resources”.
- Then, check the boxes “Other supported Plug and Play devices” and “Devices that I plug in later”. Hit OK.
- If you want this configuration to be saved for all future connections, check the corresponding box in the “Display” tab. Click “Connect” to implement the changes.
Информация к размышлению
Вместо скучной таблички с итогами (при желании вы сами можете составить такую) приведем несколько дополнительных тезисов, которые помогут вам определиться с тем, какой гипервизор выбрать. Так сказать, пища для ума или информация к размышлению:
VMware — самое дорогое решение, Hyper-V — дешевле (или при использовании Hyper-V Server и виртуальных машин с Linux — вообще бесплатное), KVM — изначально бесплатное.
Подсчитывая стоимость системы виртуализации, нужно учитывать еще и стоимость лицензий программного обеспечения, которое будет установлено в виртуальных машинах. Именно поэтому Hyper-V значительно дешевле VMware — при использовании VMware вам все равно придется покупать лицензии на гостевые ОС.
Hyper-V значительно дешевле и производительнее в гиперконвергентных решениях.
Таблица 1 — сугубо информативная, большинство пользователей не столкнется с этими ограничениями и ее не нужно учитывать, выбирая лучший гипервизор. Самое жесткое ограничение — у свободной версии ESXi.
У VMware есть Fault Tolerance, у Microsoft — пока нет
Если это для вас важно, задумайтесь над VMware.
У VMware лучше VDI, но у Microsoft организация VDI будет дешевле.
Hyper-V менее требовательный к «железу».
Хранилище для Hyper-V дешевле, поскольку VMware тесно связан по рукам и ногам HCL, а Hyper-V может использовать любой SMB 3.0 ресурс для хранения.
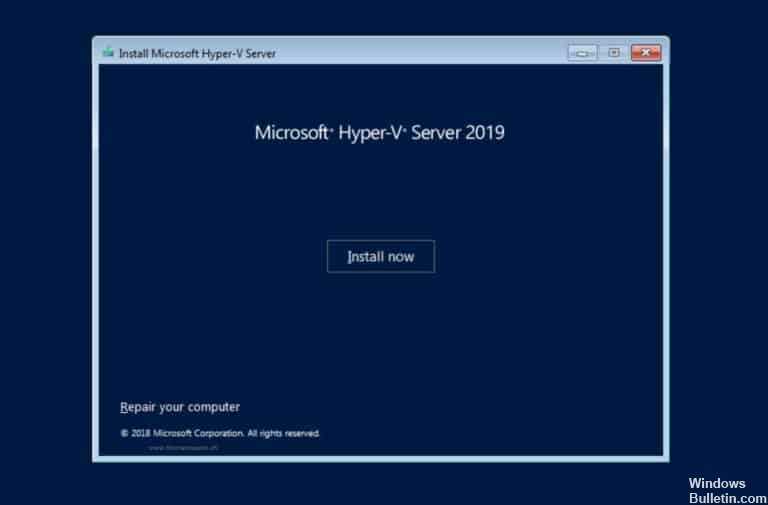
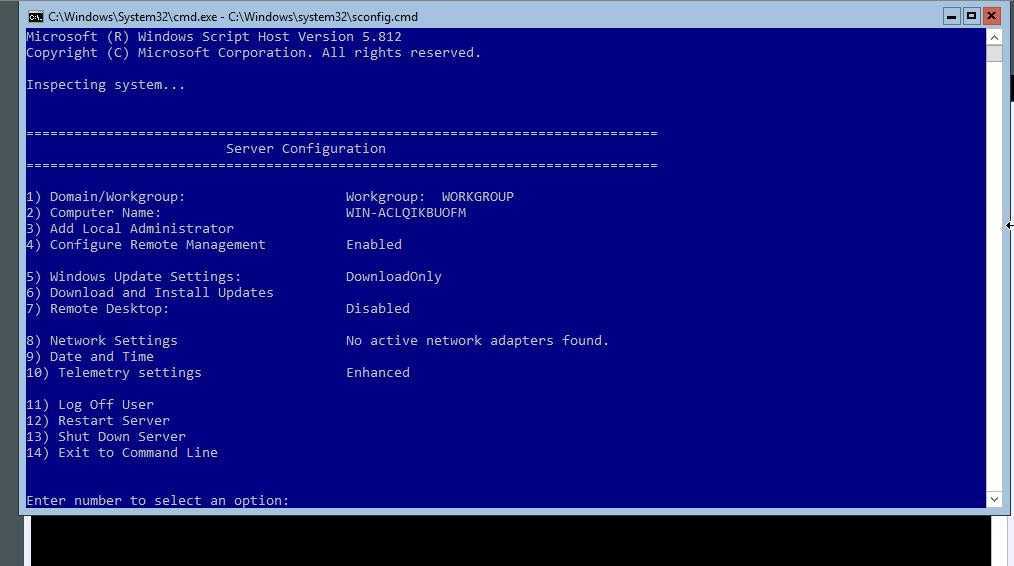
Hyper-V Server — это программное решение Hyper-V, поставляемое с Core-версией Windows без графического интерфейса. Ограничений в нем никаких нет (в отличие от бесплатной версии VMware), вы можете включить его в домен, управлять ею с помощью System Center, бэкапить и т
д. (в отличие от бесплатной vSphere).
В Hyper-V нет средств вроде Distributed Resource Scheduler или же Storage DRS, которые в VMware используются для балансировки нагрузок между ресурсами хостов
SCVMM в Hyper-V открывает возможности, выходящие за рамки простой серверной виртуализации. Вы можете создавать частные облака.
KVM — самое неприхотливое к ресурсам программное обеспечение. Это нужно учитывать при разработке бюджетных решений виртуализацией.
Для KVM можно также использовать интерфейс управления Virsh и GUI-интерфейс virtmanager.
Службы поддержки у KVM нет. Если что-то не получается, вы можете рассчитывать только на сообщество. Впрочем, поддержки нет и у бесплатного Hyper-V Server.
Существует коммерческий вариант KVM — RHEV (Red Hat Enterprise Virtualization).
Надеемся, приведенной информации будет достаточно для выбора оптимального для вас решения. Помните, что выбирать лучший гипервизор нужно не только исходя из сухих цифр, а отталкиваться нужно от требований вашего бизнеса.
Популярные услуги
SAP-хостинг
Профессиональный SAP-хостинг – это быстрый доступ к необходимому массиву данных и аналитика в режиме реального времени. Он подходит для развертывания системы управлениями базами SAP HANA и прочих высоконагруженных программ.
FreeBSD server
FreeBSD server считается одной из самых стабильных систем, поэтому многие администраторы предпочитают использовать её для управления сервером. У нас клиенты смогут арендовать VDS или VPN хостинг с этой системой. После получения хостинга пользователь сможет настроить VPN server и установить любые программные продукты, совместимые с выбранной ОС.
Публичное облако на базе VMware
Публичное облако на базе VMware позволяет быстро расширить ИТ-инфраструктуру без значительных вложений в модернизацию оборудования.
How to access USB from Hyper-V over a Remote Desktop Connection
In order to connect a USB device within a remote desktop session to VM Hyper-V, just take the following steps:
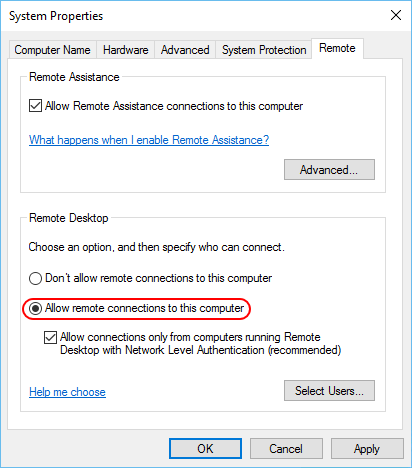
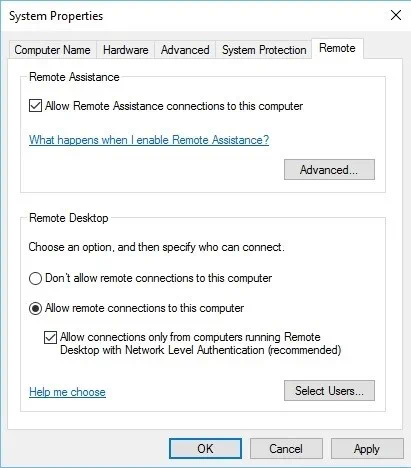
- To begin, you should allow Remote Desktop Connections on your guest system. To do this, connect to your virtual machine and find “System and Security” settings in the Control Panel. Select “Allow remote access”.
- You will see the System Properties window. In the “Remote” tab, check the “Allow remote assistance connections to this computer” box. Also, make sure that the “Allow remote connections to this computer” option is selected. Hit OK.
- Now, if you want to access a Hyper-V USB device, you should initiate a Remote Desktop session.
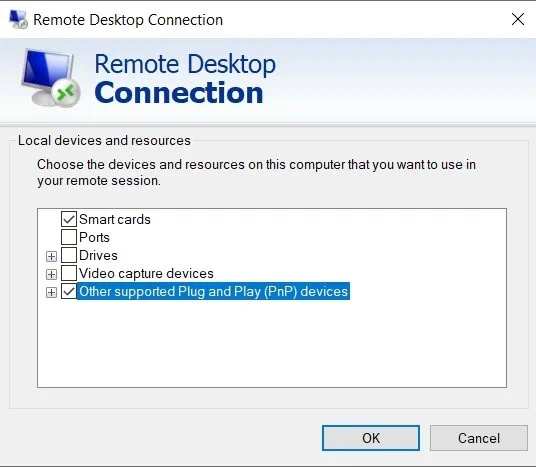
- To do this, execute the mstsc.exe command, click “Show options” in the Remote Desktop Connection window and go to the “Local Resources” tab. Click “More” in the section “Local devices and resources”.
- Check the “Other supported plug-and-play devices” box in the menu that will open. Hit OK.
- Click “Connect” to start your Remote Desktop session.
Method 2: Remote Desktop Protocol
Once a virtual machine has an operating system installed, it behaves very much like a physical machine. So, you can enable remote desktop connections in the System properties window:
Enable RDP
Once that’s done, you can connect to it remotely just as you would any other Windows system.
To allow USB devices in an RDP session:
- Run mstsc.exe at a Run/command prompt.
-
Click Show Options:
-
The dialog box will expand, exposing a number of tabs. Switch to the Local Resources tab and click the More button:
-
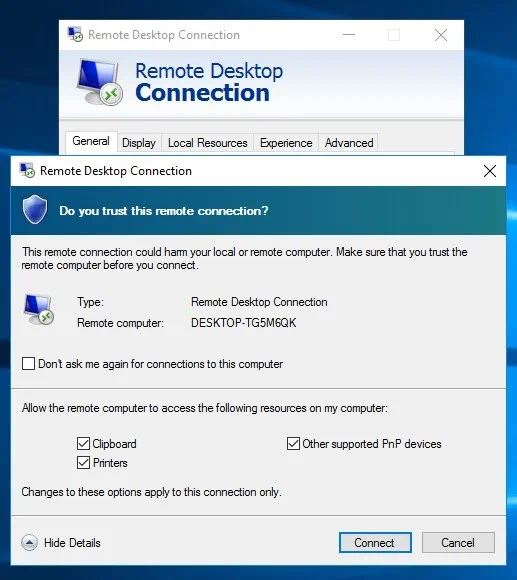
Another dialog will appear. Other devices that it detects will appear here, as will a checkbox for Other supported Plug and Play (PnP) devices. Check items as necessary.
Once you click OK and connect to an RDP session on any host, these options will be retained until you change them. There’s also a nifty tool called “Remote Desktop Connection Manager“. It’s kind of buggy and unstable, but its ability to retain many unique connection settings for remote hosts in a hierarchical tree makes it well worth the minor difficulties.
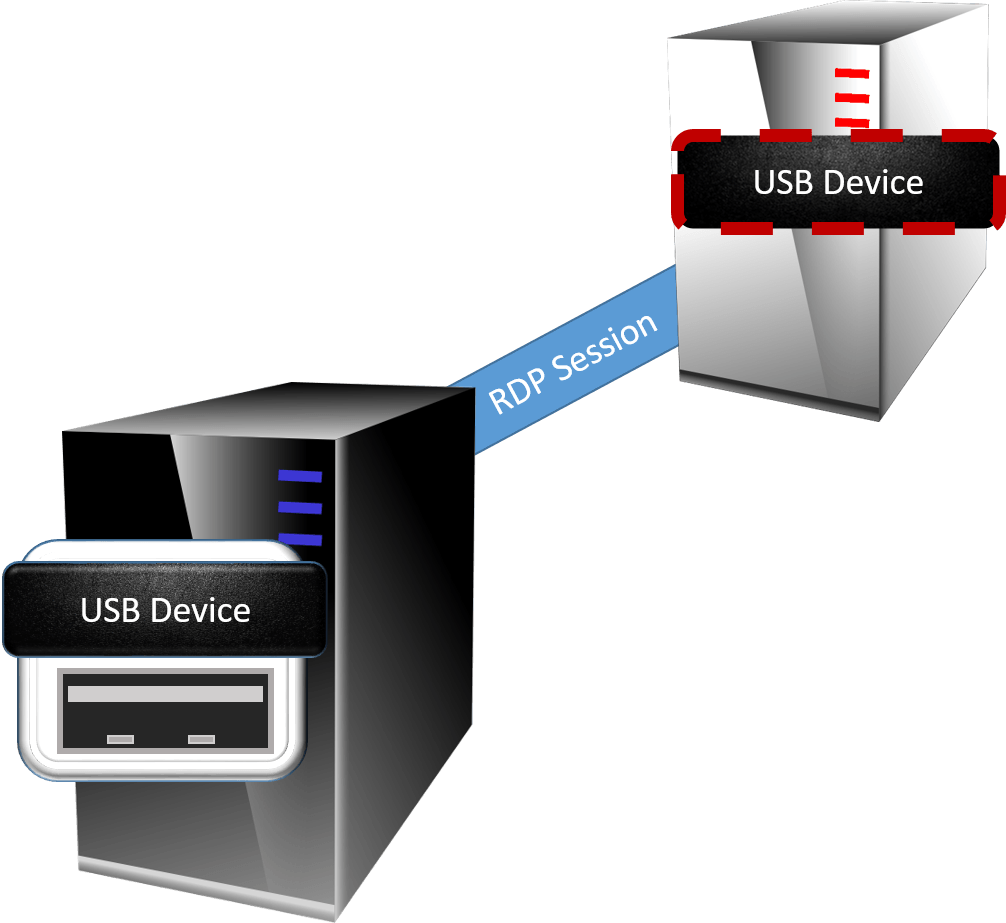
USB Over RDP
Pros of RDP-based USB connectivity:
- Completely hypervisor independent.
- Automatically works when RDP connectivity is enabled
- Can be controlled and limited by group policy
- Any user with a USB device attached to his or her desktop with RDP access to the virtual machine can use that device within the virtual machine
Cons of RDP-based USB Connectivity:
- The device is only connected as long as the RDP session is connected
- Drivers may need to be installed in the target virtual machine
- This feature was originally designed with printers in mind; may not work with all devices
- Connection speeds are commonly very slow
- Because RDP is a requirement, only Windows operating systems are supported
- You must have network connectivity between the system that is physically hosting the USB device and the guest operating system; TCP port 3389 must be opened on any firewalls
The best purpose for USB over RDP is for connecting devices from end-user computers. It’s not functionally different from the way that we’ve been connecting devices in remote sessions (usually Terminal Services) sessions for a very long time.
Hyper-V USB Passthrough with Remote Desktop Connection
To perform Hyper-V USB passthrough with Remote Desktop Connection, you should do the following:
1. Start by enabling remote desktop connections on your VM. For this purpose, connect to the VM and open Remote System Settings in the Control Panel (Control Panel> System and Security> Allow remote access).
2. The System Properties menu will open. Check the Allow Remote Assistance connections to this computer Ensure that the Allow remote connections to this computer box is also checked. Click OK.
3. Now, we can connect to this machine remotely. Connect to a USB device through enabling a RDP session.
4. Run the mstsc.exe command to open the Remote Desktop Connection window. Click Show Options, select the Local Resources tab and press the More button.

5. In the new menu that opens, you can choose which devices and resources on this computer you wish to use in a remote session. USB devices fall under the Plug and Play devices category. Check the corresponding box and click OK.
6. Lastly, click Connect to initiate a RDP session. Here, you will be asked to confirm your selection once again. Click Connect if everything is OK and you trust the remote computer.
Note that this approach requires network connectivity between the computer to which a USB device is connected and the guest OS.


