
Redirected Memory Access – RDMA
In general, RDMA can be explained by its Wikipedia entry.
Source: https://en.wikipedia.org/wiki/Remote_direct_memory_access
But how does it work?
Let me try to explain it with the following drawing:
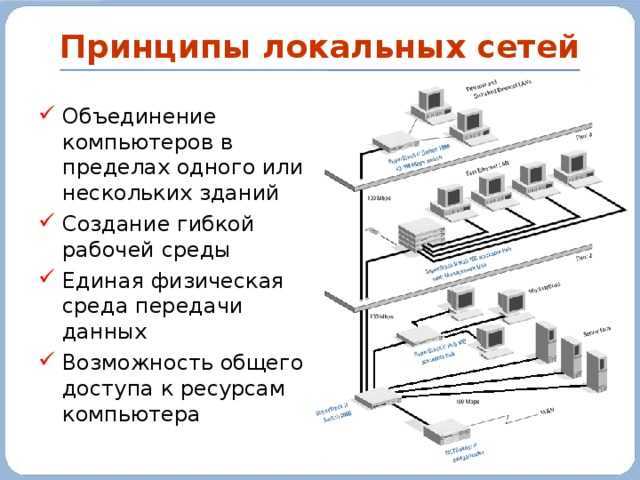
An application able to use RDMA running on Server#1, the Initiator, can directly transfer its data into the RDMA NIC Buffer. Afterwards, the RDMA NIC transfers the data to the RDMA NIC Buffer from Server #2, the target. From there, the data is directly sent to the Buffer of the Application running on Server #2. No CPU Buffer, Transport Protocol Buffer or Driver Buffer is used in between thus avoiding regulations or limitations that may be contained within those layers.
Почему вложенная устойчивость
Тома, использующие вложенную устойчивость, могут оставаться в сети и быть доступными даже в случае возникновения нескольких аппаратных сбоев в то же время, в отличие от классической двусторонней зеркальной копии . Например, если два диска в одно и то же время выйдут из строя или если сервер выйдет из строя и произойдет сбой диска, тома, использующие вложенную устойчивость, остаются в сети и доступны. Для инфраструктуры с технологией Hyper-in это увеличивает время бесперебойной работы приложений и виртуальных машин. для рабочих нагрузок файловых серверов это означает, что пользователи получают доступ к файлам без перерывов.
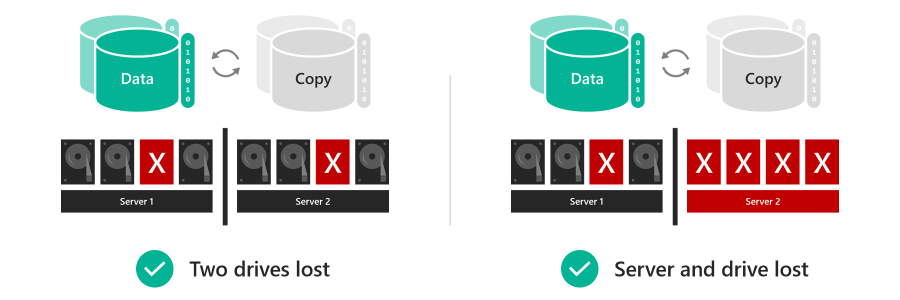
Компромисс заключается в том, что вложенная устойчивость имеет меньшую эффективность, чем классическая двусторонняя зеркальная копия, что означает, что вы получаете немного меньше свободного места. Дополнительные сведения см. в разделе ниже.
Cache behavior is set automatically
The behavior of the cache is determined automatically based on the type(s) of drives that are being cached for. When caching for solid-state drives (such as NVMe caching for SSDs), only writes are cached. When caching for hard disk drives (such as SSDs caching for HDDs), both reads and writes are cached.
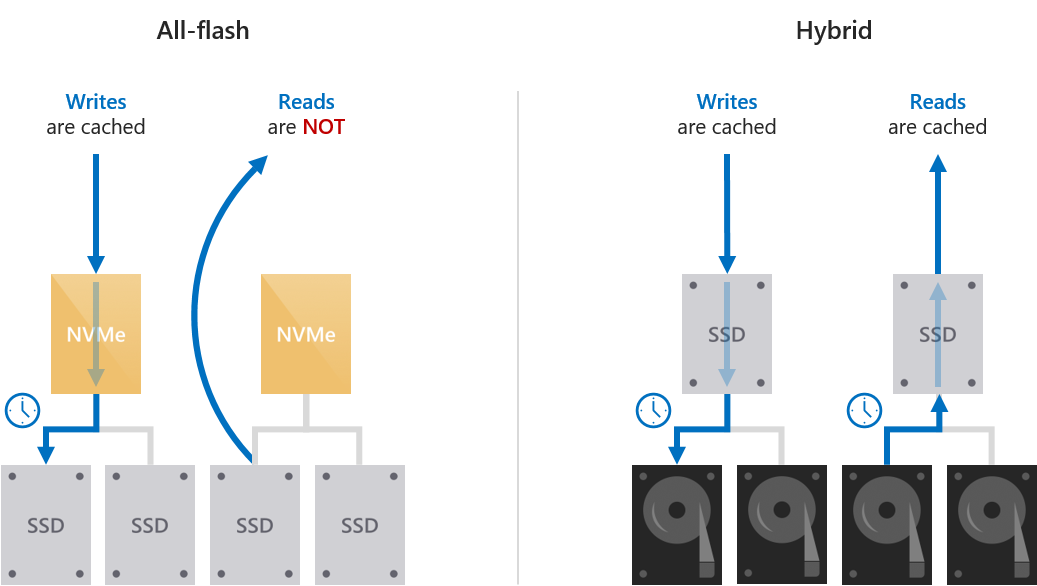
Write-only caching for all-flash deployments
When caching for solid-state drives (NVMe or SSDs), only writes are cached. This reduces wear on the capacity drives because many writes and re-writes can coalesce in the cache and then de-stage only as needed, reducing the cumulative traffic to the capacity drives and extending their lifetime. For this reason, we recommend selecting higher-endurance, write-optimized drives for the cache. The capacity drives may reasonably have lower write endurance.
Because reads do not significantly affect the lifespan of flash, and because solid-state drives universally offer low read latency, reads are not cached: they are served directly from the capacity drives (except when the data was written so recently that it has not yet been de-staged). This allows the cache to be dedicated entirely to writes, maximizing its effectiveness.
This results in write characteristics, such as write latency, being dictated by the cache drives, while read characteristics are dictated by the capacity drives. Both are consistent, predictable, and uniform.
Read/write caching for hybrid deployments
When caching for hard disk drives (HDDs), both reads and writes are cached, to provide flash-like latency (often ~10x better) for both. The read cache stores recently and frequently read data for fast access and to minimize random traffic to the HDDs. (Because of seek and rotational delays, the latency and lost time incurred by random access to an HDD is significant.) Writes are cached to absorb bursts and, as before, to coalesce writes and re-writes and minimize the cumulative traffic to the capacity drives.
Storage Spaces Direct implements an algorithm that de-randomizes writes before de-staging them, to emulate an IO pattern to disk that seems sequential even when the actual IO coming from the workload (such as virtual machines) is random. This maximizes the IOPS and throughput to the HDDs.
Caching in deployments with drives of all three types
When drives of all three types are present, the NVMe drives provides caching for both the SSDs and the HDDs. The behavior is as described above: only writes are cached for the SSDs, and both reads and writes are cached for the HDDs. The burden of caching for the HDDs is distributed evenly among the cache drives.
Choosing the size of volumes
We recommend limiting the size of each volume to:
| Windows Server 2016 | Windows Server 2019 |
|---|---|
| Up to 32 TB | Up to 64 TB |
Tip
If you use a backup solution that relies on the Volume Shadow Copy service (VSS) and the Volsnap software provider—as is common with file server workloads—limiting the volume size to 10 TB will improve performance and reliability. Backup solutions that use the newer Hyper-V RCT API and/or ReFS block cloning and/or the native SQL backup APIs perform well up to 32 TB and beyond.
Footprint
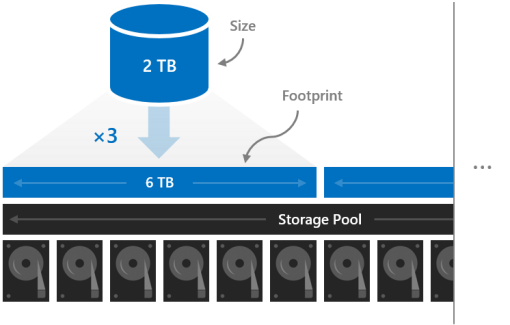
The size of a volume refers to its usable capacity, the amount of data it can store. This is provided by the -Size parameter of the New-Volume cmdlet and then appears in the Size property when you run the Get-Volume cmdlet.
Size is distinct from volume’s footprint, the total physical storage capacity it occupies on the storage pool. The footprint depends on its resiliency type. For example, volumes that use three-way mirroring have a footprint three times their size.
The footprints of your volumes need to fit in the storage pool.
Reserve capacity
Leaving some capacity in the storage pool unallocated gives volumes space to repair «in-place» after drives fail, improving data safety and performance. If there is sufficient capacity, an immediate, in-place, parallel repair can restore volumes to full resiliency even before the failed drives are replaced. This happens automatically.
We recommend reserving the equivalent of one capacity drive per server, up to 4 drives. You may reserve more at your discretion, but this minimum recommendation guarantees an immediate, in-place, parallel repair can succeed after the failure of any drive.

For example, if you have 2 servers and you are using 1 TB capacity drives, set aside 2 x 1 = 2 TB of the pool as reserve. If you have 3 servers and 1 TB capacity drives, set aside 3 x 1 = 3 TB as reserve. If you have 4 or more servers and 1 TB capacity drives, set aside 4 x 1 = 4 TB as reserve.
Note
In clusters with drives of all three types (NVMe + SSD + HDD), we recommend reserving the equivalent of one SSD plus one HDD per server, up to 4 drives of each.
How it works
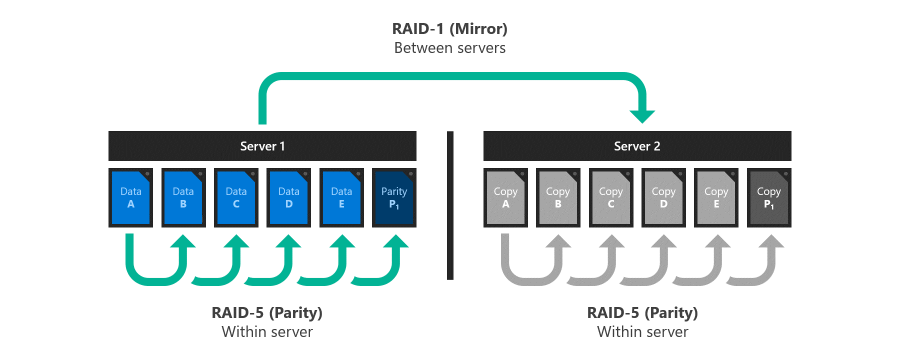
Inspiration: RAID 5+1
RAID 5+1 is an established form of distributed storage resiliency that provides helpful background for understanding nested resiliency. In RAID 5+1, within each server, local resiliency is provided by RAID-5, or single parity, to protect against the loss of any single drive. Then, further resiliency is provided by RAID-1, or two-way mirroring, between the two servers to protect against the loss of either server.

Two new resiliency options
Storage Spaces Direct in Windows Server 2019 offers two new resiliency options implemented in software, without the need for specialized RAID hardware:
-
Nested two-way mirror. Within each server, local resiliency is provided by two-way mirroring, and then further resiliency is provided by two-way mirroring between the two servers. It’s essentially a four-way mirror, with two copies in each server. Nested two-way mirroring provides uncompromising performance: writes go to all copies, and reads come from any copy.
-
Nested mirror-accelerated parity. Combine nested two-way mirroring, from above, with nested parity. Within each server, local resiliency for most data is provided by single , except new recent writes which use two-way mirroring. Then, further resiliency for all data is provided by two-way mirroring between the servers. For more information about how mirror-accelerated parity works, see Mirror-accelerated parity.
Capacity efficiency
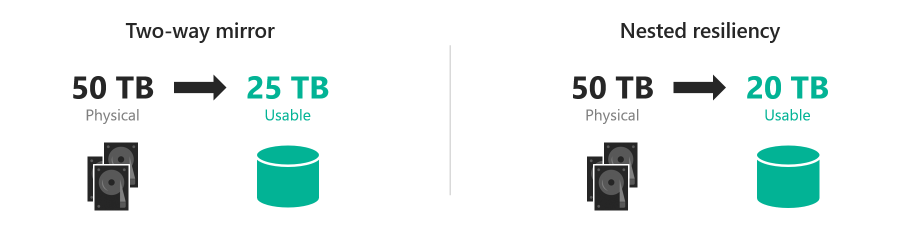
Capacity efficiency is the ratio of usable space to . It describes the capacity overhead attributable to resiliency, and depends on the resiliency option you choose. As a simple example, storing data without resiliency is 100% capacity efficient (1 TB of data takes up 1 TB of physical storage capacity), while two-way mirroring is 50% efficient (1 TB of data takes up 2 TB of physical storage capacity).
-
Nested two-way mirror writes four copies of everything, meaning to store 1 TB of data, you need 4 TB of physical storage capacity. Although its simplicity is appealing, nested two-way mirror’s capacity efficiency of 25% is the lowest of any resiliency option in Storage Spaces Direct.
-
Nested mirror-accelerated parity achieves higher capacity efficiency, around 35%-40%, that depends on two factors: the number of capacity drives in each server, and the mix of mirror and parity you specify for the volume. This table provides a lookup for common configurations:
Capacity drives per server 10% mirror 20% mirror 30% mirror 4 35.7% 34.1% 32.6% 5 37.7% 35.7% 33.9% 6 39.1% 36.8% 34.7% 7+ 40.0% 37.5% 35.3% Note
If you’re curious, here’s an example of the full math. Suppose we have six capacity drives in each of two servers, and we want to create one 100 GB volume comprised of 10 GB of mirror and 90 GB of parity. Server-local two-way mirror is 50.0% efficient, meaning the 10 GB of mirror data takes 20 GB to store on each server. Mirrored to both servers, its total footprint is 40 GB. Server-local single parity, in this case, is 5/6 = 83.3% efficient, meaning the 90 GB of parity data takes 108 GB to store on each server. Mirrored to both servers, its total footprint is 216 GB. The total footprint is thus [(10 GB / 50.0%) + (90 GB / 83.3%)] × 2 = 256 GB, for 39.1% overall capacity efficiency.
Notice that the capacity efficiency of classic two-way mirroring (about 50%) and nested mirror-accelerated parity (up to 40%) are not very different. Depending on your requirements, the slightly lower capacity efficiency may be well worth the significant increase in storage availability. You choose resiliency per-volume, so you can mix nested resiliency volumes and classic two-way mirror volumes within the same cluster.
Причины, по которым диски невозможно объединить в пул
Некоторые диски просто не готовы к работе в пуле носителей. Чтобы узнать, почему диск не подходит для объединения в пул, просмотрите свойство физического диска. Ниже приведен пример скрипта PowerShell для вывода свойства Каннотпулреасон:
Ниже представлен пример результата.
В следующей таблице подробно описаны все причины.
| Причина | Описание |
|---|---|
| В пуле | Диск уже принадлежит пулу носителей. Диски могут принадлежать только одному пулу носителей за раз. чтобы использовать этот диск в другом пуле носителей, сначала удалите его из существующего пула, что говорит о том, дисковые пространства переместить данные на диск на другие диски в пуле. или сбросьте диск, если диск был отключен от пула без уведомления дисковые пространства. чтобы безопасно удалить диск из пула носителей, используйте команду remove-physical или перейдите в диспетчер сервера > файловых служб и служба хранилища Services > служба хранилища пулах, > физических дисках, щелкните правой кнопкой мыши диск и выберите пункт удалить диск.Чтобы сбросить диск, используйте Reset-физический диск. |
| Неработоспособен | Диск находится в неработоспособном состоянии, его может потребоваться заменить. |
| Съемные носители | Диск классифицируется как съемный. дисковые пространства не поддерживает носители, распознаваемые Windows как съемные, например диски Blu-Ray. хотя многие жесткие диски находятся в съемных слотах, в общем случае носители, которые классифицируются Windows как съемные, не подходят для использования с дисковые пространства. |
| Используется кластером | Диск в настоящее время используется отказоустойчивым кластером. |
| Вне сети | Диск находится в автономном режиме. Чтобы перевести все автономные диски в оперативный режим и задать для чтения и записи, откройте сеанс PowerShell от имени администратора и используйте следующие скрипты: |
| Недостаточная емкость | Обычно это происходит, когда секции занимают свободное место на диске. Действие: удалите все тома на диске, удалив все данные на диске. Одним из способов сделать это является использование командлета PowerShell с открытым диском . |
| Выполняется проверка | проверяет, утвержден ли диск или встроенное по на диске для использования администратором сервера. |
| Сбой проверки | не удалось проверить, утвержден ли диск или встроенное по на диске для использования администратором сервера. |
| Несоответствие встроенного ПО | встроенное по на физическом диске не входит в список утвержденных версий встроенного по, указанных администратором сервера с помощью . |
| Несоответствие оборудования | этот диск не входит в список утвержденных моделей хранения, указанных администратором сервера, с помощью . |
Перед началом работы
ознакомьтесь с дисковые пространства прямыми требованиями к оборудованию и считывает этот документ, чтобы ознакомиться с общим подходом и важными примечаниями, связанными с некоторыми шагами.
Соберите следующие сведения:
Вариант развертывания. дисковые пространства Direct поддерживает с объединением, также известное как агрегированное. Ознакомьтесь с преимуществами каждого из них, чтобы решить, что вам подходит. Шаги 1-3 ниже применимы к обоим вариантам развертывания. Шаг 4 необходим только для согласованного развертывания.
Имена серверов. Ознакомьтесь с политиками именования в Организации для компьютеров, файлов, путей и других ресурсов. Необходимо подготавливать несколько серверов, каждый из которых имеет уникальные имена.
Доменное имя. Ознакомьтесь с политиками организации по именованию доменов и присоединению к домену. Вы присоедините серверы к домену, и вам потребуется указать имя домена.
Сеть RDMA. Существует два типа протоколов RDMA: iWarp и Роце
Обратите внимание, какой из них использует сетевые адаптеры, и если Роце, также обратите внимание на версию (v1 или v2). Для Роце также обратите внимание на модель коммутатора верхнего уровня.
ИД ВИРТУАЛЬНОЙ ЛС
Запишите идентификатор виртуальной ЛС, который будет использоваться для сетевых адаптеров ОС управления на серверах, если таковые имеются. Его можно получить у администратора сети.
Ресурсы виртуального диска не находятся в состоянии избыточности
узлы дисковые пространства непосредственного перезапуска системы непредвиденно вызваны сбоем или сбоем питания. Затем один или несколько виртуальных дисков могут не перейти в режим «в сети», и вы увидите описание «недостаточно сведений о избыточности».
| FriendlyName | ресилиенцисеттингнаме | OperationalStatus | HealthStatus | исмануалаттач | Размер | PSComputerName |
|---|---|---|---|---|---|---|
| Диск 4 | Зеркальное отображение | ОК | Работоспособно | True | 10 ТБ | Node-01. Конто… |
| Диск 3 | Зеркальное отображение | ОК | Работоспособно | True | 10 ТБ | Node-01. Конто… |
| Диск 2 | Зеркальное отображение | Без избыточности | Unhealthy | True | 10 ТБ | Node-01. Конто… |
| Диск 1 | Зеркальное отображение | {Отсутствие избыточности, необслуживание} | Unhealthy | True | 10 ТБ | Node-01. Конто… |
Кроме того, после попытки перевести виртуальный диск в оперативный режим в журнал кластера (Дискрековеряктион) заносится следующая информация.
В случае сбоя диска или невозможности доступа системы к данным на виртуальном диске может произойти состояние «нет работоспособности «. Эта проблема может возникать, если на узле во время обслуживания узлов происходит перезагрузка.
Чтобы устранить эту проблему, выполните следующие действия.
-
Удалите затронутые виртуальные диски из CSV-файла. Они поместит их в группу «Доступное хранилище» в кластере и отобразятся как ResourceType «физический диск».
-
на узле, владеющем доступной группой служба хранилища, выполните следующую команду на каждом диске, который не находится в состоянии избыточности. чтобы узнать, на каком узле находится группа Available служба хранилища, можно выполнить следующую команду.
-
Задайте действие восстановления диска, а затем запустите диски.
-
Должно автоматически запуститься восстановление. Дождитесь завершения восстановления. Он может перейти в приостановленное состояние и запустить его снова. Для отслеживания хода выполнения:
- Выполните команду Get-сторажежоб , чтобы отслеживать состояние восстановления и видеть, когда оно завершено.
- Выполните командлет Get-VirtualDisk и убедитесь, что пространство возвращает хеалсстатус работоспособное.
-
После завершения восстановления и работоспособности виртуальных дисков измените параметры виртуального диска обратно.
-
Переведите диски в автономный режим и снова подключитесь к сети, чтобы Дискрековеряктион вступили в силу:
-
Добавьте затронутые виртуальные диски обратно в CSV-файл.
Дискрековеряктион — это параметр переопределения, который позволяет подключить объем дискового пространства в режиме чтения и записи без проверок. Свойство позволяет выполнять диагностику, почему том не поступает в оперативный режим. Он очень похож на режим обслуживания, но его можно вызвать для ресурса в неисправном состоянии. Он также позволяет получить доступ к данным, которые могут быть полезны в таких ситуациях, как «без избыточности», где можно получить доступ к любым данным и скопировать их. Свойство Дискрековеряктион было добавлено в 22 февраля 2018, обновление, KB 4077525.

Usage in PowerShell
You can use familiar storage cmdlets in PowerShell to create volumes with nested resiliency.
Step 1: Create storage tier templates
Windows Server 2019 requires you to create new storage tier templates using the cmdlet before creating volumes. You only need to do this once, and then every new volume you create can reference these templates.
Note
If you’re running Windows Server 2022, Azure Stack HCI 21H2, or Azure Stack HCI 20H2, you can skip this step.
Specify the of your capacity drives and, optionally, the of your choice. Do not modify the other parameters.
If your capacity drives are hard disk drives (HDD), launch PowerShell as Administrator and run:
If your capacity drives are solid-state drives (SSD), set the to instead and change the to . Do not modify the other parameters.
Tip
Verify the tiers created successfully with .
Step 2: Create volumes
Then, create new volumes using the cmdlet.
Nested two-way mirror
To use nested two-way mirror, reference the tier template and specify the size. For example:
If your capacity drives are solid-state drives (SSD), change to .
Nested mirror-accelerated parity
To use nested mirror-accelerated parity, reference both the and tier templates and specify two sizes, one for each part of the volume (mirror first, parity second). For example, to create one 500 GB volume that’s 20% nested two-way mirror and 80% nested parity, run:
If your capacity drives are solid-state drives (SSD), change to .
Step 3: Continue in Windows Admin Center
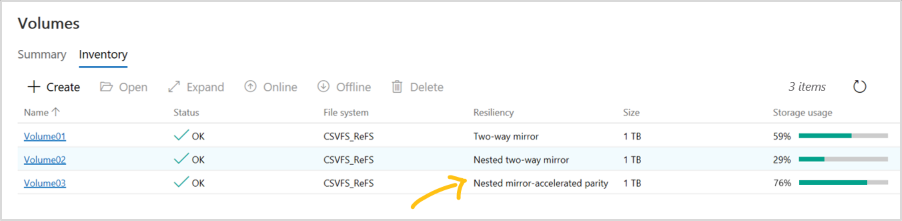
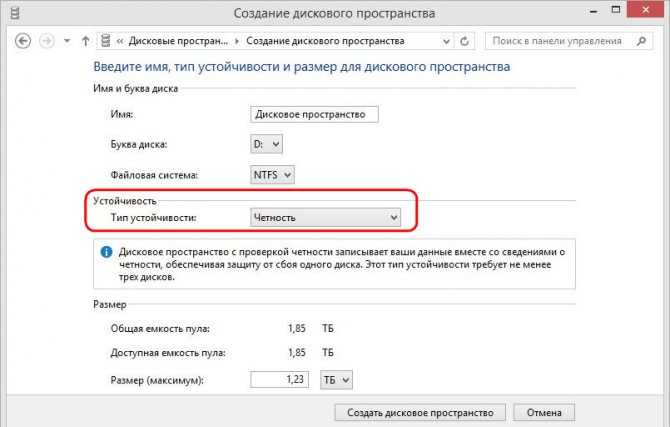
Volumes that use nested resiliency appear in Windows Admin Center with clear labeling, as in the screenshot below. Once they’re created, you can manage and monitor them using Windows Admin Center just like any other volume in Storage Spaces Direct.
Optional: Extend to cache drives
With its default settings, nested resiliency protects against the loss of multiple capacity drives at the same time, or one server and one capacity drive at the same time. To extend this protection to cache drives has an additional consideration: because cache drives often provide read and write caching for multiple capacity drives, the only way to ensure you can tolerate the loss of a cache drive when the other server is down is to simply not cache writes, but that impacts performance.
To address this scenario, Storage Spaces Direct offers the option to automatically disable write caching when one server in a two-server cluster is down, and then re-enable write caching once the server is back up. To allow routine restarts without performance impact, write caching isn’t disabled until the server has been down for 30 minutes. Once write caching is disabled, the contents of the write cache is written to capacity devices. After this, the server can tolerate a failed cache device in the online server, though reads from the cache might be delayed or fail if a cache device fails.
To set this behavior (optional), launch PowerShell as Administrator and run:
Once set to True, the cache behavior is:
| Situation | Cache behavior | Can tolerate cache drive loss? |
|---|---|---|
| Both servers up | Cache reads and writes, full performance | Yes |
| Server down, first 30 minutes | Cache reads and writes, full performance | No (temporarily) |
| After first 30 minutes | Cache reads only, performance impacted | Yes (after the cache has been written to capacity drives) |
Часто задаваемые вопросы
Можно ли использовать вложенную устойчивость с несколькими типами дисков емкости?
Да, просто укажите для каждого уровня соответствующий параметр на выше. Например, с NVMe, SSD и HDD в одном и том же кластере NVMe предоставляет кэш, тогда как две последние обеспечивают емкость: задайте уровень и уровень
Обратите внимание, что эффективность емкости четности зависит только от количества жестких дисков, и на каждом сервере требуется по крайней мере 4 из них
Сколько дисков требуется для использования вложенной устойчивости?
минимальное число дисков, необходимое для дисковые пространства Direct, — 4 емкости для каждого узла сервера, а также 2 кэша дисков на каждом узле сервера (при наличии). Это не изменилось с Windows Server 2016. Для вложенной устойчивости нет дополнительных требований, и рекомендации по резервированию емкости не меняются.
Изменилась ли вложенная устойчивость, как работает замена узлов серверов?
Нет. Чтобы заменить узел сервера и его диски, выполните следующий порядок:
- Снятие дисков с учета на исходящем сервере
- Добавление нового сервера с его дисками в кластер
- Пул носителей будет перераспределяться
- Удаление сервера исходящей почты и его дисков
Дополнительные сведения см. в разделе Удаление серверов .
Event 5120 with STATUS_IO_TIMEOUT c00000b5
Important
For Windows Server 2016: To reduce the chance of experiencing these symptoms while applying the update with the fix, it is recommended to use the Storage Maintenance Mode procedure below to install the October 18, 2018, cumulative update for Windows Server 2016 or a later version when the nodes currently have installed a Windows Server 2016 cumulative update that was released from May 8, 2018 to October 9, 2018.
You might get event 5120 with STATUS_IO_TIMEOUT c00000b5 after you restart a node on Windows Server 2016 with cumulative update that were released from May 8, 2018 KB 4103723 to October 9, 2018 KB 4462917 installed.
When you restart the node, Event 5120 is logged in the System event log and includes one of the following error codes:
When an Event 5120 is logged, a live dump is generated to collect debugging information that may cause additional symptoms or have a performance effect. Generating the live dump creates a brief pause to enable taking a snapshot of memory to write the dump file. Systems that have lots of memory and are under stress may cause nodes to drop out of cluster membership and also cause the following Event 1135 to be logged.
A change introduced in May 8, 2018 to Windows Server 2016, which was a cumulative update to add SMB Resilient Handles for the Storage Spaces Direct intra-cluster SMB network sessions. This was done to improve resiliency to transient network failures and improve how RoCE handles network congestion. These improvements also inadvertently increased time-outs when SMB connections try to reconnect and waits to time-out when a node is restarted. These issues can affect a system that is under stress. During unplanned downtime, IO pauses of up to 60 seconds have also been observed while the system waits for connections to time-out. To fix this issue, install the October 18, 2018, cumulative update for Windows Server 2016 or a later version.
Note This update aligns the CSV time-outs with SMB connection time-outs to fix this issue. It does not implement the changes to disable live dump generation mentioned in the Workaround section.
Shutdown process flow:
-
Run the Get-VirtualDisk cmdlet, and make sure that the HealthStatus value is Healthy.
-
Drain the node by running the following cmdlet:
-
Put the disks on that node in Storage Maintenance Mode by running the following cmdlet:
-
Run the Get-PhysicalDisk cmdlet, and make sure that the OperationalStatus value is In Maintenance Mode.
-
Run the Restart-Computer cmdlet to restart the node.
-
After node restarts, remove the disks on that node from Storage Maintenance Mode by running the following cmdlet:
-
Resume the node by running the following cmdlet:
-
Check the status of the resync jobs by running the following cmdlet:
Disabling live dumps
To mitigate the effect of live dump generation on systems that have lots of memory and are under stress, you may additionally want to disable live dump generation. Three options are provided below.
Caution
This procedure can prevent the collection of diagnostic information that Microsoft Support may need to investigate this problem. A Support agent may have to ask you to re-enable live dump generation based on specific troubleshooting scenarios.
There are two methods to disable live dumps, as described below.
Method 1 (recommended in this scenario)
To completely disable all dumps, including live dumps system-wide, follow these steps:
- Create the following registry key: HKLM\System\CurrentControlSet\Control\CrashControl\ForceDumpsDisabled
- Under the new ForceDumpsDisabled key, create a REG_DWORD property as GuardedHost, and then set its value to 0x10000000.
- Apply the new registry key to each cluster node.
Note
You have to restart the computer for the nregistry change to take effect.
After this registry key is set, live dump creation will fail and generate a «STATUS_NOT_SUPPORTED» error.
Method 2
By default, Windows Error Reporting will allow only one LiveDump per report type per 7 days and only 1 LiveDump per machine per 5 days. You can change that by setting the following registry keys to only allow one LiveDump on the machine forever.
Note You have to restart the computer for the change to take effect.
This cmdlet has an immediate effect on all cluster nodes without a computer restart.
Настройка вручную
В большинстве случаев ручная настройка не требуется. Если это необходимо, см. следующие разделы.
если после установки необходимо внести изменения в модель устройства кэширования, измените документ по компонентам поддержки служба работоспособности, как описано в разделе .
Указание модели кэш-накопителя
В развертываниях, где все накопители одного типа (например, только NVMe или SSD), кэш не настроен, поскольку Windows не может автоматически определить у накопителей одного типа такие характеристики, как ресурс записи.
Чтобы использовать более износостойкие накопители в качестве кэша для менее износостойких накопителей того же типа, используйте для указания нужной модели накопителя параметр -CacheDeviceModel командлета Enable-ClusterS2D. После включения локальных дисковых пространств все накопители указанной модели будут использоваться для кэширования.
Совет
Убедитесь, что строка модели указана в точности так, как она отображается в выходных данных командлета Get-PhysicalDisk.
Пример
Сначала получите список физических дисков:
Вот пример выходных данных:
Затем введите следующую команду, указав модель устройства кэша:
Вы можете проверить, что назначенные накопители используются для кэширования, запустив командлет Get-PhysicalDisk в PowerShell и проверив свойство Usage — оно должно иметь значение «Journal».
Ручная настройка поддерживает следующие варианты развертывания:

Установка режима работы кэша
Можно переопределить режим работы кэша по умолчанию. Например, можно включить кэширование операций чтения даже для развертываний только с использованием флэш-накопителей. Не рекомендуется менять режим работы, если вы не уверены, что режим работы по умолчанию не подходит для ваших рабочих нагрузок.

Чтобы переопределить поведение, используйте командлет Set-клустерсторажеспацесдирект и параметры -качемодессд и -качемодехдд . Параметр CacheModeSSD задает режим работы кэша при кэшировании твердотельных накопителей. Параметр CacheModeHDD задает режим работы кэша при кэшировании жестких дисков. Это можно сделать в любой момент после включения локальных дисковых пространств.
Чтобы проверить, задано ли поведение, можно использовать Get-клустерсторажеспацесдирект .
Пример
сначала получите параметры дисковые пространства Direct:
Вот пример выходных данных:
Затем сделайте следующее.
Вот пример выходных данных:
Копирование файлов выполняется слишком долго
При использовании проводника для копирования большого виртуального жесткого диска на виртуальный диск может возникнуть ошибка. копирование файлов занимает больше времени, чем ожидалось.
Использование проводника, Robocopy или xcopy для копирования большого виртуального жесткого диска на виртуальный диск не является рекомендуемым методом, так как это приведет к снижению ожидаемой производительности. процесс копирования не проходит через стек дисковые пространства Direct, который находится ниже в стеке хранилища, а действует как локальный процесс копирования.
если вы хотите протестировать дисковые пространства прямой производительности, мы рекомендуем использовать вмфлит и Diskspd для загрузки и нагрузочного тестирования серверов, чтобы получить базовую строку и задать ожидания дисковые пространства прямой производительности.
Mirror-accelerated parity
Beginning in Windows Server 2016, a Storage Spaces Direct volume can be part mirror and part parity. Writes land first in the mirrored portion and are gradually moved into the parity portion later. Effectively, this is using mirroring to accelerate erasure coding.
To mix three-way mirror and dual parity, you need at least four fault domains, meaning four servers.
The storage efficiency of mirror-accelerated parity is in between what you’d get from using all mirror or all parity, and depends on the proportions you choose. For example, the demo at the 37-minute mark of this presentation shows various mixes achieving 46%, 54%, and 65% efficiency with 12 servers.
Important
We recommend using mirroring for most performance-sensitive workloads. To learn more about how to balance performance and capacity depending on your workload, see .
Step 3: Create a volume
Next, you must create a volume from the virtual disk. You can assign an optional drive letter or folder, then format the volume with a file system.
-
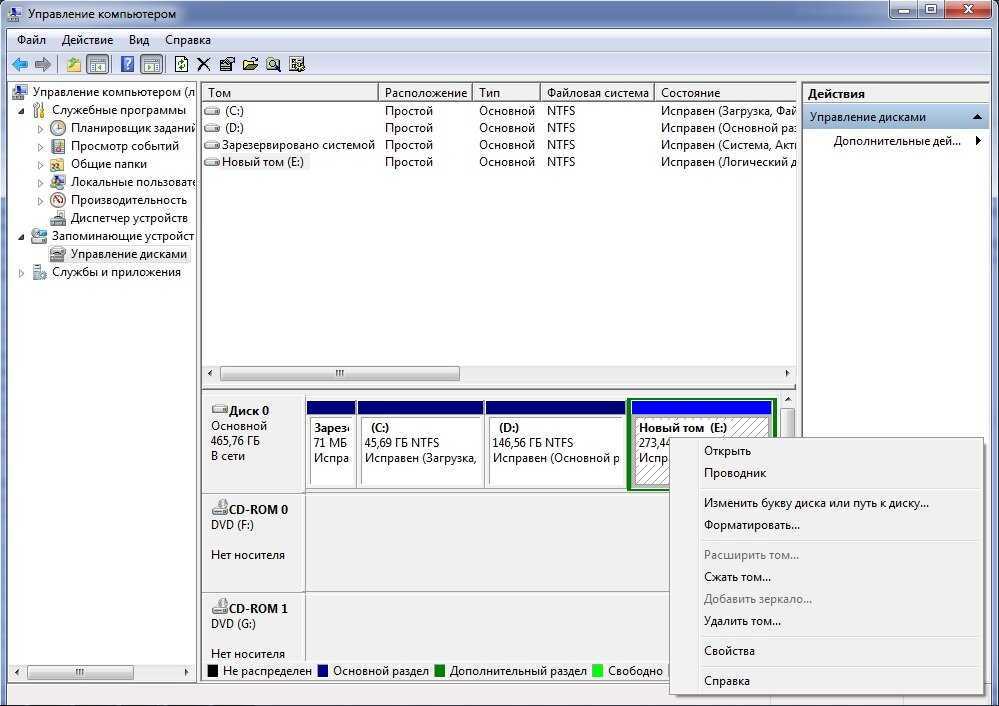
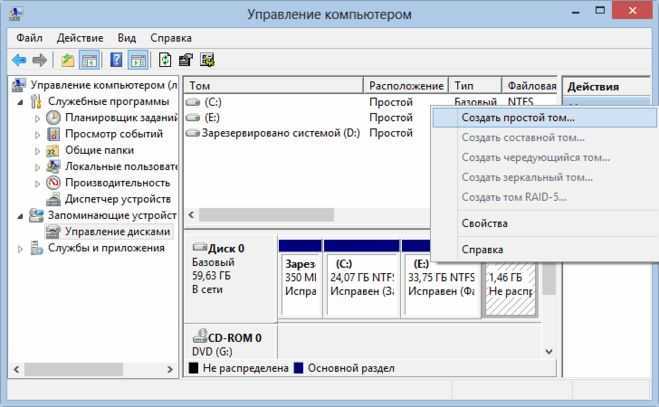
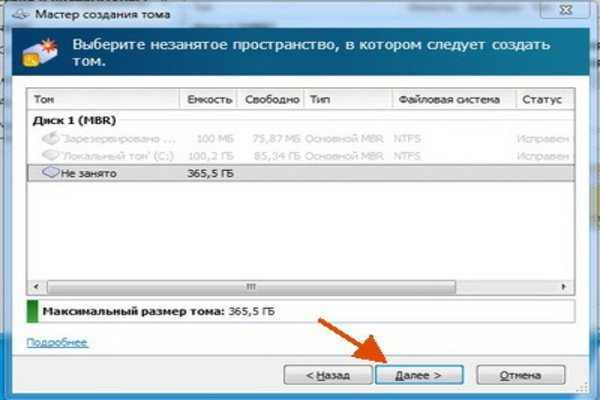
If the New Volume Wizard is not already open, on the Storage Pools page in Server Manager, under VIRTUAL DISKS, right-click the desired virtual disk, and then select New Volume.
The New Volume Wizard opens.
-
On the Before you begin page, select Next.
-
On the Select the server and disk page, do the following, and then select Next.
-
In the Server area, select the server on which you want to provision the volume.
-
In the Disk area, select the virtual disk on which you want to create the volume.
-
-
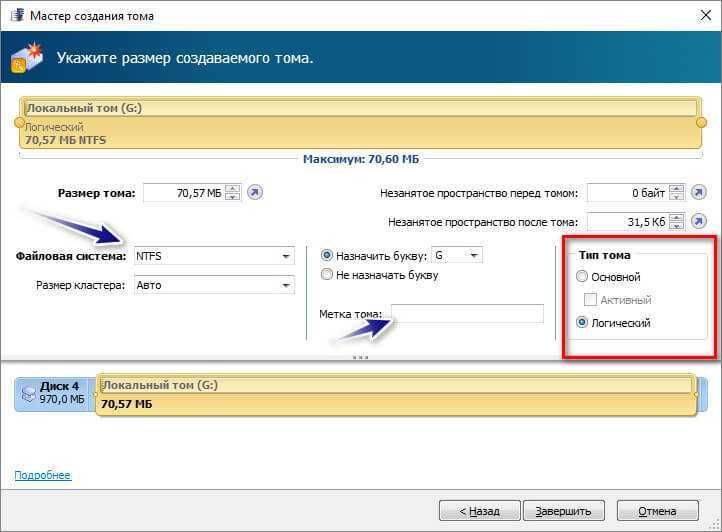
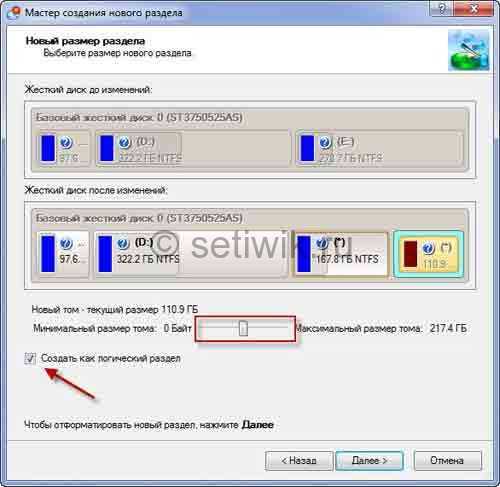
On the Specify the size of the volume page, enter a volume size, specify the units (MB, GB, or TB), and then select Next.
-
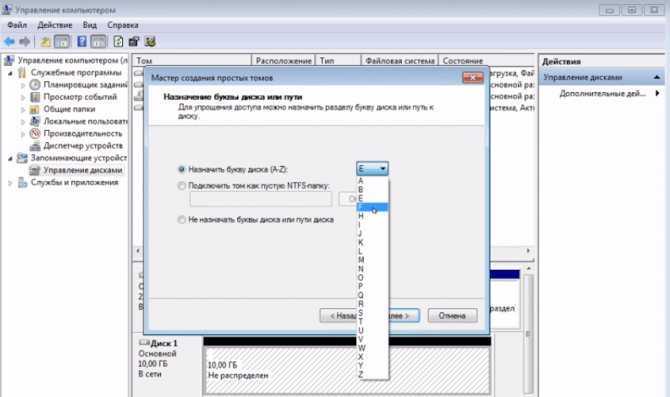
On the Assign to a drive letter or folder page, configure the desired option, and then select Next.
-
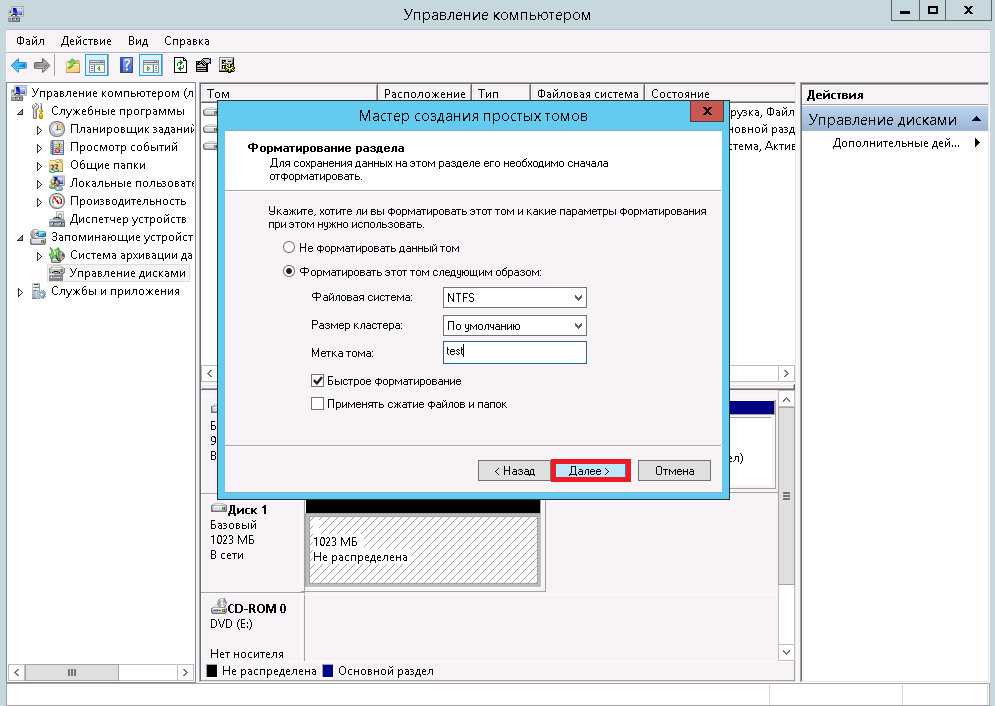
On the Select file system settings page, do the following, and then select Next.
-
In the File system list, select either NTFS or ReFS.
-
In the Allocation unit size list, either leave the setting at Default or set the allocation unit size.
Note
For more information about allocation unit size, see Default cluster size for NTFS, FAT, and exFAT.
-
Optionally, in the Volume label box, enter a volume label name, for example HR Data.
-
-
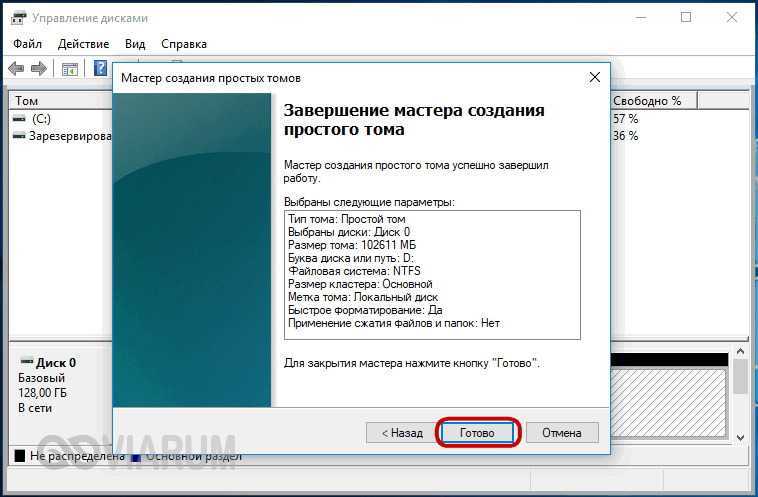
On the Confirm selections page, verify that the settings are correct, and then select Create.
-
On the View results page, verify that all tasks completed, and then select Close.
-
To verify that the volume was created, in Server Manager, select the Volumes page. The volume is listed under the server where it was created. You can also verify that the volume is in Windows Explorer.
-
Windows PowerShell equivalent commands for creating volumes
The following Windows PowerShell cmdlet performs the same function as the previous procedure. Enter the command on a single line.
The following example initializes the disks for virtual disk VirtualDisk1, creates a partition with an assigned drive letter, and then formats the volume with the default NTFS file system.
Physical Disk «Healthy,» and Operational Status is «Removing from Pool»
In a Windows Server 2016 Storage Spaces Direct cluster, you might see the HealthStatus for one ore more physical disks as «Healthy,» while the OperationalStatus is «(Removing from Pool, OK).»
«Removing from Pool» is an intent set when Remove-PhysicalDisk is called but stored in Health to maintain state and allow recovery if the remove operation fails. You can manually change the OperationalStatus to Healthy with one of the following methods:
- Remove the physical disk from the pool, and then add it back.
- Import-Module Clear-PhysicalDiskHealthData.ps1
- Run the Clear-PhysicalDiskHealthData.ps1 script to clear the intent. (Available for download as a .TXT file. You’ll need to save it as a .PS1 file before you can run it.)
Here are some examples showing how to run the script:
-
Use the SerialNumber parameter to specify the disk you need to set to Healthy. You can get the serial number from WMI MSFT_PhysicalDisk or Get-PhysicalDIsk. (We’re just using 0s for the serial number below.)
-
Use the UniqueId parameter to specify the disk (again from WMI MSFT_PhysicalDisk or Get-PhysicalDIsk).
Data Deduplication
If you’ve used storage systems for any length of time, you will also know about data deduplication. Deduplication is a technology which is very common, and whose goal is to reduce the amount of capacity that stored data needs on a physical device by removing duplicated data blocks.
I don’t want to drill deeper into Dedupe because we are focusing on S2D with this series and there are much better articles from storage experts out their, explaining these topics for all kinds of vendors.
Also of note: deduplication for S2D is not supported with Windows Server 2016 but it is on the feature list for S2D in Windows Server 2019.
As it looks so far with the Windows Server 2019 Technical Preview, deduplication for S2D works as expected and when looking on most Hyper-V workloads, you may see a dedup rate of around 50%.
Снижение производительности или «потеря связи», «ошибка ввода-вывода», «отсоединено» или «нет избыточности» для развертываний, использующих устройства Intel P3x00 NVMe
мы обнаружили критическую ошибку, которая влияет на некоторые дисковые пространства пользователей, использующих оборудование на базе семейства Intel P3x00 нвм Express (NVMe) с версиями встроенного по до «технического выпуска 8».
Примечание
У отдельных изготовителей оборудования могут быть устройства, основанные на семействе устройств NVMe семейства Intel P3x00 с уникальными строками версий встроенного по. Обратитесь к изготовителю оборудования за дополнительными сведениями о последней версии встроенного по.
Если в развертывании используется оборудование, основанное на семействе устройств NVMe под управлением Intel P3x00, рекомендуется немедленно применить последнюю версию доступного встроенного по (по крайней мере в техническом выпуске 8). В этой статье Служба поддержки Майкрософт содержатся дополнительные сведения об этой ошибке.


