
By the power of the shell
Even if you’re not familiar with the power shell (PS) environment, you can easily learn and use it. If you look on them, you can see that all PS command are get-, set-, add-, remove-, rename-… something. Moreover, you can learn a lot about PS if you use the PS ISE (Integrated Scripting Environment) version on the Server GUI version.
I will use PS ISE only to show you all commands related to the NIC teaming feature. The NIC teaming feature is actually named Load Balancing and Fail Over or LBFO in short. As this is the network related feature, it’s eventually named NetLBFO. We will find this module in the drop-down list.
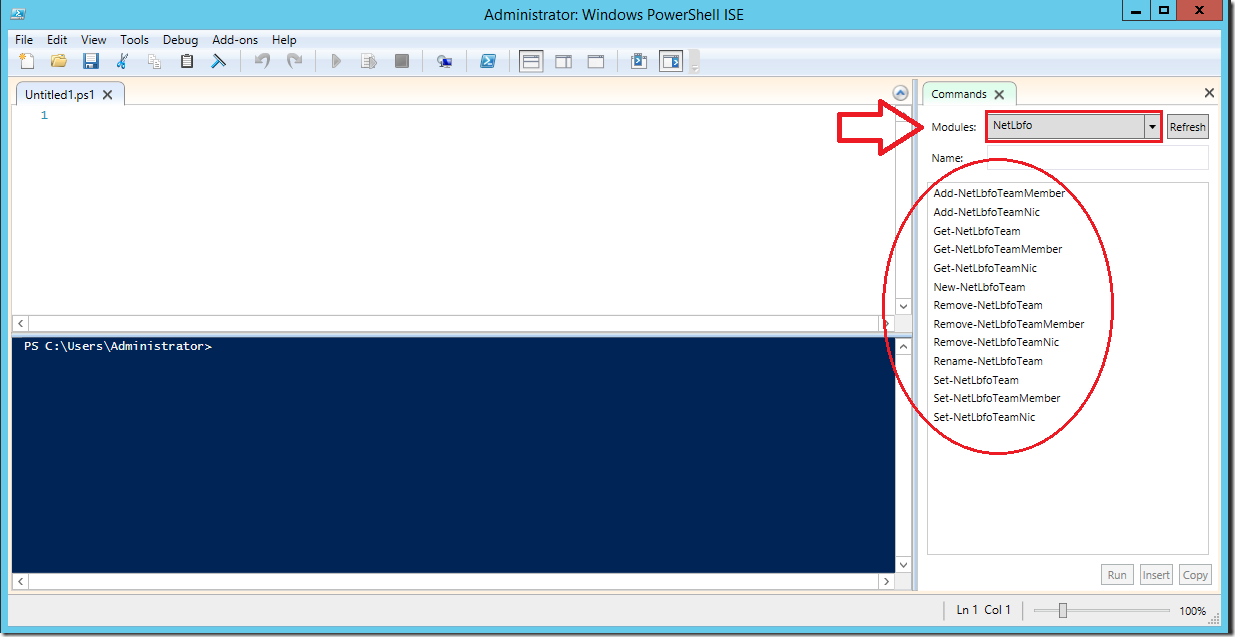
If you look on this list, you can see that there are commands for all tasks we performed using the GUI environment. Additionally, you can see in PS ISE all mandatory and optional parameters that you may specify. I would like to suggest to you to use regular PS, as PS ISE exists only on the GUI version.
For all of you, my friends, who are impatient, I uploaded the single file with all commands mentioned in this article. Moreover, this file covers additional commands that we will cover in the second part of this story.
Параметр резервного адаптера Standby adapter setting
Для параметра «резервный адаптер» задано значение «нет» (все адаптеры активны) или выбор определенного сетевого адаптера в группе сетевых адаптеров, который выступает в качестве резервного адаптера. The options for Standby Adapter are None (all adapters Active) or your selection of a specific network adapter in the NIC Team that acts as a Standby adapter. При настройке сетевой карты в качестве резервного адаптера все остальные невыбранные члены группы активны, и сетевой трафик не отправляется или не обрабатывается адаптером до тех пор, пока не произойдет сбой активного сетевого адаптера. When you configure a NIC as a Standby adapter, all other unselected team members are Active, and no network traffic is sent to or processed by the adapter until an Active NIC fails. После сбоя активного сетевого адаптера резервный сетевой адаптер станет активным и обработает сетевой трафик. After an Active NIC fails, the Standby NIC becomes active and processes network traffic. Когда все члены группы восстанавливаются в службу, член Рабочей группы Standby возвращается в состояние Standby. When all team members get restored to service, the standby team member returns to standby status.
Если у вас есть команда с двумя СЕТЕВыми адаптерами и вы решили настроить один сетевой адаптер в качестве резервного, будут потеряны преимущества статистической обработки пропускной способности, существующие в двух активных сетевых картах. If you have a two-NIC team and you choose to configure one NIC as a Standby adapter, you lose the bandwidth aggregation advantages that exist with two active NICs. Для достижения отказоустойчивости не нужно назначать резервный адаптер. отказоустойчивость всегда присутствует при наличии по крайней мере двух сетевых адаптеров в группе сетевых адаптеров. You do not need to designate a Standby Adapter to achieve fault tolerance; fault tolerance is always present whenever there are at least two network adapters in a NIC Team.
Switch-Independent Teaming
Switch-independent teaming offers the advantage of not requiring the switch to participate in the NIC Teaming process. Network cards from the server can connect to different switches within our network.
Switch-independent teaming is preferred when bandwidth isn’t an issue and we are mostly interested in creating a fault tolerant connection by placing a team member into standby mode so that when one network adapter or link fails, the standby network adapter automatically takes over. When a failed network adapter returns to its normal operating mode, the standby member will return to its standby status.
Switch-dependent teaming requires the switch to participate in the teaming process, during which Windows Server 2012 negotiates with the switch creating one virtual link that aggregates all physical network adapters’ bandwidth. For example, a server with four 1Gbps network cards can be configured to create a single 4Gbps connection to the network.
Switch-dependent teaming supports two different modes: Generic or Static Teaming (IEEE 802.3ad) and Link Aggregation Control Protocol Teaming (IEEE 802.1ax, LACP). LACP is the default mode in which Windows NIC Teaming always operates.
Configuring NIC Teaming in Windows Server 2012
In this example, we’ll be teaming two 100Mbps network adapters on our server. Both network adapters are connected to the same switch and configured with an IP address within the same subnet 192.168.10.0/24.
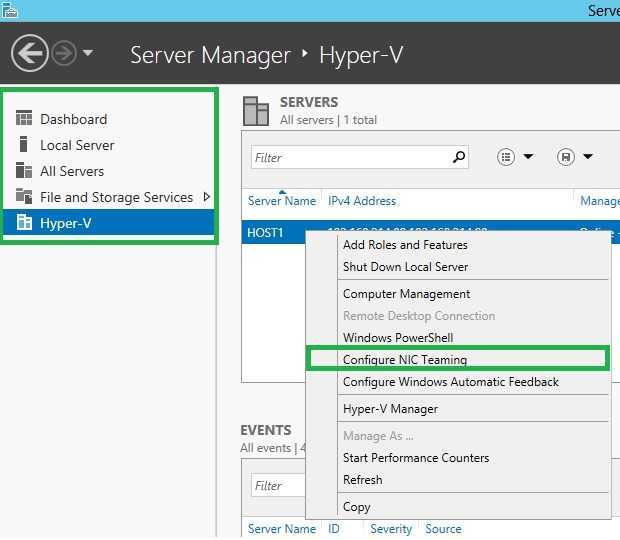
To begin, open Server Manager and locate the NIC Teaming section under Local Server:
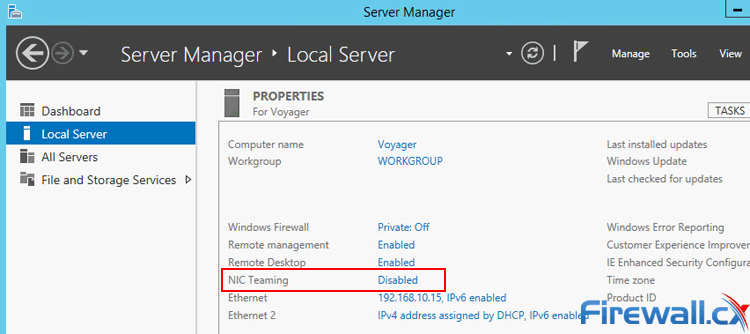
Figure 2. Locating NIC Teaming section in Server Manager Windows 2012 Server
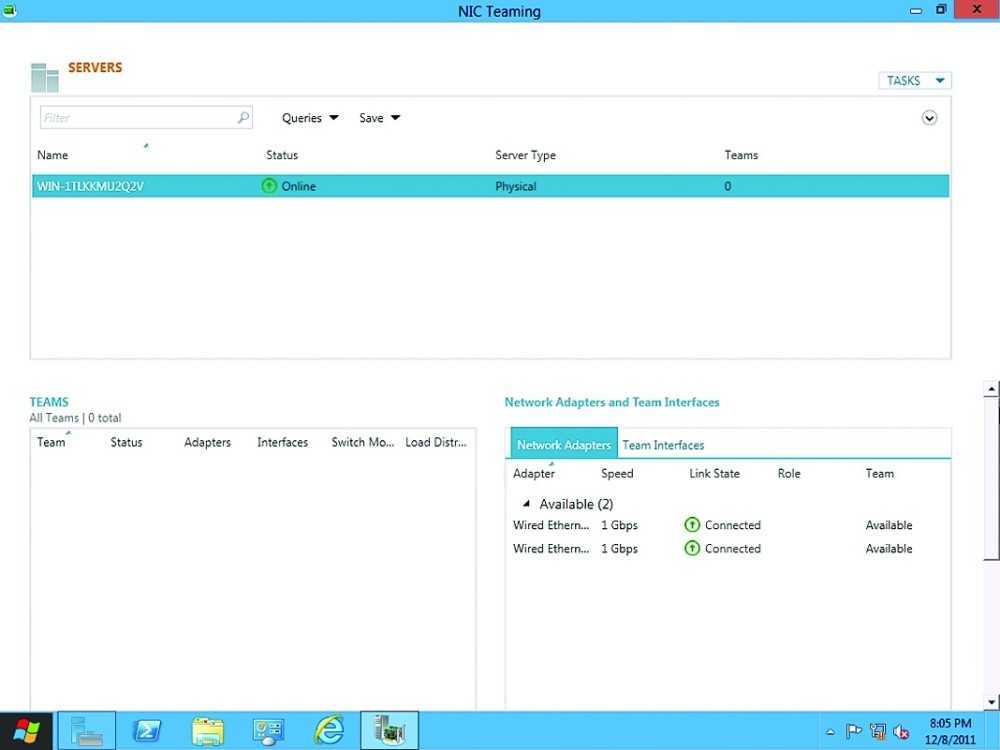
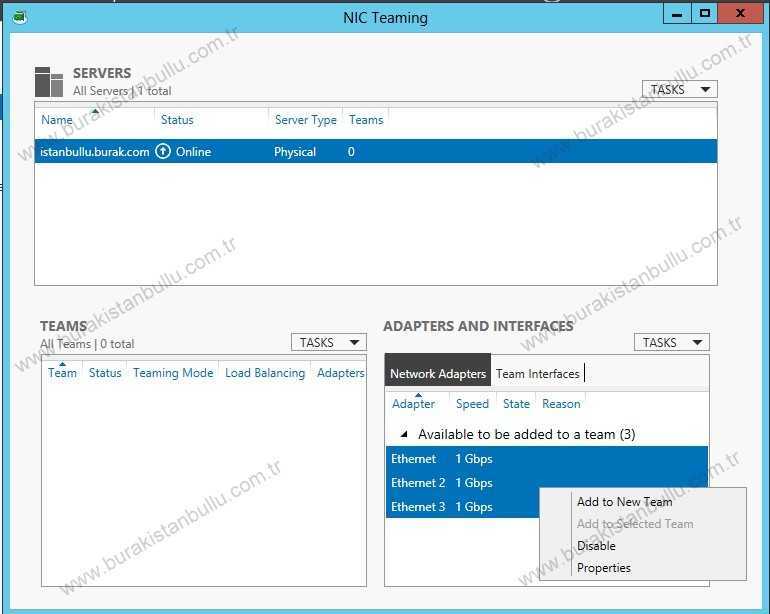
The lower right section of the NIC Teaming window displays the available network adapters that can be assigned to a new team. In our case these are two 100Mbps Ethernet adapters.
From the TEAM area, select Tasks and then New Team from the dropdown menu to create a new NIC Team:
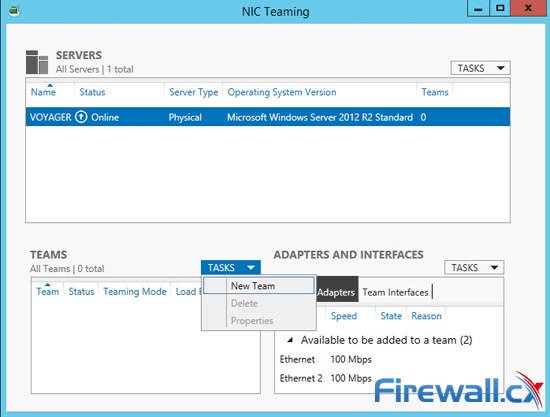 Figure 3. Creating a new NIC Team in Windows Server 2012
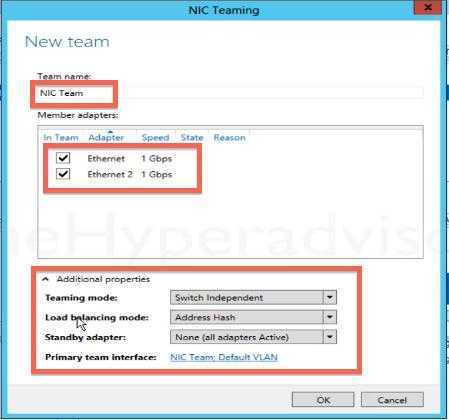
At the NIC Teaming window select the adapters to be part of the new NIC Team. Ensure Teaming mode is set to the desired mode (LACP in our case) and Load balancing mode is set to Dynamic. The Standby Adapter option will be available when more than two network adapters are available for teaming. Optionally we can give the new NIC Team a unique name or leave it as is.
Finally, we can select the default VLAN under the Primary Team Interface option (not shown below). When ready, click on OK to save the configuration and create the NIC Team:
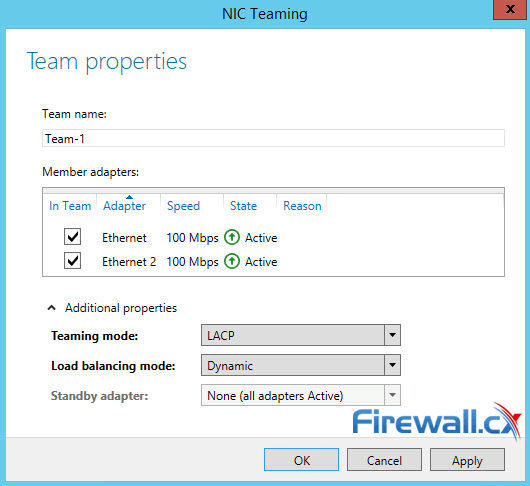 Figure 4. Configuring Teaming Mode, Load Balancing Mode and NIC Team members
Notice how the State of each network adapter is reported as Active – this indicates the adapter is correctly functioning as a member of the NIC Team.
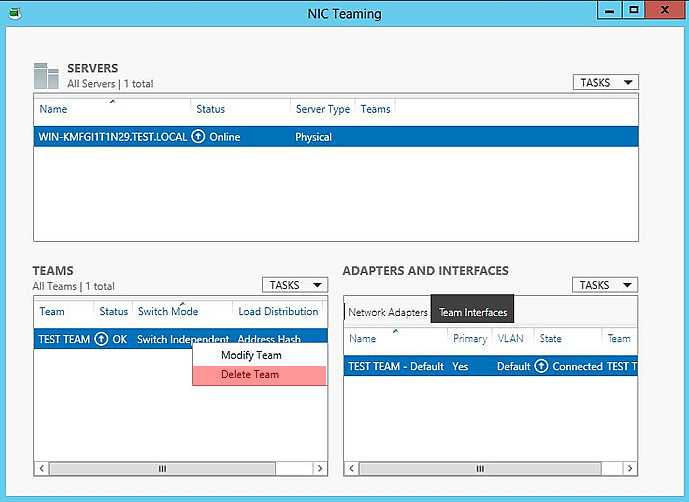
When the new NIC Team window disappears we are brought back to the NIC Teaming window where Windows Server 2012 reports the NIC Teams currently configured, speed, status, Teaming Mode and Load Balancing mode:
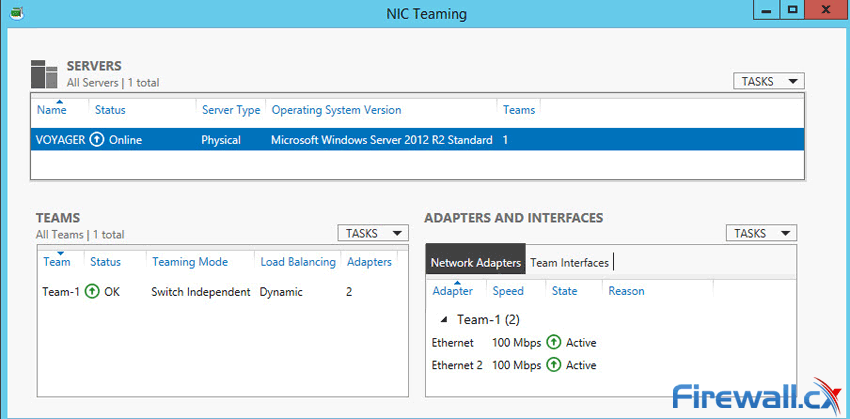 Figure 5. Viewing NIC Teams, their status, speed, Teaming mode, Load balancing mode and more
As mentioned earlier, NIC Teaming creates a virtual adapter that combines the speed of all network adapters that are part of the NIC Team. As we can see below, Windows Server has created a 200Mbps network adapter named Team-1:
 Figure 6. The newly created NIC Team Adapter in Windows 2012 Server
We should note that the MAC address used by the virtual adapter will usually be the MAC address from either physical network adapters.
Network configuration requirements
Before you can create a new NIC Team, you must deploy a Hyper-V host with two network adapters that connect to different physical switches. You must also configure the network adapters with IP addresses that are from the same IP address range.


The physical switch, Hyper-V Virtual Switch, local area network (LAN), and NIC Teaming requirements for creating a NIC Team in a VM are:
-
The computer running Hyper-V must have two or more network adapters.
-
If connecting the network adapters to multiple physical switches, the physical switches must be on the same Layer 2 subnet.
-
You must use Hyper-V Manager or Windows PowerShell to create two external Hyper-V Virtual Switches, each connected to a different physical network adapter.
-
The VM must connect to both external virtual switches you create.
-
NIC Teaming, in Windows Server 2016, supports teams with two members in VMs. You can create larger teams, but there is no support.
-
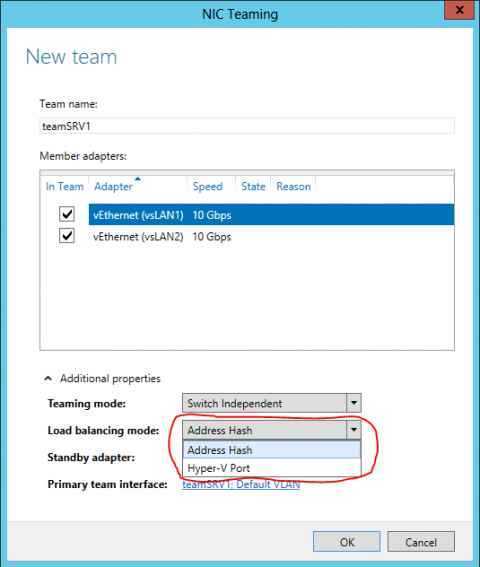
If you are configuring a NIC Team in a VM, you must select a Teaming mode of Switch Independent and a Load balancing mode of Address Hash.
Шаг 1. Настройка физической и виртуальной сети
В этой процедуре вы создадите два внешних коммутатора Hyper-V, подключите виртуальную машину к коммутаторам, а затем настроите подключения виртуальных машин к коммутаторам.
Процедура
-
На узле Hyper-V откройте диспетчер Hyper-V и в разделе действия щелкните Диспетчер виртуальных коммутаторов.
-
Убедитесь, что в диспетчере виртуальных коммутаторов выбран параметр Внешние , а затем нажмите кнопку создать виртуальный коммутатор.
-
В свойствах виртуального коммутатора введите имя виртуального коммутатора и добавьте Примечания при необходимости.
-
В поле тип подключения во внешней сети выберите физический сетевой адаптер, к которому нужно подключить виртуальный коммутатор.
-
Настройте дополнительные свойства коммутатора для развертывания и нажмите кнопку ОК.
-
Создайте второй внешний виртуальный коммутатор, повторив предыдущие шаги. Подключение второй внешний коммутатор для другого сетевого адаптера.
-
в диспетчере Hyper-V в разделе виртуальные машины щелкните правой кнопкой мыши виртуальную машину, которую необходимо настроить, и выберите пункт Параметры.
откроется диалоговое окно Параметры вм.
-
Убедитесь, что виртуальная машина не запущена. Если оно запущено, выполните завершение работы, прежде чем настраивать виртуальную машину.
-
В списке оборудование щелкните сетевой адаптер.
-
В окне свойства сетевого адаптера выберите первый виртуальный коммутатор, созданный на предыдущих шагах, и нажмите кнопку Применить.
-
В поле оборудование щелкните, чтобы развернуть значок плюса (+) рядом с пунктом сетевой адаптер.
-
Щелкните Дополнительные функции , чтобы включить объединение сетевых карт с помощью графического пользовательского интерфейса.
Совет
также можно включить объединение сетевых карт с помощью команды Windows PowerShell:
а. Выберите динамический для Mac-адреса.
b. Щелкните, чтобы выбрать защищенную сеть.
c. Выберите этот параметр, чтобы включить этот сетевой адаптер в состав команды в гостевой операционной системе.
d. Нажмите кнопку ОК.
-
-
чтобы добавить второй сетевой адаптер, в диспетчере Hyper-V в области виртуальные машины щелкните ту же виртуальную машину правой кнопкой мыши и выберите пункт Параметры.
откроется диалоговое окно Параметры вм.
-
В окне Добавить оборудование выберите пункт сетевой адаптер и нажмите кнопку добавить.
-
В окне свойства сетевого адаптера выберите второй виртуальный коммутатор, созданный на предыдущих шагах, и нажмите кнопку Применить.
-
В поле оборудование щелкните, чтобы развернуть значок плюса (+) рядом с пунктом сетевой адаптер.
-
Щелкните Дополнительные компоненты, прокрутите вниз до пункта Объединение сетевых карт и выберите включить этот сетевой адаптер в качестве части команды в гостевой операционной системе.
-
Нажмите кнопку ОК.


Поздравляем! Вы настроили физическую и виртуальную сеть. Теперь можно приступить к созданию новой группы сетевых адаптеров.
Отключение и включение сетевых адаптеров с помощью Windows PowerShell
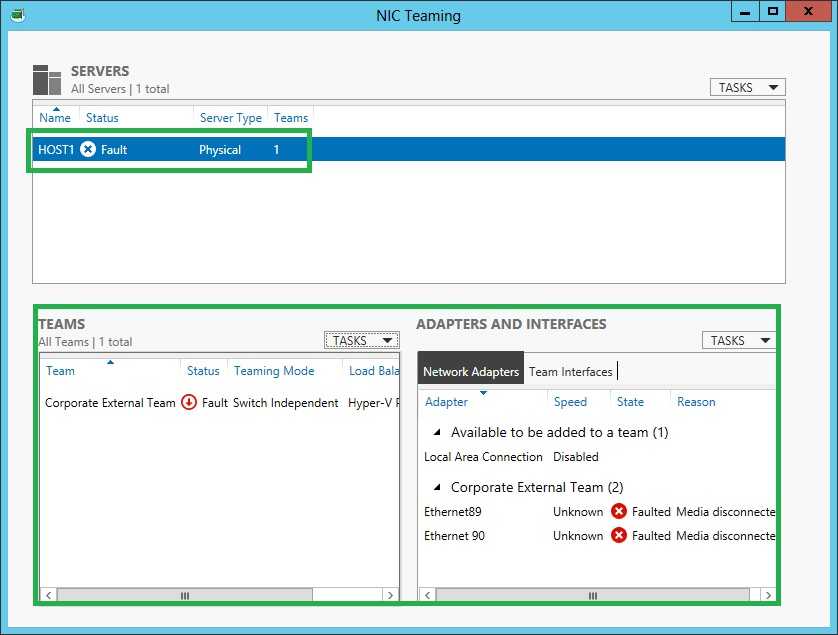
Распространенной причиной сбоя группы сетевых адаптеров является то, что интерфейс группы отключен, и во многих случаях случайно при выполнении последовательности команд. Эта конкретная последовательность команд не включает все Нетадаптерс отключены, поскольку отключение всех базовых физических членов сетевых адаптеров приводит к удалению интерфейса группы сетевых карт.
В этом случае интерфейс группы сетевых адаптеров больше не отображается в Get-NetAdapter, и по этой причине Enable-NetAdapter \* не включает команду сетевой карты. Однако команда Enable-NetAdapter \* включает сетевые карты участников, которые затем (через некоторое время) повторно создают интерфейс группы. Интерфейс группы остается в состоянии «отключено» до повторного включения, что позволяет начать перетекание сетевого трафика.
следующая Windows PowerShell последовательность команд может неслучайно отключить интерфейс команды:
Compatibility
NIC teaming is compatible with all networking technologies in Windows Server 2016 with the following exceptions.
-
Single-root I/O virtualization (SR-IOV). For SR-IOV, data is delivered directly to the NIC without passing it through the networking stack (in the host operating system, in the case of virtualization). Therefore, it is not possible for the NIC team to inspect or redirect the data to another path in the team.
-
Native host Quality of Service (QoS). When you set QoS policies on a native or host system, and those policies invoke minimum bandwidth limitations, the overall throughput for a NIC team is less than it would be without the bandwidth policies in place.
-
TCP Chimney. TCP Chimney is not supported with NIC teaming because TCP Chimney offloads the entire networking stack directly to the NIC.
-
802.1X Authentication. You should not use 802.1X Authentication with NIC Teaming because some switches do not permit the configuration of both 802.1X Authentication and NIC Teaming on the same port.
To learn about using NIC Teaming within virtual machines (VMs) that run on a Hyper-V host, see Create a new NIC Team on a host computer or VM.
Load Balancing modes
The options for Load Balancing distribution mode are Address Hash, Hyper-V Port, and Dynamic.
Address Hash
With Address Hash, this mode creates a hash based on address components of the packet, which then get assigned to one of the available adapters. Usually, this mechanism alone is sufficient to create a reasonable balance across the available adapters.
Use Windows PowerShell to specify values for the following hashing function components.
-
Source and destination TCP ports and source and destination IP addresses. This is the default when you select Address Hash as the Load Balancing mode.
-
Source and destination IP addresses only.
-
Source and destination MAC addresses only.
The TCP ports hash creates the most granular distribution of traffic streams, resulting in smaller streams that can be independently moved between NIC team members. However, you cannot use the TCP ports hash for traffic that is not TCP or UDP-based, or where the TCP and UDP ports are hidden from the stack, such as with IPsec-protected traffic. In these cases, the hash automatically uses the IP address hash or, if the traffic is not IP traffic, the MAC address hash is used.
Hyper-V Port
With Hyper-V Port, NIC Teams configured on Hyper-V hosts give VMs independent MAC addresses. The VMs MAC address or the VM ported connected to the Hyper-V switch, can be used to divide network traffic between NIC Team members. You cannot configure NIC Teams that you create within VMs with the Hyper-V Port load balancing mode. Instead, use the Address Hash mode.
Because the adjacent switch always sees a particular MAC address on one port, the switch distributes the ingress load (the traffic from the switch to the host) on multiple links based on the destination MAC (VM MAC) address. This is particularly useful when Virtual Machine Queues (VMQs) are used, because a queue can be placed on the specific NIC where the traffic is expected to arrive.
However, if the host has only a few VMs, this mode might not be granular enough to achieve a well-balanced distribution. This mode will also always limit a single VM (i.e., the traffic from a single switch port) to the bandwidth that is available on a single interface. NIC Teaming uses the Hyper-V Virtual Switch Port as the identifier instead of using the source MAC address because, in some instances, a VM might be configured with more than one MAC address on a switch port.


Dynamic
With Dynamic, outbound loads are distributed based on a hash of the TCP ports and IP addresses. Dynamic mode also rebalances loads in real time so that a given outbound flow may move back and forth between team members. Inbound loads, on the other hand, get distributed the same way as Hyper-V Port. In a nutshell, Dynamic mode utilizes the best aspects of both Address Hash and Hyper-V Port and is the highest performing load balancing mode.
The outbound loads in this mode are dynamically balanced based on the concept of flowlets. Just as human speech has natural breaks at the ends of words and sentences, TCP flows (TCP communication streams) also have naturally occurring breaks. The portion of a TCP flow between two such breaks is referred to as a flowlet.
When the dynamic mode algorithm detects that a flowlet boundary has been encountered — such as when a break of sufficient length has occurred in the TCP flow — the algorithm automatically rebalances the flow to another team member if appropriate. In some circumstances the algorithm might also periodically rebalance flows that do not contain any flowlets. Because of this, the affinity between TCP flow and team member can change at any time as the dynamic balancing algorithm works to balance the workload of the team members.
Whether the team is configured with Switch Independent or one of the Switch Dependent modes, it is recommended that you use Dynamic distribution mode for best performance.
There is an exception to this rule when the NIC Team has just two team members, is configured in Switch Independent mode, and has Active/Standby mode enabled, with one NIC active and the other configured for Standby. With this NIC Team configuration, Address Hash distribution provides slightly better performance than Dynamic distribution.
Introduction
Windows Server 2012 has a number of great new features. One of the most welcome new features is the ability to create NIC teams. A NIC team is a collection of network interfaces (NICs) that work together as one. There are many benefits to building a NIC team. The main benefit is bandwidth aggregation. NIC teaming allows the bandwidth of every NIC in the team to be combined, thereby delivering more bandwidth than any single NIC in the team would be able to handle by itself.
Another noteworthy benefit to NIC teaming is redundancy. NIC teaming protects the server against NIC failures. If a NIC within a NIC team fails then the team is able to continue functioning in spite of the failure, but at a reduced capacity.
Technically speaking, NIC teaming isn’t an entirely new feature. Previous versions of Windows Server supported NIC teaming, but only with some very significant restrictions. The main restriction was that the NIC team had to be implemented at the hardware level, not the software level. This meant that you had to purchase server hardware and NICs that natively supported NIC teaming. Furthermore, the server and the NICs had to be provided by the same vendor. Needless to say, this approach to NIC teaming was expensive to say the least.
These limitations are gone in Windows Server 2012. Now NIC teaming can be implemented at the software level, so there is no need to purchase specialized server hardware. Furthermore, the NIC team does not need to be vendor consistent. You can create a NIC team consisting of NICs from multiple vendors.
Another benefit is that a NIC team can be huge. You can combine up to 32 physical NICs into a NIC team. Imagine for a moment that you built a team of 32 ten gigabit NICs. That would be the functional equivalent to having a 320 gigabit connection (minus overhead).
Load Balancing Mode — Load Distribution Algorithms
Load distribution algorithms are used to distribute outbound traffic amongst all available physical links, avoiding bottlenecks while at the same time utilizing all links. When configuring NIC Teaming in Windows Server 2012, we are required to select the required Load Balancing Mode that makes use of one of the following load distribution algorithms:
Hyper-V Switch Port: Used primarily when configuring NIC Teaming within a Hyper-V virtualized environment. When Virtual Machine Queues (VMQs) are used a queue can be placed on the specific network adapter where the traffic is expected to arrive thus providing greater flexibility in virtual environments.
Address Hashing: This algorithm creates a hash based on one of the characteristics listed below and then assigns it to available network adapters to efficiently load balance traffic:
- Source and Destination TCP ports plus Source and Destination IP addresses
- Source and Destination IP addresses only
- Source and Destination MAC addresses only
- Distributes outgoing traffic based on a hash of the TCP Ports and IP addresses with real-time rebalancing allowing flows to move backward and forward between networks adapters that are part of the same group.
- Inbound traffic is distributed similar to the Hyper-V port algorithm
Dynamic: The Dynamic algorithm combines the best aspects of the two previous algorithms to create an effective load balancing mechanism. Here’s what it does:
The Dynamic algorithm is the preferred Load Balancing Mode for Windows 2012 and the one we are covering in this article.
Appendix: Encryption
Cluster traffic
By default, cluster communication is not encrypted. You can enable encryption if you want. However, realize that there is performance overhead that is associated with encryption. To enable encryption, you can use the following Windows PowerShell command to set the security level for the cluster.
The following table shows the different security level values.
| Security Description | Value |
|---|---|
| Clear text | |
| Signed (default) | 1 |
| Encrypted | 2 |
Live migration traffic
Live migration traffic is not encrypted. You can enable IPsec or other network layer encryption technologies if you want. However, realize that encryption technologies typically affect performance.
SMB traffic
By default, SMB traffic is not encrypted. Therefore, we recommend that you use a dedicated network (physical or logical) or use encryption. For SMB traffic, you can use SMB encryption, layer-2 or layer-3 encryption. SMB encryption is the preferred method.
Replica traffic
If you use Kerberos-based authentication, Hyper-V Replica traffic is not encrypted. We strongly recommend that you encrypt replication traffic that transits public networks over the WAN or the Internet. We recommend Secure Sockets Layer (SSL) encryption as the encryption method. You can also use IPsec. However, realize that using IPsec may significantly affect performance.
NIC Team Uses
Right about now you might be wondering under what circumstances you can use a NIC team. Generally speaking, a NIC team can be used in any situation that a physical NIC would be used in. NIC teams can handle normal server level traffic, but they can also be used by virtual machines. Having said that, there are a few exceptions. NIC teaming does not work with the following:
SR-IOV
Remote Direct Memory Access (RDMA)
TCP Chimney
Microsoft doesn’t really explain why TCP Chimney isn’t supported (at least not that I have found), but they do indicate that that the reason SR-IOV and RDMA aren’t supported is because these technologies send traffic directly to the network adapter and completely bypass the networking stack, which means that SR-IOV and RDMA are unable to detect the NIC team.
Quality of Service (QoS) recommendations
You can use QoS technologies that are available in Windows Server 2012 to meet the service requirements of a workload or an application. QoS provides the following:
-
Measures network bandwidth, detects changing network conditions (such as congestion or availability of bandwidth), and prioritizes — or throttles — network traffic.
-
Enables you to converge multiple types of network traffic on a single adapter.
-
Includes a minimum bandwidth feature which guarantees a certain amount of bandwidth to a given type of traffic.
We recommend that you configure appropriate Hyper-V QoS on the virtual switch to ensure that network requirements are met for all appropriate types of network traffic on the Hyper-V cluster.
Note
You can use QoS to control outbound traffic, but not the inbound traffic. For example, with Hyper-V Replica, you can use QoS to control outbound traffic (from the primary server), but not the inbound traffic (from the Replica server).


Recommendations
For a Hyper-V cluster, we recommend that you configure Hyper-V QoS that applies to the virtual switch. When you configure QoS, do the following:
-
Configure minimum bandwidth in weight mode instead of in bits per second. Minimum bandwidth specified by weight is more flexible and it is compatible with other features, such as live migration and NIC Teaming. For more information, see the MinimumBandwidthMode parameter in New-VMSwitch.
-
Enable and configure QoS for all virtual network adapters. Assign a weight to all virtual adapters. For more information, see Set-VMNetworkAdapter. To make sure that all virtual adapters have a weight, configure the DefaultFlowMinimumBandwidthWeight parameter on the virtual switch to a reasonable value. For more information, see Set-VMSwitch.
The following table recommends some generic weight values. You can assign a value from 1 to 100. For guidelines to consider when you assign weight values, see Guidelines for using Minimum Bandwidth.
| Network Classification | Weight |
|---|---|
| Default weight | |
| Virtual machine access | 1, 3 or 5 (low, medium and high-throughput virtual machines) |
| Cluster | 10 |
| Management | 10 |
| Replica traffic | 10 |
| Live migration | 40 |
| Storage | 40 |
What is Windows Server NIC teaming?
For those who might not be familiar with Windows Server NIC teaming, it is a mechanism that allows multiple physical NICs to be bound together into a single logical NIC. That logical NIC therefore has the capabilities of all the underlying physical hardware.
You can see the end result in the figure below. This figure shows an administrative PowerShell window on a lab server that is running Windows Server 2012 R2. As you can see, I used the Get-NetAdapter cmdlet to list all of the network adapters that are installed in the server.
The cmdlet used in the figure above displays five different network adapters. The first one on the list (vEthernet) is a Hyper-V virtual Ethernet adapter, and it has a link speed of 10Gbps. I don’t actually have any 10Gbps hardware installed, but it doesn’t matter because this NIC is purely virtual.
The next three NICs that are listed are physical NICs running at 1Gbps each. The last network adapter on the list is named MyTeam. This one is a NIC team that is made up of the three physical network adapters that are listed by the cmdlet. As previously mentioned, those three NICs run at 1Gbps each. The NIC team, therefore, has a listed speed of 3Gbps, which is the aggregate speed of the physical NICs that make up the NIC team. So far, so good, right?
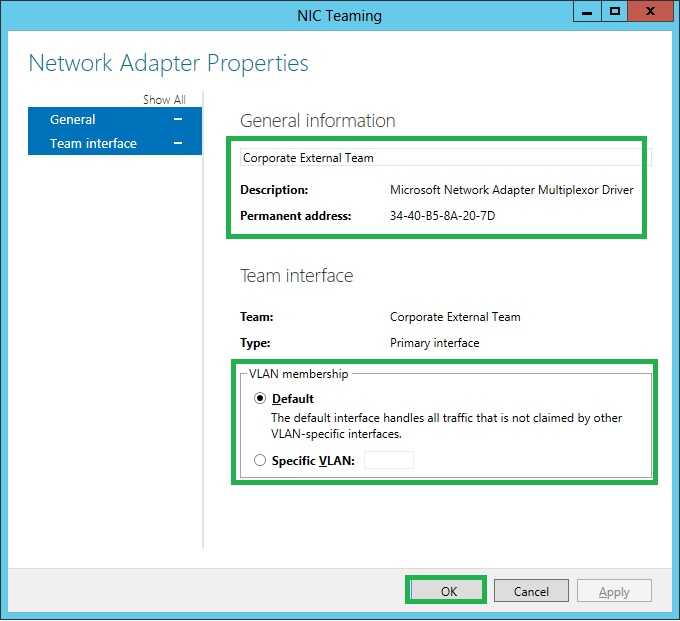
Standby adapter setting
The options for Standby Adapter are None (all adapters Active) or your selection of a specific network adapter in the NIC Team that acts as a Standby adapter. When you configure a NIC as a Standby adapter, all other unselected team members are Active, and no network traffic is sent to or processed by the adapter until an Active NIC fails. After an Active NIC fails, the Standby NIC becomes active and processes network traffic. When all team members get restored to service, the standby team member returns to standby status.
If you have a two-NIC team and you choose to configure one NIC as a Standby adapter, you lose the bandwidth aggregation advantages that exist with two active NICs. You do not need to designate a Standby Adapter to achieve fault tolerance; fault tolerance is always present whenever there are at least two network adapters in a NIC Team.
Create a NIC Team in Windows Server
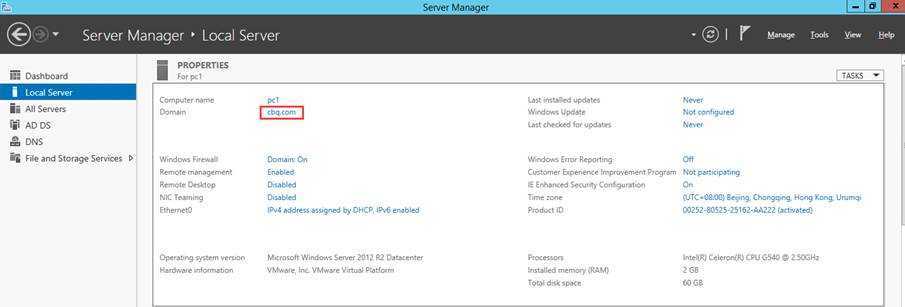
First, we go into Server Manager and click on the local server to bring up the dashboard.

As we can see NIC Teaming is set to Disabled. Let’s click on that Disabled link and see what happens.

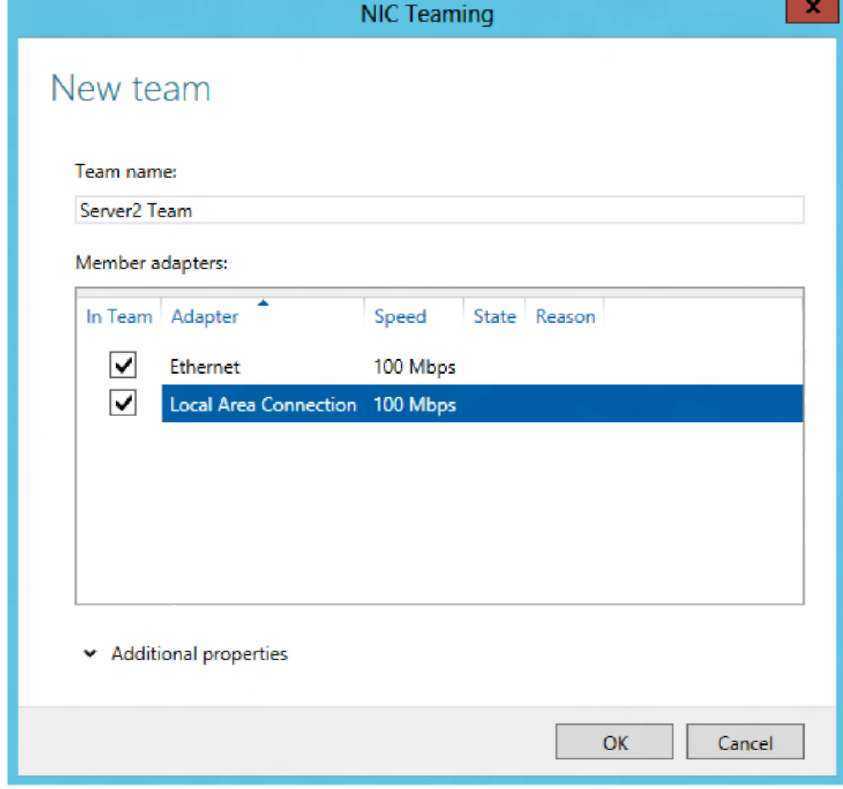
We are presented with this NIC Teaming dialog box where we can create a new team using the two network adapters that we have available to us, which are Ethernet0 and Ethernet1 2.
So, let’s go to Tasks, and click New Team.

In the New Team dialog box, we have several options to choose from:

Let’s go through each one by one and see what they do.
The Team Name is the name of the virtual NIC as we will see it in the network connections folder. This can be anything you want, I chose EthernetTeam.
Then we have to select the members of the team. We can choose to have several teams as it’s not required to add all the NICs under one team.
Then we have Additional properties. Now, I had to expand that list, since by default it’s hidden. Which means, it would be enough to just click OK after you selected the NICs and everything would be fine.
But in our case, we like to go into tiny details, so let’s see what each of the option does.
Teaming Mode is the mode the team will work on. We have several options: Static Teaming, Switch Independent and LACP.

We have one which is switch independent and we have two which are switch dependent. LACP stands for Link Aggregation Control Protocol. The switch independent options mean that we do not have to make any configuration changes on the switch side.


Using Switch Independent means that outgoing traffic will be load balanced using the algorithm we choose, but since the switches are not aware of the load balancing, the incoming traffic is not going to be load balanced.
Static configuration is where we configure the ports on the switch and plug the network cards in those specific ports. This way the switch is aware of the teaming and all traffic will be load balanced.
LACP is a lot more dynamic. We configure the switch rather than individual ports, which means that we can move the cables around and we would still get a load balanced scenario.
Now we also have to choose the load balancing algorithm.
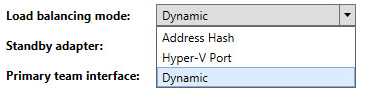
We have three of them: Address Hash, Hyper-V Port and Dynamic. Now let’s see what each does.
The Address Hash algorithm uses attributes of network traffic, port, IP address and MAC address to determine where the traffic should go to.
The Hyper-V port algorithm will tie a VM to a specific network card in the team. This works well if you have a lot of VMs since it’s a very good chance they will be distributed well between the adapters.
The Dynamic algorithm, which Microsoft recommends, uses specification from both worlds, address hash and Hyper-V to load balance the data.
Once we are done with the above configuration, we click OK and wait for the teaming to come online.
Thank you for taking the time of reading this article and come back for future articles on Windows Server. Enjoy!
SR-IOV-Capable Network Adapters
A NIC team in or under the Hyper-V host cannot protect SR-IOV traffic because it doesn’t go through the Hyper-V Switch. With the VM NIC Teaming option, you can configure two external Hyper-V Virtual Switches, each connected to its own SR-IOV-capable NIC.
Each VM can have a virtual function (VF) from one or both SR-IOV NICs and, in the event of a NIC disconnect, failover from the primary VF to the backup adapter (VF). Alternately, the VM may have a VF from one NIC and a non-VF vmNIC connected to another virtual switch. If the NIC associated with the VF gets disconnected, the traffic can failover to the other switch without loss of connectivity.
Because failover between NICs in a VM might result in traffic sent with the MAC address of the other vmNIC, each Hyper-V Virtual Switch port associated with a VM using NIC Teaming must be set to allow teaming.


