
Parameters
-Confirm
The Confirm switch specifies whether to show or hide the confirmation prompt. How this switch affects the cmdlet depends on if the cmdlet requires confirmation before proceeding.
- Destructive cmdlets (for example, Remove-* cmdlets) have a built-in pause that forces you to acknowledge the command before proceeding. For these cmdlets, you can skip the confirmation prompt by using this exact syntax: .
- Most other cmdlets (for example, New-* and Set-* cmdlets) don’t have a built-in pause. For these cmdlets, specifying the Confirm switch without a value introduces a pause that forces you acknowledge the command before proceeding.
| Type: | SwitchParameter |
| Aliases: | cf |
| Position: | Named |
| Default value: | None |
| Accept pipeline input: | False |
| Accept wildcard characters: | False |
| Applies to: | Exchange Server 2010, Exchange Server 2013, Exchange Server 2016, Exchange Server 2019 |
-Database
- Name
- Distinguished name (DN)
- GUID
| Type: | DatabaseIdParameter |
| Position: | Named |
| Default value: | None |
| Accept pipeline input: | False |
| Accept wildcard characters: | False |
| Applies to: | Exchange Server 2010, Exchange Server 2013, Exchange Server 2016, Exchange Server 2019 |
-Identity
| Type: | StoreMailboxIdParameter |
| Position: | Named |
| Default value: | None |
| Accept pipeline input: | False |
| Accept wildcard characters: | False |
| Applies to: | Exchange Server 2010, Exchange Server 2013, Exchange Server 2016, Exchange Server 2019 |
-MailboxState
- Disabled
- SoftDeleted
| Type: | MailboxStateParameter |
| Position: | Named |
| Default value: | None |
| Accept pipeline input: | False |
| Accept wildcard characters: | False |
| Applies to: | Exchange Server 2010, Exchange Server 2013, Exchange Server 2016, Exchange Server 2019 |
-WhatIf
The WhatIf switch simulates the actions of the command. You can use this switch to view the changes that would occur without actually applying those changes. You don’t need to specify a value with this switch.
| Type: | SwitchParameter |
| Aliases: | wi |
| Position: | Named |
| Default value: | None |
| Accept pipeline input: | False |
| Accept wildcard characters: | False |
| Applies to: | Exchange Server 2010, Exchange Server 2013, Exchange Server 2016, Exchange Server 2019 |
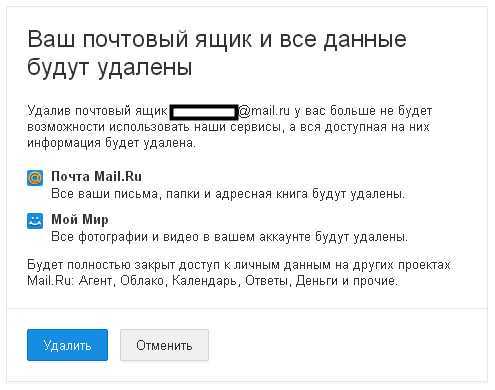
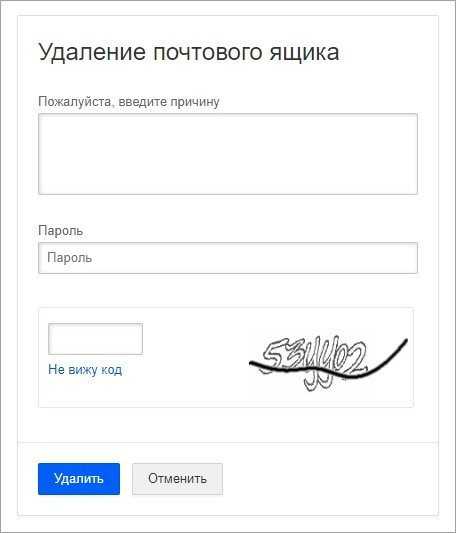
Disable mailboxes
Use the EAC to disable a mailbox
-
In the EAC, go to Recipients, and click the tab for the type of mailbox that you want to disable:
-
Mailboxes for user mailboxes and linked mailboxes.
-
Shared for shared mailboxes.
-
-
-
Click Search and enter the text to filter the list of mailboxes.
-
Use the Exchange Management Shell to disable a mailbox
To disable a mailbox, use this syntax:
This example disables the user mailbox that has the alias value danj.
This example disables the room mailbox named Conf Room 31/1234 (12).
How do you know this worked?
To verify that you’ve successfully disabled a mailbox, do any of these steps:
-
Notes:
-
When you delete a mailbox, the value of the DisconnectReason property is also , but the corresponding Active Directory user account is also deleted.
Then, run the previous command, which should now return results.
-
-
In the Exchange Management Shell, replace <UserIdentity> with the name or user principal name of the user (for example, user@contoso.com), and run this command to verify that the RecipientType property value is , not .
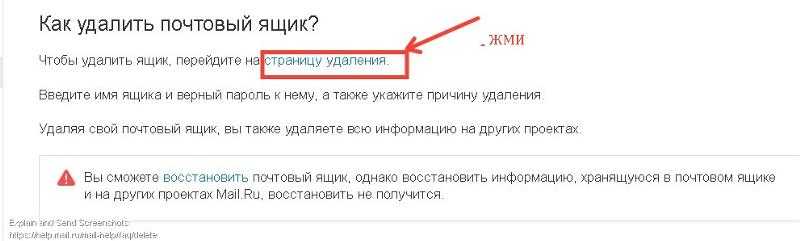
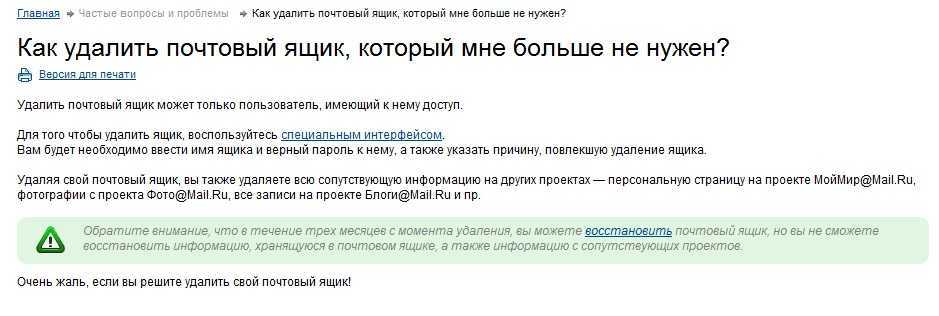
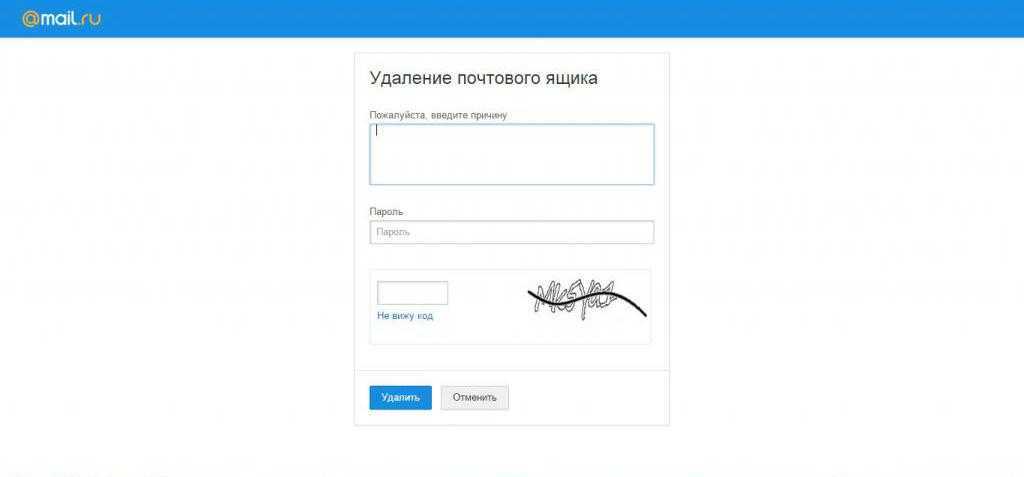
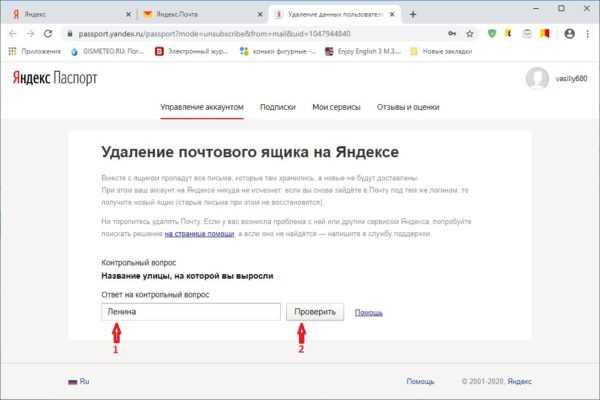
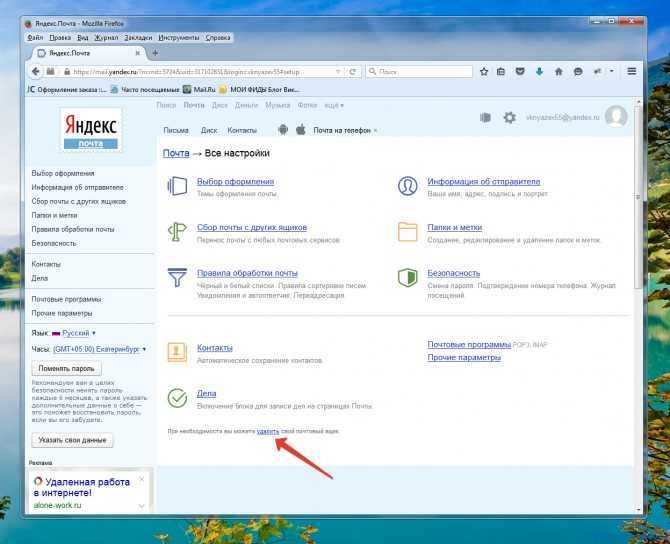
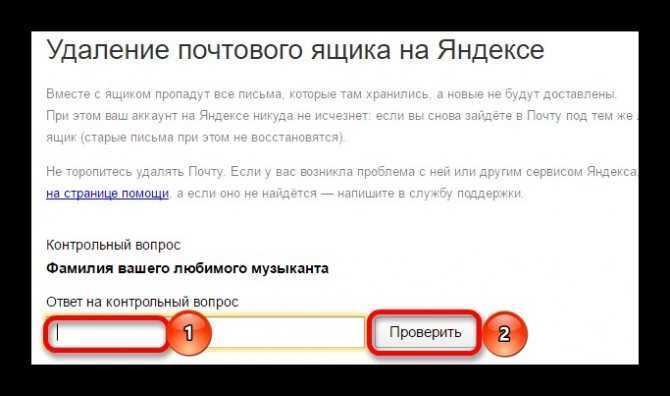
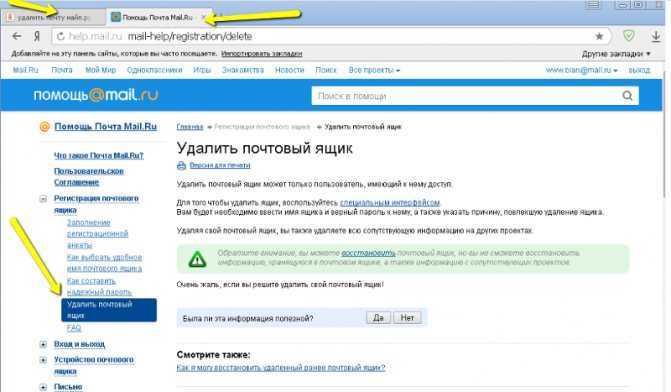
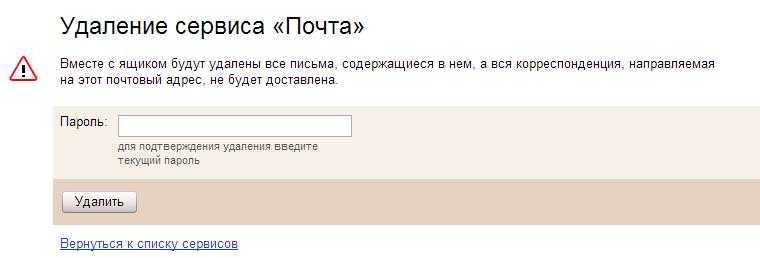
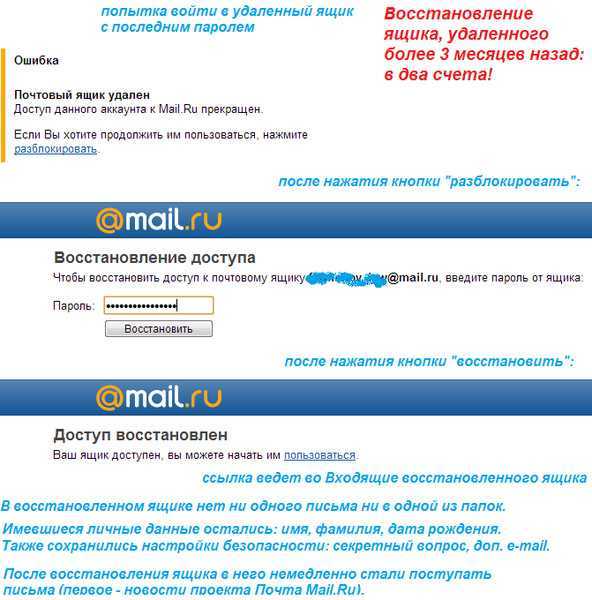
Восстановление удаленных почтовых ящиков в Exchange 2010.
Некоторое время назад я уже писал, как восстановить пользователя в AD, подробнее читаем здесь:
осталось дело за малым, восстановить ящик пользователя
По умолчанию, срок хранения удаленного почтового ящика в базе составляет 30 дней, и настраивается этот параметр для каждой базы отдельно на вкладке Limits (рис.1).
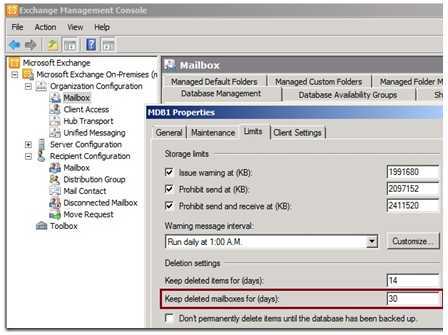
Рис.1: Установка срока хранения для удаленных почтовых ящиков.
Удалить почтовый ящик достаточно просто, для этого нужно всего лишь нажать на нем правой кнопкой мыши и выбрать действие Remove (Удалить). Но не забывайте, что при этом будет удалена и учетная запись пользователя в Active Directory! Если учетную запись необходимо сохранить, то нужно выбрать действие Disable (Отключить).
Что касается личных архивов в Exchange 2010, то их тоже можно отключить от почтовых ящиков при помощи действияDisable Archive. После отключения личный архив остается в базе данных также в течении 30 дней. В это время его можно восстановить, связав с любым существующим почтовым ящиком.
Примечание: Если отключить личный архив, а потом его включить, то почтовый ящик получит новый архив.
Восстановление почтовых ящиков и личных архивов.
Прежде чем восстановить почтовый ящик, его необходимо сначала найти. Так вот, все удаленные почтовые ящики и личные архивы находятся в разделе Disconnected Mailbox на уровне Recipient Configuration.
Примечание: Если объект был удален недавно, то сначала придется перезапустить службу Microsoft Exchange Information Store (Банк данных MicrosoftExchange) и выполнить команду Clean-MailboxDatabase.
В нашем случае перезапускать службуMicrosoft Exchange Information Store (Банк данных Microsoft Exchange) не потребовалось и мы просто выполнили команду:
Clean-MailboxDatabase head1
Подробней про синтаксис можно прочитать здесь: http://technet.microsoft.com/ru-ru/library/bb124076(v=exchg.141).aspx
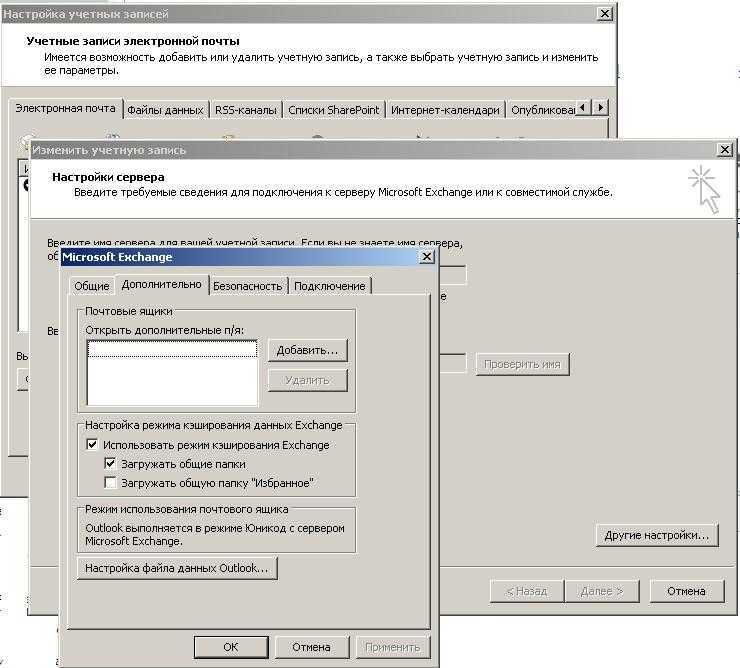
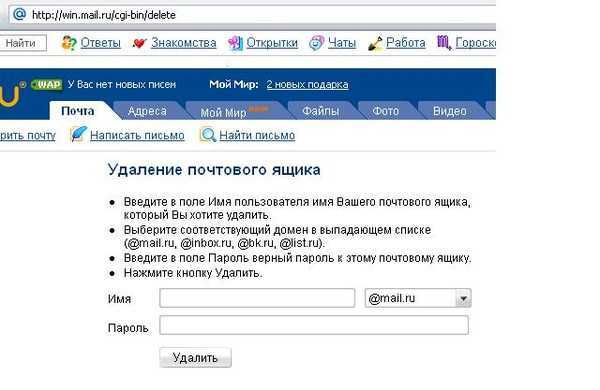
Чтобы восстановить почтовый ящик, нужно нажать на нем правой кнопкой мыши, и выбрать действие Connect.
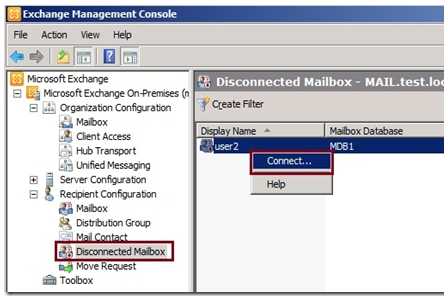
Рис.2: Подключение удаленного почтового ящика.
При этом будет запущен соответствующий мастер, который позволит вам подключить этот почтовый ящик к старой учетной записи (если он был отключен), либо создать нового пользователя и связать ящик с ним.
Вернуть личный архив можно также при помощи графической консоли, для этого необходимо выбрать действие Connect to Primary Mailbox.
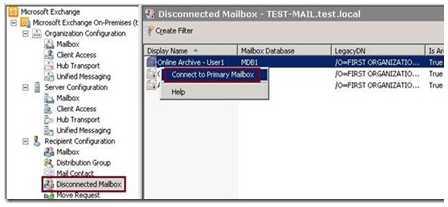
Рис.3: Восстановление отключенных архивов.
Работать с отключенными почтовыми ящиками и архивами можно также и через командную консоль управления EMS. Для этого необходимо выполнить ряд действий:
1. Узнаем имя отключенного ящика / архива:
Get-MailboxDatabase «MDB2» | Get-MailboxStatistics | where {$_.DisconnectDate -ne $null} | fl
В данном примере выполняется поиск всех отключенных почтовых ящиков и личных архивов в базе данных почтовых ящиков MDB2 и отображаются все дополнительные сведения о личных архивах, такие как идентификатор GUID и количество элементов.
2. Подключение почтового ящика:
Connect-Mailbox -Database <Mailbox_database > -Identity <Deleted_Mailbox>
3. Подключение личного архива к основному почтовому ящику.
Connect-Mailbox -Identity «8734c04e-981e-4ccf-a547-1c1ac7ebf3e2» -Archive -User «User1» -Database «MDB2»
В этом примере выполняется подключение архива пользователя User1 к основному почтовому ящику этого пользователя, и в качестве удостоверения личного архива используется идентификатор GUID.
Примечание: Придется подождать, пока закончится репликация Active Directory, прежде чем пользователь сможет получить доступ к этому личному архиву (подождать некоторое время действительно пришлось).
Путем нехитрых манипуляций и сам пользователь и его почта были восстановлены за достаточно короткий срок.
Всем хорошей работы!!!
P.S. Недавно получил интересный вопрос:
Примечание: Если отключить личный архив, а потом его включить, то почтовый ящик получит новый архив.
А как вернуть почтовому ящику старый архив?
Сам ранее не задавался таким вопросом, пришлось вдаться в тему:
Для начала, надо узнать GUID отключенного архива:
Get—Mailbox —Identity user@comp.loc | fl *archive*
В атрибуте DisabledArchiveDatabase отображается имя базы данных, в которой находится отключенный архивный ящик. В атрибуте DisabledArchiveGuid находится ID отключенного архива. Теперь возьмем эти значения и подставим в следующую команду:
Connect—Mailbox —Identity <DisabledArchiveGuid> —Archive —User user@comp.loc —Database <DisabledArchiveDatabase>
В этом случае должен быть приконнекчен именно, отключенный ранее архив.
Description
To view soft-deleted mailboxes, run the Get-MailboxStatistics cmdlet against a database using the property DisconnectReason with a value of SoftDeleted.
To view disabled mailboxes, run the Get-MailboxStatistics cmdlet against a database using the property DisconnectReason with a value of Disabled.
You need to be assigned permissions before you can run this cmdlet. Although this topic lists all parameters for the cmdlet, you may not have access to some parameters if they’re not included in the permissions assigned to you. To find the permissions required to run any cmdlet or parameter in your organization, see Find the permissions required to run any Exchange cmdlet.
Additional switches and parameters
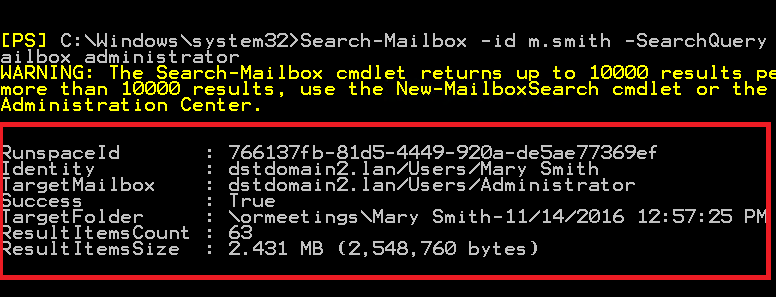
After you run the Search-Mailbox command with the -DeleteContent switch, the output is going to contain a very basic summary of the process (example in below image).
-EstimateResultOnly
As I mentioned earlier, you can use this switch to get the above type of summary, before using the -DeleteContent switch. Note that -EstimateResultOnly cannot be used together with -DeleteContent. Example:
-LogOnly
By default the -LogOnly switch sends the exact same basic information as -EstimateResultOnly to a specified mailbox. This is because the default log level is ‘Basic’. You can change this by raising the log level to full.
Note that, when using the -LogOnly switch, you have to define the target mailbox and folder and you cannot use the -DeleteContent switch. Example:
-LogLevel
You can also use the -LogLevel parameter together with the -DeleteContent switch to obtain detailed information about what has been deleted. Like above, you will have to raise the log level to full and specify a target mailbox and folder.
Parameters
-Confirm
The Confirm switch specifies whether to show or hide the confirmation prompt. How this switch affects the cmdlet depends on if the cmdlet requires confirmation before proceeding.
- Destructive cmdlets (for example, Remove-* cmdlets) have a built-in pause that forces you to acknowledge the command before proceeding. For these cmdlets, you can skip the confirmation prompt by using this exact syntax: .
- Most other cmdlets (for example, New-* and Set-* cmdlets) don’t have a built-in pause. For these cmdlets, specifying the Confirm switch without a value introduces a pause that forces you acknowledge the command before proceeding.
| Type: | SwitchParameter |
| Aliases: | cf |
| Position: | Named |
| Default value: | None |
| Accept pipeline input: | False |
| Accept wildcard characters: | False |
| Applies to: | Exchange Server 2010, Exchange Server 2013, Exchange Server 2016, Exchange Server 2019 |
-DomainController
The DomainController parameter specifies the domain controller that’s used by this cmdlet to read data from or write data to Active Directory. You identify the domain controller by its fully qualified domain name (FQDN). For example, dc01.contoso.com.
| Type: | Fqdn |
| Position: | Named |
| Default value: | None |
| Accept pipeline input: | False |
| Accept wildcard characters: | False |
| Applies to: | Exchange Server 2010, Exchange Server 2013, Exchange Server 2016, Exchange Server 2019 |
-Identity
- Name
- Distinguished name (DN)
- GUID
| Type: | DatabaseIdParameter |
| Position: | 1 |
| Default value: | None |
| Accept pipeline input: | True |
| Accept wildcard characters: | False |
| Applies to: | Exchange Server 2010, Exchange Server 2013, Exchange Server 2016, Exchange Server 2019 |
-WhatIf
The WhatIf switch simulates the actions of the command. You can use this switch to view the changes that would occur without actually applying those changes. You don’t need to specify a value with this switch.
| Type: | SwitchParameter |
| Aliases: | wi |
| Position: | Named |
| Default value: | None |
| Accept pipeline input: | False |
| Accept wildcard characters: | False |
| Applies to: | Exchange Server 2010, Exchange Server 2013, Exchange Server 2016, Exchange Server 2019 |
What do you need to know before you begin?
-
Estimated time to complete: 2 minutes.
-
To open the EAC, see Exchange admin center in Exchange Server. To open the Exchange Management Shell, see Open the Exchange Management Shell.
-
Create a new user account in Active Directory to connect the deleted mailbox to. Or use the Get-User cmdlet in the Exchange Management Shell to verify that the Active Directory user account that you want to connect the deleted mailbox to exists and that it isn’t already associated with another mailbox. To connect a deleted mailbox to a user account, the account must exist and the value for the RecipientType property has to be , which indicates that the account isn’t already mailbox-enabled.
For on-premises Exchange organizations, you can also verify this information in Active Directory Users and Computers.
Important
-
-
You need to be assigned permissions before you can perform this procedure or procedures. To see what permissions you need, see the «Recipient Provisioning Permissions» section in the Recipients Permissions topic.
-
For information about keyboard shortcuts that may apply to the procedures in this topic, see Keyboard shortcuts in the Exchange admin center.
-
Having problems? Ask for help in the Exchange forums. Visit the forums at: Exchange Server, Exchange Online, or Exchange Online Protection.
Используйте центр & безопасности PowerShell для удаления элементов из папки «Извлекаемые элементы» для почтовых ящиков, которые не находятся на удержании или не имеют возможности восстановления одного элемента
Элементы в папке «Извлекаемые элементы» можно удалить с помощью cmdlets New-ComplianceSearch и New-ComplianceSearchAction в центре безопасности & PowerShell.
Для поиска элементов, расположенных в папке «Извлекаемые элементы», рекомендуется выполнить целевые коллекции. Это означает, что область поиска сузится только до элементов, расположенных в папке «Извлекаемые элементы». Это можно сделать, запуская сценарий в статье Use Content Search for targeted collections. В этом скрипте возвращается значение свойства ID папки для всех подмостков в целевой папке «Возвращаемые элементы». Затем для возврата элементов, расположенных в этой папке, используется ИД папки в поисковом запросе.
Ниже представлен обзор процесса поиска и удаления элементов в папке «Извлекаемые элементы» пользователя:
-
Запустите сценарий целевой коллекции, который возвращает ИД папок для всех папок в почтовом ящике целевого пользователя. Скрипт подключается к Exchange Online PowerShell и security & PowerShell в том же сеансе PowerShell. Дополнительные сведения см. в
-
Скопируйте папки для всех подмостков в папке «Извлекаемые элементы». Кроме того, можно перенаправить выход скрипта в текстовый файл.
Вот список и описание подмастерей в папке «Извлекаемые элементы», которые можно искать и удалять из:
-
Удаления. Содержит элементы с мягким удалением, срок хранения удаленных элементов которых не истек. Пользователи могут восстанавливать удаленные элементы из этого подмастеря с помощью средства Восстановления удаленных элементов в Outlook.
-
Purges: Содержит трудно удаленные элементы, срок хранения удаленных элементов которых истек. Пользователи также могут удалить элементы с помощью удаления элементов из папки «Извлекаемые элементы». Если почтовый ящик находится в удержании, элементы с жесткой удаляемой почтой сохраняются. Этот подмосток не виден конечным пользователям.
-
DiscoveryHolds. Содержит трудноутвердимые элементы, которые были сохранены в удержании электронных данных или политике хранения. Этот подмосток не виден конечным пользователям.
-
SubstrateHolds: содержит трудно удаленные элементы из Teams и других облачных приложений, которые были сохранены политикой хранения или другим типом удержания. Этот подмосток не виден конечным пользователям.
-
-
Используйте комдлет New-ComplianceSearch (в центре обеспечения безопасности & PowerShell) или используйте средство поиска контента в Центр соответствия требованиям Microsoft 365 для создания поиска контента, возвращаемого из папки возвращаемых элементов целевого пользователя. Это можно сделать, включив папку FolderId в поисковый запрос для всех подвещений, которые необходимо искать. Например, следующий запрос возвращает все сообщения в подволдингах Purges и eDiscoveryHolds:
Дополнительные сведения и примеры выполнения поиска контента с использованием свойства ID папки см. в примере Использование ИД папки или documentlink для выполнения
Примечание
Если для поиска в папке «Извлекаемые элементы» используется кодлет New-ComplianceSearch, для выполнения поиска обязательно используйте кодлет Start-ComplianceSearch.
-
После создания поиска контента и проверки того, что он возвращает элементы, которые необходимо удалить, используйте команду (в центре обеспечения безопасности & PowerShell) для постоянного удаления элементов, возвращаемых поиском контента, созданным на предыдущем шаге. Например, вы можете запустить команду, аналогичную следующей команде:
-
При запуске предыдущей команды удаляется не более 10 элементов на почтовый ящик. Это означает, что вам может потребоваться выполнить команду несколько раз, чтобы удалить все элементы, которые необходимо удалить в папке «Извлекаемые элементы». Чтобы удалить дополнительные элементы, сначала необходимо удалить предыдущее действие по очистке от проверки соответствия требованиям. Вы делаете это, запуская cmdlet. Например, чтобы удалить действие очистки, которое было выполнить на предыдущем шаге, запустите следующую команду:
После этого можно создать новое действие по очистке от поиска соответствия требованиям, чтобы удалить больше элементов. Перед созданием нового действия необходимо удалить каждое действие очистки.
Чтобы получить список действий по поиску соответствия требованиям, можно запустить этот список. Действия очистки идентифицированы по приложению к имени поиска.
Parameters
-Archive
The on-premises mail user and its associated cloud-based mailbox aren’t removed if you use this switch.
| Type: | SwitchParameter |
| Position: | Named |
| Default value: | None |
| Accept pipeline input: | False |
| Accept wildcard characters: | False |
| Applies to: | Exchange Server 2010, Exchange Server 2013, Exchange Server 2016, Exchange Server 2019 |
-Confirm
The Confirm switch specifies whether to show or hide the confirmation prompt. How this switch affects the cmdlet depends on if the cmdlet requires confirmation before proceeding.
- Destructive cmdlets (for example, Remove-* cmdlets) have a built-in pause that forces you to acknowledge the command before proceeding. For these cmdlets, you can skip the confirmation prompt by using this exact syntax: .
- Most other cmdlets (for example, New-* and Set-* cmdlets) don’t have a built-in pause. For these cmdlets, specifying the Confirm switch without a value introduces a pause that forces you acknowledge the command before proceeding.
| Type: | SwitchParameter |
| Aliases: | cf |
| Position: | Named |
| Default value: | None |
| Accept pipeline input: | False |
| Accept wildcard characters: | False |
| Applies to: | Exchange Server 2010, Exchange Server 2013, Exchange Server 2016, Exchange Server 2019 |
-DomainController
The DomainController parameter specifies the domain controller that’s used by this cmdlet to read data from or write data to Active Directory. You identify the domain controller by its fully qualified domain name (FQDN). For example, dc01.contoso.com.
| Type: | Fqdn |
| Position: | Named |
| Default value: | None |
| Accept pipeline input: | False |
| Accept wildcard characters: | False |
| Applies to: | Exchange Server 2010, Exchange Server 2013, Exchange Server 2016, Exchange Server 2019 |
-Identity
The Identity parameter specifies the cloud-based mailbox. Valid values are:
- ADObjectID
- GUID
- Distinguished name (DN)
- Domain\Username
- User principal name (UPN)
- LegacyExchangeDN
- Email address
- User alias
| Type: | RemoteMailboxIdParameter |
| Position: | 1 |
| Default value: | None |
| Accept pipeline input: | True |
| Accept wildcard characters: | False |
| Applies to: | Exchange Server 2010, Exchange Server 2013, Exchange Server 2016, Exchange Server 2019 |
-IgnoreDefaultScope
The IgnoreDefaultScope switch tells the command to ignore the default recipient scope setting for the Exchange Management Shell session, and to use the entire forest as the scope. This allows the command to access Active Directory objects that aren’t currently available in the default scope.
Using the IgnoreDefaultScope switch introduces the following restrictions:
- You can’t use the DomainController parameter. The command uses an appropriate global catalog server automatically.
- You can only use the DN for the Identity parameter. Other forms of identification, such as alias or GUID, aren’t accepted.
| Type: | SwitchParameter |
| Position: | Named |
| Default value: | None |
| Accept pipeline input: | False |
| Accept wildcard characters: | False |
| Applies to: | Exchange Server 2010, Exchange Server 2013, Exchange Server 2016, Exchange Server 2019 |
-IgnoreLegalHold
| Type: | SwitchParameter |
| Position: | Named |
| Default value: | None |
| Accept pipeline input: | False |
| Accept wildcard characters: | False |
| Applies to: | Exchange Server 2010, Exchange Server 2013, Exchange Server 2016, Exchange Server 2019 |
-WhatIf
The WhatIf switch simulates the actions of the command. You can use this switch to view the changes that would occur without actually applying those changes. You don’t need to specify a value with this switch.
| Type: | SwitchParameter |
| Aliases: | wi |
| Position: | Named |
| Default value: | None |
| Accept pipeline input: | False |
| Accept wildcard characters: | False |
| Applies to: | Exchange Server 2010, Exchange Server 2013, Exchange Server 2016, Exchange Server 2019 |
Очистить почтовый ящик Exchange 2010.
В прошлом посте
я писал, о том, как удалось найти ящик, рассылающий спам, но этот ящик необходимо еще и очистить, как говорил ранее, к тому моменту в нем находилось 367000 писем, что не есть ГУД, так как они просто не нужны (все это СПАМ).
Самый простой вариант это «прикрутить» ящик к Outlook и очистить его, но при попытке его прикрутить Outlook впадает в глубокий «гидростопор», вероятно количество писем сказывается, соответственно этот вариант нам не подходит и ящик надо зачистить непосредственно на сервере. Тема актуальна и для любого другого ящика, поэтому приступаю…
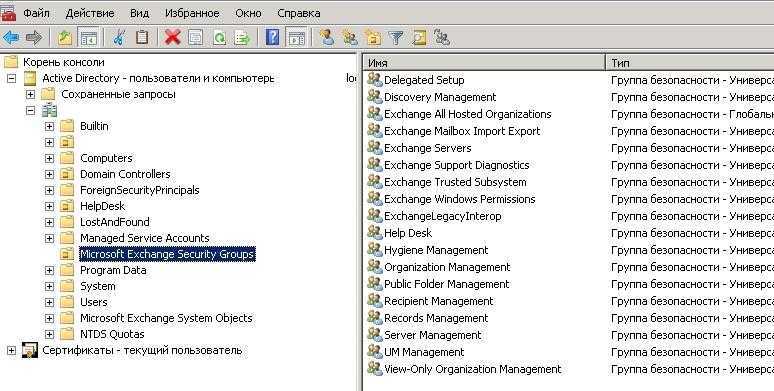
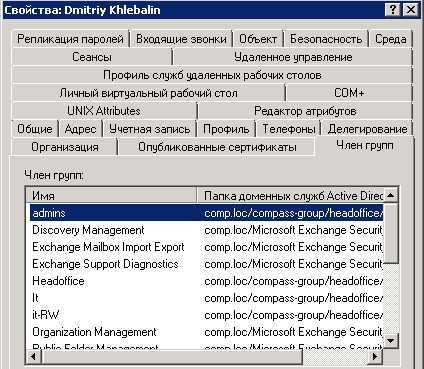
Сначала имеет смысл проверить, есть ли права на очистку для этого проверяем входит ли моя учетка в следующие группы разрешений:
Discovery Management — я уже вхожу
Exchange Support Diagnostics
видим что последних двух групп не существует…
А вот зачем они нужны читаем вот здесь:
-Members «<domain\groupname>»
Создаем эти группы и соответственно добавляем себя в них (это можно сделать через GUI и раздать разрешения руками, а можно вот так, это будет быстрей):
и
C:\Windows\system32>New-RoleGroup -Name «Exchange Support Diagnostics» -Roles «Support Diagnostics» -DisplayName «Exchange Support Diagnostics» -Description «This group will provide access to support diagnostics cmdlets within entire Exchange Organization.»
Заходим в оснастку проверяем что группы есть и моя учетка в них добавлена:
Далее приступаем непосредственно к удалению почтовых сообщений из почтового ящика…
Но для этого еще необходимо иметь права на удаления, раздам их себе, сделать их можно или так:
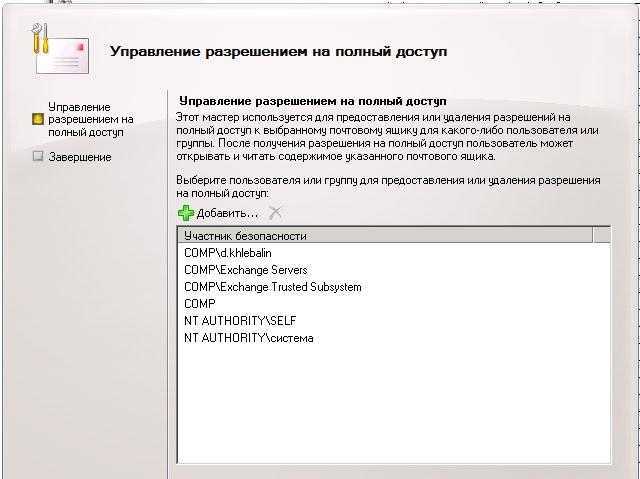
или через PS (что собственно равносильно):
Add-MailboxPermission «hotline» -User «Dmitriy Khlebalin» -AccessRights FullAccess
В обоих случаях у себя в Outlook видим следующее, появился ящик hotline (если на него нажать и попытаться посмотреть содержимое, то он начнет тянуть почту или вообще повиснет как в моем текущем случае, это в любом случае время поэтому я более ничего не трогаю) :
Права есть возвращаемся к удалению…
Get-Mailbox | where-object {$_.alias -match «hotline»}

далее удаляем все
Search-Mailbox -Identity «hotline» -DeleteContent

Жмем Y
через несколько минут, ящик пуст…
Эта операция удалит всю почту из ящика, но бывают ситуации, когда необходимо удалить часть почты, например до определенной даты, в этом мне поможет параметр SearchQuery, в котором можно задать различные параметры, отформатированные с использованием дополнительного синтаксиса запроса (AQS).
Подробнее об это можно почитать тут:
тут
или тут
Далее можно использовать следующие варианты:
удаление сообщений из почтового ящика «hotline», полученных в период с 1-го по 15 августа 2014 г.:
Search-Mailbox -Identity «hotline» -SearchQuery «Received:08/01/2014..08/15/2014» -DeleteContent
или
удаление сообщений из почтового ящика «hotline», в теме которых есть фраза «При заказе комплексного ремонта»
Search-Mailbox -Identity «hotline» -SearchQuery «Subject:’При заказе комплексного ремонта’» -DeleteContent
или
удаление сообщения в теме которых есть фраза «При заказе комплексного ремонта » из всех почтовых ящиков в почтовой базе данных «head»
Get-Mailbox -Database «head» | Search-Mailbox -SearchQuery «Subject:’При заказе комплексного ремонта’» -DeleteContent
или
удаление сообщений из почтового ящика «hotline», полученных до 1-го августа 2014 г.:
Search-Mailbox -Identity «hotline» -SearchQuery «Received:08/01/2014» -DeleteContent
На сегодня это все…
P.S. Единственное что не удалось понять, что после того как удалил необходимую почту из необходимого мне ящика (в данном случае это hotline), лишаю себя полных прав на управление этим ящиком, перезапускаю Outlook, но он как был в Outlook так и остался, хотя доступа в него у же нет. Но по логике и сам ящик должен был отмонтироваться, но почему-то не отмонтировался. Вот как его отмонтировать, я так и не смог понять? Если есть варианты, прошу отписать в комментарии… Заранее благодарю за участие в обсуждении вопроса.
То есть вот тут он отображается в Outlook:
А если посмотреть вот сюда, то его как дополнительного ящика нет:
Всем хорошей работы!!!
Connect a deleted mailbox
Use the EAC to connect a deleted mailbox
-
In the EAC, go to Recipients > Mailboxes.
-
Click More , and then click Connect a mailbox.
A list of mailboxes that are disconnected on the selected Exchange server in your Exchange organization will be displayed.
Note
This list of disconnected mailboxes includes disabled mailboxes, deleted mailboxes, and soft-deleted mailboxes.
-
Click the deleted mailbox that you want to connect a user to, and then click Connect.
-
A list of user accounts that aren’t mail-enabled is displayed.
-
Click the user that you want to connect the deleted mailbox to, and then click OK.
Exchange will connect the deleted mailbox to the user account that you selected.
Use the Exchange Management Shell to connect a deleted mailbox
Note
Note
You can also use the values for the or properties to identify the deleted mailbox.
This example connects a room mailbox.
This example connects an equipment mailbox.
This example connects a shared mailbox.
Note
You can also use the or values to identify the deleted mailbox.
For detailed syntax and parameter information, see Connect-Mailbox.
How do you know this worked?
To verify that you’ve successfully connected a deleted mailbox to a user account, do one of the following steps:
-
In the Exchange Management Shell, run the following command.
Deleting emails from multiple mailboxes
For example, the below commands delete content that matches #Your query# from all mailboxes that can be found in an organization:
NOTE: When using the foreach method, I recommend appending the command with a -Force switch. Otherwise you will have to confirm the content deletion for each individual mailbox.
The result of the two above commands is identical in terms of deleted content.
If you add a target mailbox and folder to the command (see below), the Get-Mailbox pipeline will generate 1 search summary and log file, while the foreach loop will generate separate search summaries and log files for each mailbox.
Both methods allow for limiting the scope of mailboxes on which the search and delete operation is performed.
The Get-Mailbox pipeline also lets you perform simple scoping operations, such as limiting the output to a defined mailbox database, organizational unity, domain, or mailboxes of a certain type. For further details see this Microsoft documentation.
Сведения о параметрах нежелательной почты в Outlook
Чтобы включить, отключить и настроить параметры клиентского фильтра нежелательной почты, доступные в Outlook, используйте групповую политику. Дополнительные сведения см. в материалах Administrative Template files (ADMX/ADML) и Office Customization Tool для Приложения Microsoft 365 для предприятий, Office 2019 г. и Office 2016 г., а также сведения о развертывании параметров нежелательной почты, таких как список отправителей Сейф,с помощью групповой политики .
Когда фильтр нежелательной почты Outlook установлен для автоматической фильтрации в параметрах нежелательной почты нежелательной почты, Outlook не пытается классифицировать сообщения как спам, но по-прежнему использует коллекцию безопасных списков > > (список отправителей Сейф, список получателей Сейф и список заблокированных отправителей) для перемещения сообщений в папку нежелательной почты.
Если для фильтра нежелательной почты Outlook выбран параметр Низкий или Высокий, то фильтр нежелательной почты Outlook использует собственную технологию фильтрации SmartScreen для определения и перемещения спама в папку «Нежелательная почта». Такая классификация спама выполняется отдельно от порога вероятности нежелательной почты, настроенного для организации Exchange или почтового ящика. Фактически Outlook игнорирует значение вероятности нежелательной почты, присвоенное сообщению программой Exchange (это касается всех значений вероятности нежелательной почты, отличных от -1), и руководствуется собственными критериями определения того, является ли сообщение спамом (хотя выводы о том, что сообщение является нежелательным, сделанные Exchange и Outlook, могут совпадать).
Примечание
В ноябре 2016 г. корпорация Майкрософт прекратила выпуск обновлений определения нежелательной почты для фильтров SmartScreen в Exchange и Outlook. Существующие определения нежелательной почты SmartScreen были оставлены на месте, но их эффективность со временем, скорее всего, будет ухудшаться. Дополнительные сведения см. в статье Прекращение поддержки SmartScreen в Outlook и Exchange.
Итак, для перемещения сообщений в папку «Нежелательная почта» фильтр нежелательной почты Outlook может использовать как коллекции списков надежных отправителей почтового ящика, так и собственную классификацию спама, даже если в почтовом ящике отключены правило нежелательной почты и/или порог вероятности нежелательной почты. Разница заключается в том, на основании чего сообщение перемещается в папку «Нежелательная почта», согласно правилу нежелательной почты на сервере или в соответствии с настройками фильтра нежелательной почты в клиенте Outlook.
Outlook и Outlook в Интернете поддерживают коллекцию safelist. Коллекция safelist сохранена в Exchange почтовом ящике, поэтому изменения в коллекции safelist в Outlook отображаются в Outlook в Интернете и наоборот. Функция агрегации безопасного списка агента фильтра контента делит эти списки со встроенными Exchange антиспама. Дополнительные сведения см. в агрегации Safelist.
См. также
- Папки и элементы в веб-службах Exchange
- Разработка клиентов веб-служб для Exchange
- Папка «элементы с возможностью восстановления»
- Exchange 2013: удаление повторяющихся рядов программным способом из серверов Exchange Server
- Exchange 2013: Программное удаление задач из учетной записи на серверах Exchange Server
- Exchange 2013: пустые папки на серверах Exchange Server программным способом
- Exchange 2013: Программное удаление папок из серверов Exchange Server
- Exchange 2013: Программное удаление многих элементов из серверов Exchange Server
- Exchange 2013: Программное удаление контактов из серверов Exchange Server
- Удаление встреч и отмена собраний с помощью EWS в Exchange
- Управление параметрами сохраняемого приложения с помощью EWS в Exchange
Delete mailboxes
Use the EAC to delete a mailbox
-
In the EAC, go to the location for the type of mailbox that you want to delete:
-
Recipients > Mailboxes for user mailboxes and linked mailboxes.
-
Recipients > Resources for room and equipment mailboxes.
-
Recipients > Shared for shared mailboxes.
-
Public folders > Public folder mailboxes for public folder mailboxes.
-
-
-
Click Search and enter the text to filter the list of mailboxes.
-
To delete a mailbox, use this syntax:
This example deletes the equipment mailbox named Fleet Van (16).
How do you know this worked?
To verify that you’ve successfully deleted a mailbox, do any of these steps:
-
In Active Directory Users and Computers, verify that the associated account is no longer listed. Note that mailbox types other than user and linked mailboxes also have associated user accounts that are disabled (for example, room, equipment, arbitration, shared, and public folder mailboxes).
-
Notes:
-
Then, run the previous command, which should now return results.
-
-
In the Exchange Management Shell, replace <UserIdentity> with the name or user principal name of the user (for example, user@contoso.com), and run this command to verify that the user can’t be found.
What do you need to know before you begin?
-
Estimated time to complete each procedure: 2 minutes.
-
For more information about accessing and using the EAC, see Exchange admin center in Exchange Server. To learn how to open the Exchange Management Shell in your on-premises Exchange organization, see Open the Exchange Management Shell.
-
You need to be assigned permissions before you can perform this procedure or procedures. To see what permissions you need, see the «Recipient Provisioning Permissions» section in the Recipients Permissions topic.
-
For information about keyboard shortcuts that may apply to the procedures in this topic, see Keyboard shortcuts in the Exchange admin center.
Tip
Having problems? Ask for help in the Exchange forums. Visit the forums at: Exchange Server, Exchange Online, or Exchange Online Protection.
Limiting the scope of deleted items
You can limit the scope of the search & delete process using these parameters:
-SearchQuery
In Exchange 2010, 2013 and 2016 the range of queryable item properties and operations you can perform on them is quite wide.
You can use all properties listed in this article and the operations you can perform on them come courtesy of KQL (Keyword Query Language). Specific examples of queries in .
Note: Exchange 2010 uses a query language, which is slightly less agile. Learn more in this Microsoft documentation.
-SearchDumpster
By default the Recoverable items folder of a mailbox is searched. To exclude it add to your script.
-DoNotIncludeArchive
Excludes the archive of a given mailbox (switch).
-SearchDumpsterOnly
Limits the search and deletion to the Recoverable items folder of a given mailbox (switch).
Restore a deleted mailbox
Note
You can’t use the EAC to restore a deleted mailbox.
Use the Exchange Management Shell to restore a deleted mailbox
To create a mailbox restore request, you have to use the display name, legacy distinguished name (DN), or mailbox GUID of the deleted mailbox. Use the Get-MailboxStatistics cmdlet to display the values of the , , and properties for the deleted mailbox that you want to restore. For example, run the following commands to return this information for all disabled and deleted mailboxes in your organization.
For detailed syntax and parameter information, see New-MailboxRestoreRequest.
How do you know this worked?
To verify that you’ve successfully restored a deleted mailbox to the target mailbox, run the Get-MailboxRestoreRequest cmdlet to display information about the restore request. If the restore request was successfully created, the Status property will have a value of , , or . After the restore request is completed, the contents from the deleted mailbox will appear in the target mailbox.
For more information, see:


