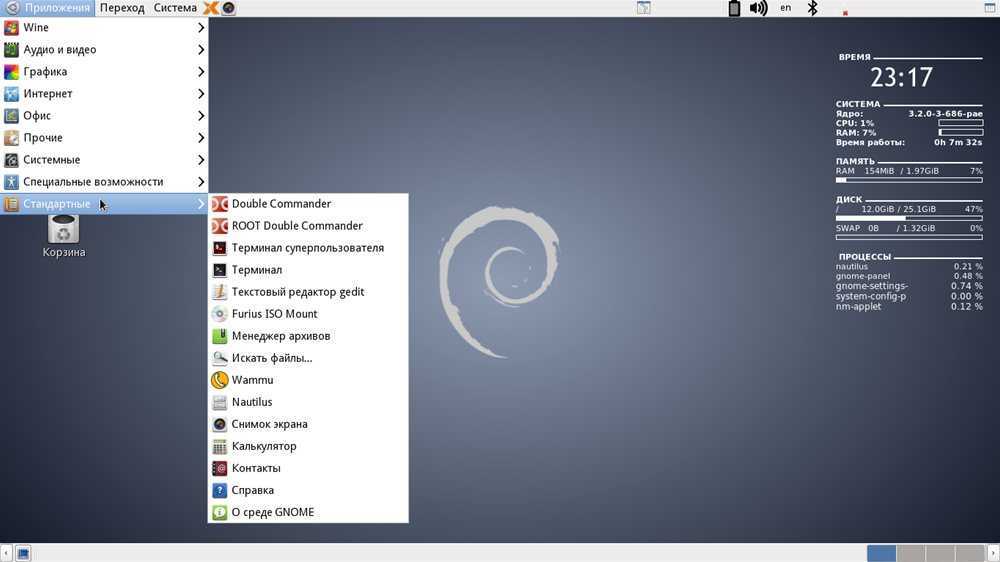
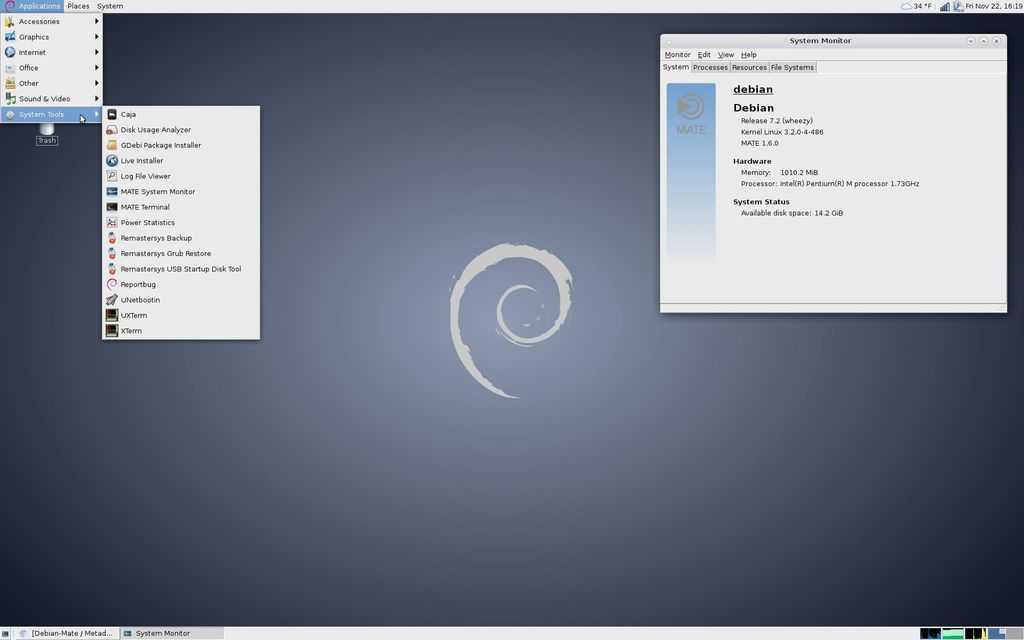
Создание SWAP-файла
Создадим файл c именем swap размером 4 G в папке корне системы /:
$ sudo dd if=/dev/zero of=/swap.img bs=1024 count=4000000
4000000+0 записей получено
4000000+0 записей отправлено
4096000000 байт (4,1 GB, 3,8 GiB) скопирован, 45,6991 s, 89,6 MB/s
|
1 |
$sudo dd if=devzero of=swap.img bs=1024count=4000000 4000000+записейполучено 4000000+записейотправлено 4096000000байт(4,1GB,3,8GiB)скопирован,45,6991s,89,6MBs |
Форматируем файл в формат свопа:
$ sudo mkswap /swap.img
mkswap: /swap.img: insecure permissions 0644, 0600 suggested.
Setting up swapspace version 1, size = 3,8 GiB (4095995904 bytes)
без метки, UUID=6a46beca-c117-4c53-8b05-3641fc85b7e1
|
1 |
$sudo mkswapswap.img mkswapswap.imginsecure permissions0644,0600suggested. Setting up swapspace version1,size=3,8GiB(4095995904bytes) безметки,UUID=6a46beca-c117-4c53-8b05-3641fc85b7e1 |
Подключаем файл к системе:
$ sudo swapon /swap.img
swapon: /swap.img: insecure permissions 0644, 0600 suggested.
|
1 |
$sudo swaponswap.img swaponswap.imginsecure permissions0644,0600suggested. |
Проверяем результат работы:
$ sudo swapon -s
Имя файла Тип Размер Исп-но Приоритет
/swap.img file 3999996 0 -2
|
1 |
$sudo swapon-s ИмяфайлаТипРазмерИсп-ноПриоритет swap.img file3999996-2 |
Сделаем чтобы swap монтировался при загрузке. Для этого добавляем в fstab необходимый параметр:
$ nano /etc/fstab
# Подключим swap при загрузке
/swap.img swap swap defaults 0 0
|
1 |
$nanoetcfstab swap.img swap swap defaults |
Сохраняем файл и перезагружаемся.
$ sudo reboot
| 1 | $sudo reboot |
Проверяем:
$ swapon -s
Имя файла Тип Размер Исп-но Приоритет
/swap.img file 3999996 0 -2
|
1 |
$swapon-s ИмяфайлаТипРазмерИсп-ноПриоритет swap.img file3999996-2 |
Usage
There are several ways to configure and manage zram device(-s):
-
using zram and zram_control sysfs attributes
-
using zramctl utility, provided by util-linux (util-linux@vger.kernel.org).
In this document we will describe only ‘manual’ zram configuration steps,
IOW, zram and zram_control sysfs attributes.
In order to get a better idea about zramctl please consult util-linux
documentation, zramctl man-page or zramctl –help. Please be informed
that zram maintainers do not develop/maintain util-linux or zramctl, should
you have any questions please contact util-linux@vger.kernel.org
Ускорение загрузки ядра Linux
Параметры загрузки ядра находятся в файле /etc/default/grub. Изменения нужно внести в значение строки GRUB_CMDLINE_LINUX_DEFAULT (значение в скобках, после знака = )
quiet — тихий вариант загрузки, выводит минимум информации
rootfstype=ext4 — в какую ФС отформатирован корень (в моём случае btrfs)
libahci.ignore_sss=1— ускоряет загрузку жестких дисков
raid=noautodetect-отключение raid
selinux=0 — система контроля доступа, которая не нужна на домашнем ПК
plymouth.enable=0— отключает заставку
lpj=0000000 -позволяет задать константу loops_per_jiffy, чтобы ядро её каждый раз не вычисляло. Значение индивидуально для каждого компьютера. Чтобы её узнать, нужно открыть ещё один терминал и там ввести «dmesg | grep ‘lpj=’». Полученное значение скопировать.
В итоге, строка будет иметь примерно такой вид:
GRUB_CMDLINE_LINUX_DEFAULT=»quiet rootfstype=ext4 libahci.ignore_sss=1 raid=noautodetect selinux=0 plymouth.enable=0 lpj=12053560″


Для указания корневого раздела желательно не использовать UUID, быстрее будет, если написать прямо. Добавьте в тот же файл строчку:
GRUB_DISABLE_LINUX_UUID=true
После этой операции нужно обновить конфигурацию GRUB
sudo update-grub
zram 技术的由来
zram(也称为 zRAM,先前称为 compcache)是 Linux 内核的一项功能,可提供虚拟内存压缩。zram 通过在 RAM 内的压缩块设备上分页,直到必须使用硬盘上的交换空间,以避免在磁盘上进行分页,从而提高性能。由于 zram 可以用内存替代硬盘为系统提供交换空间的功能,zram 可以在需要交换 / 分页时让 Linux 更好利用 RAM ,在物理内存较少的旧电脑上尤其如此。
即使 RAM 的价格相对较低,zram 仍有利于嵌入式设备、上网本和其它相似的低端硬件设备。这些设备通常使用固态存储,它们由于其固有性质而寿命有限,因而避免以其提供交换空间可防止其迅速磨损。此外,使用 zRAM 还可显著降低 Linux 系统用于交换的 I/O 。
zram 在 2009 年的时候就进了 kernel 的 staging 目录,并于 2014 年 3 月 30 日发布的 3.14 版本正式合并入 Linux 内核主线。在 2014 年 6 月 8 日发布的 3.15 版本的 Linux 内核中,zram 已可支持 LZ4 压缩算法,而 LZO 仍然作为默认的压缩后端。内核 3.15 中的修改还改进了性能,以及经由 sysfs 切换压缩算法的能力。
Lubuntu 于 13.10 开始使用 zram 。截至 2012 年 12 月,Ubuntu 考虑为小内存的计算机默认启用 zram 。 Google 在 Chrome OS 中使用 zram,它也成为了 Android 4.4 及以后版本设备的一个选项。
本文主要介绍在 Android 设备上使用的 zram swap,它可以让小内存的设备在多任务的情况下切换自如,提高用户体验。
zram swap 主要原理就是从内存分配一块区域出来用作 swap 分区,每次如果内存空间不够了,不是把应用程序杀掉,而是把应用程序所占用的内存数据复制到 swap 分区,等切换回来的时候就可以直接把这部分数据恢复到内存当中,节省重新开启所需的时间。而被放到 swap 分区的应用程序,所占用的内存都是被压缩过的,比如,微信在普通内存中占用 50 MB 的空间,如果压缩率为 0.4,则放到 swap 分区里面的数据只需要 20 MB 的空间,这样 swap 分区里面就可以存放更多后台临时不用的应用程序,变相扩展了内存的大小。
App optimization tips
- Review Manage your app’s memory and these blog posts:
- Remove any unused assets from preinstalled apps using (this should help make the app smaller).
- Use the PNG format for assets, especially when they have transparent areas.
- If writing native code, use rather than /.
- Don’t enable code that writes Parcel data to disk and reads it later.
Understand the various process states in Android
| State | Meaning | Details |
|---|---|---|
| Apps that run in the background for app-related reasons. | are the most common problems apps have when they run in the background too much. Use %duration * pss or %duration as a «badness» metric. Ideally, these apps shouldn’t be running at all. | |
| Apps running in the background (not directly interacting with the user). | These add memory load to the system. Use the (%duration * pss) «badness» value to order these processes. However, many of these apps run for good reasons. The size of pss is an important part of their memory load. | |
| Persistent system process. | Track pss to watch for these processes getting too large. | |
| The process the user is currently interacting with. | pss is the important metric here, showing how much memory load the app creates while in use. | |
| The processes the system is keeping around in case they are needed again. | These processes can be freely killed at any time and recreated if needed. The memory state (normal, moderate, low, critical) is computed based on how many of these processes the system is running. The key metric for these processes is the pss. In this state, these processes should decrease their memory footprint as much as possible to allow for the maximum total number of processes to be kept around. In this state, a well behaved app generally has a significantly smaller pss footprint than it does in the state. | |
| When compared with , these show how well an app releases memory into the background. | Excluding state makes this data better, because it removes situations when the process has started for some reasons besides interacting with the user. This eliminates dealing with the UI overhead gets when user-related activities. |
Как включить Wi-Fi
Если по каким-либо причинам Wi-Fi не работает и у вас не отображается список доступных сетей, то причин для этого может быть несколько.
- Проверьте подключение wi-fi адаптера к компьютеру.
- Проверьте включен ли ваш роутер и проверьте его настройки
- Проверьте установился ли драйвер для вашего wi-fi адаптера
Третий пункт можно проверить из терминала командами
sudo iwconfig
sudo lspci
Чаще всего драйвер можно найти на сайте производителя адаптера, поэтому поищите его там. Бывают случаи, когда подключить Wi-Fi удается, но соединение постоянно отключается (отваливается). В такой ситуации нужно будет переустановить драйвер, но в каждом конкретном случае это делается по-разному. Задайте ваш вопрос на форуме и мы вместе постараемся решить вашу проблему.
Compression Algorithms[edit]
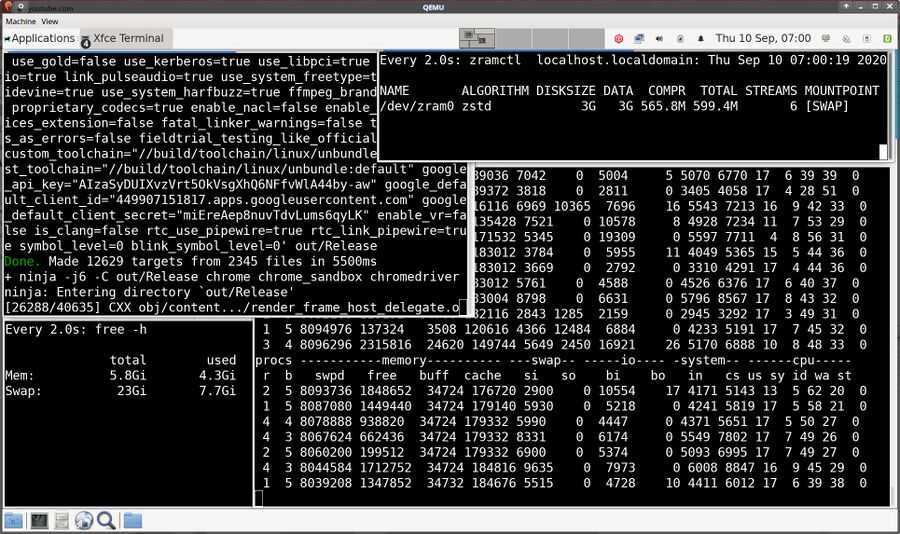 Chromium 85 being compiled in a QEMU virtual machine with 6 GiB RAM and a 3 GiB zstd zram compressed swap.
Comparing how compression algorithms play out when they are used to store files on a a zram-backed regular file system in a repeatable fashion is easy. Here’s how much RAM it takes to store the Linux kernel on a zram device:
| Algorithm | cp time | Data | Compressed | Total |
|---|---|---|---|---|
| lzo | 4.571s | 1.1G | 387.8M | 409.8M |
| lzo-rle | 4.471s | 1.1G | 388M | 410M |
| lz4 | 4.467s | 1.1G | 403.4M | 426.4M |
| lz4hc | 14.584s | 1.1G | 362.8M | 383.2M |
| 842 | 22.574s | 1.1G | 538.6M | 570.5M |
| zstd | 7.897s | 1.1G | 285.3M | 298.8M |
See for details on how the above tests were done.
Comparing how the different compression algorithms play out when a zram block device is used as a swap device is a very different matter. This is how much memory is used when a 3 GiB zram swap is fully filled while building Chromium 85 in a virtual machine with just 6 GiB total system memory available (and a HDD backed swap):
| Algorithm | Disk size | Data | Compressed | Total memory used |
|---|---|---|---|---|
| zstd | 3G | 3G | 565.8M | 599.4M |
| lzo-rle | 3G | 3G | 811.1M | 851M |
The above real-world zram swap compression number with indicate a 5:1 compression ratio while does something in the neighborhood of 3.7:1. This may or may not reflect what you get in your particular workload.
Нехватка оперативной памяти в Linux на рабочем ПК: оптимизация и действия при зависании +39
- 15.12.17 16:47
•
specblog
•
#344836
•
Хабрахабр
•
•
15300
Системное администрирование, *nix, Настройка Linux


На любой операционной системе часто не хватает оперативной памяти. Рассмотрим, как и сэкономить на увеличении аппаратных ресурсов машины с Linux, и продолжить более-менее комфортно пользоваться компьютером с Linux в условиях нехватки памяти.
Типична такая ситуация: есть своп (swap, раздел подкачки), который начинает использоваться при нехватке оперативной памяти, и размещен он на HDD, то есть жестком диске с низкой скоростью чтения информации. В таких ситуациях операционная система начинает тормозить, подвисает курсор мыши, сложно переключиться в соседнюю tty и т.д. Почему? Потому что планировщик ядра Linux не может выполнить запрос на какое-то действие в запущенной программе, пока не получит доступ к ее оперативной памяти, выполнить следующее действие тоже не может, образовывается очередь из запросов на чтение с диска, и система «подвисает» именно потому, что обработка очереди происходит гораздо медленнее, чем этого хочет пользователь.
Если в такой момент запустить или , то показатель Load Average (LA) будет очень высоким, несмотря на низкую загруженность ядер процессора. Сочетание высокого Load Average и низкой загрузки процессора говорят о забитой очереди процессора.
Часто в интернете советуют изменить параметр ядра Linux . Узнать его текущее значение на вашей системе можно так:
Ответ будет 60 почти наверняка. Это значит, что ядро Linux начинает свопить редко используемые страницы оперативной памяти, когда использование свободной оперативной памяти достигает 100%-60%=40%. Часто встречаются рекомендации поставить, например, vm.swappiness=10, чтобы своп не начинал использоваться, пока загрузка ОЗу не достигнет 90%. На самом деле не нужно трогать vm.swappiness, вы не умнее разработчиков ядра Linux, которые не просто так поставили 60 по умолчанию. Почему?
Представьте, что у вас всего 4 ГБ оперативной памяти, из них прямо сейчас занято 3 ГБ, vm.swappiness=10, своп на жестком диске (HDD) занят на 0%, и вы открываете тяжелый сайт в браузере, для чего требуется больше, чем имеющийся свободный 1 ГБ, например, 2 ГБ. Операционная система начинает в экстренном порядке отправлять в своп как минимум 0.5 ГБ (а по факту больше), чтобы можно было выделить браузеру необходимое количество оперативной памяти. Эта процедура становится самой приоритетной задачей, и придется пожертвовать даже движениями курсора мыши, чтобы ее выполнить как можно быстрее. Вы ждете. Проходит 5 минут, и система развисает, потому что окончила процедуру 100% загрузки очереди доступа к медленному жесткому диску, на котором размещена оперативная память (своп). При дефолтном vm.swappiness=60 редко используемые страницы памяти сбрасываются в своп заблаговременно, и резкого зависания на 5-10 минут не происходит.
Graphics
Xorg configuration
Graphics performance may depend on the settings in ; see the NVIDIA, ATI, AMDGPU and Intel articles. Improper settings may stop Xorg from working, so caution is advised.
Mesa configuration
adriconf (Advanced DRI Configurator) — GUI tool to configure Mesa drivers by setting options and writing them to the standard drirc file.
DRIconf — Configuration applet for the Direct Rendering Infrastructure. It allows customizing performance and visual quality settings of OpenGL drivers on a per-driver, per-screen and/or per-application level.
Overclocking
As with CPUs, overclocking can directly improve performance, but is generally recommended against. There are several packages in the AUR, such as AUR (old AMD/ATI cards), AUR (recent AMD cards), AUR (old NVIDIA — up to Geforce 9), and for recent NVIDIA cards.
See or .
Enabling PCI Resizable BAR
If the BAR has a 256M size, the feature is not enabled or not supported:
# dmesg | grep BAR=
Detected VRAM RAM=8176M, BAR=256M
To enable it, enable the setting named «Above 4G Decode» or «>4GB MMIO» in your motherboard settings. Verify that the BAR is now larger:
# dmesg | grep BAR=
Detected VRAM RAM=8176M, BAR=8192M
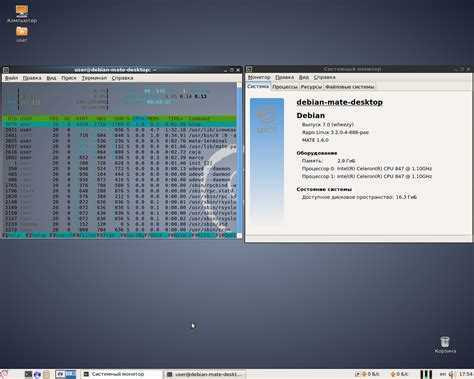
Свободная и занятая оперативная память
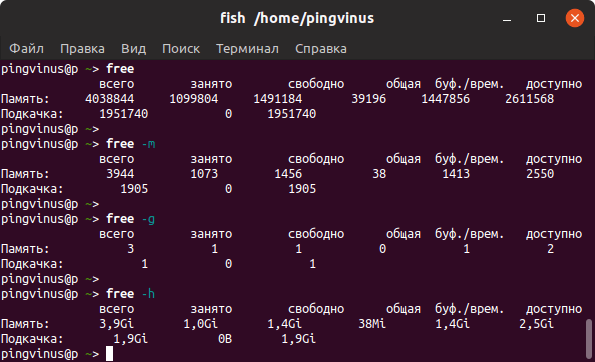
Для получения информации о количестве свободной и занятой оперативной памяти в Linux можно использовать различные утилиты и команды. Рассмотрим несколько распространенных способов.
Команда free
Команда free очень простая, она выводит информацию о общем количестве оперативной памяти, о количестве занятой и свободной памяти, а также об использовании файла подкачки.
По умолчанию объем памяти выводится в килобайтах. Используя опции, можно выводить объем памяти в других форматах. Некоторые опции:
- -m — в мегабайтах
- -g — в гигабайтах
- -h — автоматически определить формат
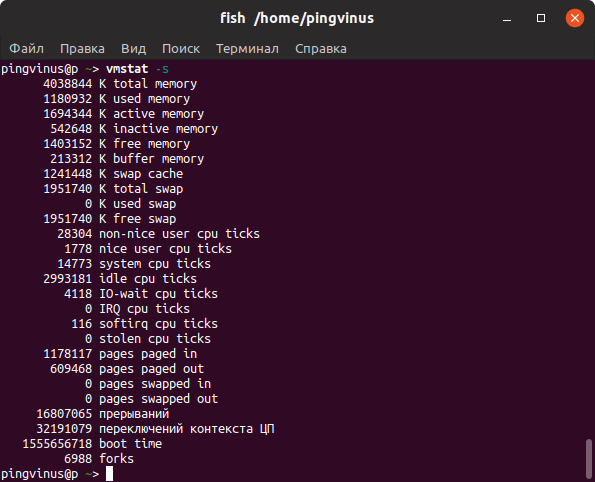
Команда vmstat
Команда vmstat выводит различную статистику по использованию памяти. Используя ключ -s можно вывести подробную статистику в табличном виде.
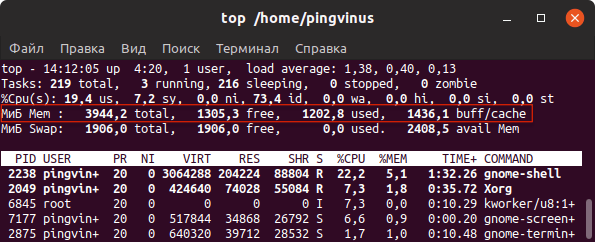
Команда top
top — это утилита командной строки, которая используется для мониторинга процессов и используемых ресурсов компьютера.
Запуск утилиты top:
В заголовке выводится информация об использованной оперативной памяти.
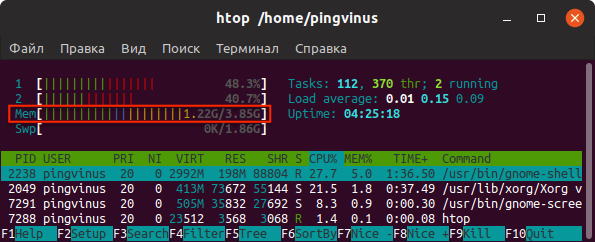
Команда htop
Утилита htop, также как и top, используется для мониторинга ресурсов и процессов.
Для установки утилиты htop в Ubuntu Linux (Linux Mint и других Ubuntu/Debian-дистрибутивах) выполните команду:
Запуск утилиты htop:
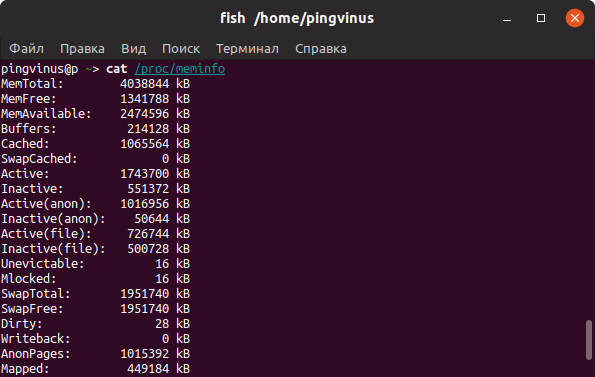
Файл /proc/meminfo
Описанные выше команды, в качестве источника информации используют системные файлы из файлов, хранящихся в виртуальной файловой системе /proc. В файле /proc/meminfo содержится информация об использовании памяти. Выведем содержимое файла /proc/meminfo:
Introduction
The zram kernel module enables support for creating compressed block devices in RAM. These block devices can then be used for swap or general purpose RAM disks. Popular uses for it on Gentoo are to extend the available amount of RAM to processes (swap space), virtualize /tmp, and /var/tmp/portage. /var/tmp/portage is Portage’s temporary directory used for software compilation.
The RAM used for the block device is dynamically obtained and released up to its predefined uncompressed maximum size. The way it extends the amount of available RAM to a system is by using a portion of the RAM as compressed swap. It can therefore hold more pages of memory in the compressed swap than the amount of actual memory used.
Typically it compresses to a 3:1 ratio. So, 1 GiB of swap uses only 333 MiB of RAM on average. The compression ratio including memory used for disk overhead varies depending on the percent of maximum space utilized. This may typically vary from 1.5:1 for a 1.5 GiB disk with only 5% space used, to over 3:1 when nearly full. It also is much faster at swapping pages than typical speeds for hard disk swap.
Combining zram with a correctly tuned Portage configuration will should a desktop system running in a responsive manner even during intensive software compilation.
Kernel configuration
Tuning kernel/ActivityManager to reduce direct reclaim
Direct reclaim happens when a process or the kernel tries to allocate a page of memory (either directly or due to faulting in a new page) and the kernel has used all available free memory. This requires the kernel to block the allocation while it frees up a page. This in turn often requires disk I/O to flush out a dirty file-backed page or wait for to kill a process. This can result in extra I/O in any thread, including a UI thread.
To avoid direct reclaim, the kernel has watermarks that trigger or background reclaim. This is a thread that tries to free up pages so the next time a real thread allocates, it can succeed quickly.
The default threshold to trigger background reclaim is fairly low, around 2 MB on a 2 GB device and 636 KB on a 512 MB device. The kernel reclaims only a few megabytes of memory in background reclaim. This means any process that quickly allocates more than a few megabytes is going to quickly hit direct reclaim.
Support for a kernel tunable is added in the Android-3.4 kernel branch as patch 92189d47f66c67e5fd92eafaa287e153197a454f («add extra free kbytes tunable»). Cherry-picking this patch to a device’s kernel allows to tell the kernel to try to keep three full-screen 32 bpp buffers of memory free.
These thresholds can be configured with the framework.
-1
Tuning LowMemoryKiller
configures the thresholds of the LowMemoryKiller to match its expectation of the working set of file-backed pages (cached pages) required to run the processes in each priority level bucket. If a device has high requirements for the working set, for example if the vendor UI requires more memory or if more services have been added, the thresholds can be increased.
The thresholds can be reduced if too much memory is being reserved for file-backed pages, so that background processes are being killed long before disk thrashing would occur due to the cache getting too small.
-1
Swap to zram
zram swap can increase the amount of memory available in the system by compressing memory pages and putting them in a dynamically allocated swap area of memory. Since this is trading off CPU time for a small increase in memory, you should be careful about measuring the performance impact zram swap has on your system.
Android handles swap to zram at several levels:
- First, the following kernel options must be enabled to use zram swap effectively:
- Then, you should add a line that looks like this to your fstab:
/dev/block/zram0 none swap defaults zramsize=,swapprio=
- is mandatory and indicates how much uncompressed memory you want the zram area to hold. Compression ratios in the 30-50% range are usually observed.
- is only needed if you don’t have more than one swap area.
Label the associated block device as a in the device-specific so that it’s treated properly by SELinux.
/dev/block/zram0 u:object_r:swap_block_device:s0
- By default, the Linux kernel swaps in eight pages of memory at a time. When using zram, the incremental cost of reading one page at a time is negligible and may help if the device is under extreme memory pressure. To read only one page at a time, add the following to your :
write /proc/sys/vm/page-cluster 0
- In your after the line, add:
swapon_all /fstab.X
- The memory cgroups are automatically configured at boot time if the feature is enabled in the kernel.
- If memory cgroups are available, marks lower-priority threads as being more swappable than other threads. If memory is needed, the Android kernel starts migrating memory pages to zram swap, giving a higher priority to the memory pages that have been marked by .
Carveouts, Ion, and contiguous memory allocation (CMA)
On low-memory devices, it’s important to be mindful about carveouts, especially those that aren’t fully used, such as a carveout for secure video playback. There are several solutions to minimize the impact of your carveout regions that depend on the exact requirements of your hardware.


If hardware permits discontiguous memory allocations, the Ion system heap allows memory allocations from system memory, eliminating the need for a carveout. Ion also attempts to make large allocations to eliminate translation lookaside buffer (TLB) pressure on peripherals. If memory regions must be contiguous or confined to a specific address range, the CMA can be used.
This creates a carveout that the system can also use for movable pages. When the region is needed, movable pages are migrated out of it, allowing the system to use a large carveout for other purposes when it’s free. You can use CMA directly with the Ion CMA heap.
 Stats
Per-device statistics are exported as various nodes under /sys/block/zram<id>/
A brief description of exported device attributes follows. For more details
please read Documentation/ABI/testing/sysfs-block-zram.
|
Name |
access |
description |
|---|---|---|
|
disksize |
RW |
show and set the device’s disk size |
|
initstate |
RO |
shows the initialization state of the device |
|
reset |
WO |
trigger device reset |
|
mem_used_max |
WO |
reset the mem_used_max counter (see later) |
|
mem_limit |
WO |
specifies the maximum amount of memory ZRAM can |
|
writeback_limit |
WO |
specifies the maximum amount of write IO zram |
|
writeback_limit_enable |
RW |
show and set writeback_limit feature |
|
max_comp_streams |
RW |
the number of possible concurrent compress |
|
comp_algorithm |
RW |
show and change the compression algorithm |
|
compact |
WO |
trigger memory compaction |
|
debug_stat |
RO |
this file is used for zram debugging purposes |
|
backing_dev |
RW |
set up backend storage for zram to write out |
|
idle |
WO |
mark allocated slot as idle |
User space is advised to use the following files to read the device statistics.
File /sys/block/zram<id>/stat
Represents block layer statistics. Read Block layer statistics in /sys/block/<dev>/stat for
details.

File /sys/block/zram<id>/io_stat
The stat file represents device’s I/O statistics not accounted by block
layer and, thus, not available in zram<id>/stat file. It consists of a
single line of text and contains the following stats separated by
whitespace:
File /sys/block/zram<id>/mm_stat
The mm_stat file represents the device’s mm statistics. It consists of a single
line of text and contains the following stats separated by whitespace:
File /sys/block/zram<id>/bd_stat
The bd_stat file represents a device’s backing device statistics. It consists of
a single line of text and contains the following stats separated by whitespace:
zram and zswap[edit]
The Linux kernel has a similarly-sounding kernel module called . It is easy to confuse a zram swap with a zswap since it sounds similar. However, they are not the same thing.
zswap is fundamentally different in one simple way: It is a swap drive cache. It can compress pages going to a swap device in RAM and compress up to 3:1 if you use compression and the zpool.
Pick one or the other, don’t use both. Using a compressed memory cache to cache a compressed memory block device is foolish unless you have some very unusual and very specific requirements. Using it to cache a hard disk swap does make sense. You can not configure zswap to only cache a specific swap device so it does not sense to use it even if your machine has a real swap if you also use a zram swap.
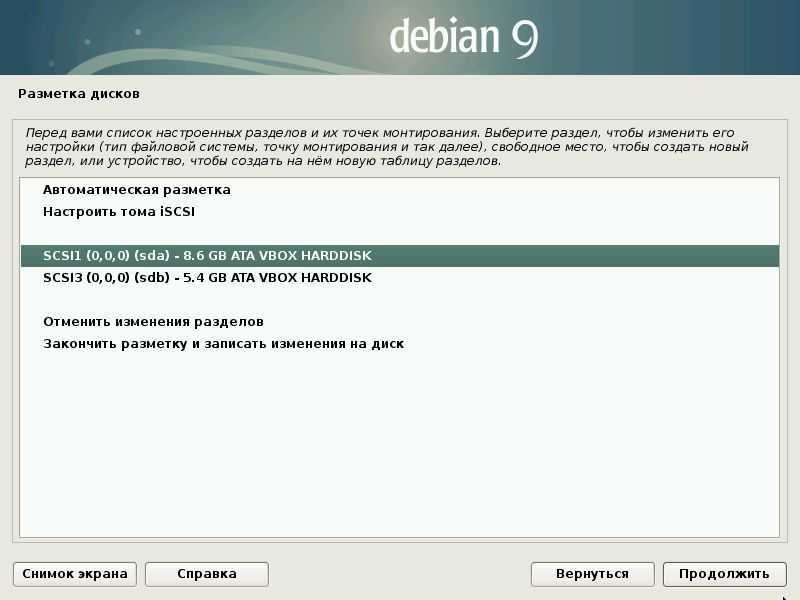
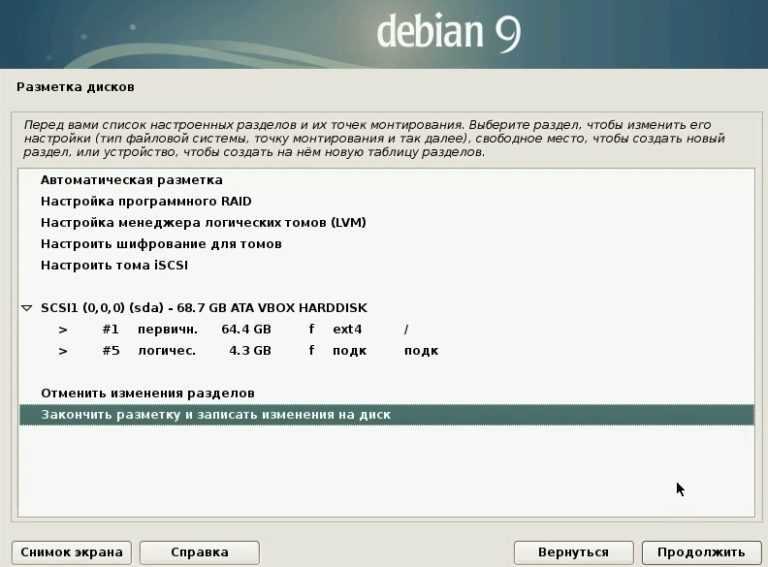
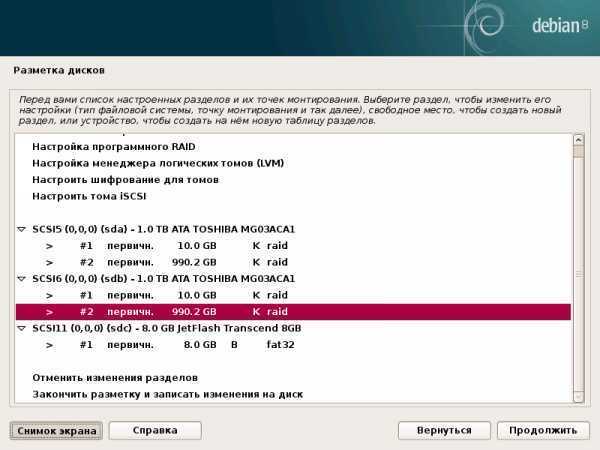
Варианты размещения SWAP
Вариантов несколько:
- на разделе диска,
- в файле,
- или в оперативной памяти использую zRAM.
Исторически в Linux SWAP размещался на разделе, но в современных дистрибутивах производительность SWAP-файла не уступает SWAP-разделу и это весьма радует.
SWAP-раздел
Когда вы точно знаете, что размер оперативной памяти меняться не будет и вы точно уверены в размере SWAP разумно выделить раздел при установке системы.
Хочу заострить ваше внимание на установку систем Linux из готовых шаблонов которые предлагают хозяева ресурсов предоставляющих услуги VDS. Один из шаблонов при использовании 2 G памяти создал мне SWAP раздел размером 512 М
При таком размере он заполнился на стадии настройки системы. Устанавливайте OS Linux по возможности с минимального iso образа системы!
SWAP-файл
Использование файла очень удобно особенно когда нет точного понимания какие будут окончательные аппаратные параметры системы. Файл можно создать в любом удобном месте и необходимым вам размером. Ниже я расскажу как это сделать.
ZRAM и ZSWAP
Вариант с использованием этих вариантов требует наличие хорошего опыт в использовании Linux систем. На мой взгляд данный способ имеет смысл использовать с хорошим знанием системы на которой это будет работать.
ZRAM — это модуль ядра Linux, позволяющий сжимать содержимое оперативной памяти, и таким образом увеличивать ее объем в несколько раз. ZRAM создает сжатое блочное устройство в ОЗУ которое чаще всего используется как swap. При этом степень сжатия данных получается в среднем 3:1. Это означает что на 1 гигабайт подкачки будет использовано в 333 мегабайт физической памяти.
ZSWAP — тличается от ZRAM тем, что использует существующий swap-раздел на диске, а в ОЗУ создаётся пул со сжатыми данными (кэшем). После того как пул до отказа забьётся сжатыми данными, он сбросит их в раздел подкачки и снова начнёт принимать и сжимать данные. По утверждению разработчиков, в их конфигурации при компиляции ядра в ситуации когда происходит своппинг, выигрыш по объему ввода/вывода составил 76%, а время выполнения операции сократилось на 53%. При использовании ZSWAP, используется раздел swap на диске, в ОЗУ хранится только сжатый кэш.
Настройка размера кэша памяти
Куда удобнее не очищать кэш каждый раз, а настроить ограничение, при превышении которого система сама будет удалять лишние страницы. Вы не можете явно ограничить сколько мегабайт может система использовать под кэш. Будет использоваться вся доступная память по мере необходимости, но можно настроить скорость удаления просроченных страниц из кэша.
За это отвечает файл /proc/sys/vm/vfs_cache_pressure. Он содержит относительный показатель, насколько агрессивно нужно удалять страницы из кэша. По умолчанию установлен параметр 100. Если его уменьшить ядро будет реже удалять страницы и это приведет к очень быстрому увеличению кэша. При нуле страницы вообще не будут удаляться. Если значение больше 100, размер кэша будет увеличиваться медленнее и неиспользуемые страницы будут сразу удаляться.
Например, сделаем минимальный размер кэша:
Не забудьте, что это очень сильно снизит производительность вашей системы, потому что вместо кэша данные будут читаться из диска.
Analysis
Analyzing app startup time
To analyze your app’s startup time, run or and start your app. The profiler starts after the process is forked from the zygote and before any code is loaded into the fork.
Analyzing using bug reports
Bug reports contain several services, including , , , and , which can be used for debugging. Reports can include lines like this:
------ CHECKIN BATTERYSTATS (dumpsys batterystats --checkin) ------ 7,0,h,-2558644,97,1946288161,3,2,0,340,4183 7,0,h,-2553041,97,1946288161,3,2,0,340,4183
Checking for any persistent processes
To check for any persistent processes, reboot the device and check the processes. Then, run the device for a few hours and check the processes again. There shouldn’t be any long-running processes between the two checks.
Running longevity tests
To run longevity tests, run the device for longer durations and track the memory of the processes to determine if it increases or stays constant. Then create canonical use cases and run longevity tests on these scenarios.
Как настроить скрытую сеть Wi-Fi
Для создания или подключени к скрытой сети Wi-Fi в менеджере сетевых подключений имеются соответствующие строки.
Нажмите на «подключиться к скрытой беспроводной сети и заполните следующие поля:
Если вы хотите создань новую скрытую сеть то заполните поля, как на изображении ниже
Как видите, ничего сложного и мы надеемся, что данная статья помогла вам подключиться к интернету и полноценно пользоваться операционной системой Linux Mint.
Всем привет! После использования новой операционной системы периодически сталкивался с проблемой – когда Linux Mint не видит WiFi. Немного поднабравшись опыта, я решил написать более детальную статью, в отличие от тех, которые есть в интернете. Они конечно неплохие, но как правило не полностью решает некоторые мелкие нюансы.