
Lifecycle management hooks
Beginning with Ubuntu 12.10, it is possible to define hooks to be executed at specific points in a container’s lifetime:
- Pre-start hooks are run in the host’s namespace before the container ttys, consoles, or mounts are up. If any mounts are done in this hook, they should be cleaned up in the post-stop hook.
- Pre-mount hooks are run in the container’s namespaces, but before the root filesystem has been mounted. Mounts done in this hook will be automatically cleaned up when the container shuts down.
- Mount hooks are run after the container filesystems have been mounted, but before the container has called to change its root filesystem.
- Start hooks are run immediately before executing the container’s init. Since these are executed after pivoting into the container’s filesystem, the command to be executed must be copied into the container’s filesystem.
- Post-stop hooks are executed after the container has been shut down.
If any hook returns an error, the container’s run will be aborted. Any post-stop hook will still be executed. Any output generated by the script will be logged at the debug priority.
Please see the manual page for the configuration file format with which to specify hooks. Some sample hooks are shipped with the lxc package to serve as an example of how to write and use such hooks.
Backing Stores
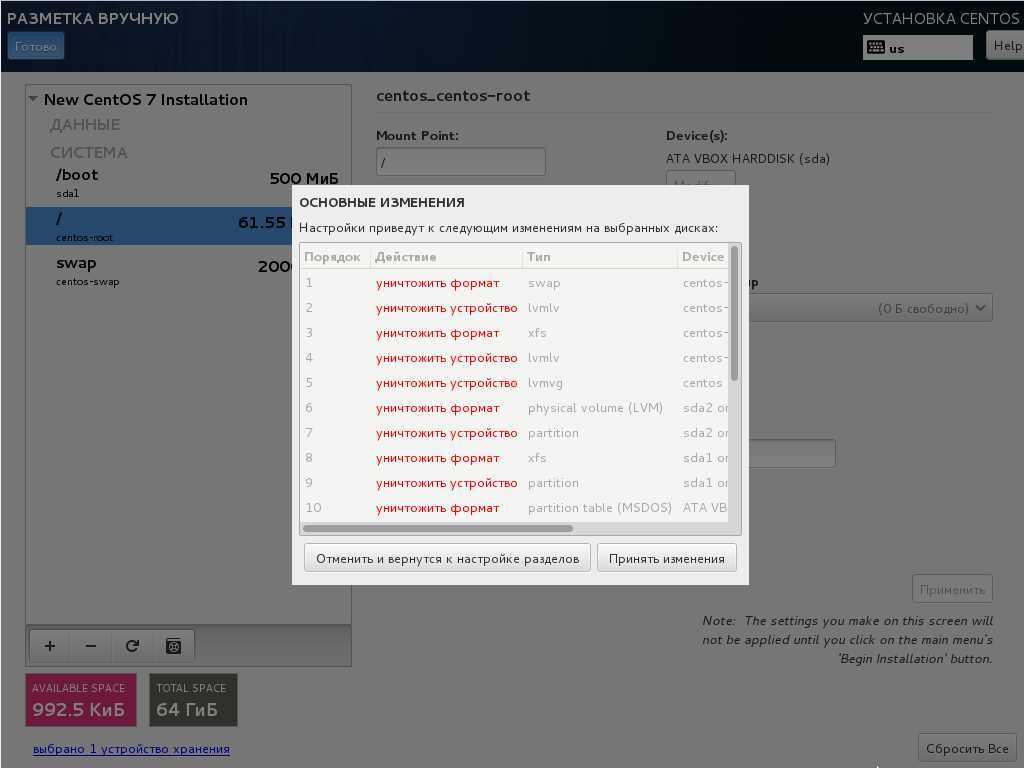
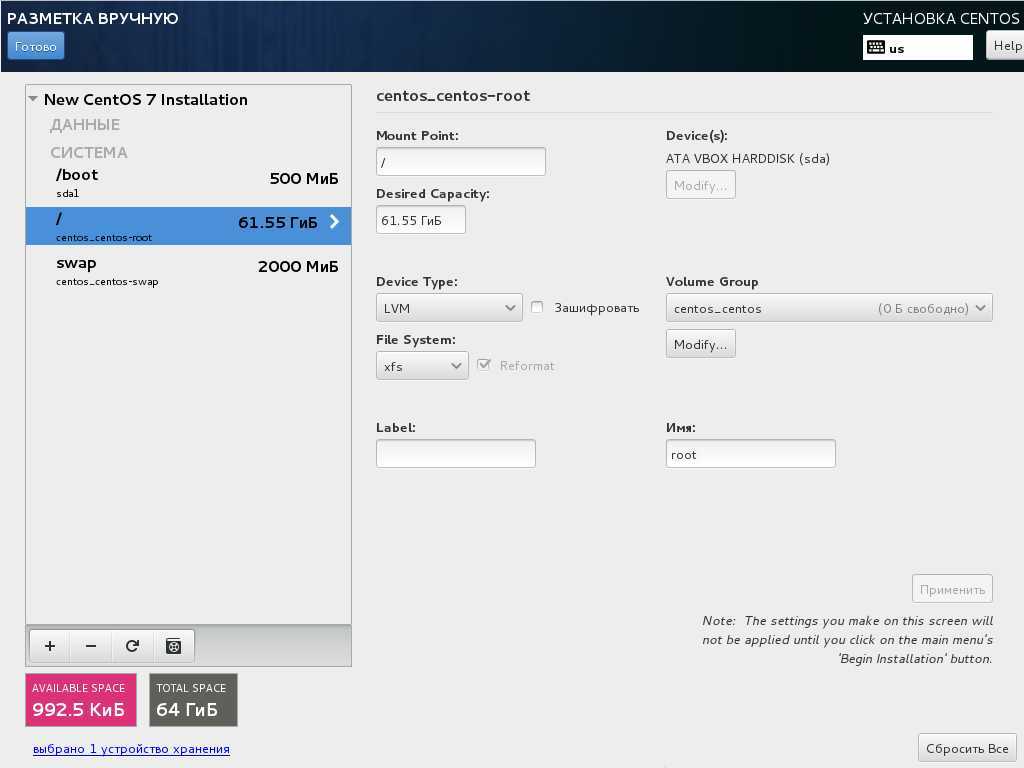
LXC supports several backing stores for container root filesystems. The default is a simple directory backing store, because it requires no prior host customization, so long as the underlying filesystem is large enough. It also requires no root privilege to create the backing store, so that it is seamless for unprivileged use. The rootfs for a privileged directory backed container is located (by default) under , while the rootfs for an unprivileged container is under . If a custom lxcpath is specified in , then the container rootfs will be under .
A snapshot clone C2 of a directory backed container C1 becomes an overlayfs backed container, with a rootfs called . Other backing store types include loop, btrfs, LVM and zfs.
A btrfs backed container mostly looks like a directory backed container, with its root filesystem in the same location. However, the root filesystem comprises a subvolume, so that a snapshot clone is created using a subvolume snapshot.
The root filesystem for an LVM backed container can be any separate LV. The default VG name can be specified in lxc.conf. The filesystem type and size are configurable per-container using lxc-create.
The rootfs for a zfs backed container is a separate zfs filesystem, mounted under the traditional location. The zfsroot can be specified at lxc-create, and a default can be specified in lxc.system.conf.
More information on creating containers with the various backing stores can be found in the lxc-create manual page.
Troubleshooting
Logging
If something goes wrong when starting a container, the first step should be to get full logging from LXC:
This will cause lxc to log at the most verbose level, , and to output log information to a file called ‘debug.out’. If the file already exists, the new log information will be appended.
Monitoring container status
Two commands are available to monitor container state changes. monitors one or more containers for any state changes. It takes a container name as usual with the -n option, but in this case the container name can be a posix regular expression to allow monitoring desirable sets of containers. continues running as it prints container changes. waits for a specific state change and then exits. For instance,
would print all state changes to any containers matching the listed regular expression, whereas
will wait until container cont1 enters state STOPPED or state FROZEN and then exit.
Attach
As of Ubuntu 14.04, it is possible to attach to a container’s namespaces. The simplest case is to simply do
which will start a shell attached to C1’s namespaces, or, effectively inside the container. The attach functionality is very flexible, allowing attaching to a subset of the container’s namespaces and security context. See the manual page for more information.
Container init verbosity
If LXC completes the container startup, but the container init fails to complete (for instance, no login prompt is shown), it can be useful to request additional verbosity from the init process. For an upstart container, this might be:
You can also start an entirely different program in place of init, for instance
Типовые операции с LXC-контейнерами
Запуск:
sudo lxc-start -n
Остановка:
sudo lxc-stop -n
Просмотр всех контейнеров:
sudo lxc-ls -f
Сетевой вход в контейнер:
ssh -l admin 10.10.10.100(возможна задержка примерно в минуту, в течение которой ssh-сервер стартует внутри контейнера)
Пароль по умолчанию — astralinuxважно: после первого логина нужно сменить пароль для пользователя admin на более надёжный командой passwd;
Удаление контейнера:
sudo lxc-destroy -n
Также, в случае использования контейнера в Astra Linux Common Edition для входа можно использовать консоль:
sudo lxc-console -n
Внутри контейнера, при правильно настроенной сети, можно устанавливать и настраивать программы так же, как и на обычном компьютере.
Control Groups
Control groups (cgroups) are a kernel feature providing hierarchical task grouping and per-cgroup resource accounting and limits. They are used in containers to limit block and character device access and to freeze (suspend) containers. They can be further used to limit memory use and block i/o, guarantee minimum cpu shares, and to lock containers to specific cpus.
By default, a privileged container CN will be assigned to a cgroup called . In the case of name conflicts (which can occur when using custom lxcpaths) a suffix “-n”, where n is an integer starting at 0, will be appended to the cgroup name.
By default, a privileged container CN will be assigned to a cgroup called under the cgroup of the task which started the container, for instance . The container root will be given group ownership of the directory (but not all files) so that it is allowed to create new child cgroups.
As of Ubuntu 14.04, LXC uses the cgroup manager (cgmanager) to administer cgroups. The cgroup manager receives D-Bus requests over the Unix socket . To facilitate safe nested containers, the line
can be added to the container configuration causing the directory to be bind-mounted into the container. The container in turn should start the cgroup management proxy (done by default if the cgmanager package is installed in the container) which will move the directory to , then start listening for requests to proxy on its own socket . The host cgmanager will ensure that nested containers cannot escape their assigned cgroups or make requests for which they are not authorized.
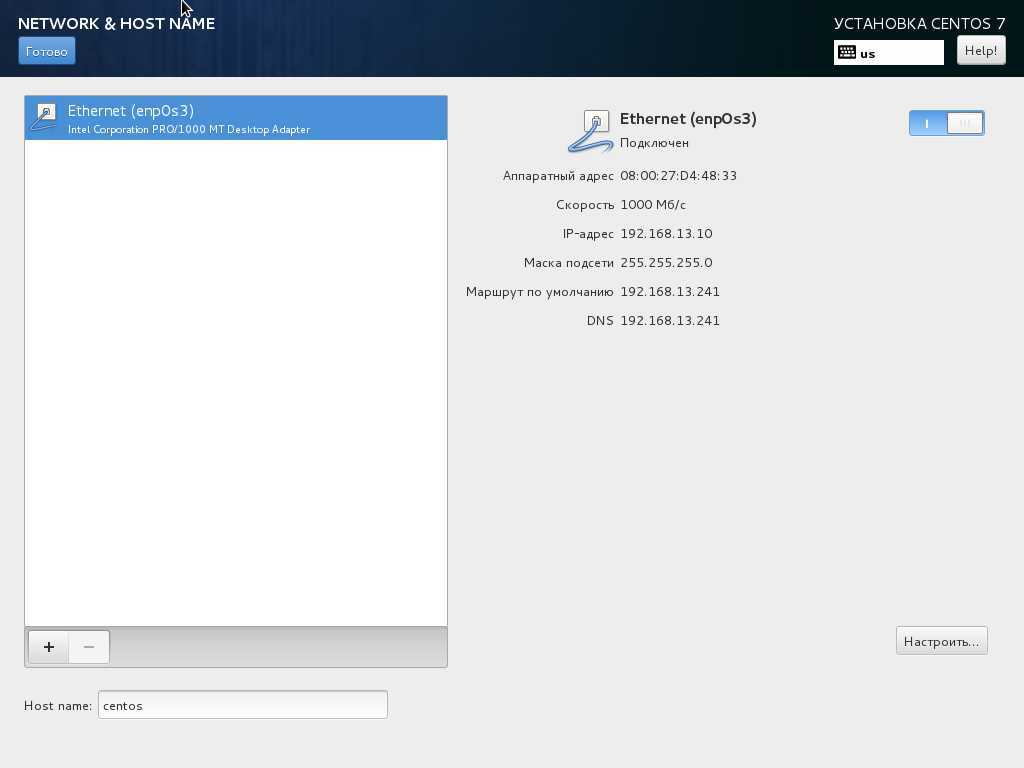
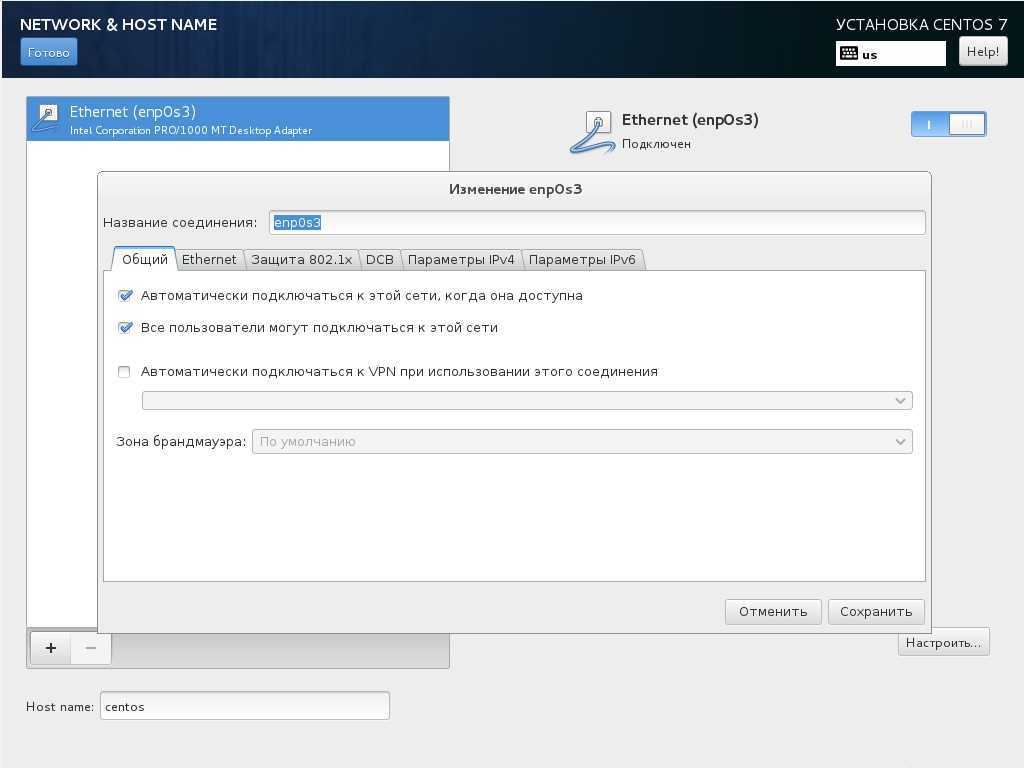
Настройка сети под LXC-контейнеры
| Перед установкой пакетов необходимо правильно настроить пути к репозиториям в файле /etc/apt/sources.list: в нём дожны быть указаны в качестве источников установочный диск (репозиторий) и диск (репозиторий) со средставами разработки, при этом установочный диск (репозиторий установочного диска) должен быть указан в файле /etc/apt/sources.list первым. В Astra Linux Special Edition некоторые пакеты, нужные для работы lxc, находятся на втором диске дистрибутива (диск со средствами разработки). |
-
Создать файл /etc/default/lxc-net со следующим содержимым:
USE_LXC_BRIDGE="true"
LXC_BRIDGE="lxcbr0"sudo lxc-create -t astralinux-se -n container-se
LXC_ADDR="10.0.3.1"
LXC_NETMASK="255.255.255.0"
LXC_NETWORK="10.0.3.0/24"
LXC_DHCP_RANGE="10.0.3.2,10.0.3.254"
LXC_DHCP_MAX="253"
LXC_DHCP_CONFILE=""
LXC_DOMAIN=""
-
В файле /etc/lxc/default.conf строчку
lxc.net.0.type = empty
заменить на текст:
lxc.net.0.type = veth
lxc.net.0.link = lxcbr0
lxc.net.0.flags = up
-
Перезапустить службу lxc-net:
sudo systemctl restart lxc-net
-
Создать контейнер:
Так как в качестве ядра контейнера используется ядро хост-машины, на хост-машине с Astra Linux Special Edition обязательно нужно использовать шаблон astralinux-se, а для Astra Linux Common Edition – шаблон astralinux-ce.Следует также помнить, что в качестве источника пакетов используются репозитории хост-машины, указанные в файле /etc/apt/sources.list. #для Astra Linux Specail Edition:sudo lxc-create -t astralinux-se -n container-sesudo lxc-create -t astralinux-se -n container-se#или для Astra Linux Common Edition:sudo lxc-create -t astralinux-ce -n container-ce
Для контейнера использовано имя container-1, в командах управления контейнерами имя контейнера задаётся опцией -n;
-
Запустить созданный контейнер (на примере контейнера container-ce):
sudo lxc-start -n container-ce
-
Дождаться, когда в контейнере заработает сетевой интерфейс, т.е. когда команда:
sudo lxc-info -n container-ce -iH станет выдавать IP-адрес конейнера.
-
-
Войти в контейнер, используя полученный адрес (пароль пользователя, устанавливаемый по умолчанию — astralinux):
ssh -l admin `sudo lxc-info -n container-ce -iH`
Consoles
Containers have a configurable number of consoles. One always exists on the container’s . This is shown on the terminal from which you ran , unless the -d option is specified. The output on can be redirected to a file using the -c console-file option to . The number of extra consoles is specified by the variable, and is usually set to 4. Those consoles are shown on (for 1 <= N <= 4). To log into console 3 from the host, use:
or if the option is not specified, an unused console will be automatically chosen. To exit the console, use the escape sequence . Note that the escape sequence does not work in the console resulting from without the option.
Each container console is actually a Unix98 pty in the host’s (not the guest’s) pty mount, bind-mounted over the guest’s and . Therefore, if the guest unmounts those or otherwise tries to access the actual character device , it will not be serving getty to the LXC consoles. (With the default settings, the container will not be able to access that character device and getty will therefore fail.) This can easily happen when a boot script blindly mounts a new .
Global configuration
The following configuration files are consulted by LXC. For privileged use, they are found under , while for unprivileged use they are under .
- may optionally specify alternate values for several lxc settings, including the lxcpath, the default configuration, cgroups to use, a cgroup creation pattern, and storage backend settings for lvm and zfs.
- specifies configuration which every newly created container should contain. This usually contains at least a network section, and, for unprivileged users, an id mapping section
- specifies how unprivileged users may connect their containers to the host-owned network.
and are both under and , while is only host-wide.
By default, containers are located under /var/lib/lxc for the root user.
Возможности
Самая полезная часть статьи — рецепты, как и что можно использовать с помощью LXD
Поехали
Инициализация LXD
Первый запуск предупредит о том, что мы должны инициализировать через команду lxd_init систему контейнеризации, то есть указать начальные настройки. Запускаем и дальше как по мастеру. Отвечаем на вопросы по своему вкусу.
Положить/забрать файл из контейнера.
LXC предоставляет хорошие возможности для управления контейнерами «на лету». Вот так, например, можно поместить созданный на основном хосте файл внутрь контейнера:
Можно совершить и обратную операцию — загрузить файл из контейнера на основной хост:
Можно и редактировать файлы в контейнере напрямую:
Создать общий ресурс
Импорт различных образов
LXD основан на образах. Контейнеры создаются из образа, поэтому хранилище образов должно содержать несколько образов перед основной работой с LXD.
Есть несколько путей заполнить хранилище:
- Используя удаленный LXD как сервер образов
- Используя встроенные источники образов
- Вручную импортируя по одному
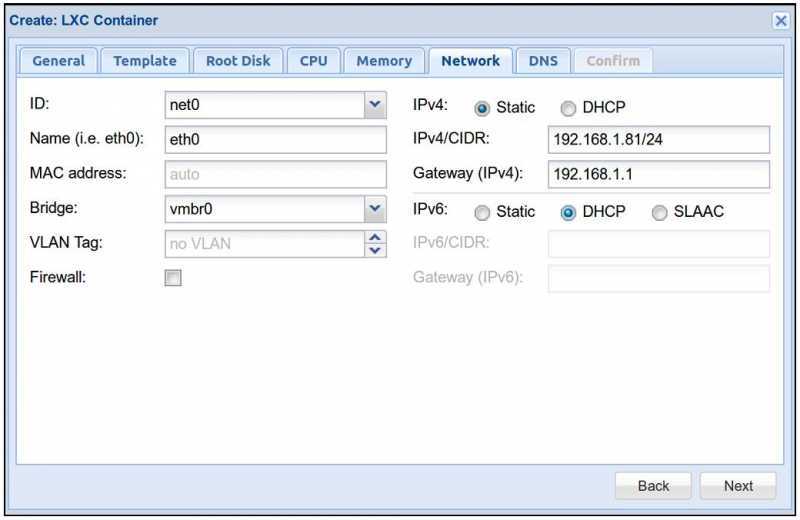
Связать с определннным мостом и задать статический IPv4 адрес
Кстати, очень удобный инструмент, позволяющий держать систему в нескольких или различных сетях на одном хосте, при этом в основной системе требуется для этого организовать лишь интерфейс типа мост, к которому потом прикрепляем контейнер и задаем внутреннее имя интерфейса.
Редактируем файл «/etc/default/lxc-net» и меняем
на
Переместить пул хранилища
Я люблю хранить все конфигурации в определенном мною месте, поэтому тут способ, как переместить дефолтное хранилище наиболее безболезненно.
Останавливаем LXD, перемещаем содержимое /var/lib/lxd в новую директорию, после этого делаем симлинк на новое место, и можно запускать LXD
Проброс устройств
Шикарная возможность, позволяющая пробрасывать устройства внутрь контейнера, основываясь на vendor/product id, так как многие usb устройства любят менять свой номер устройства на шине pci (в листинге вывода lsusb). Подробнее по параметрам .
Автозапуск контейнера при запуске основной системы
Флаг автозапуска и приоритеты запуска, для того, чтобы определить очередность запуска контейнеров и задержку перед запуском
Необходимо сменить язык программирования
Проблему с бесчисленным количеством уязвимостей в Linux Кис Кук частично связывает и с языком программирования С, самым популярным в мире (статистика Tiobe на июль 2021 г.). «Linux, написанный на C, по-прежнему будет иметь длинный хвост проблем», – подчеркнул Кук, добавив, что Linux следовало бы писать на «более безопасных» языках.
«ВТБ Лизинг» внедряет управление данными как ценным бизнес-активом
ИТ в банках

В качестве примера Кук привел язык Rust. Как сообщал CNews, согласно опросу Stack Overflow, большинство программистов называют его своим самым любимым языком. К тому же, он очень нравится и киберпреступникам.
Также Кук считает неправильным нынешний алгоритм поиска уязвимостей в коде ядра. Программисты задействуют базу данных Mitre CVE (Common Vulnerabilities and Exposures), используя ее для оценки опасности существующих уязвимостей. Кук уверен, что она совершенно не годится для решения этой задачи, поскольку, с его слов, «не всем уязвимостям присваиваются CVE-метки, и к тому же они назначаются несвоевременно».
Почему в Linux так много «дыр»
Сообществу разработчиков ядра Linux не хватает специалистов, чтобы вовремя устранять найденные в нем уязвимости
Как сообщил The Register, на эту проблему обратил внимание программист Кис Кук (Kees Cook) из Google Security Team, принимающий непосредственное участие в развитии Linux
По словам Кука, каждую неделю программисты готовят приблизительно по 100 новых исправлений для ядра, но сил тех, кто их проверяет, попросту не хватает, чтобы протестировать каждое из них
Кук утверждает, что из-за этого разработчики отбирают только самые важные из них, притом руководствуются они исключительно собственными критериями «важности» таких патчей
Кук подчеркнул, что из-за нехватки специалистов многие проблемы ядра попросту игнорируются. По его подсчетам, на разбор еженедельных 100 исправлений требуется, по меньшей мере, 100 специалистов.

Ядру Linux просто не хватает разработчиков, которые бы «заботились» о нем
Кис Кук заявил, что большая часть инженеров, в настоящее время занятых развитием ядра Linux, работают в различных компаниях. Он призвал руководителей этих компаний нанимать больше инженеров, чтобы у разработчиков появилось больше времени на Linux.
Мотивация Кука
Кис Кук объяснил свой призыв к найму большего числа инженеров тем, что из-за сложившейся вокруг ядра Linux ситуации многие уязвимости могут находиться в нем годами. Пока разработчики латают одну брешь, другая теряется в строчках кода.
В словах Кука есть внушительная доля правды. В ядре Linux постоянно обнаруживаются «дыры» в возрасте нескольких лет, многие из которых несут чрезвычайную опасность как для частных пользователей, так и для корпораций.
Кис Кук уверен, что подход к разработке Linux нужно менять полностью
Например, в ноябре 2017 г. CNews рассказывал о том, как россиянин Антон Коновалов всего за несколько месяцев выловил в коде ядра Linux, по меньшей мере, 15 багов в драйверах USB. Он подчеркнул, что такие уязвимости можно использовать для запуска произвольного кода и захвата контроля над пользовательскими системами.
В июле 2021 г. эксперты по информационной безопасности компании Qualys нашли в ядре уязвимости с зашкаливающим уровнем опасности. Они позволяют вызвать крах системы и выполнить произвольный код. И если в случае «дыр», выявленных Антоном Коноваловым их возраст не был установлен, то находкам Qualys совсем недавно исполнилось шесть и семь лет.
Более того, одну из этих уязвимостей они нашли, успешно проэксплуатировав вторую. Из-за них под угрозой оказались пользователи Debian, Ubuntu, Red Hat и целого ряда других популярных дистрибутивов Linux.
Cloning
For rapid provisioning, you may wish to customize a canonical container according to your needs and then make multiple copies of it. This can be done with the program.
Clones are either snapshots or copies of another container. A copy is a new container copied from the original, and takes as much space on the host as the original. A snapshot exploits the underlying backing store’s snapshotting ability to make a copy-on-write container referencing the first. Snapshots can be created from btrfs, LVM, zfs, and directory backed containers. Each backing store has its own peculiarities — for instance, LVM containers which are not thinpool-provisioned cannot support snapshots of snapshots; zfs containers with snapshots cannot be removed until all snapshots are released; LVM containers must be more carefully planned as the underlying filesystem may not support growing; btrfs does not suffer any of these shortcomings, but suffers from reduced fsync performance causing dpkg and apt to be slower.
Snapshots of directory-packed containers are created using the overlay filesystem. For instance, a privileged directory-backed container C1 will have its root filesystem under . A snapshot clone of C1 called C2 will be started with C1’s rootfs mounted readonly under . Importantly, in this case C1 should not be allowed to run or be removed while C2 is running. It is advised instead to consider C1 a canonical base container, and to only use its snapshots.
Given an existing container called C1, a copy can be created using:
A snapshot can be created using:
See the lxc-clone manpage for more information.
Snapshots
To more easily support the use of snapshot clones for iterative container development, LXC supports snapshots. When working on a container C1, before making a potentially dangerous or hard-to-revert change, you can create a snapshot
which is a snapshot-clone called ‘snap0’ under /var/lib/lxcsnaps or $HOME/.local/share/lxcsnaps. The next snapshot will be called ‘snap1’, etc. Existing snapshots can be listed using , and a snapshot can be restored — erasing the current C1 container — using . After the restore command, the snap1 snapshot continues to exist, and the previous C1 is erased and replaced with the snap1 snapshot.
Snapshots are supported for btrfs, lvm, zfs, and overlayfs containers. If lxc-snapshot is called on a directory-backed container, an error will be logged and the snapshot will be created as a copy-clone. The reason for this is that if the user creates an overlayfs snapshot of a directory-backed container and then makes changes to the directory-backed container, then the original container changes will be partially reflected in the snapshot. If snapshots of a directory backed container C1 are desired, then an overlayfs clone of C1 should be created, C1 should not be touched again, and the overlayfs clone can be edited and snapshotted at will, as such
Ephemeral Containers
While snapshots are useful for longer-term incremental development of images, ephemeral containers utilize snapshots for quick, single-use throwaway containers. Given a base container C1, you can start an ephemeral container using
The container begins as a snapshot of C1. Instructions for logging into the container will be printed to the console. After shutdown, the ephemeral container will be destroyed. See the lxc-start-ephemeral manual page for more options.
Troubleshooting
Root login fails
If presented with following error upon trying to login using lxc-console:
login: root
Login incorrect
And the container’s journal shows:
pam_securetty(login:auth): access denied: tty 'pts/0' is not secure !
Alternatively, create a new user in lxc-attach and use it for logging in to the system, then switch to root.
# lxc-attach -n playtime
# useradd -m -Gwheel newuser
# passwd newuser
# passwd root
# exit
# lxc-console -n playtime
$ su
No network-connection with veth in container config
If you cannot access your LAN or WAN with a networking interface configured as veth and setup through .
If the virtual interface gets the ip assigned and should be connected to the network correctly.
ip addr show veth0
inet 192.168.1.111/24
You may disable all the relevant static ip formulas and try setting the ip through the booted container-os like you would normaly do.
Example
...
lxc.net.0.type = veth
lxc.net.0.name = veth0
lxc.net.0.flags = up
lxc.net.0.link =
...
And then assign the IP through a preferred method inside the container, see also .
Error: unknown command
The error may happen when a basic command (ls, cat, etc.) on an attached container is typed hen a different Linux distribution is containerized relative to the host system (e.g. Debian container in Arch Linux host system). Upon attaching, use the argument :
# lxc-attach -n container_name --clear-env
Error: Failed at step KEYRING spawning…
Services in an unprivileged container may fail with the following message
some.service: Failed to change ownership of session keyring: Permission denied
some.service: Failed to set up kernel keyring: Permission denied
some.service: Failed at step KEYRING spawning ....: Permission denied
Create a file containing
/etc/lxc/unpriv.seccomp
2
blacklist

keyctl errno 38
Then add the following line to the container configuration after lxc.idmap
lxc.seccomp.profile = /etc/lxc/unpriv.seccomp
Templates
Creating a container generally involves creating a root filesystem for the container. delegates this work to templates, which are generally per-distribution. The lxc templates shipped with lxc can be found under , and include templates to create Ubuntu, Debian, Fedora, Oracle, centos, and gentoo containers among others.

Creating distribution images in most cases requires the ability to create device nodes, often requires tools which are not available in other distributions, and usually is quite time-consuming. Therefore lxc comes with a special download template, which downloads pre-built container images from a central lxc server. The most important use case is to allow simple creation of unprivileged containers by non-root users, who could not for instance easily run the command.
When running , all options which come after – are passed to the template. In the following command, –name, –template and –bdev are passed to , while –release is passed to the template:
You can obtain help for the options supported by any particular container by passing –help and the template name to . For instance, for help with the download template,
Установка Calculate Linux
Перед загрузкой рекомендую на всякий случай ознакомиться с документом «Структура FTP-зеркала», это снимет ряд вопросов, что и где скачивать. Дистрибутив CDS и CLDX поставляется в виде LiveCD, а CLD – LiveDVD ISO-образов. Образы находятся в одноименных каталогах, внутри – отдельные подкаталоги со сборками для i686- и x64-систем. Здесь же доступны tar.7z-архивы, которые предназначены для обновления дистрибутива и по составу приложений не отличаются от ISO-вариантов. Последние версии Calculate поддерживают обновление и из установочных ISO-образов, поэтому дополнительно tar.7z-файл скачивать уже не обязательно.
Аппаратные требования системы для работы невысоки: процессор класса i686, 256 Мб ОЗУ (512 Мб для CLD) и 3 Гб (6 Гб CLD) на жестком диске. После перехода в версии 9.6 на использование алгоритма LZMA во время установки требуется не менее 1 Гб ОЗУ, иначе копирование файлов завершается с ошибкой. Решить проблему можно, подключив swap-раздел командой swapon. Разработчики знают о проблеме, и уже в CLD 9.7 установочный скрипт самостоятельно монтирует swap-раздел перед началом копирования файлов (в CDS 9.7 для этого необходимо обновить установщик).
Установка дистрибутива на жесткий диск, обновление, а также сборка загрузочного ISO-образа системы производится при помощи Perl-утилиты calculate собственной разработки, работающей в консоли. Несмотря на отсутствие каких-либо графических инструментов, процесс инсталляции очень прост. Следует загрузиться в Live-режиме (при наличии 2 Гб памяти можно выгрузить образ в ОЗУ), обновить скрипт calculate.
В версии 9.6 для этого следовало выполнять:
calculate —update
В релизе 9.7 появилась новая версия calculate 1.1.0, которая не поддерживает параметра —update, поэтому обновлять следует через emerge:
layman -S && emerge calculate
Далее два варианта установки. Первый – самый простой и почему-то до сих пор недокументированный на сайте проекта. При наличии жесткого диска размером больше 45 Гб (при установке на флешку достаточно 512 Мб) утилита calculate умеет автоматически разбивать пространство и создавать разделы (все разделы будут уничтожены). В этом случае в качестве параметра необходимо указать только диск:
calculate —disk=/dev/sda
В результате будет установлена система, жесткий диск будет разбит на такие разделы:
/dev/sda1 swap
/dev/sda2 (/) 10 Гб (десктоп) или 20 Гб (сервер)
/dev/sda3 (/)10 Гб (десктоп) или 20 Гб (сервер)
/dev/sda4 Extended
/dev/sda5 Linux (/var/calculate – для CDS/CLD/CLDX)
Именно такая схема рекомендуется разработчиками, и, чтобы получить все преимущества Calculate, ее желательно придерживаться (почему – объясню чуть позже). Под корневой раздел можно отвести меньшее место (в документации указано 10-20 Гб, но нижний предел можно сделать еще меньше, установка занимает меньше 3 Гб).
Если в результате работы скрипта получаем сообщение:
The size of the disk is not sufficient to perform automatic partitioning!
то жесткий диск необходимо разметить вручную, при помощи fdisk/cfdisk. И указать затем на корневой в параметре запуска:
calculate —disk=/dev/sda2
При большом количестве однотипных систем (типичные размеры жестких дисков 20, 30, 40, 80 Гб …), проще подправить скрипт calculate, указав свои настройки.
Например, за проверку объема диска отвечает такая строка:
if($size
Указываем свой минимальный размер вместо 45. Параметры для разметки диска берутся из одного из файлов fdisk.*, соответствующего версии системы, который находится в /usr/calculate/install/config. Внутри файла – набор команд для fdisk, просто указываем другие размеры.
Основа
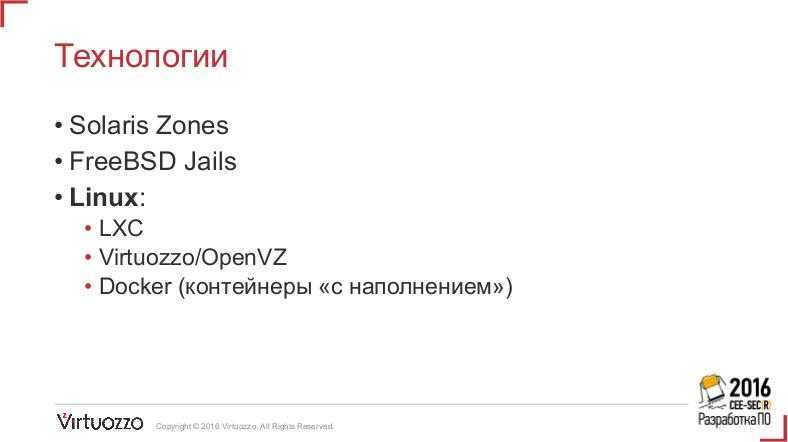
LXC это набор инструментов для контейнеризации целых ОС, в отличии от Докера, который больше заточен под релизы и тесты для разработчиков, тут больше пространства для маневра, без надобности вдаваться сильно в зависимости и синтаксис конфигурационных файлов. Серьезно, для домашних служб Докер монстровато выглядит. Ладно, хватит субъективностей, раз я LXC выбрал, расскажу тут все полезное, что раскопал, пока строил заново домашние сервисы на новой платформе.
Первое, что и очень важное, это выбор хостовой системы для нашего контейнерного парка. К слову, я пробовал реализации lxc/lxd на debian, arch, centos, ubuntu, и выиграл по многим параметрам по моему мнению ubuntu 18.04 LTS
Не буду тут все расписывать подробно за и против, решайте сами что кому по душе.
Итак, я установил хостовую систему ubuntu 18.04 LTS. Настроил по своему вкусу безопасность и остальное, что мы там любим настроить на свежей системе. Перейдем к делу.
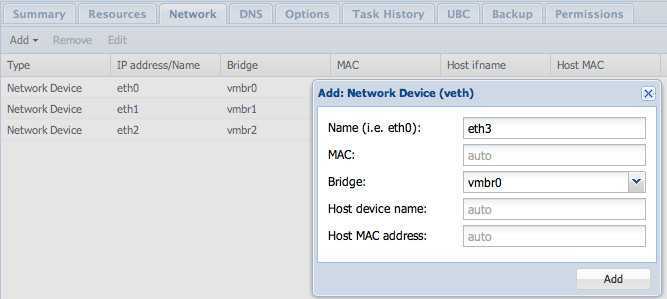
Networking
By default LXC creates a private network namespace for each container, which includes a layer 2 networking stack. Containers usually connect to the outside world by either having a physical NIC or a veth tunnel endpoint passed into the container. LXC creates a NATed bridge, lxcbr0, at host startup. Containers created using the default configuration will have one veth NIC with the remote end plugged into the lxcbr0 bridge. A NIC can only exist in one namespace at a time, so a physical NIC passed into the container is not usable on the host.
It is possible to create a container without a private network namespace. In this case, the container will have access to the host networking like any other application. Note that this is particularly dangerous if the container is running a distribution with upstart, like Ubuntu, since programs which talk to init, like , will talk over the abstract Unix domain socket to the host’s upstart, and shut down the host.
To give containers on lxcbr0 a persistent ip address based on domain name, you can write entries to like:
If it is desirable for the container to be publicly accessible, there are a few ways to go about it. One is to use to forward host ports to the container, for instance
Then, specify the host’s bridge in the container configuration file in place of lxcbr0, for instance
Finally, you can ask LXC to use macvlan for the container’s NIC. Note that this has limitations and depending on configuration may not allow the container to talk to the host itself. Therefore the other two options are preferred and more commonly used.
There are several ways to determine the ip address for a container. First, you can use which will print the ip addresses for all running containers, or which will print C1’s ip address. If dnsmasq is installed on the host, you can also add an entry to as follows
after which dnsmasq will resolve locally, so that you can do:
For more information, see the manpage as well as the example network configurations under .
Настройка нескольких контейнеров с одним рабочим местом
Настройка хост-системы
Создайте файл с правилами для разделения устройств вывода, отдав контейнеру pc100, а контейнеру pc101:
/etc/udev/rules.d/95-id-lxc.rules
ACTION=="add|remove", KERNEL=="tty7", ENV{ID_LXC}="pc100"
ACTION=="add|remove", KERNEL=="tty8", ENV{ID_LXC}="pc101"
Важно
Номер в имени файла не следует менять.
Перечитайте правила udev для принятия изменений:
/etc/init.d/udev reload
Настройка первого контейнера
Отредактируйте настройки системы первого контейнера:
/var/calculate/lxc/pc100/rootfs/etc/calculate/ini.env
vt = 7
Выполните обновление настроек системы в контейнере:
lxc-attach -n pc100 cl-setup-system
Установка второго контейнера
Установите второй контейнер:
lxc-create -t download -n pc101 — —server mirror.calculate-linux.org —no-validate -d CCDX —arch x86_64
(потребуется ввести номер версии дистрибутива),
где pc101 — имя контейнера, участвующее в дальнейших настройках и используемое в качестве сетевого имени.
Настройка второго контейнера
Добавьте настройки сети для контейнера и права на запись в , дописав в конец файла:
/var/calculate/lxc/pc101/config
# Network configuration
lxc.net.0.type = veth
lxc.net.0.flags = up
lxc.net.0.name = eth0
lxc.net.0.link = br0
lxc.net.0.hwaddr = 04:05:06:07:08:09

lxc.mount.auto = cgroup:mixed proc:mixed sys:rw
lxc.environment = LXC_DESKTOP=1
Измените MAC)адрес 04:05:06:07:08:09 на любой другой. Не забывайте, что первое число должно быть чётным.
Настройте второй контейнер по аналогии с первым, указав для него восьмой терминал:
/var/calculate/lxc/pc101/rootfs/etc/calculate/ini.env
vt = 8
Запустите второй контейнер и выполните базовые настройки: пароль root, запуск демона ssh, локализация системы, обновление всех настроек:
lxc-start -n pc101
lxc-attach -n pc101 passwd
lxc-attach -n pc101 — cl-setup-locale -l ru_RU —timezone Europe/Moscow
Используйте свои значения локализации ru_RU и временной зоны Europe/Moscow.
ln -sf /etc/init.d/lxc /etc/init.d/lxc.pc101


rc-update add lxc.pc101
Перезагрузите оба контейнера:
lxc-stop -r -n pc100
lxc-stop -r -n pc101
Для переключения между графическими сеансами двух работающих lxc-desktop используйте комбинации клавиш и .


