
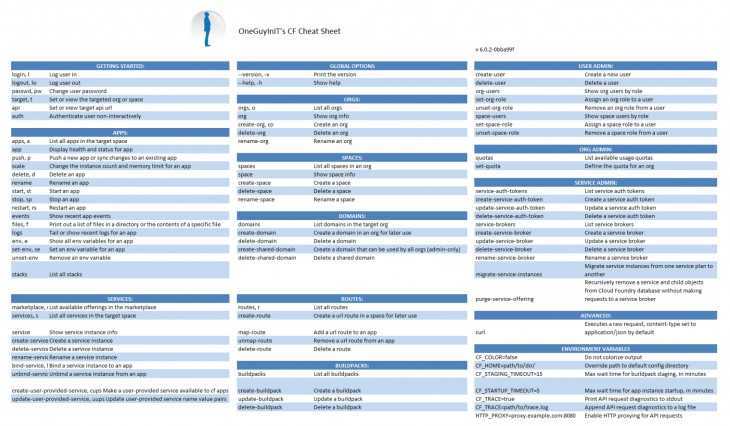
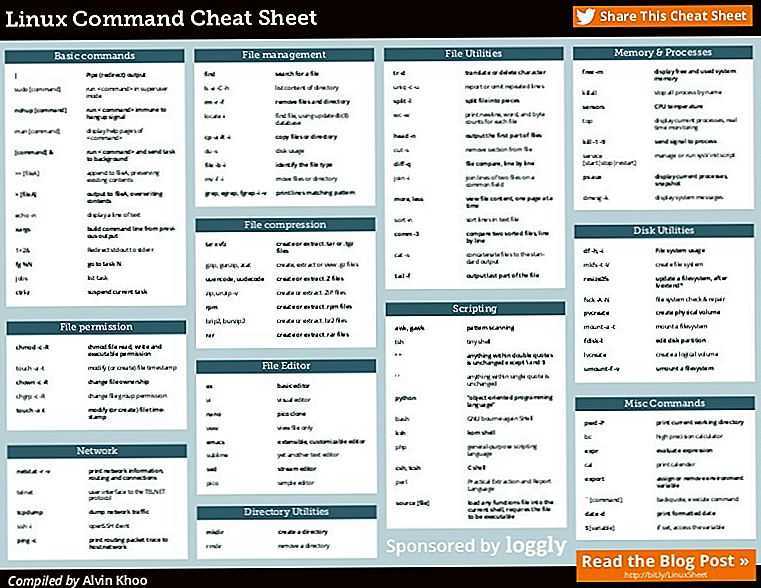
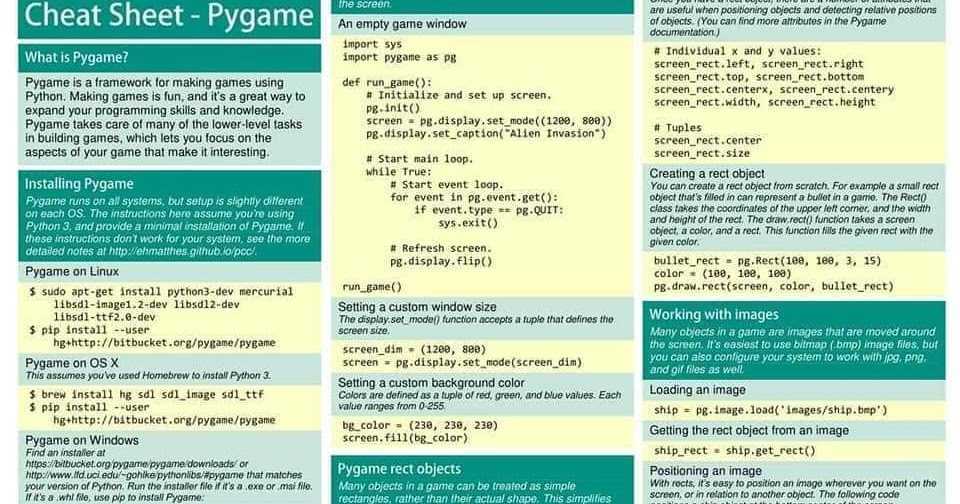
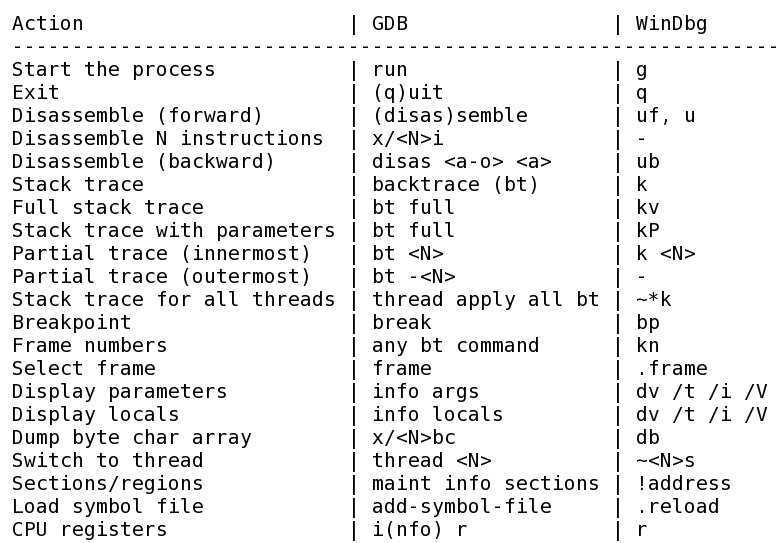
GDB Front Ends
Here’s a partial list of front ends using GDB. If you know of others, please add a link.
1.1. Using modern GDB/MI
GDB/MI is a line based machine oriented text interface to GDB. It is specifically intended to support the development of systems which use the debugger as component of a larger system. See The GDB/MI Interface in the GDB manual.
-
gdbgui — Feature rich browser-based frontend with data structure visualizations (like DDD), and gdb terminal access. Compatible with C, C++, golang, Rust, fortran. Written in Python and JavaScript. pip install gdbgui.
-
BVRDE — A fully integrated development environment (IDE) for remote cross-platform compiling and debugging of UNIX and LINUX console applications. BVRDE runs on a Windows platform, but compiles and debugs applications on UNIX systems.
-
CLion — A cross-platform C/C++ IDE by JetBrains. It bundles multi-arch GDB debugger, easily switchable to your custom version, and supports remote debug via gdbserver.
-
Eclipse CDT (C/C++ Development Tooling) — The CDT Project provides a fully functional C and C++ Integrated Development Environment based on the Eclipse platform.
-
Eclipse’s Standalone Debugger — Starts up a subset of Eclipse CDT plugins specifically to C/C++ debugging, plus a command-line script which allows an end-user to start up the debugger from the command-line and pass arguments that will start the debugger for the appropriate task.
-
KDevelop — A feature-full, plugin extensible, free, open source IDE for C/C++. Runs on Linux, Solaris, FreeBSD, Mac OS X and other Unix flavors, and Windows as well. It is based on KDE and Qt libraries and is under development since 1998.
-
NetBeans — Although this is the official IDE for Java, it can do C/C++, Fortran and Assembly too. It is plugin extensible, and you’ll find plugins that extend the GDB integration, like e.g., the GDBserver plugin here.
-
Nemiver — An easy to use standalone C/C++ debugger that integrates well in the GNOME environment.
-
Pyclewn — Pyclewn allows using vim as a front end to a debugger.
-
WinGDB — Debugging with GDB under Visual Studio
-
CodeLite — An open source, free, cross platform IDE for the C/C++ programming languages which runs best on all major Platforms ( OSX, Windows and Linux ).
-
Qt Creator — Qt Creator is a cross-platform IDE (integrated development environment) tailored to the needs of Qt developers. It is part of the Qt Project.
-
GNU Emacs (24 and beyond) — See GDB Graphical Interface in the Emacs manual. GDB is just a M-x gdb away.
-
SlickEdit — SlickEdit is a cross-platform, multi-language code editor that gives programmers the ability to code in over 50 languages on 9 platforms, that supports C++ debugging using GDB.
-
Gede — Gede is a graphical frontend (GUI) to GDB written in Qt.
-
Lazarus IDE for the Free Pascal Compiler — A Delphi compatible cross-platform IDE for Rapid Application Development. It has variety of components ready for use and a graphical form designer to easily create complex graphical user interfaces.
1.2. Built-in/linked-with GDB
-
GDB TUI — GDB’s own built-in curses interface, just a ctrl-x a away.
-
PyGtk GUI — A somewhat nameless Gtk-based GUI using GDB’s Python scripting.
-
Insight — A Tcl/Tk GUI with very tight GDB integration.
1.3. Using the old (deprecated) annotations mechanism (please fix them!)
-
Code::Blocks — A free C, C++ and Fortran IDE, with a consistent look, feel and operation across platforms. Designed to be very extensible and fully configurable.
-
GNU Emacs (prior to 24)
-
GNU DDD — A graphical front-end for command-line debuggers (GDB, Perl, bash, GNU Make, Python, etc.). Besides «usual» front-end features such as viewing source texts, DDD has become famous through its interactive graphical data display, where data structures are displayed as graphs.
-
CGDB — cgdb is a lightweight curses (terminal-based) interface. In addition to the standard gdb console, cgdb provides a split screen view that displays the source code as it executes. The keyboard interface is modelled after vim, so vim users should feel at home using cgdb.
-
KDbg (using plain CLI) — A graphical user interface to gdb. Provides an intuitive interface for setting breakpoints, inspecting variables, and stepping through code. Requires KDE, but you can of course debug any program.
Stepping through Code
Stepping lets you trace the path of your program, and zero in on the code that is crashing or returning invalid input.
-
l
-
l 50
-
l myfunction
Lists 10 lines of source code for current line (l), a specific line (l 50), or for a function (l myfunction).
-
next
Runs the program until next line, then pauses. If the current line is a function, it executes the entire function, then pauses. next is good for walking through your code quickly.
-
step
Runs the next instruction, not line. If the current instruction is setting a variable, it is the same as next. If it’s a function, it will jump into the function, execute the first statement, then pause. step is good for diving into the details of your code.
-
-
finish
Finishes executing the current function, then pause (also called step out). Useful if you accidentally stepped into a function.


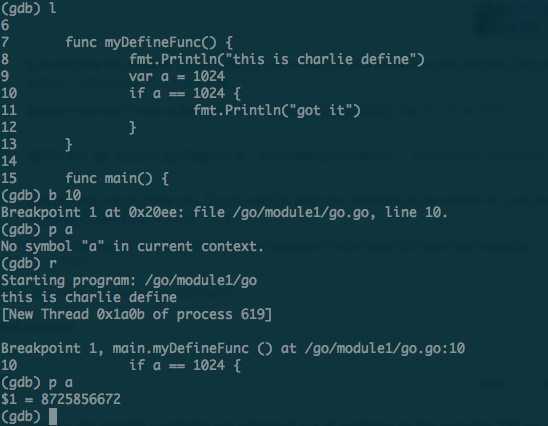
Синтаксис команд
Команда GDB представляет собой одну строку ввода. Никаких
ограничений на ее длину нет. Она начинается именем команды, за которым
следуют параметры, значение которых определяется ее названием.
Например, команда допускает в качестве параметра число
шагов, как в `step 5′. Вы также можете использовать команду
и без параметров. Некоторые команды не допускают
никаких параметров.
Названия команд GDB всегда могут быть сокращены, если это
сокращение однозначно. Другие возможные сокращения команд перечислены в
документации по отдельным командам. В некоторых случаях, допускаются
даже неоднозначные сокращения; напрмер, специально определено
как эквивалент , даже если существуют другие команды, чьи
названия начинаются на . Вы можете проверить сокращения,
задавая их как параметр для команды .
Введенная пустая строка (просто нажатие RET), означает повтор
предыдущей команды. Определенные команды (например, )
не повторяются таким способом; это те команды, непреднамеренное
повторение которых может вызвать проблемы и которые вы вряд ли захотите
повторять.
Команды и , при их повторе нажатием RET,
вместо точного повтора создают новые параметры. Это позволяет легко
просматривать исходный текст или память.
GDB может также использовать RET по-другому: для
разделения длинного вывода, аналогично обычной утилите
(see section ). Так как в такой ситуации легко
нажать RET слишком много раз, GDB блокирует повтор после
любой команды, генерирующей такой тип вывода.
Любой текст, расположенный от # до конца строки является
комментарием; он ничего не делает. В основном, это полезно в
командных файлах (see section ).
Points to Note
-
Even though GDB can help you in finding out memory leakage related bugs, but it is not a tool to detect memory leakages.
-
GDB cannot be used for programs that compile with errors and it does not help in fixing those errors.
GDB — Installation
Before you go for installation, check if you already have gdb installed on your Unix system by issuing the following command:
$gdb -help
If GDB is installed, then it will display all the available options within your GDB. If GDB is not installed, then proceed for a fresh installation.
You can install GDB on your system by following the simple steps discussed below.
step 1: Make sure you have the prerequisites for installing gdb:
-
An ANSI-compliant C compiler (gcc is recommended — note that gdb can debug codes generated by other compilers)
-
115 MB of free disk space is required on the partition on which you’re going to build gdb.
-
20 MB of free disk space is required on the partition on which you’re going to install gdb.
-
GNU’s decompression program, gzip
-
The make utility — the GNU version is known to work without a problem, others probably do as well.
step 2: Download the gdb source distribution from ftp.gnu.org/gnu/gdb. (We used gdb-6.6.tar.gz for these instructions.) Place the distribution files in your build directory.
step 3: In your build directory, decompress gdb-6.6.tar.gz and extract the source files from the archive. Once the files have finished extracting, change your working directory to the gdb-6.6 directory that was automatically created in your build directory.
$ build> gzip -d gdb-6.6.tar.gz
$ build> tar xfv gdb-6.6.tar
$ build> cd gdb-6.6
step 4: Run the configure script to configure the source tree for your platform.
$ gdb-6.6> .⁄configure
step 5: Build gdb using the make utility.
$ gdb-6.6> make
step 6: Login as root and install gdb using the following command.
$ gdb-6.6> make install
step 7: If required, disk space can be reclaimed by deleting the gdb build directory and the archive file after the installation is complete.
$ gdb-6.6> cd ..
$ build> rm -r gdb-6.6
$ build> rm gdb-6.6.tar
You now have gdb installed on your system and it is ready to use.
GDB — Debugging Symbols
A Debugging Symbol Table maps instructions in the compiled binary program to their corresponding variable, function, or line in the source code. This mapping could be something like:
Program instruction ⇒ item name, item type, original file, line number defined.
Symbol tables may be embedded into the program or stored as a separate file. So if you plan to debug your program, then it is required to create a symbol table which will have the required information to debug the program.
We can infer the following facts about symbol tables:
-
A symbol table works for a particular version of the program – if the program changes, a new table must be created.
-
Debug builds are often larger and slower than retail (non-debug) builds; debug builds contain the symbol table and other ancillary information.
-
If you wish to debug a binary program you did not compile yourself, you must get the symbol tables from the author.
To let GDB be able to read all that information line by line from the symbol table, we need to compile it a bit differently. Normally we compile our programs as:
gcc hello.cc -o hello
Instead of doing this, we need to compile with the -g flag as shown below:
gcc -g hello.cc -o hello
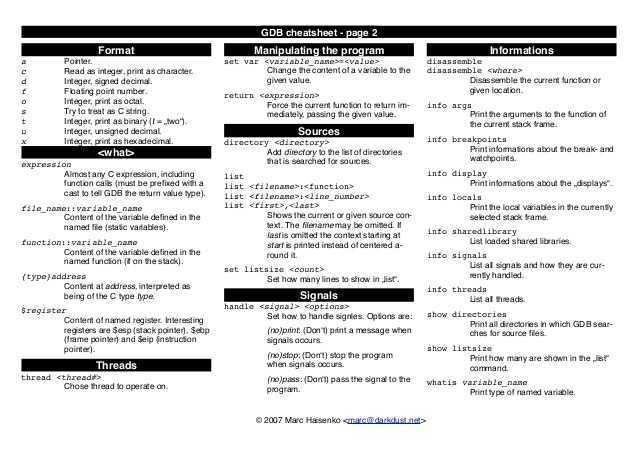
GDB — Commands
GDB offers a big list of commands, however the following commands are the ones used most frequently:
-
b main — Puts a breakpoint at the beginning of the program
-
b — Puts a breakpoint at the current line
-
b N — Puts a breakpoint at line N
-
b +N — Puts a breakpoint N lines down from the current line
-
b fn — Puts a breakpoint at the beginning of function «fn»
-
d N — Deletes breakpoint number N
-
info break — list breakpoints
-
r — Runs the program until a breakpoint or error
-
c — Continues running the program until the next breakpoint or error
-
f — Runs until the current function is finished
-
s — Runs the next line of the program
-
s N — Runs the next N lines of the program
-
n — Like s, but it does not step into functions
-
u N — Runs until you get N lines in front of the current line
-
p var — Prints the current value of the variable «var»
-
bt — Prints a stack trace
-
u — Goes up a level in the stack
-
d — Goes down a level in the stack
-
q — Quits gdb
Рабочая среда вашей программы
Среда состоит из набора переменных среды и их значений.
Переменные среды обычно хранят такие данные, как ваше имя пользователя,
домашний каталог, тип терминала и путь поиска для
запуска программ. Как правило, вы устанавливаете переменные среды с
помощью оболочки и они наследуются всеми другими программами, которые вы
вызываете. При отладке может оказаться полезным попробовать
запустить программу в измененной среде, не перезапуская
GDB.

-
Добавить каталог в начало переменной среды (пути
поиска выполняемых файлов), как для GDB, так и для вашей
программы. Вы можете указать названия нескольких каталогов, разделив их
пробелом или системно-зависимым разделителем (`:’ в Unix, `;’
в MS-DOS и MS-Windows). Если каталог уже находится в списке путей,
он переносится в начало, так что поиск в нем будет производиться
раньше.Вы можете использовать строку `cwd’, чтобы сослаться на
рабочий каталог, который является текущим в тот момент, когда
GDB производит поиск. Если вместо этого вы используете
`.’, то она будет указывать на тот каталог, в котором вы
выполнили команду . GDB заменяет `.’ в
аргументе каталог (на текущий путь) до добавления каталога к
списку путей поиска. -
Отобразить список путей для поиска выполняемых файлов (переменную среды
). -
Вывести значение переменной среды имя-перем, которое будет
передано вашей программе при ее старте. Если вы не указываете
имя-перем, вывести названия и значения всех переменных среды,
передаваемых вашей программе. Вы можете сократить
как . -
Присваивает значение переменной среды имя-перем. Значение
меняется только для вашей программы, но не для самого GDB.
значение может быть любой строкой; значениями переменных среды
являются просто строки, а их интерпретацию обеспечивает ваша
программа. Параметр значение является необязательным; если он
опущен, переменная устанавливается в пустое значение.Например, эта команда:
set env USER = foo
говорит отлаживаемой программе, что при последующих запусках именем
пользователя является `foo’. (Пробелы, окружающие `=’,
использованы здесь для ясности; в действительности, они не обязательны.) -
Удалить переменную имя-перем из среды, передаваемой вашей
программе. Это отличается от `set env имя-перем =’;
удаляет переменную из среды, а не присваивает
ей пустое значение.
Предупреждение: В системах Unix, GDB вызывает вашу
программу, используя оболочку, указанную вашей переменной среды
, если она определена (или , если не
определена). Если ваша переменная указывает на оболочку,
которая выполняет файл инициализации—такой как `.cshrc' для
оболочки C-shell, или `.bashrc' для BASH—любая переменная, которую вы
установите в этом файле, воздействует на вашу программу. В этой
связи, вы можете захотеть перенести установку переменных среды в
файлы, которые выполняются только при вашем входе в систему, такие как
`.login' или `.profile'.
Присваивание значений пеpеменным
Для изменения значения переменной, вычислите выражение присваивания.
See section . Например,
print x=4
сохраняет значение 4 в переменной и затем выводит значение данного
выражения (которое равно 4). See section , для получения большей инфоpмации
об операторах в поддерживаемых языках.
Если вы не хотите видеть значение присваивания, используйте команду
вместо . Команда аналогична команде
за исключением того, что значение выражения не выводится и не
заносится в историю значений (see section ). Выражение вычисляется только ради его действия.
Если начало строки параметров команды выглядит идентично
подкоманде , используйте вместо нее команду . Эта команда аналогична , но не имеет подкоманд.
Например, если в вашей программе есть переменная , то вы получите
ошибку, если попытаетесь установить новое значение просто с помощью
`set width=13′, потому что GDB имеет команду
:
(gdb) whatis width
type = double
(gdb) p width
$4 = 13
(gdb) set width=47
Invalid syntax in expression.
Недопустимое выражение, это, конечно, `=47′. Для того чтобы
действительно установить переменную программы , используйте
(gdb) set var width=47
Так как команда имеет много подкоманд, которые могут
конфликтовать с именами переменных в программе, то хорошей практикой
является использование команды вместо просто
. Например, если ваша программа имеет переменную , у
вас возникнут проблемы, если вы попытаетесь установить новое значение
с помощью `set g=4′, потому что GDB имеет команду
, которая сокращается как :
(gdb) whatis g
type = double
(gdb) p g
$1 = 1
(gdb) set g=4
(gdb) p g
$2 = 1
(gdb) r
The program being debugged has been started already.
Start it from the beginning? (y or n) y
Starting program: /home/smith/cc_progs/a.out
"/home/smith/cc_progs/a.out": can't open to read symbols:
                                 Invalid bfd target.
(gdb) show g
The current BFD target is "=4".
Переменная программы не изменилась, и вы незаметно установили
в неверное значение. Для установки значения переменной
, используйте
(gdb) set var g=4
GDB допускает больше неявных преобразований в присваиваниях,
чем Си; вы можете свободно сохранить целое значение в
переменной-указателе и наоборот, преобразовать любую структуру к любой
другой, которая имеет ту же длину или короче.
Для сохранения значений в произвольных местах
памяти, используйте конструкцию `{…}’ для создания
значения определенного типа по определенному адресу памяти
(see section ). Например,
ссылается на ячейку памяти как на целое (что
предполагает соответствующий размер и представление в памяти), и
set {int}0x83040 = 4
записывает в эту ячейку памяти значение 4.
Starting your program
-
Use the command to start your program under GDB.
You must first specify the program name (except on VxWorks) with an
argument to GDB (see section ), or by using the or command
(see section ).
If you are running your program in an execution environment that
supports processes, creates an inferior process and makes
that process run your program. (In environments without processes,
jumps to the start of your program.)
The execution of a program is affected by certain information it
receives from its superior. GDB provides ways to specify this
information, which you must do before starting your program. (You
can change it after starting your program, but such changes only affect
your program the next time you start it.) This information may be
divided into four categories:
- The arguments.
-
Specify the arguments to give your program as the arguments of the
command. If a shell is available on your target, the shell
is used to pass the arguments, so that you may use normal conventions
(such as wildcard expansion or variable substitution) in describing
the arguments.
In Unix systems, you can control which shell is used with the
environment variable.
See section . - The environment.
-
Your program normally inherits its environment from GDB, but you can
use the GDB commands and to change parts of the environment that affect
your program. See section . - The working directory.
-
Your program inherits its working directory from GDB. You can set
the GDB working directory with the command in GDB.
See section . - The standard input and output.
-
Your program normally uses the same device for standard input and
standard output as GDB is using. You can redirect input and output
in the command line, or you can use the command to
set a different device for your program.
See section .Warning: While input and output redirection work, you cannot use
pipes to pass the output of the program you are debugging to another
program; if you attempt this, GDB is likely to wind up debugging the
wrong program.
When you issue the command, your program begins to execute
immediately. See section , for discussion
of how to arrange for your program to stop. Once your program has
stopped, you may call functions in your program, using the
or commands. See section .
If the modification time of your symbol file has changed since the last
time GDB read its symbols, GDB discards its symbol
table, and reads it again. When it does this, GDB tries to retain
your current breakpoints.
-
The name of the main procedure can vary from language to language.
With C or C++, the main procedure name is always , but
other languages such as Ada do not require a specific name for their
main procedure. The debugger provides a convenient way to start the
execution of the program and to stop at the beginning of the main
procedure, depending on the language used.The `start’ command does the equivalent of setting a temporary
breakpoint at the beginning of the main procedure and then invoking
the `run’ command.Some programs contain an elaboration phase where some startup code is
executed before the main procedure is called. This depends on the
languages used to write your program. In C++, for instance,
constructors for static and global objects are executed before
is called. It is therefore possible that the debugger stops
before reaching the main procedure. However, the temporary breakpoint
will remain to halt execution.Specify the arguments to give to your program as arguments to the
`start’ command. These arguments will be given verbatim to the
underlying `run’ command. Note that the same arguments will be
reused if no argument is provided during subsequent calls to
`start’ or `run’.It is sometimes necessary to debug the program during elaboration. In
these cases, using the command would stop the execution of
your program too late, as the program would have already completed the
elaboration phase. Under these circumstances, insert breakpoints in your
elaboration code before running your program.
Borland, Code Gear, Embarcadero etc.
Выполните Run | Step over, или нажмите F8. Вы получите примерно такую картину, как на рисунке. Синяя стрелка указывает,
какой оператор будет выполнен. Используя шаг с обходом (F8), шаг с заходом (F7) можно исполнять программу. Кроме этого, имеются дополнительные возможности,
например исполнение кода до курсора (F4), исполнение до тех пор, пока не будет осуществлён возврат (Shift + F8), просматривать состояние переменных и выражений (Run | Inspect),
изменять значение переменных (Ctrl + F7) и добавлять список отслеживаемых переменных и выражений (Ctrl + F5).
Вызов отладчика на Embarcadero RAD Studio XE2
Шаг с обходом выполняет оператор, но не заходит в него. Например, если это вызов функции, то он будет произведён, но внутрь функции мы не попадём.


Шаг с заходом позволяет «зайти» в оператор, если он сложный. Например, перейти к функции, которая выполняется.
Шаг с выходом позволяет вернуться на уровень выше, если мы совершили шаг с заходом.
Окошко «Local Variables» слева снизу отображает текущее значение локальных переменных. Во время захода в функцию в значениях хранится мусор.
Нажимая F8, дойдите до строки 23, где происходит вызов функции printArray. Если вы нажмёте F7, то перейдёт внутрь функции printArray.
Шаг с заходом позволяет перейти в функцию
Если часть программы необходимо пропустить, то ставят точку останова. Для этого кликают по левому полю, рядом со строчкой, на которой необходимо остановиться. Останов можно осуществить только на операторе, нельзя остановиться, например, на определении переменной или пустой строке. В этом случае отладчик отметит крестом нерабочую точку останова. Во время отладки все возможные точки останова выделены синим, если по ним кликнуть, то они становятся активными красными.
Синие метки — возможные точки останова, красные — активные
После того, как точка останова выставлена, можно нажать F9. Программа будет выполняться до тех пор, пока не встретит точку останова. Это особенно удобно, когда нужно обойти ввод данных.
Точка останова может быть иметь ряд условий, например, число попаданий, фильтры, действие, которое выполняется при остановке и т.д. Для того, чтобы задать дополнительные свойства, кликните правой кнопкой мыши на точке и в выпадающем меню выберете Breakpoint Properties….
Пусть, например, мы хотим остановить выполнение программы тогда, когда значение локальной переменной i внутри цикла в функции стало равно 2. Для этого напишем соответствующее условие в поле condition
Останов выполнения программы может быть осуществлён по условию
Теперь, если нажать на «Продолжить», то программа будет работать до тех пор, пока значение локальной переменной i внутри функции не станет равным 2.
Слева расположено окно Watchlist. Watchlist позволяет добавлять отслуживаемые переменные и выражения. Кликните два раза по полю и появится диалоговое окно. Пусть, например, мы хотим трассировать сумму переменных i и j. Запишем в watchlist сумму
Watchlist позволяет отслеживать значения переменных и выражений во время отладки
Q&A
Всё ещё не понятно? – пиши вопросы на ящик
Основные команды
Запуск
Общий синтаксис выбора исполняемого файла для анализа
Запустить выполнение программы
Присоединиться к gdbserver
Присоединиться к процессу, отключиться от него
Выйти из gdb
Статический анализ
Выбрать синтаксис ассемблера
Просмотреть информацию об архитектуре, секциях
Получение списка функций
Получение asm-листинга функции
Если у вас есть исходники (можем собрать с опцией -g3 для gcc) или исследуемая программа содержит отладочную информацию, можем посмотреть листинг ее исходного кода
Динамический анализ
Установить аргументы для каждого запуска программы и посмотреть их
Распределение виртуальной памяти
Просмотр регистров
Отладка
Шаг с заходом в функцию
Шаг с прыжком через вызываемую подпрограмму
Выполнить до нужной строки, адреса
Информация об аргументах функции, локальных переменных (для файлов, содержащих отладочную информацию) и фрейме текущей функции
Просмотреть список процессов и выбрать интересующий
Способы расстановки breakpoints
Посмотреть список точек останова, включить или отключить, удалить breakpoint
Продолжить выполнение до следующего breakpoint-а
Просмотр стека
Для отображения значения по указанному адресу используется команда x, где через «/» указывается формат вывода
а также размер вывода
Пример
Передача аргумента командной строки
Для передачи значений функциям ввода
Reverse Debug
Все мы проходили через этот неловкий момент когда во время отладки мы проскочили интересующую нас функцию, и теперь снова надо перезапускать отладчик, проходить тот же путь на CFG и т.п. Чтобы избежать этого, в gdb есть такая фишка как Reverse Debug, позволяющая сохранить состояние программы и обратно отладить до него.


Для этого, после запуска отладчика укажем gdb, что хотим начать использовать reverse debug и стоит сохранять состояния программы
После этого станут доступны следующие команды
Создание дампа
Сдампить участок памяти ( часто необходимо при работе с распаковщиками )
Для того чтобы закрепить вывод команды, скажем просмотр инструкций во время отладки и отображения регистров можно воспользоваться командой display
Remote Debugging
For remote debugging, a remote stub should be implemented in the remote program that needs to be debugged. That means the kernel should contain the remote stub to talk to the host GDB during the debug session. This requires a kernel source change and it is a must if you are running your kernel on a test(real) machine and debugging from another machine. If you are using an emulator (Bochs or QEMU), you can use the GDB stub compiled into the emulator.
Implementing GDB Stub
To debug (using GDB) a kernel running on a real machine, the kernel needs to contain a GDB stub. For the i386 platform, GDB source includes a reference implementation of gdb-stub.c. It requires the following three functions from the kernel to read/write from a serial port and to set up the exception handlers.
   getDebugChar(); // to read a character from serial port
   putDebugChar(int); // to write a character to serial port
   exceptionHandler(int exception_number, void *exception_address); // to set exception handler
Implement the above functions in your kernel, include the gdb-stub.c in the compilation, and also call the following functions during kernel start to connect to the gdb host.
   InitSerialPort(sys_gdb_port, 9600, UART_DATA_BIT_8, UART_PARITY_NONE, UART_STOP_BIT_1);   /*set up the serial port*/
   set_debug_traps();   /*setup exception handlers*/
   kprintf("Waiting for GDB(0x%X) : ", sys_gdb_port );
   __asm__("int3");   /*break point exception to sync with GDB host*/
Now start your test machine and your kernel will wait for a GDB host connection.
Using Emulator Stubs
QEMU — GDB can be connected to QEMU by simply starting qemu with the -s -S command line switches.
Bochs — For GDB to be able to interface with Bochs, Bochs will need to be configured with the --enable-gdb-stub argument.
The bochssrc (or whatever configuration script is being used) will need to have the gdbstub line set to something like gdbstub: enabled=1, port=1234, text_base=0, data_base=0, bss_base=0.
Setting Variables
Viewing and changing variables at runtime is a critical part of debugging. Try providing invalid inputs to functions or running other test cases to find the root cause of problems. Typically, you will view/set variables when the program is paused.
-
print x
Prints current value of variable x. Being able to use the original variable names is why the (-g) flag is needed; programs compiled regularly have this information removed.
-
set x = 3
-
set x = y
Sets x to a set value (3) or to another variable (y)
-
call myfunction()
-
call myotherfunction(x)
-
call strlen(mystring)
Calls user-defined or system functions. This is extremely useful, but beware of calling buggy functions.
-
display x
Constantly displays the value of variable x, which is shown after every step or pause. Useful if you are constantly checking for a certain value.
-
undisplay x
Removes the constant display of a variable displayed by display command.
Исходный текст и машинный код
Вы можете использовать команду , чтобы отобразить cтроки
исходного текста в программные адреса (и наоборот), и
команду , чтобы вывести диапазон адресов в виде
машинных инструкций. При запуске в режиме GNU Emacs, команда
выводит стрелку, указывающую на заданную строку.
Также выводит адреса как в символьной форме, так и в
шестнадцатеричной.
-
Выводит начальный и конечный адреса скомпилированного кода,
соответствующего строке исходного текста указ-стр. Вы можете
определить строки исходного текста любым способом, воспринимаемым
командой (see section ).
Например, мы можем использовать для определения
положения объектного кода первой строки функции
:
(gdb) info line m4_changequote
Line 895 of "builtin.c" starts at pc 0x634c and ends at 0x6350.
Мы также можем запросить (используя как форму
задания указ-стр), какая строка исходного текста соответствует
определенному адресу:
(gdb) info line *0x63ff
Line 926 of "builtin.c" starts at pc 0x63e4 and ends at 0x6404.
После , адрес, используемый по умолчанию для команды
, меняется на начальный адрес строки, так что `x/i’
достаточно для начала исследования машинного кода (see section ). Этот адрес также сохраняется как значение
вспомогательной переменной (see section ).
-
Эта специализированная команда служит для дампа диапазона памяти в виде
машинных инструкций. Диапазоном памяти по умолчанию является функция, в
которой находится счетчик программы в выбранном кадре. Одиночным
параметром этой команды является значение счетчика программы;
GDB выводит дамп функции, которой принадлежит указанный адрес. Два
параметра определяют диапазон адресов для дампа (первый включается, второй
исключается).
Следующий пример показывает результат дисассемблирования диапазона
адресов кода HP PA-RISC 2.0:
(gdb) disas 0x32c4 0x32e4
Dump of assembler code from 0x32c4 to 0x32e4:
0x32c4 <main+204>:      addil 0,dp
0x32c8 <main+208>:      ldw 0x22c(sr0,r1),r26
0x32cc <main+212>:      ldil 0x3000,r31
0x32d0 <main+216>:      ble 0x3f8(sr4,r31)
0x32d4 <main+220>:      ldo 0(r31),rp
0x32d8 <main+224>:      addil -0x800,dp
0x32dc <main+228>:      ldo 0x588(r1),r26
0x32e0 <main+232>:      ldil 0x3000,r31
End of assembler dump.
Некоторые архитектуры имеют несколько широко используемых наборов мнемоник
инструкций или другой синтаксис.
-
Выбрать набор инструкций для использования при дисассемблировании программы
командами и .В настоящее время, эта команда определена только для Intel x86. Вы
можете установить набор-инструкций в или .
По умолчанию установлено , диалект AT&T используется по
умолчанию ассемблерами Unix на архитектурах, базирующихся на x86.
Go to the first, previous, next, last section, table of contents.
Спонсоры:
Хостинг:
Maxim ChirkovДобавить, Поддержать, Вебмастеру

![Tmux [wiki.eduvdom.com]](http://smartshop124.ru/wp-content/uploads/6/f/f/6ff8cfeff1af2f51acd26bdf0e528c84.jpeg)


