HTTPS configuration
HTTPS configuration for Roundcube
Configure the Nginx service for domain name roundcube.example.org:
/etc/nginx/sites-enabled/roundcube.example.org.conf
upstream php-handler {
    server unix:/run/php-fpm.socket;
}

server {
    listen 80;
    server_name roundcube.example.org;
    rewrite ^ https://$server_name$request_uri? permanent;
}

server {
    listen 443 ssl http2;
    ssl_certificate /etc/letsencrypt/live/roundcube.example.org/fullchain.pem;
    ssl_certificate_key /etc/letsencrypt/live/roundcube.example.org/privkey.pem;
    include ssl.conf;

    server_name roundcube.example.org;
    root /var/calculate/www/roundcube/roundcubemail-latest;
    index index.php index.html index.htm;

    error_log /var/log/nginx/roundcube.error;
    access_log /var/log/nginx/roundcube.access;

    location / {
        try_files $uri $uri/ /index.php;
    }

    location ~ ^/(README|INSTALL|LICENSE|CHANGELOG|UPGRADING)$ {
        deny all;
    }
    location ~ ^/(bin|SQL)/ {
        deny all;
    }

    location ~ \.php$ {
        try_files $uri =404;
        fastcgi_pass php-handler;
        fastcgi_index index.php;
        fastcgi_param SCRIPT_FILENAME $document_root$fastcgi_script_name;
        include /etc/nginx/fastcgi.conf;
    }
}
Install Roundcube on Ubuntu 18.04
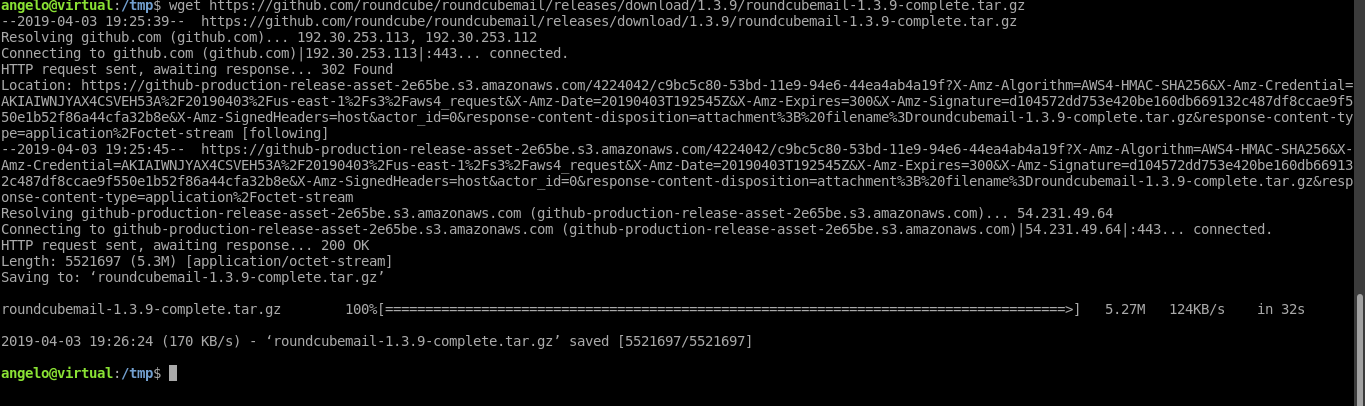
It is now possible to install Rouncube on Ubuntu 18.04. First, let’s download it:
:~$ cd /tmp/
:~$ wget https://github.com/roundcube/roundcubemail/releases/download/1.3.8/roundcubemail-1.3.9-complete.tar.gz
 7.- Download and install Roundcube on Ubuntu 18.04
Next, decompress it.
:~$ tar -xvzf tar -xvzf roundcubemail-1.3.9-complete.tar.gz
And move it to the Apache folder.
:~$ sudo mv roundcubemail-1.3.9 /var/www/html/roundcube
After that, the Roundcube database has to be started. To do this, run the following command:
:~$ cd /var/www/html/roundcube
:~$ sudo mysql -u  -p  < SQL/mysql.initial.sql
 8.- Installing Roundcube
After all this, it is necessary to assign the Rouncube folder the necessary permissions to avoid execution problems.
:~$ sudo chown -R www-data:www-data /var/www/html/roundcube/
:~$ sudo find /var/www/html/roundcube/ -type d -exec chmod 750 {} \;
:~$ sudo find /var/www/html/roundcube/ -type f -exec chmod 640 {} \;
 9.- Set the permission to the folder
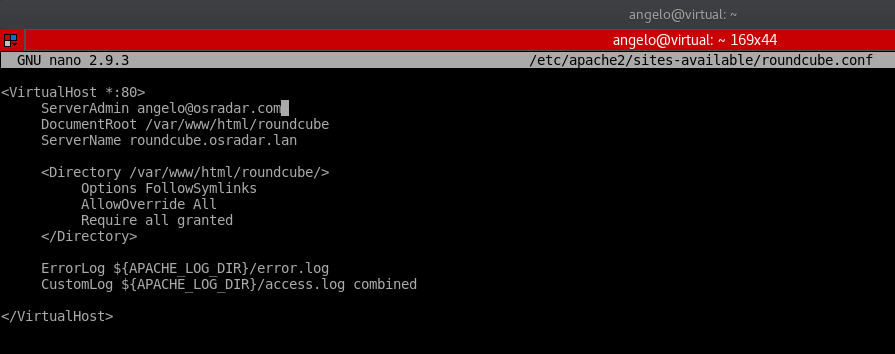
Next, you need to create a new virtual host for Roundcube.
:~$ sudo nano /etc/apache2/sites-available/roundcube.conf
And add the following:
<VirtualHost *:80>
     ServerAdmin
     DocumentRoot /var/www/html/roundcube
     ServerName your-server.com

     <Directory /var/www/html/roundcube/>
          Options FollowSymlinks
          AllowOverride All
          Require all granted
     </Directory>

     ErrorLog ${APACHE_LOG_DIR}/error.log
     CustomLog ${APACHE_LOG_DIR}/access.log combined

</VirtualHost>
 10.- Creating a new virtualhost for Roundcube
Save the changes and close it.
Finally, enable the new virtual host and restart Apache.
:~$ sudo a2ensite roundcube.conf
:~$ sudo systemctl reload apache2
 11.- Restart Apache
Now, you can complete the installation using the web interface.
Step 2: Install Dependencies
Run the following command to install required PHP extensions.
sudo apt install php-net-ldap2 php-net-ldap3 php-imagick php7.2-common php7.2-gd php7.2-imap php7.2-json php7.2-curl php7.2-zip php7.2-xml php7.2-mbstring php7.2-bz2 php7.2-intl php7.2-gmp
Install Composer, which is a dependency manager for PHP.
sudo apt install composer
Change into the roundcube directory.
cd /var/www/roundcube
Use Composer to install all needed dependencies (3rd party libraries) for Roundcube Webmail.
composer install --no-dev
If you see the message, then all dependencies are installed.

Make the web server user () as the owner of the and directory so that web server can write to these two directories.
sudo chown www-data:www-data temp/ logs/ -R
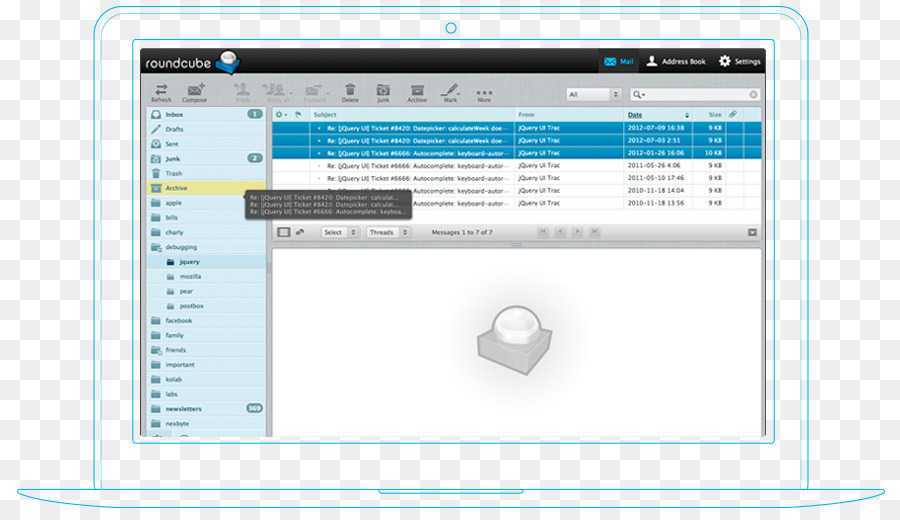
Current features
- Ajax technology spread throughout the user interface, allowing features such as drag-and-drop message management
- Multilingual with over 70 languages
- Connects to any IMAPv4 server
- Encrypted TLSv1.2 connection to IMAP server using PHP5.6 SSL/TLS libraries
- Full support for MIME and HTML messages
- Sophisticated privacy protection
- Compose Richtext/HTML messages with attachments
- Multiple sender identities
- Threaded message listing
- IDNA support
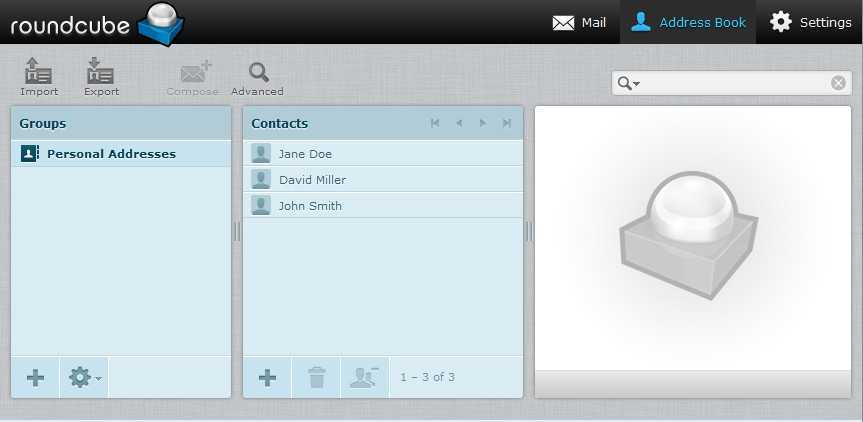
- Full-featured address book based on vCard with group support
- LDAP directory integration for address books
- Find-as-you-type address book integration
- Forwarding messages with attachments
- Built-in caching for fast mailbox access
- Searching messages and contacts
- Spell checking
- Support for external SMTP server
- Support for shared/global folders and IMAP ACLs
- IMAP folder management
- Template system for custom themes
- Canned response templates
- Three column (widescreen) mailbox view
Building a Docker image
Use the in this repository to build your own Docker image.
It pulls the latest build of Roundcube Webmail from the Github download page and builds it on top of a Docker image.
Build it from this directory with
You can also create your own Docker image by extending from this image.
For instance, you could extend this image to add composer and install requirements for builtin plugins or even external plugins:
FROM roundcube/roundcubemail:latest

RUN set -ex; \
    apt-get update; \
    apt-get install -y --no-install-recommends \
        git \
    ; \
    \
    curl -sS https://getcomposer.org/installer | php -- --install-dir=/usr/bin --filename=composer; \
    mv /usr/src/roundcubemail/composer.json-dist /usr/src/roundcubemail/composer.json; \
    \
    composer \
        --working-dir=/usr/src/roundcubemail/ \
        --prefer-dist --prefer-stable \
        --no-update --no-interaction \
        --optimize-autoloader --apcu-autoloader \
        require \
            johndoh/contextmenu \
    ; \
    composer \
        --working-dir=/usr/src/roundcubemail/ \
        --prefer-dist --no-dev \
        --no-interaction \
        --optimize-autoloader --apcu-autoloader \
        update;
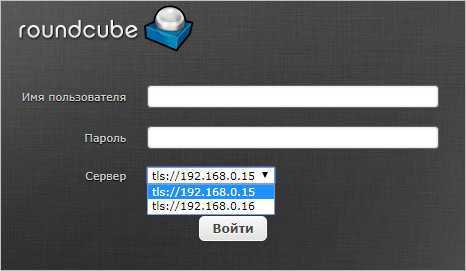
Добавление почтового сервера
Добавим еще один сервер почты в Roundcube. Открываем конфигурационный файл:
vi /usr/share/nginx/html/webmail/config/config.inc.php
Находим нашу настройку:
$config = ‘tls://192.168.0.15’;
… и меняем ее на:
$config = array(‘tls://192.168.0.15’, ‘tls://192.168.0.16’);
* мы изменили тип записи, указав, что это массив (array) и через запятую перечислили два сервера — 192.168.0.15 и 192.168.0.16.
Переходим на страницу авторизации Roundcube http://<IP-адрес сервера>/webmail/. — мы должны увидеть выпадающий список наших серверов:
Несколько доменов без выпадающего списка
Как правило, пользователям неудобно выбирать нужный сервер. Это может их сбить с толку.
Чтобы Roundcube автоматически выбирал почтовый сервер, внесем изменения в наш конфигурационный файл:
vi /usr/share/nginx/html/webmail/config/config.inc.php
…
$config = ‘tls://imap.%s’;
…
$config = ‘tls://smtp.%s’
…
Чтобы данная настройка корректно работала, необходимо, чтобы сервер мог разрешать имена серверов для подключения в IP-адреса. Для этого все хосты imap и smtp для обслуживаемых почтовых доменов должны быть в DNS-сервере, к которому обращается сервер Roundcube. Или нужные записи можно прописать в файле /etc/hosts.
How do I get it?
The setup guide walks you through getting your own box set up. Users report it taking just a few hours to get to a fully operational system. And see the video above!
Legal note! Mail-in-a-Box is made available per the CC0 public domain dedication. By running Mail-in-a-Box, you will invoke scripts that use Let’s Encrypt to provision TLS certificates per the Let’s Encrypt Subscriber Agreement(s) & Terms of Services. Please be sure you accept the terms in both documents before beginning.
If you are an expert and have a domain name and a completely fresh Ubuntu 18.04 machine running in the cloud, you basically just run on that machine:
curl -s https://mailinabox.email/setup.sh | sudo bash
Please note that the goal of this project is to provide a simple, turn-key solution. There are basically no configuration options and you can’t tweak the machine’s configuration files after installation. If you are looking for something more advanced, try iRedMail or Modoboa.
Note: Mail-in-a-Box’s maintainers work on Mail-in-a-Box in their limited free time. Your mileage may vary.
Step 4: Enabling HTTPS
It’s highly recommended that you use TLS to encrypt your webmail. If Roundcube, Postfix and Dovecot are installed on the same machine, then you can reuse the TLS certificate you created for Postfix and Dovecot . If Roundcube is installed on a separate machine, then you can always get a free certificate from Let’s Encrypt.
First, install Let’s Encrypt client (certbot).
sudo apt install software-properties-common
sudo add-apt-repository ppa:certbot/certbot
sudo apt update
sudo apt install certbot python3-certbot-nginx
Then use the nginx plugin to obtain a TLS certificate from Let’s Encrypt.
sudo certbot --nginx --agree-tos --redirect --hsts --email your-email-address -d mail.your-domain.com
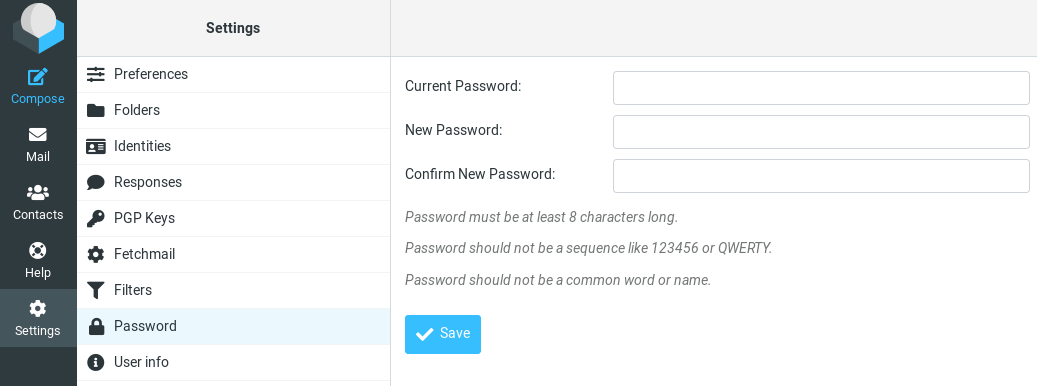
Step 10: Configure the Password Plugin in Roundcube
Roundcube includes a password plugin that allows users to change their passwords from the webmail interface. Edit the file.
sudo nano /var/www/roundcube/config/config.inc.php
Make sure the plugin in the plugin list at the end of this file. The plugin order doesn’t matter.
$config = array('acl', 'additional_message_headers', 'password', .....);
Save and close the file.
However, we need to configure this plugin before it will work. Run the following command to copy the distributed password plugin config file to a new file.
sudo cp /var/www/roundcube/plugins/password/config.inc.php.dist /var/www/roundcube/plugins/password/config.inc.php
Edit the password plugin configuration file.
sudo nano /var/www/roundcube/plugins/password/config.inc.php
Find the following line:
$config = '';
This parameter is used to tell the password plugin where the user passwords are stored. By default, the value is empty and it will query the database, which doesn’t store user passwords. If you followed my PostfixAdmin tutorial, then user passwords are stored in the table, so we need to change the value to:
$config = 'mysql://postfixadmin:postfixadmin_database_password@127.0.0.1/postfixadmin';
The tells the password plugin to connect to the database. If you don’t remember your postfixadmin database password, you can find it in the file. If your PostfixAdmin password contains a single quote character, then you can use backslash () to escape it.
Then find the following line.
$config = 'SELECT update_passwd(%c, %u)';
Change it to the following.
$config = 'UPDATE mailbox SET password=%D,modified=NOW() WHERE username=%u';
I recommend enabling a password strength checker to prevent users from setting weak passwords. Go to the beginning of this file, you can find the following line.
$config = null;
We can use the password strength driver, so change it to:
$config = 'zxcvbn';
Add the following line in this file to allow strong passwords only.
$config = 5;
Note: The parameter doesn’t work with the driver, so leave it alone.
You can also set a minimum length for the password. Find the following line.
$config = 0;
Change it to:
$config = 8;
Recall that we used the ARGON2I password scheme in the PostfixAdmin tutorial, so we also need to configure the password plugin to use ARGON2I. Find the following lines in the file.
$config = 'clear';
By default, the password will be stored as clear text, change the value to the following to use Dovecot’s builtin password algorithm.
$config = 'dovecot';
Then find the following line, which tells where the Dovecot’s password hash generator is located.
$config = '/usr/local/sbin/dovecotpw'; // for dovecot-1.x
Change it to the following.
$config = '/usr/bin/doveadm pw -r 5';
Then find the following line, which tells which password scheme will be used.
$config = 'CRAM-MD5';
Change it to:
$config = 'ARGON2I';
Find the following line.
$config = false;
Change to This will add a {ARGON2I} prefix to the hashed password, so you will recognize which password scheme is used.
$config = true;
Save and close the file. Since this file contains the database password, we should allow only the user to read and write to this file.


sudo chown www-data:www-data /var/www/roundcube/plugins/password/config.inc.php
sudo chmod 600 /var/www/roundcube/plugins/password/config.inc.php
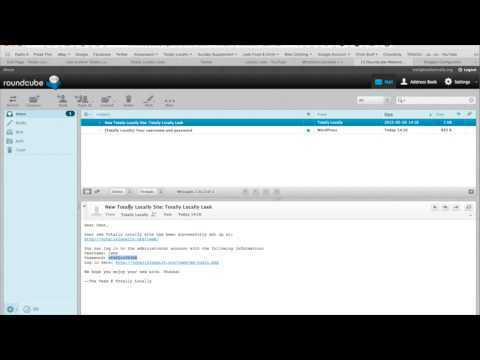
Now users should be able to change their passwords in the Roundcube webmail interface.
Step 3: Download and Configure Roundcube
Now that Apache2 and PHP 7.2 are installed, use the steps below to download and configure Roundcube environment on Ubuntu servers. First use the commands below to download the latest version.
After that create Roundcube directory and extract the download content there.
After that, run the commands below to import Roundcube database tables to initiate the database.
Next, configure the directory access permission for Apache2.
When you’re done, run the commands below to create Roundcube Apache2 configuration file.
Then copy and paste the content below into the file and save.
Save the file and exit.
Next, run the commands below to enable Roundcube virtual host and restart Apache2.
Finally, open your web browser and browse the server name to access the back-end portal.
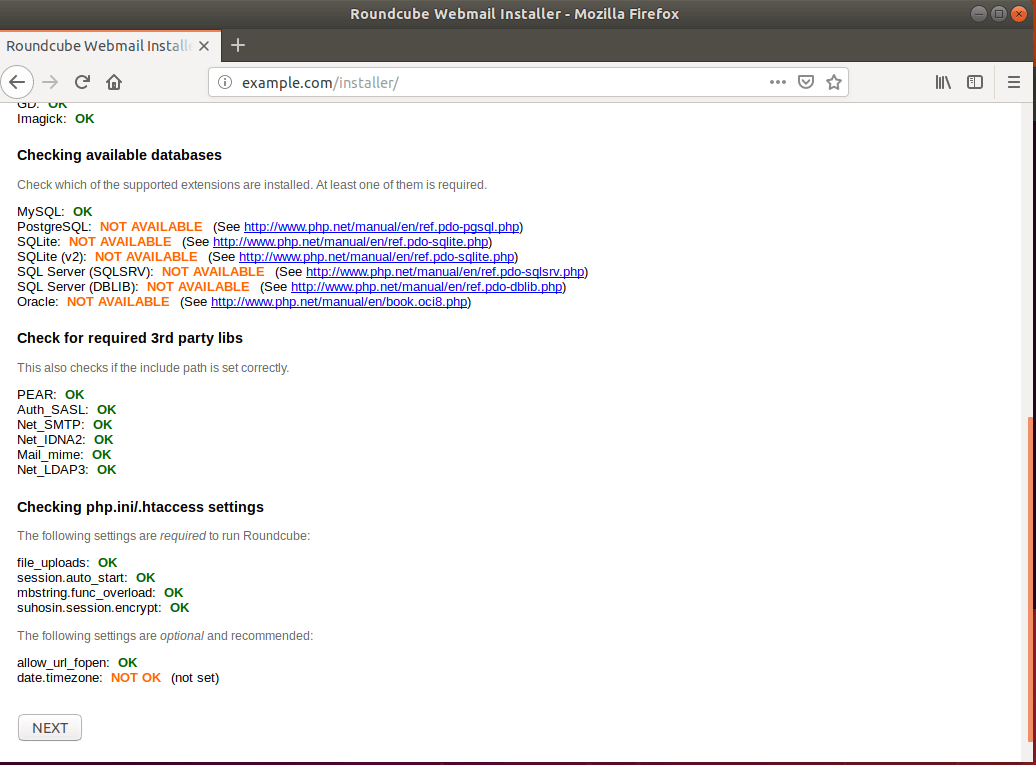
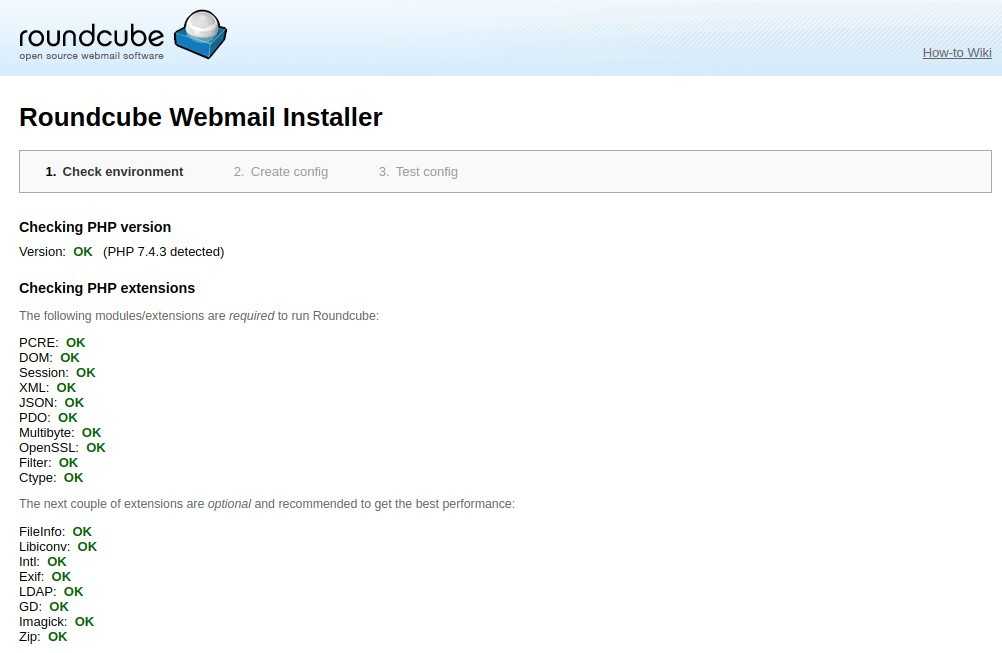
http://example.com/installer
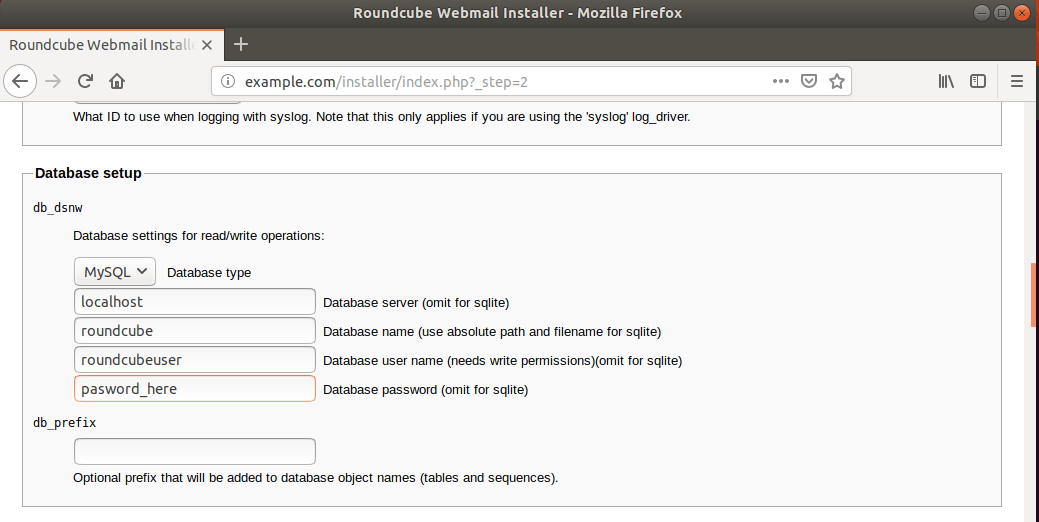
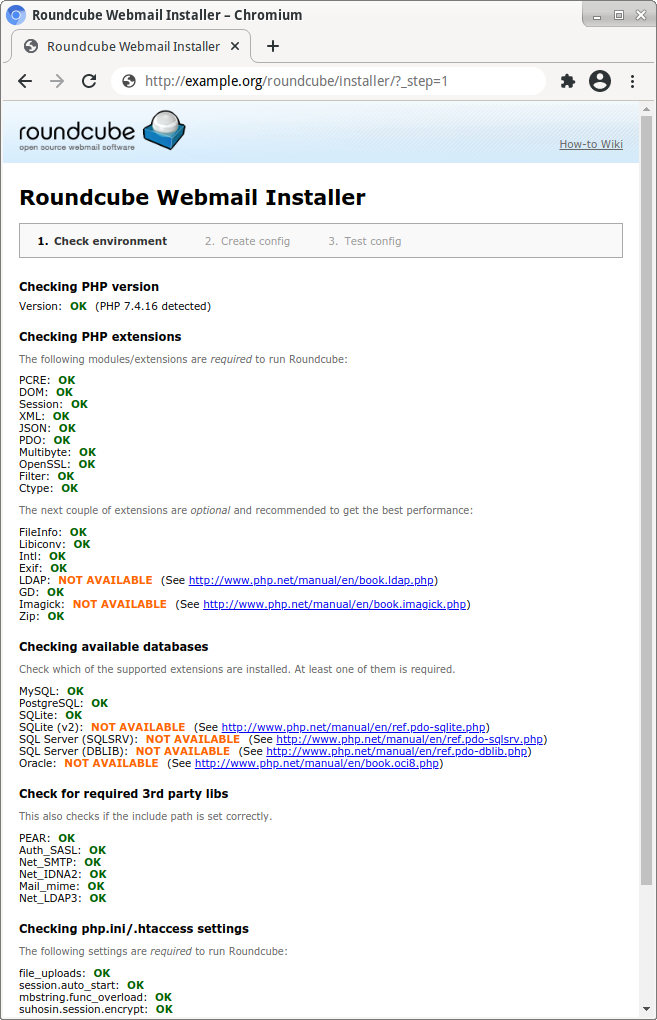
You should see that all the checks are ok. Click Next to continue with the setup.
On the next page, focus mainly on the Database, IMAP and SMTP sections. The easiest IMAP and SMTP host to use is Google.
Google IMAP settings.
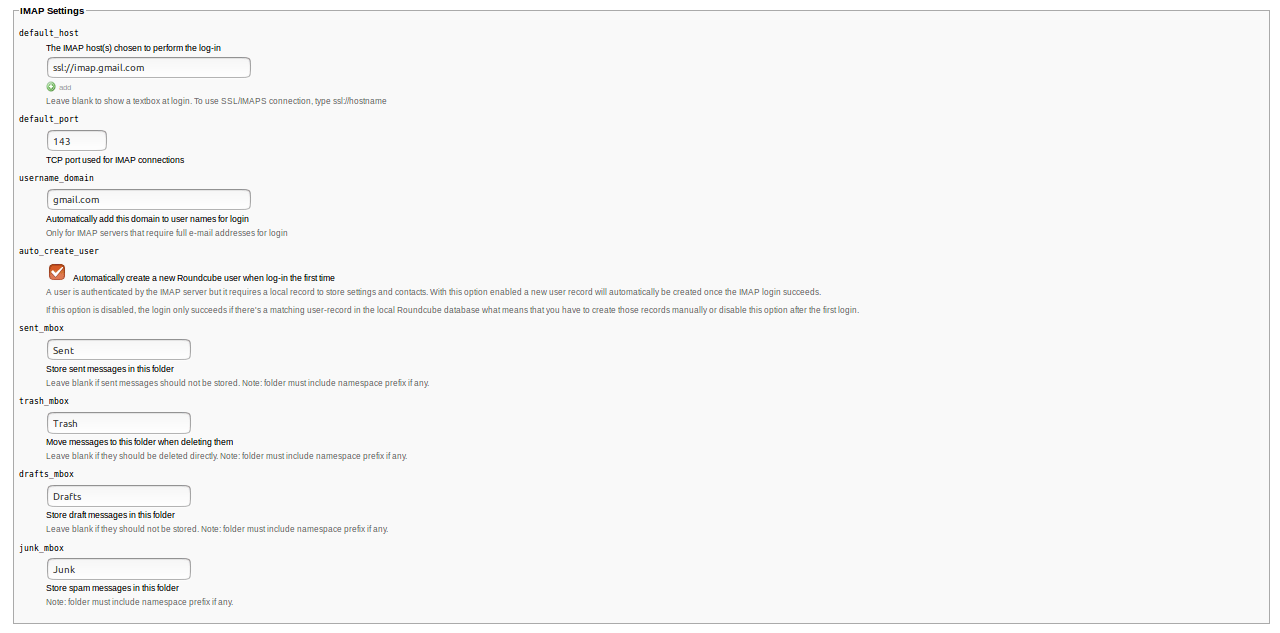
Google SMTP settings.

Run the commands below to delete the installer folder.
Login and begin configuring Roundcube
http://example.com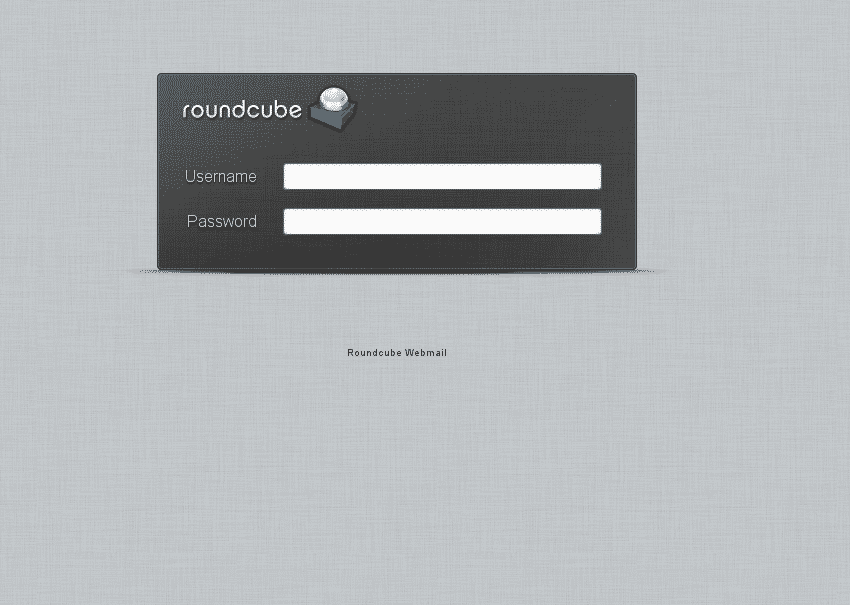
Congratulations! You have successfully installed and configure Roundcube on Ubuntu 16.04 | 18.04 with Apache2 and PHP 7.2.
стек для Linux, Apache, MySQL и PHP (LAMP)
Установить пакеты стека LAMP
- Установите метапакет, который устанавливает Apache, MySQL и PHP как зависимости:
- В процессе установки вам будет предложено выбрать пароль для пользователя root MySQL.
- Защитите вашу новую установку MySQL:
- Укажите часовой пояс VPS в файле конфигурации PHP. Если ваш сервер не использует UTC, замените его местным часовым поясом, указанным на PHP.net :
Создание Apache Виртуальный хост с SSL
- Разместите приглашение оболочки вашего VPS в каталоге:
- Загрузите копию нашего файла конфигурации виртуального хоста. Замените экземпляры на нужный домен или поддомен вашей установки.
- Перенесите владение файла в root :
- Затем измените права доступа к файлу:
- Определите, какой тип сертификата шифрования Secure Socket Layer (SSL) лучше всего подходит для развертывания Roundcube. легко и свободно, но вызывает ошибку в большинстве современных браузеров , сообщающих о том , что соединение не является частным. Let’s Encrypt предлагает браузеру надежные, бесплатные сертификаты SSL, но не поддерживает расширенную проверку (EV) или многодоменные ( подстановочные ) сертификаты. Чтобы получить эти функции, необходимо использовать .
- Получив сертификат SSL, измените следующие параметры в соответствии с желаемой конфигурацией:
- ServerAdmin: административный адрес электронной почты для вашего линода (например, или )
- ServerName: полное доменное имя виртуального хоста (например )
- ErrorLog (необязательно): путь к пользовательскому файлу журнала ошибок (например , раскомментировать, удалив )
- CustomLog (необязательно): путь к файлу журнала настраиваемого доступа (например , снова, раскомментируйте, удалив )
- SSLCertificateFile: путь к файлу информации о сертификате SSL ( )
- SSLCertificateKeyFile: путь к файлу закрытого ключа сертификата SSL ( )
- Переименуйте файл конфигурации, чтобы он соответствовал полному имени домена:
- Наконец, отключите виртуальный хост Apache по умолчанию, если вы не планируете его использовать.
Создайте базу данных MySQL и постоянную пользователя
- Войдите в командную строку MySQL от имени пользователя root :
- После входа в систему и отображения приглашения создайте новую базу данных MySQL с именем :
- Создайте нового пользователя MySQL с именем и назначьте ему надежный пароль:
- Предоставьте новому пользователю полный доступ к базе данных Roundcube :
- Очистите таблицы привилегий MySQL, чтобы перезагрузить их:
- Выйдите из командной строки MySQL и вернитесь к обычной командной строке Linux:
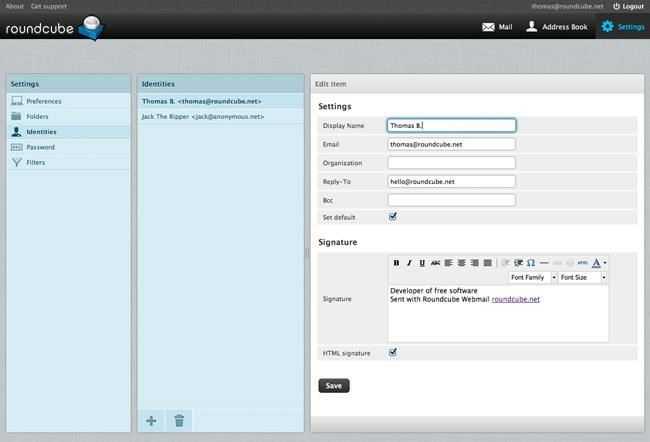
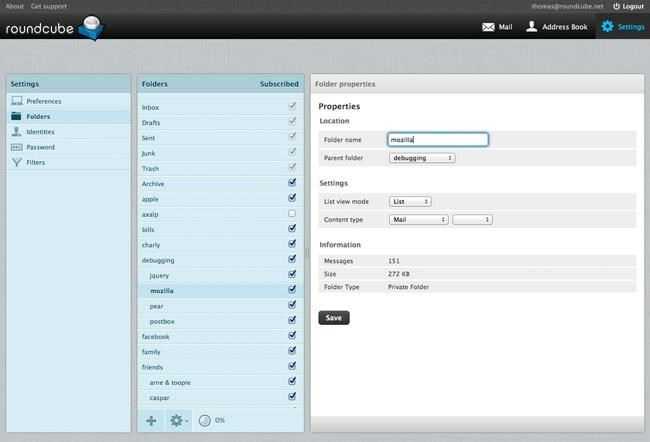
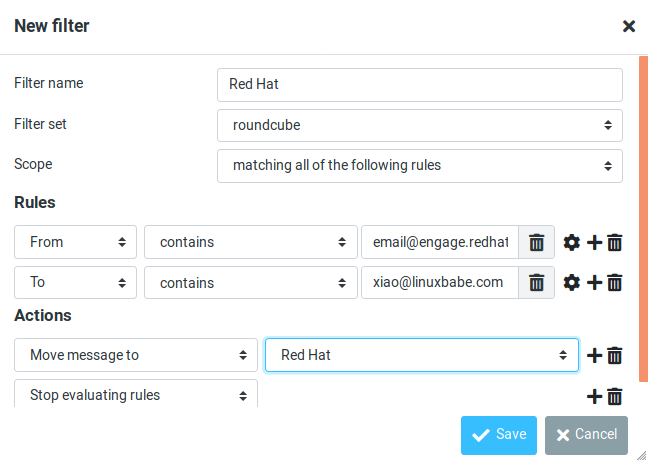
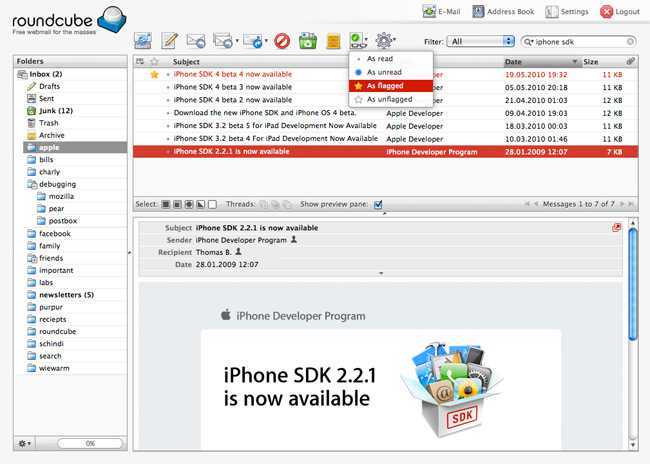
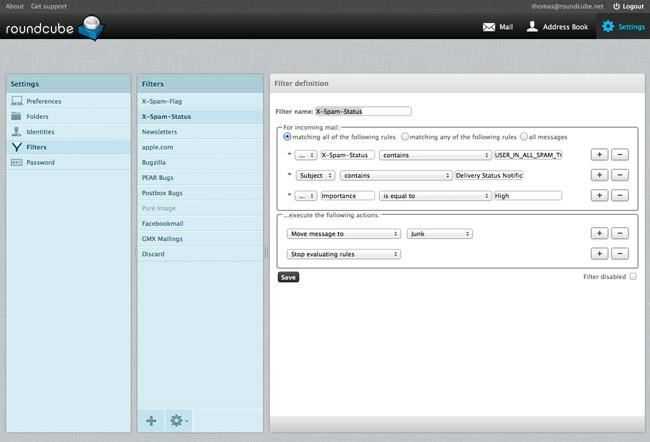
How to Set Up Vacation/Out-of-Office Messages
We can use the sieve filter to create vacation/out-of-office messages. Go to Roundcube Settings -> Filters. Then click the button to create a filter.
- Give this filer a name like “out of office”.
- New filters are not disabled, so you can leave the button alone.
- In the Scope field, select all messages.
- Select Replay with message in the Actions settings, and enter the message that will be automatically sent.
- Enter 1 in how ofter send messages. Leave other text field empty.
- Click the Save button and you are done.
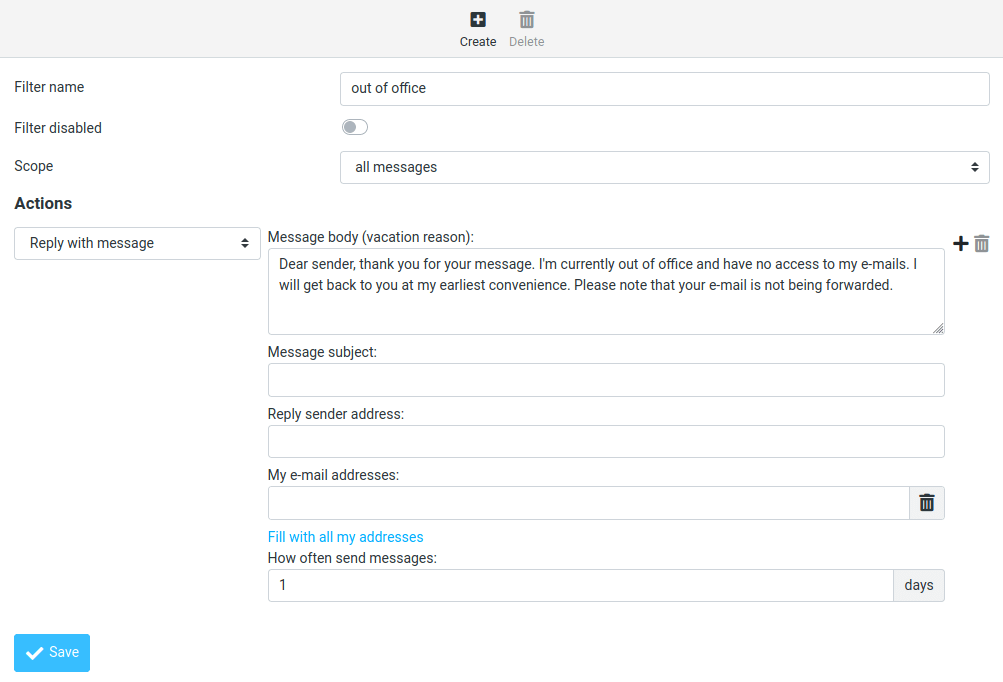
When you are back to office, you can toggle the “Filter disabled” button, and click the Save button to disable this filter.
Installing and configuring Roundcube
Configure the roundcube user created for PostgreSQL:
mkdir /var/calculate/www
useradd -m -s /sbin/nologin -d /var/calculate/www/roundcube roundcube
Install Roundcube on your webserver:
su — -s /bin/bash roundcube
mkdir versions
exit
Using the web interface for configuration
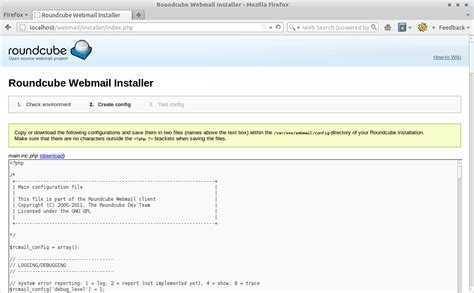
To configure via the Web interface, open http://roundcube.org/installer~ in your browser and do the final Roundcube setup:
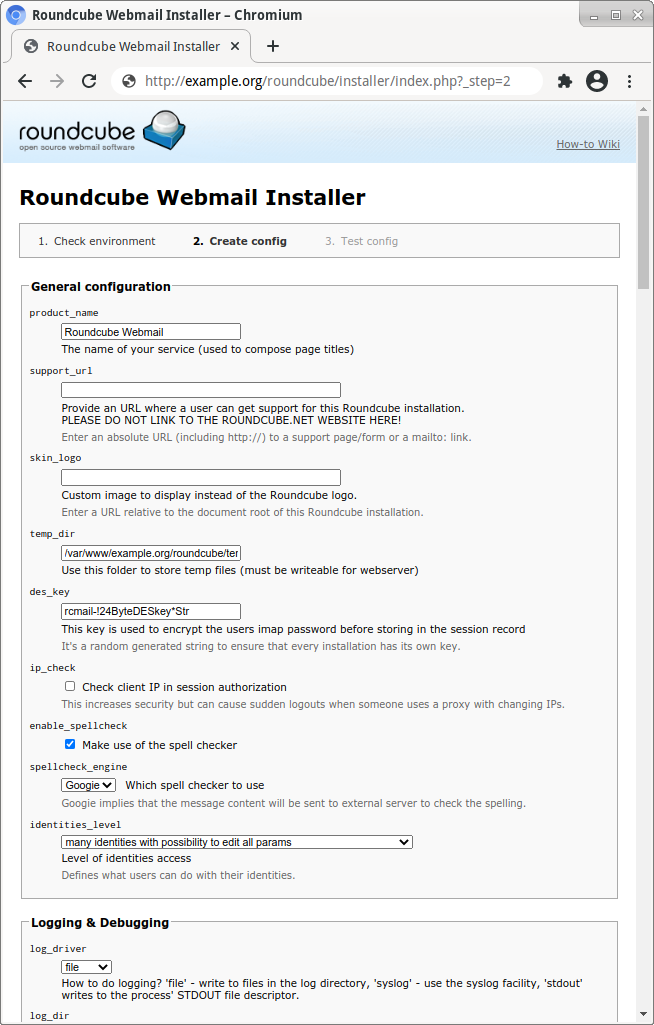
Save the resulting configuration file by clicking :
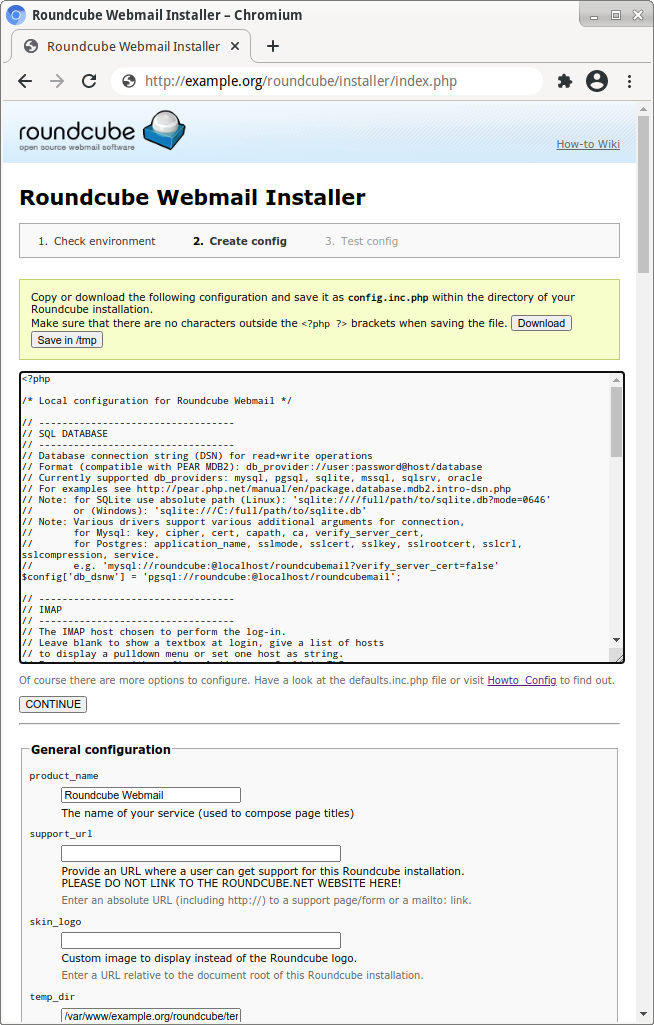
Copy the settings to :
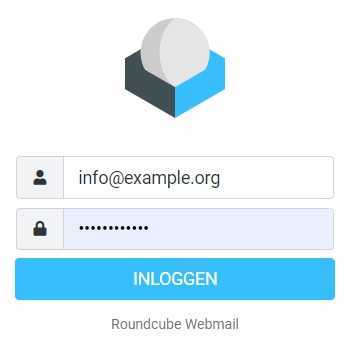
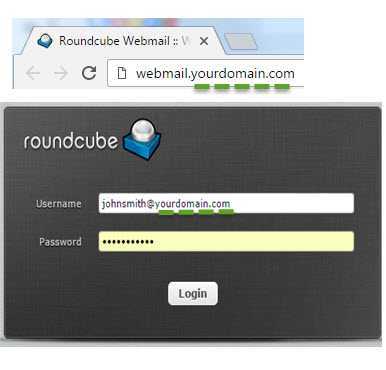
Open http://example.org/roundcube/ in your Web browser. For authentication in Roundcube, use your mailserver login and password:
Выбор сервера отправки в зависимости от адреса получателя
Итак, в sender_bcc_map всю локальную почту я оставляю локально, просто указывая адрес отправителя (каждый сайт шлет почту от своего ящика) и локального пользователя, к которому она будет складываться. Если у вас много сайтов, то для каждого сайта будет свой локальный пользователь. Чаще всего это так, потому что разные сайты лучше всего запускать под разными пользователями, от которых работает веб сервер. Файл с записями для sender_bcc_map выглядит так:
user1@site1.ru user1
user2@site2.ru user2
Если у вас использует разные ящики для отправки, то можете настроить правило для всего домена сразу:
*@site1.ru user1
*@site2.ru user2
Дальше вам нужно выяснить, как выглядит полностью адрес домена для локальной доставки почты. Это имя задается в параметре mydomain в конфиге postfix main.cf. Допустим, там указано имя сервера — websrv.site.ru. Это не принципиально, в нашем случае там можно написать все, что угодно, но лучше использовать полное доменное имя (fqdn) самого веб сервера, которое указано в DNS записи типа А.
Теперь создаем файл transport_map, в котором пишем следующее:
websrv.site.ru local
Мы явно указываем, что всю почту для домена websrv.site.ru отправлять локально. Не забываем построить индексированный файл:
# postmap /etc/postfix/transport_map
Отправляемся в конфиг main.cf и добавляем туда параметр:
transport_maps = hash:/etc/postfix/transport_map
Перезапускаем postfix и проверяем работу. При отправке почтового сообщения от имени пользователя user1@site1.ru там должно быть примерно следующее:
websrv postfix/smtpd: CC8F0602E205: client=localhost
websrv postfix/cleanup: CC8F0602E205: message-id=<DNCl5UdUPH7JG8sqfGbn9dobkStUcQ3l5IjwA8iMxDY@site.ru>
websrv postfix/qmgr: CC8F0602E205: from=<user1@site1.ru>, size=874, nrcpt=2 (queue active)
websrv postfix/smtpd: disconnect from localhost ehlo=1 mail=1 rcpt=1 data=1 quit=1 commands=5
websrv postfix/local: CC8F0602E205: to=<user1@websrv.site.ru>, relay=local, delay=0.07, delays=0.06/0.01/0/0.01, dsn=2.0.0, status=sent (delivered to mailbox)
websrv postfix/smtp: CC8F0602E205: to=<mail@mail.ru>, relay=smtp.yandex.ru:465, delay=0.93, delays=0.06/0.01/0.23/0.63, dsn=2.0.0, status=sent (250 2.0.0 Ok: queued on myt6-9bdf92ffd111.qloud-c.yandex.net as 1608951012-xOUj8gBhbE-oCJSqvIX)
websrv postfix/qmgr: CC8F0602E205: removed
| user1@site1.ru | адрес, с которого сайт ведет отправку почты |
| user1@websrv.site.ru | итоговый локальный адрес, куда идет пересылка почты |
| mail@mail.ru | внешний почтовый адрес, куда идет отправление через внешний smtp |
| smtp.yandex.ru | адрес внешнего smtp сервера |
Получили в итоге то, что хотели. Внешняя почта отправляется через внешний smtp адрес, указанный в relayhost, а копии сообщений падают в локальный ящик, который находится в файле /var/mail/user1. Конкретно мне это нужно было для отладки, чтобы понять, что именно отправляет сайт.
Если вам нужно пересылать почту не локально, а на какой-то свой почтовый сервер, который вы используете для сбора и анализа отправленной почты, то настройки у вас будут немного другие.
sender_bcc_maps:
*@site1.ru fwd_site1@backupmail.ru
*@site2.ru fwd_site2@backupmail.ru
transport_map:
backupmail.ru relay::25
В данном случае backupmail.ru это отдельный почтовый домен и почтовый сервер для него для сбора всей вашей почты. Это не обязательно может быть собственноручно настроенный почтовый сервер. Можете использовать ящик в какой-то готовой службе почты. Но имейте ввиду, если это будет какой-то бесплатный сервис, то он вас быстро заблокирует, если будете слать слишком много почты на этот ящик.
Step 8: Configure the Sieve Message Filter
sudo apt install dovecot-sieve dovecot-managesieved
Install the Dovecot LMTP Server.
sudo apt install dovecot-lmtpd
Edit the Dovecot main configuration file.
sudo nano /etc/dovecot/dovecot.conf
Add and to the supported protocols.
protocols = imap lmtp sieve
Save and close the file. Then edit the Dovecot 10-master.conf file.
sudo nano /etc/dovecot/conf.d/10-master.conf
Change the lmtp service definition to the following.
service lmtp {
 unix_listener /var/spool/postfix/private/dovecot-lmtp {
   group = postfix
   mode = 0600
   user = postfix
  }
}
Next, edit the Postfix main configuration file.
sudo nano /etc/postfix/main.cf
mailbox_transport = lmtp:unix:private/dovecot-lmtp
smtputf8_enable = no
Save and close the file. Open the file.
sudo nano /etc/dovecot/conf.d/15-lda.conf
protocol lda {
    # Space separated list of plugins to load (default is global mail_plugins).
    mail_plugins = $mail_plugins sieve
}
Save and close the file. If you can find the file under directory, then you should also enable the sieve plugin in that file like below.
protocol lmtp {
      mail_plugins = quota sieve
}
Edit the file.
sudo nano /etc/dovecot/conf.d/10-mail.conf
mail_home = /var/vmail/%d/%n
Save and close the file.
Finally, restart Postfix and Dovecot.
sudo systemctl restart postfix dovecot
If you don’t have the option, it’s probably because you didn’t enable the plugin. Edit the file.
sudo nano /var/www/roundcube/config/config.inc.php
Add the plugin in the array at the end of this file. The plugin order doesn’t matter.
$config = array('acl', 'additional_message_headers', 'managesieve', .....);
Save and close the file.
Note that if you move a sieve filter set from an old mail server to your new mail server, you need to go to Settings -> Filters, then click Actions and enable the filter set, or Dovecot LMTP server won’t execute the sieve filter.
Step 5. Install Apache and Create a Virtual Host
Roundcube is webmail solution, so we have to install web server to serve the Roundcube file. It supports almost all of the major web servers, but in this tutorial we will use Apache. It can be easily installed with the following command
Once the APT package manager completes the installation, start the web server and enable it to start upon a reboot
Next, create Apache virtual host directory, so you can access Roundcube with a domain or subdomain, instead of your server’s IP address.
Save the file and run the following command to enable the virtual host:
Finally, reload the web server for the changes to take effect:
Configuration/Environment Variables
The following env variables can be set to configure your Roundcube Docker instance:
By default, the image will use a local SQLite database for storing user account metadata.
It’ll be created inside the directory and can be backed up from there. Please note that
this option should not be used for production environments.
Connect to a Database
The recommended way to run Roundcube is connected to a MySQL database. Specify the following env variables to do so:
Before starting the container, please make sure that the supplied database exists and the given database user
has privileges to create tables.
Run it with a link to the MySQL host and the username/password variables:
Зачем нужен postfix на web сервере
Расскажу для начала, зачем вообще в данном случае нужен postfix. Почему не отправлять почту напрямую с сайта через smtp с авторизаций на удаленном сервере. Сейчас все современные движки это поддерживают. Причин тут может быть много. Вот основные из них:
- У postfix хорошее логирование. Если вы отправляете через него, у вас будет вся аналитика по отправке. Вы можете проверить статус доставки каждого письма. Если вам нужны логи, то их ведение нужно будет реализовывать либо в самом движке сайта, либо их должен поддерживать удаленный smtp сервер. Но, к примеру, если с сайта письмо ушло, а на удаленный smtp не попало по какой-то причине, у вас не останется информации об этом событии, если сам сайт не ведет логов.
- Postfix может быть гибко настроен на отправку почты. Можно выбирать, как будет отправляться почта для каждого исходящего домена, для разного домена или даже адреса получателя. Можно на ходу подменять адрес отправителя или изменять тему письма. И все это делается достаточно просто. Реализовывать тот же функционал через движок сайта значительно труднее.
- Вы можете всю отправленную почту пересылать куда-то на отдельный ящик для различных нужд — аналитика, контроль и т.д. Это тоже гибко настраивается. Для каждого сайта может быть свой почтовый ящик для сбора. Их может быть несколько, для каждого адреса отправителя свой дублирующий ящик и т.д. В общем, это все тоже очень гибко настраивается.
- Так как есть подробное логирование отправки, легко настроить мониторинг postfix и получить аналитику и контроль отправленных сообщений. Если кто-то сломает ваш сайт и начнет рассылать через него спам, вы это сразу заметите. К примеру, я настраивал почтовый сервер для одной нишевой соц. сети. Когда кто-то начал массово спамить через личные сообщения, это сразу стало видно на мониторинге почты, так как количество отправленных сообщений через почтовый сервер резко возросло. На каждое личное сообщение отправлялось уведомление по почте.
Это несколько примеров, которые сходу пришли в голову. В целом, никакого уникального функционала postfix не представляет, но все описанное выше очень легко и быстро реализовывается штатными средствами почтового сервера. Просто бери и настраивай, как тебе надо. Нет нужды это реализовывать самому в самом движке. Накодить весь этот функционал трудозатратно.
Install & Configure Postfix
-
SSH to your server and install the Postfix server by running the command below.
-
You’ll get the Postfix configuration screen, as shown below. Press TAB and ENTER to continue.
-
On the next screen, select Internet Site, then TAB and ENTER.
-
Enter the system mail name, which is your domain name. For instance, the server name is mail.example.com, so you’ll enter example.com here.
-
Back up the the /etc/postfix/main.cf file, and create a new one.
-
Enter the information below to the new file. Replace example.com with your domain name throughout the file. Make sure the value of smtpdtlscert_file and smtpdtlskey_file point to your SSL certificate.
-
Save and close the file.
Troubleshooting Tips
If you encounter errors, you can check the web server error logs at (if you are using Apache), or (if you are using Nginx.), also the Roundcube error logs in directory.
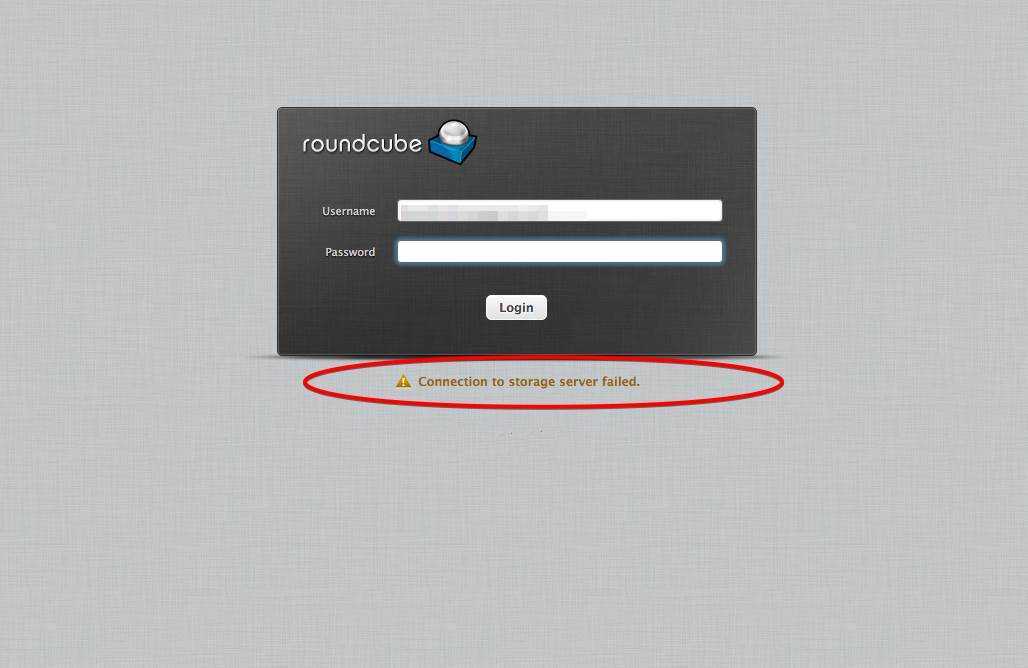
Connection to Storage Server Failed
If you see the Connection to storage server failed error when trying to log into RoundCube, it’s probably because
- Dovecot server isn’t running. You can restart Dovecot with and check its status with .
- You are using a self-signed TLS certificate. Roundcube requires a valid TLS certificate issued from a trusted certificate authority such as Let’s Encrypt.
- Your TLS certificate expired. You can renew the Let’s Encrypt TLS certificate with , then restart Postfix and Dovecot ().
Настройка брандмауэра
Перед тем, как мы начнем настройку, убедимся, что для почтового сервера у нас открыты необходимые порты в брандмауэре. В зависимости от используемой системы управления netfilter команды будут отличаться.
Для Iptables
Как правило, Iptables используется для систем на базе Debian.
Для того, чтобы открыть нужные нам порты, вводим:
iptables -I INPUT 1 -p tcp —match multiport —dports 25,465,587 -j ACCEPT
iptables -I INPUT 1 -p tcp —match multiport —dports 110,143,993,995 -j ACCEPT
* где мы откроем следующие порты:
- 25 — стандартный SMTP через STARTTLS;
- 110 — стандартный POP3 через STARTTLS;
- 143 — стандартный IMAP через STARTTLS;
- 465 — защищенный SMTP через SSL/TLS;
- 587 — защищенный SMTP через STARTTLS;
- 993 — защищенный IMAP через SSL/TLS;
- 995 — защищенный POP3 через SSL/TLS.
Для сохранения правил установим пакет:
apt-get install iptables-persistent
И выполняем команду:
netfilter-persistent save
Firewalld
Firewalld, в основном, используется в системах на базе Red Hat.
Для открытия нужных нам портов вводим команды:
firewall-cmd —permanent —add-port=25/tcp —add-port=465/tcp —add-port=587/tcp
firewall-cmd —permanent —add-port=110/tcp —add-port=143/tcp —add-port=993/tcp —add-port=995/tcp
И применяем настройки:
firewall-cmd —reload
* где мы откроем следующие порты:
- 25 — стандартный SMTP через STARTTLS;
- 110 — стандартный POP3 через STARTTLS;
- 143 — стандартный IMAP через STARTTLS;
- 465 — защищенный SMTP через SSL/TLS;
- 587 — защищенный SMTP через STARTTLS;
- 993 — защищенный IMAP через SSL/TLS;
- 995 — защищенный POP3 через SSL/TLS.
How to Set Up Vacation/Out-of-Office Messages
We can use the sieve filter to create vacation/out-of-office messages. Go to Roundcube Settings -> Filters. Then click the button to create a filter.
- Give this filer a name like “out of office”.
- New filters are not disabled, so you can leave the button alone.
- In the Scope field, select all messages.
- Select Replay with message in the Actions settings, and enter the message that will be automatically sent.
- Enter 1 in how ofter send messages. Leave other text field empty.
- Click the Save button and you are done.
When you are back to office, you can toggle the “Filter disabled” button, and click the Save button to disable this filter.
SSL и TLS
Если почтовый сервер поддерживает/требует SSL или TLS соединения, то открываем конфигурационный файл roundcube:
vi /usr/share/nginx/html/webmail/config/config.inc.php


… и редактируем:
…
$config = ‘tls://192.168.0.15’;
…
$config = ‘ssl://192.168.0.16’;
…
* в данном примере мы указали, что подключение к серверу по IMAP выполняется с использованием TLS, а по SMTP — по SSL.
Открываем браузер и переходим по адресу http://<IP-адрес сервера>/webmail/. — входим в систему под пользователем и паролем одной из почтовых учетных записей. Вход должен выполнить успешно и мы должны увидеть письма, находящиеся в почтовом ящике.
Квоты
Если у получателя превышена квота, то отправителю сообщения приходит письмо с указанием на это:
This is the mail system at host mail.domain.ru.

I'm sorry to have to inform you that your message could not
be delivered to one or more recipients. It's attached below.

For further assistance, please send mail to postmaster.

If you do so, please include this problem report. You can
delete your own text from the attached returned message.

                   The mail system

<user@domain.ru>: host mail.domain.ru[private/dovecot-lmtp] said:
    552 5.2.2 <user@domain.ru> Quota exceeded (mailbox for user is
    full) (in reply to end of DATA command)
Quota exceeded = квота превышена
Download and Install Roundcube
-
Make sure your Linode’s shell prompt is operating inside your user’s home directory. The folder is preferable, but is also acceptable.
-
Download Roundcube. At the time of this writing, the current stable version is 1.3.3, so it will be used for the rest of this guide.
-
Decompress and copy Roundcube to the directory. Again, replace any occurrences of in the filename with a newer version number if necessary:
-
Eliminate the version number from Roundcube’s directory name. This will make updating easier later:
-
Transfer ownership of the directory to the user. This will allow Roundcube to save its own configuration file, instead of you having to download it and then manually upload it to your Linode:
-
Lastly, you should enable Roundcube’s automatic cache-cleaning shell script:
This utilizes a cron job to run the shell script included with Roundcube once per day at midnight. Read our
Scheduling Tasks with Cron guide to learn about Cron.