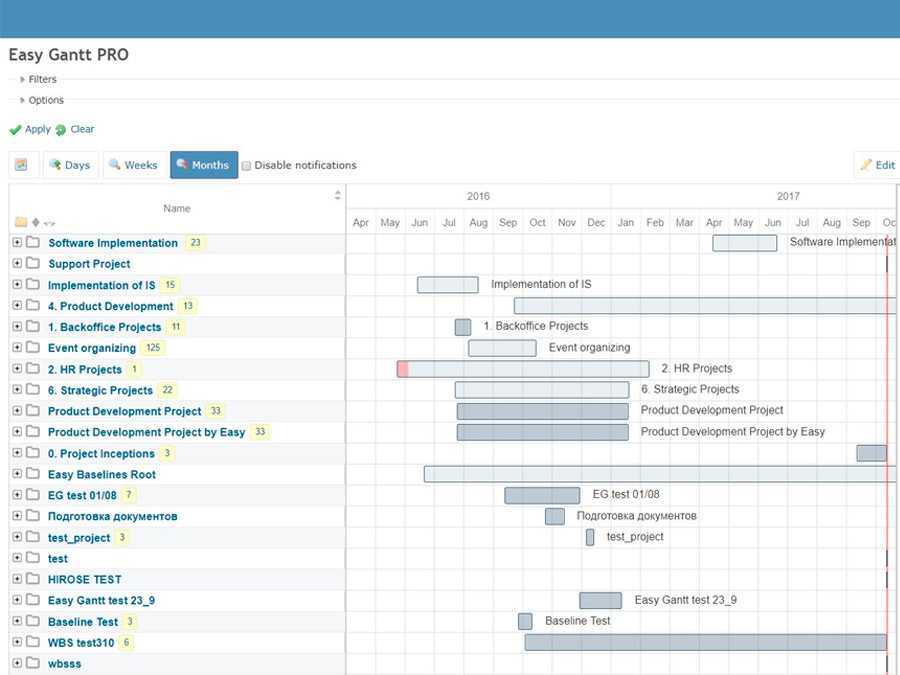
GanttPRO: если важно не только управление, но и планирование, презентация
Программа позволяет строить графики, отслеживать ход выполнения работ, контролировать расходы финансов и времени. С помощью GanttPRO можно общаться со своей командой, получать уведомления в режиме реального времени. Готовые шаблоны помогут быстрее разобраться в интерфейсе.
Плюсы:
- множество инструментов управления разными видами ресурсов;
- автоматическое построение и обновление графиков проекта;
- возможность автоматизировать управленческие процессы.
К недостаткам относят недоработанное приложение для смартфонов. А чтобы увидеть весь график проекта, необходимо делать выгрузку в отдельный файл.
Configuring Apache
You need to modify two files for apache. The first is /etc/apache2/mods-available/passenger.conf which needs the text PassengerDefaultUser www-data added as seen below. Do not try to replace whole file content!
<IfModule mod_passenger.c>
  PassengerDefaultUser www-data
  PassengerRoot /usr
  PassengerRuby /usr/bin/ruby
</IfModule>
Now create a symlink to connect Redmine into the web document space:
$ sudo ln -s /usr/share/redmine/public /var/www/html/redmine
And modify /etc/apache2/sites-available/000-default.conf (before apache 2.4 /etc/apache2/sites-available/default) to insert the following with the other <Directory> sections so that apache knows to follow the symlink into Rails:
<Directory /var/www/html/redmine>
    RailsBaseURI /redmine
    PassengerResolveSymlinksInDocumentRoot on
</Directory>
Create and set the ownership of a Gemfile.lock file so that apache’s www-data user can access it:
$ sudo touch /usr/share/redmine/Gemfile.lock
$ sudo chown www-data:www-data /usr/share/redmine/Gemfile.lock
Now restart apache:
$ sudo service apache2 restart
You should now be able to access redmine from the local host
$ firefox http://127.0.0.1/redmine
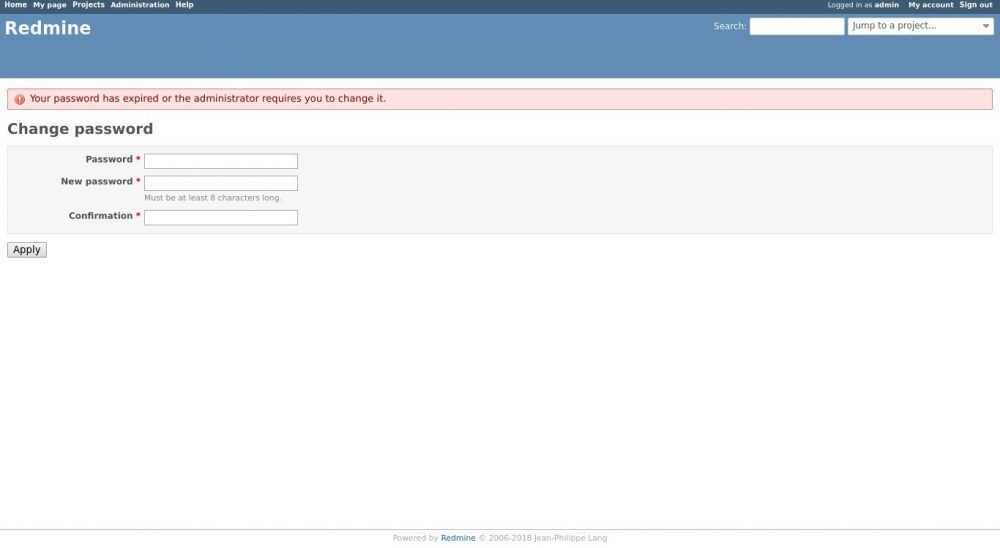
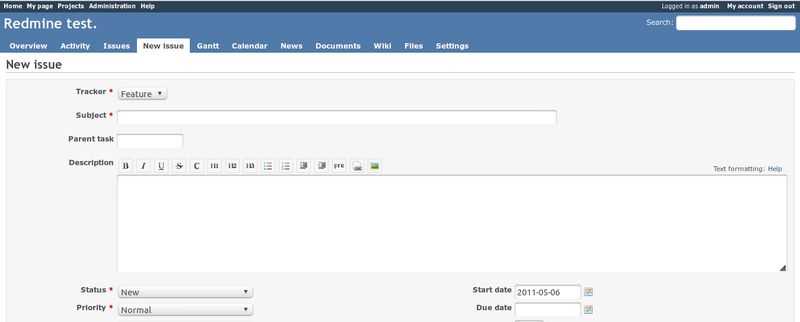
In the upper right corner of the browser window you should see the «Sign in» link. Click that and enter «admin» at both the Login: and Password: prompts. Note: this is not the password you set during the installation process. Click the Login button.
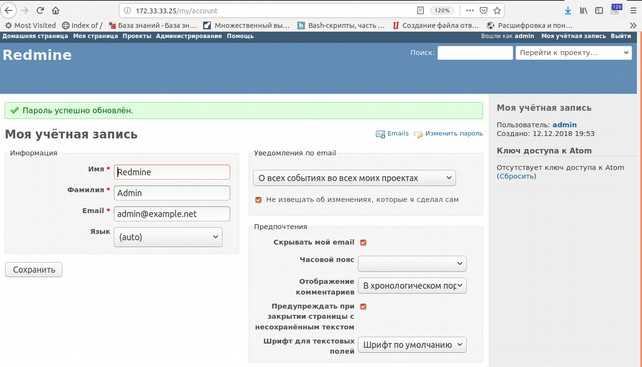
I recommend that the next thing you do is to click on My account in the upper right corner and change that password. In the page that is displayed there should be a Change password link in the upper right of the white area of the page. Click to change the password.
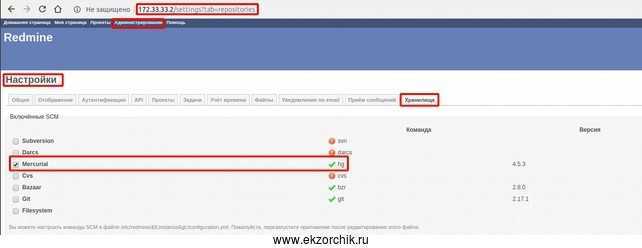
Настройки SCM
- изменить имена команд по-умолчанию, если бинарники SCM в используют нестандартные имена (Windows .bat/.cmd не работают)
- определить полный путь к бинарникам
Пример(для Subversion):
Переопределение имени команды:
scm_subversion_command: "svn_replacement.exe"
Абсолютный путь:
scm_subversion_command: "C:\Program Files\Subversion\bin\svn.exe"
Настройка хранилища вложений
Вы можете задать путь, где Redmine будет хранить вложения, который отличается от стандартного ‘files’, используя параметр .
Примеры:
attachments_storage_path: /var/redmine/files
attachments_storage_path: D:/redmine/files
Introduction
This tutorial walks you step-by-step through installing Redmine on a clean/fresh Ubuntu 12.04 installation. This is intended to be a complete cookbook method for getting Redmine installed and running. It makes no assumptions about other things being installed or configured. Since I have had some issues when using the graphical package managers, we will be doing this from the command line prompt to keep things as clear and clean as possible.
I recommend that you install any Ubuntu updates prior to beginning this process. There are almost always some waiting to be applied after Ubuntu is first set up.
Шаг 2. Установка MariaDB в Ubuntu 20.04.
После обновления системы используйте следующие команды для установки сервера MariaDB в системе Ubuntu:
sudo apt install software-properties-common mariadb-server mariadb-client
После установки сервера для остановки, запуска и перезапуска служб базы данных можно использовать следующие команды:
sudo systemctl stop mariadb.service
sudo systemctl start mariadb.service
sudo systemctl restart mariadb.service
Давайте подтвердим нашу установку сервера MariaDB на Ubuntu 20.04:
mysql -V
Защита MariaDB после установки.
По умолчанию MariaDB не усилен. Вы можете защитить MariaDB с помощью скрипта. вы должны внимательно прочитать и под каждым шагом, который установит пароль root, удалит анонимных пользователей, запретит удаленный вход root и удалит тестовую базу данных и доступ к безопасности MariaDB:
mysql_secure_installation
Настройте это так:
- Set root password? [Y/n] y
- Remove anonymous users? [Y/n] y
- Disallow root login remotely? [Y/n] y
- Remove test database and access to it? [Y/n] y
- Reload privilege tables now? [Y/n] y
Чтобы войти в MariaDB, используйте следующую команду (обратите внимание, что это та же команда, которую вы использовали бы для входа в базу данных MariaDB):
mysql -u root -p
Вам будет предложено ввести пароль, поэтому введите пароль root для MariaDB и нажмите Enter. После входа на сервер базы данных вам необходимо создать базу данных для установки Redmine:
CREATE DATABASE redmine CHARACTER SET utf8mb4;
GRANT ALL PRIVILEGES ON redmine.* TO 'redmine'@'localhost' IDENTIFIED BY 'your-passwd';
FLUSH PRIVILEGES;
EXIT;
УСТАНОВКА REDMINE НА CENTOS
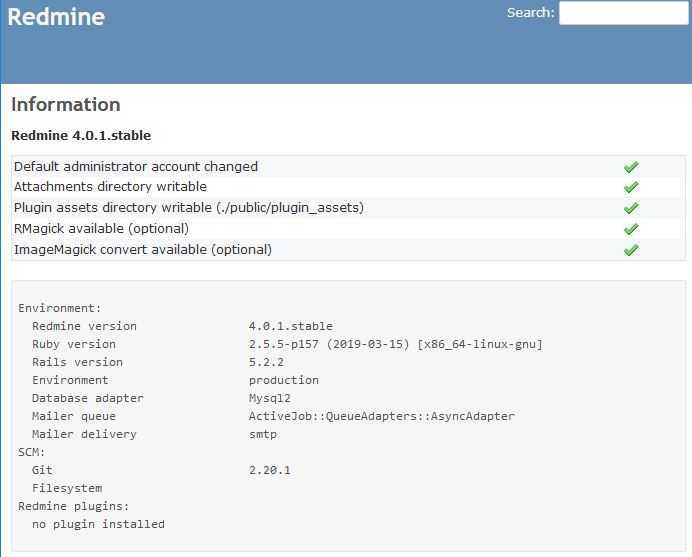
На момент написания этой статьи последняя стабильная версия Redmine — это версия 4.0.1.
Прежде чем перейти к следующим шагам, вам следует проверить страницу загрузки Redmine, чтобы узнать, доступна ли более новая версия.
Убедитесь, что вы выполняете следующие шаги как пользователь.
1. ЗАГРУЗКА REDMINE
Загрузите архив Redmine с помощью следующей команды curl :
YAML
curl -L http://www.redmine.org/releases/redmine-4.0.1.tar.gz -o redmine.tar.gz
| 1 | curl-Lhttp://www.redmine.org/releases/redmine-4.0.1.tar.gz -o redmine.tar.gz |
После завершения загрузки распакуйте архив:
YAML
tar -xvf redmine.tar.gz
| 1 | tar-xvfredmine.tar.gz |
Почта. Отправка уведомлений на почту в Redmine
Создадим конфиг:
sudo su - redmine
cd redmine/config
cp ./configuration.yml.example ./configuration.yml
Добавим в конфиг настройки:
nano ./configuration.yml
В конце файла добавляем секцию production со своим логином и паролем для gmail:
production:
  email_delivery:
    delivery_method: :smtp
    smtp_settings:
      enable_starttls_auto: true
      address: "smtp.gmail.com"
      port: '587'
      domain: "smtp.gmail.com"
      authentication: :plain
      user_name: "your_email@gmail.com"
      password: "your_password"
Разлогиниваемся из под пользователя redmine и перезапускаем apache2:
exit
sudo service apache2 restart
Проверить работоспособность почты можно на вкладке: http://localhost/redmine/settings?tab=notifications
На этой вкладке внизу есть ссылка для тестовой отправки емейла.
Если вы зашли на эту вкладку или после настроек сайт перестал работать, скорей всего вы неправильно отформатировали конфиг, отступы играют роль!
P.S.: теперь у вас есть свой инструмент для управления проектами.
Удачи)
Prerequisites: Apache, mod-passenger, and MySQL
There are several support packages that we will install first. The apache installation is pretty simple if you just follow the prompts and accept the defaults.
$ sudo apt-get install apache2 libapache2-mod-passenger
Installing mysql takes just a little more, so the details are spelled out.
$ sudo apt-get install mysql-server mysql-client
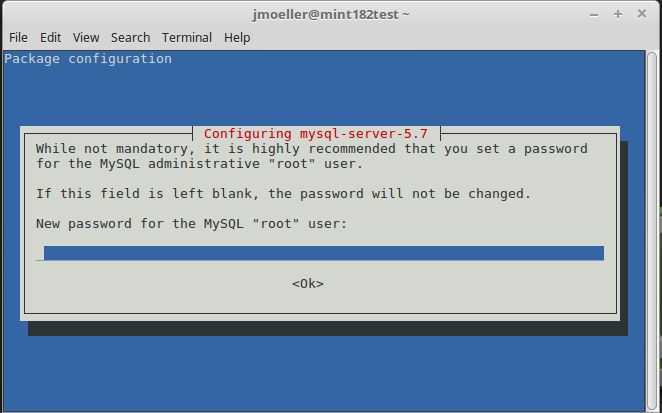
The installation process for mysql is going to prompt you for a password for the «root» access for the database server, then ask you to confirm the password in a follow-up screen. This sets the database adminstration password.
Package configuration

  ┌────────────────────┤ Configuring mysql-server-5.5 ├─────────────────────┐
  │ While not mandatory, it is highly recommended that you set a password   │
  │ for the MySQL administrative "root" user.                               │
  │                                                                         │
  │ If this field is left blank, the password will not be changed.          │
  │                                                                         │
  │ New password for the MySQL "root" user:                                 │
  │                                                                         │
  │ _______________________________________________________________________ │
  │                                                                         │
  │                                 <Ok>                                    │
  │                                                                         │
  └─────────────────────────────────────────────────────────────────────────┘
  ┌────┤ Configuring mysql-server-5.5 ├──────────┐
  │                                              │
  │ Repeat password for the MySQL "root" user.   │
  │                                              │
  │                                              │
  │ ____________________________________________ │
  │                                              │
  │                   <Ok>                       │
  │                                              │
  └──────────────────────────────────────────────┘
Canciones MP3 De Howto install redmine on ubuntu 1804 step by step
Install Redmine on Ubuntu 20.04
- Rabi Gurung
- hace 2 meses
- 513plays
Learn how to install Redmine on Ubuntu 20.04 Redmine is a free and open source web-based project management and issue …
- Reproducir MúsicaPlay
- Parar La MusicaDetener
- Descargar MP3Descargar
- IT Tamilan
- hace 1 año
- 386plays
Redmine #Linux #Tamil-Tutorial Install Redmine Project Management Platform On Ubuntu 16.04 | 18.04 | 18.10 With Apache2 …
- Reproducir MúsicaPlay
- Parar La MusicaDetener
- Descargar MP3Descargar
HowTo Install Plugins on Redmine Linux (step by step)
- Mustafa Beyazbulut
- hace 2 años
- 4Kplays
download plug-ins first Then create the plugins folder (/Usr/Share/Redmine/Plugins) copy downloaded plug-ins to the plugins …
- Reproducir MúsicaPlay
- Parar La MusicaDetener
- Descargar MP3Descargar
Redmine Project Management Tutorial Part 1 Installation
- Juan Guardado
- hace 7 meses
- 1.2Kplays
On this tutorial I show how to install Redmine Project Management. Redmine Project Management is a web-based software which …
- Reproducir MúsicaPlay
- Parar La MusicaDetener
- Descargar MP3Descargar
- aryan computer
- hace 9 meses
- 3.3Kplays
Hi friends! Aryan Computer is dedicated to providing technical, IT education and solution, including computer software, computer …
- Reproducir MúsicaPlay
- Parar La MusicaDetener
- Descargar MP3Descargar
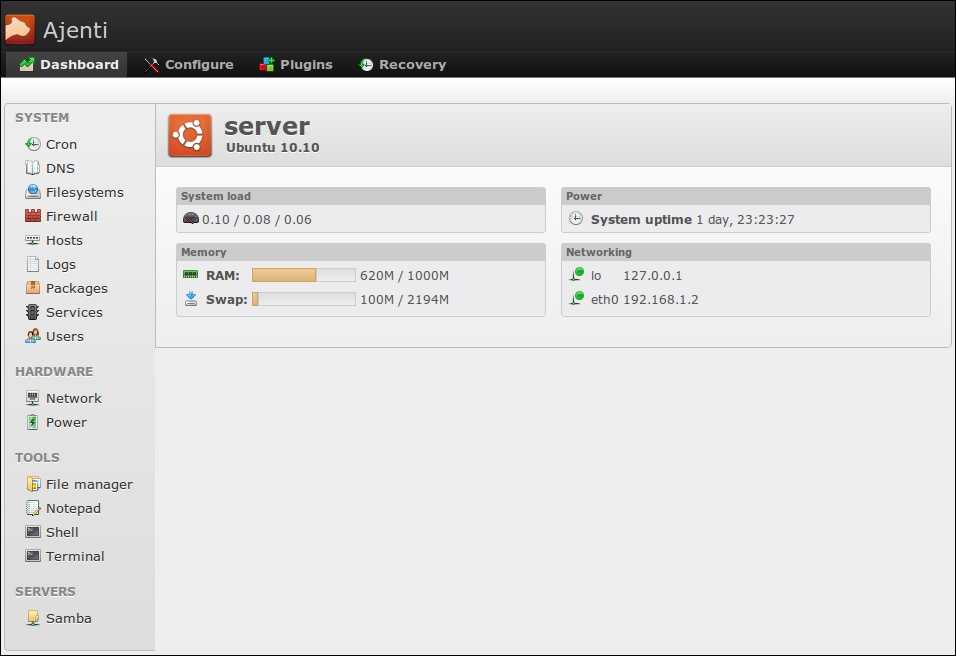
How to install Redmine in Ubuntu 10.10 (Maverick Meerkat)
- Simplified Guide
- hace 10 años
- 14.9Kplays
Full tutorial at https://www.simplified.guide/redmine/install-in-ubuntu.
- Reproducir MúsicaPlay
- Parar La MusicaDetener
- Descargar MP3Descargar
Install Redmine Project Management tool in Ubuntu 16.04
- Michika Iranga Perera
- hace 4 años
- 11.3Kplays
Check my blogspot for more info http://altairca.blogspot.com/2017/04/install-redmine-project-management-tool.html.
- Reproducir MúsicaPlay
- Parar La MusicaDetener
- Descargar MP3Descargar
REDMINE INSTALLATION|Bitnami | WINDOWS 10 | RAHUL QA LABS
- Rahul QA Labs
- hace 4 meses
- 1.3Kplays
————————————————————————————————————————— Note : The above link are affiliate links …
- Reproducir MúsicaPlay
- Parar La MusicaDetener
- Descargar MP3Descargar
How to install any Redmine plugin — easy step by step tutorial
- Easy Redmine
- hace 3 años
- 9Kplays
——— Easy Redmine is a web based collaborative project management application. It is used by companies from around the …
- Reproducir MúsicaPlay
- Parar La MusicaDetener
- Descargar MP3Descargar
How To Install Redmine with Nginx Web Server on Ubuntu 16.04 Xenial Xerus
- Quick Notepad Tutorial
- hace 4 años
- 1Kplays
This Tutorial Shows You Step-by-step How To Install Redmine with Nginx Web Server on Ubuntu 16.04 Xenial Xerus Redmine is …
- Reproducir MúsicaPlay
- Parar La MusicaDetener
- Descargar MP3Descargar
How To Install Redmine With Apache2 And Mysql on Debian 9.1 Stretch
- Quick Notepad Tutorial
- hace 4 años
- 1.8Kplays
This Tutorial Shows You Step-by-step How To Install Redmine With Apache2 And Mysql on Debian 9.1 Stretch Redmine is a free …
- Reproducir MúsicaPlay
- Parar La MusicaDetener
- Descargar MP3Descargar
Bitnami Redmine installation on linux machine
- venkatesh kondapalli
- hace 5 años
- 6.1Kplays
PMP.
- Reproducir MúsicaPlay
- Parar La MusicaDetener
- Descargar MP3Descargar
Redmine Tutorial
- Daniel Avram
- hace 8 años
- 292.1Kplays
INFO 420 | Project Management A tutorial on using Redmine software project management suite.
- Reproducir MúsicaPlay
- Parar La MusicaDetener
- Descargar MP3Descargar
How to install #Redmine with Apache on CentOS 7 #linux
- TechServiceDoc
- hace 2 años
- 3.4Kplays
This article will help to configure Redmine with Apache on CentOS 7 #Howtoconfigureredmineapache #redmineapache …
- Reproducir MúsicaPlay
- Parar La MusicaDetener
- Descargar MP3Descargar
- RedmineUP
- hace 4 años
- 2.6Kplays
- Reproducir MúsicaPlay
- Parar La MusicaDetener
- Descargar MP3Descargar
how to install #Redmine on Centos 7 #Linux (DMS)
- TechServiceDoc
- hace 3 años
- 3.3Kplays
#howtoinstallredmine #redmineinstall #redmine #redmineinlinux #redminesteps Here we have Top Document Management …
- Reproducir MúsicaPlay
- Parar La MusicaDetener
- Descargar MP3Descargar
How to install Remmina App on Ubuntu 18.04 & 19.04 Video Tutor in HD
- TEC ROBUST
- hace 2 años
- 1.4Kplays
This video is about installing Remmina app on Ubuntu 18.04 LTS and 19.04 Disco Dingo editon. Follow the instruction as we …
- Reproducir MúsicaPlay
- Parar La MusicaDetener
- Descargar MP3Descargar
An Introduction to Redmine
- S Raborg
- hace 2 años
- 20.7Kplays
This video provides a short introduction to Redmine, covering some of its basic features.
- Reproducir MúsicaPlay
- Parar La MusicaDetener
- Descargar MP3Descargar
Вариант решения
В качестве системы учета задач использую redmine (ссылка), вариант использования опишу в отдельной статье. Привязать к задачам можно только локальный git репозиторий в формате bare.
Можно вручную настроить git сервис, но с точки зрения администрирования это не удобно, поэтому рядом с redmine развернут gitea (ссылка) и у пользователя из под которого запущен redmine есть доступ к папке с репозиториями gitea. Если используется gitlab, то можно зеркалировать репозиторий (ссылка).
![Tutorial redmine - installation on ubuntu linux [ step by step ]](https://smartshop124.ru/wp-content/uploads/b/6/7/b67ffe1736f379231d5de7178ea2da61.jpeg)

VDS использую «VDS-KVM-SSD-Старт-8.0 Виртуализация: KVM, Процессор: 1 ядро, Память: 2 Гб, Диск: 20 Гб SSD», для работы хватает.
ОС Ubuntu 20.04.
Step 6. Configure Nginx
Now, let’s edit the default nginx site configuration file. We need to modify the webroot location to point to our Redmine installation directory.
nano /etc/nginx/sites-enabled/default
Add/edit these lines:
root /opt/redmine/public;
passenger_enabled on;
client_max_body_size 20m;
Test the configuration and restart nginx
nginx -t
systemctl restart nginx
At this point, you should be able to access Redmine with your server IP address at http://1.2.3.4. Make sure to replace 1.2.3.4 with your server’s public IP address. If you want to access it using your domain, you can simply add an Nginx server block:
nano /etc/nginx/sites-enabled/yourdomain.com.conf
Add these lines and edit it to reflect your actual domain name by replacing “yourdomain.com” with your registered domain name.
server {
listen 80;
server_name yourdomain.com;
root /opt/redmine/public;
passenger_enabled on;
client_max_body_size 20m;
}
Save the file then restart Nginx.

Congratulations! You are now able to access your newly installed Redmine at http://yourdomain.com. For more information about Redmine along with its features and configuration, please check their official documentation.
Of course, you don’t have to know how to Install Redmine on Ubuntu 18.04 if you have use one of our Ubuntu 18.04 Cloud VPS Hosting services. If you do, you can simply ask our support team to install Redmine on Ubuntu 18.04 for you. They are available 24/7, and will be able to help you with the installation of Redmine on Ubuntu 18.04.
PS. If you enjoyed reading this blog post on how to Install Redmine on Ubuntu 18.04, or if you found it helpful, feel free to share it on social networks using the shortcuts below, or simply leave a comment. Thank you.
Требования
Операционная система
Redmine должен работать на Unix, Linux, Mac, Mac Server и Windows поскольку Ruby доступен для этих платформ. Конкретные инструкции доступны здесь.
Ruby интерпретатор
Соответствие версий Ruby и версий Redmine:
| Версия Redmine | Поддерживаемая версия Ruby | Необходимая версия Rails |
|---|---|---|
| текущий trunk | ruby 1.9.3, 2.0.0, 2.1, 2.2 | Rails 4.2 |
| 3.0 | ruby 1.9.3, 2.0.0, 2.1, 2.2 | Rails 4.2 |
| 2.6 | ruby 1.8.7, 1.9.2, 1.9.3, 2.0.0, 2.1, 2.2, jruby-1.7.6 | Rails 3.2 |
База данных
- MySQL 5.0 и выше (рекомендуется)
- PostgresSQL 8.2 или выше
- убедитесь, что тип данных установлен в ISO (настройка по-умолчанию для Postgres). Вы можете установить ее используя:
- некоторые ошибки в PostgreSQL 8.4.0 и 8.4.1 вызывают ошибки в Redmine(#4259, #4314), они исправлены в PostgreSQL 8.4.2
- Microsoft SQL Server *новое*
поддержка запланирована для версии 2.3.0 (но она уже доступна в trunk для ранних версий)
SQLite 3 (не для многопользовательского использования!)
Не обязательные компоненты
- Бинарники системы управления исходным кодом (SCM) (например svn), для просмотра хранилища(должны быть доступны в PATH). Прочитайтехранилища Redmine для получения информации о совместимости и требованиях.
- ImageMagick (чтобы включить возможность экспорта диаграммы Ганта в png изображение)
- Ruby OpenID Library (чтобы активировать поддержку OpenID). Требуется версия 2 или выше.
Подготовка запуска
Предполагается, что у вас уже установлен LAMP (если нет — установите)
Запуск в виде подкаталога на основном сервере:
- установите пакет
-
создайте ссылки
cd /etc/apache2/mods-enabled
ln -s ../mods-available/passeng* .
-
Скопируйте конфигурационный файл
cp /usr/share/doc/redmine/examples/apache2-passenger.conf /etc/apache2/conf.d/redmine.conf
-
Отредактируйте файл
# These modules must be enabled : passenger # Configuration for http://localhost/redmine #<VirtualHost localhost> # this is the passenger config PassengerDefaultUser www-data RailsEnv production RailsBaseURI /redmine SetEnv X_DEBIAN_SITEID "default" Alias "/redmine/plugin_assets/" /var/cache/redmine/default/plugin_assets/ DocumentRoot /usr/share/redmine/public <Directory "/usr/share/redmine/public"> Order allow,deny Allow from all </Directory> #</VirtualHost> -
Создайте ссылку
ln -s /usr/share/redmine/public /var/www/redmine
-
Обновите конфигурацию web-сервера
/etc/init.d/apache2 reload
Запуск в виде виртуального сервера:
- установите пакет
- установите пакет
-
создайте ссылки
cd /etc/apache2/mods-enabled
ln -s ../mods-available/passeng* .
ln -s ../mods-available/rewrite* .
ln -s ../mods-available/fastcgi* .
-
переименуйте файл
cd /usr/share/redmine/public
mv dispatch.fcgi.example dispatch.fcgi
-
Создайте конфигурационный файл
<VirtualHost *:80> ServerName redmine.domain ServerAdmin webmaster@localhost PassengerDefaultUser www-data RailsEnv production SetEnv RAILS_RELATIVE_URL_ROOT "" SetEnv X_DEBIAN_SITEID "default" Alias "/plugin_assets/" /var/cache/redmine/default/plugin_assets/ DocumentRoot /usr/share/redmine/public <Directory "/usr/share/redmine/public"> Options +FollowSymLinks +ExecCGI Options -MultiViews Order allow,deny Allow from all </Directory> ErrorLog /var/log/apache2/error.rm.log LogLevel warn CustomLog /var/log/apache2/access.rm.log combined </VirtualHost> -
создайте ссылку
cd /etc/apache2/sites-enabled
ln -s ../sites-available/redmine
-
Перезапустите web-сервер
/etc/init.d/apache2 restart
-
не забудьте настроить псевдоним в DNS
Можно обойтись и без fastcgi, но не нужно, так как будет существенно задумываться на каждой страничке.
Автоматическое создание SVN хранилищ для проектов
Для этой задачи есть скрипт /usr/share/redmine/extra/svn/reposman.rb. Он при запуске сверяет созданные проекты в Redmine и существующие svn хранилища. И если есть проект для которого нет хранилища — он создаст его. Для того чтобы это заработало нужно прописать запуск reposman.rb в crontab:
*/5 * * * * /usr/share/redmine/extra/svn/reposman.rb --redmine redmine.example.com --key=ключ --svn-dir /var/svn --owner www-data --url http://svn.example.com/svn-private/ --verbose
Описание аргументов скрипта:
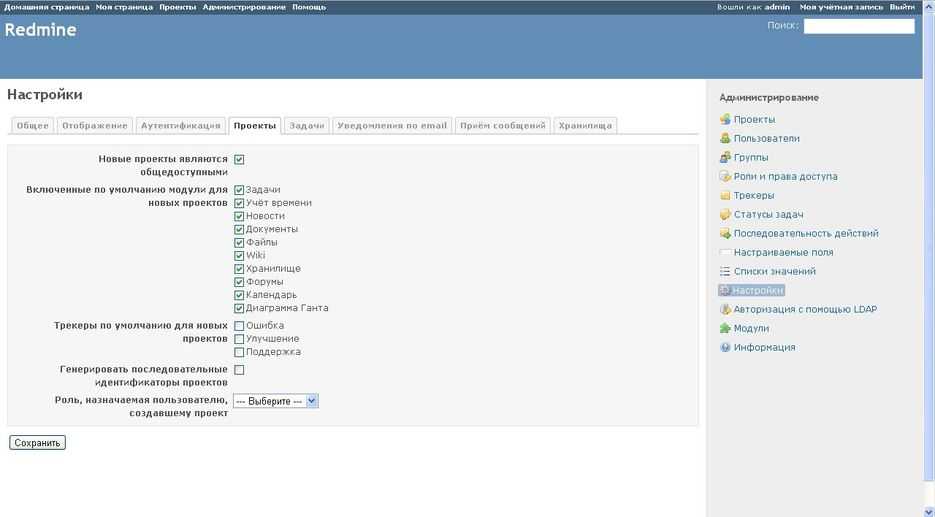
- — API ключ. В Redmine Администрирование → Настройки → Хранилище → API ключ. Выбираем Сгенерировать ключ и копируем его в скрипт.
- — хост, на котором висит redmine.
- — путь к svn.
- — владелец хранилища.
- — url к svn (svn-private нужен для того, что б redmine мог получать доступ к хранилищам без авторизации).
Все, настройка завершена. Теперь можно попробовать создать проект, через некоторое время для него автоматически будет создано хранилище. После следует добавить участников в проект и попробовать авторизоваться с использовании их учётных данных в хранилище.
Installing and configuring the Ubuntu Redmine package
Now it is time to install redmine itself.
$ sudo apt-get install redmine redmine-mysql
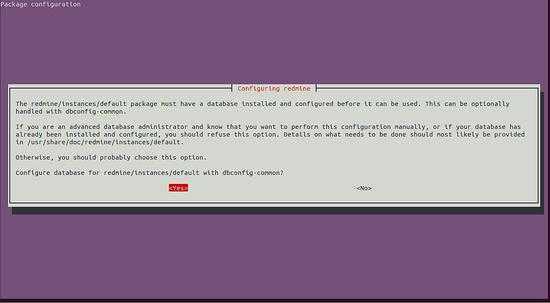
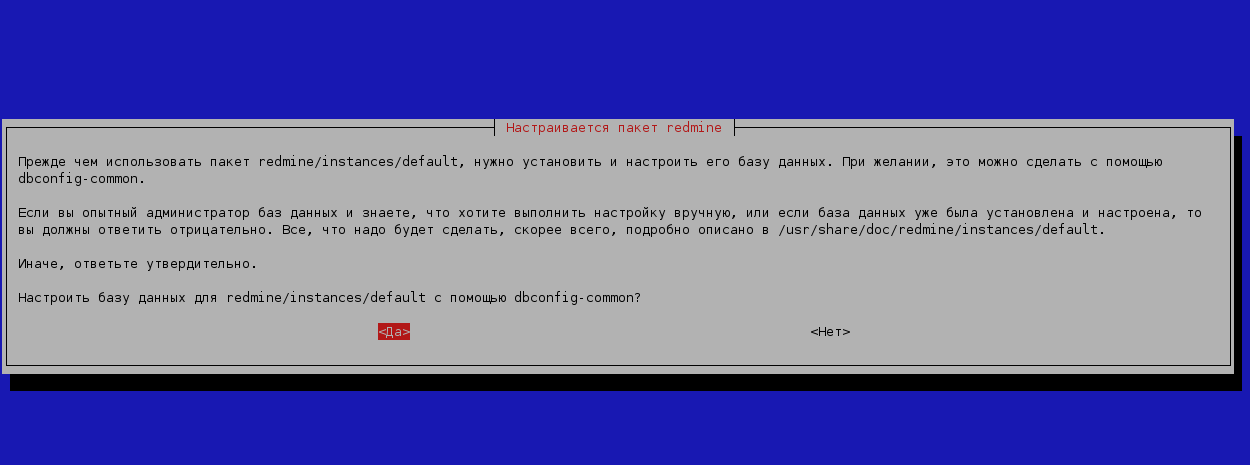
You want to allow dbconfig-common to configure the database when prompted so select Yes from the prompt in the panel below.
Package configuration

 ┌──────────────────────────┤ Configuring redmine ├──────────────────────────┐
 │                                                                           │
 │ The redmine/instances/default package must have a database installed and  │
 │ configured before it can be used.  This can be optionally handled with    │
 │ dbconfig-common.                                                          │
 │                                                                           │
 │ If you are an advanced database administrator and know that you want to   │
 │ perform this configuration manually, or if your database has already      │
 │ been installed and configured, you should refuse this option.  Details    │
 │ on what needs to be done should most likely be provided in                │
 │ /usr/share/doc/redmine/instances/default.                                 │
 │                                                                           │
 │ Otherwise, you should probably choose this option.                        │
 │                                                                           │
 │ Configure database for redmine/instances/default with dbconfig-common?    │
 │                                                                           │
 │                    <Yes>                       <No>                       │
 │                                                                           │
 └───────────────────────────────────────────────────────────────────────────┘
Then you want to provide the «root» password for the database, so that the installer can create the redmine database. This is the password set when you installed mysql.


Package configuration

 ┌──────────────────────────┤ Configuring redmine ├──────────────────────────┐
 │ Please provide the password for hte administrative account with which     │
 │ this package should create its MySQL database and user.                   │
 │                                                                           │
 │ Password of the database's administrative user:                           │
 │                                                                           │
 │ ******__________________________________________________________________  │
 │                                                                           │
 │                   <Ok>                       <Cancel>                     │
 │                                                                           │
 └───────────────────────────────────────────────────────────────────────────┘
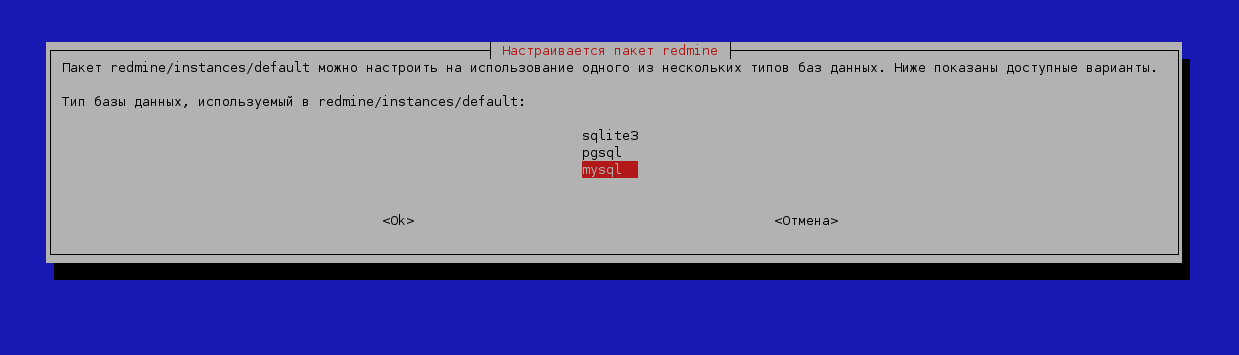
Tell the redmine installer we are using mysql for this installation by highlighting «mysql» from the list of database choices:
Package configuration

 ┌──────────────────────────┤ Configuring redmine ├──────────────────────────┐
 │ The redmine/instances/default package can be configured to use one of     │
 │ several database types. Below, you will be presented with the available   │
 │ choices.                                                                  │
 │                                                                           │
 │ Database type to be used by redmine/instances/default:                    │
 │                                                                           │
 │                                  sqlite3                                  │
 │                                  pgsql                                    │
 │                                  mysql                                    │
 │                                                                           │
 │                                                                           │
 │                    <Ok>                        <Cancel>                   │
 │                                                                           │
 └───────────────────────────────────────────────────────────────────────────┘
Now you are asked to provide a password that will be used to protect the redmine database. Redmine itself will use this when it wants to access mysql.
Package configuration

 ┌──────────────────────────┤ Configuring redmine ├──────────────────────────┐
 │ Please provide a password for redmine/instances/default to register with  │
 │ the database server.  If left blank, a random password will be            │
 │ generated.                                                                │
 │                                                                           │
 │ MySQL application password for redmine/instances/default:                 │
 │                                                                           │
 │ *******__________________________________________________________________ │
 │                                                                           │
 │                    <Ok>                        <Cancel>                   │
 │                                                                           │
 └───────────────────────────────────────────────────────────────────────────┘
Now confirm the redmine password.
Package configuration

   ┌────┤ Configuring redmine ├─────┐
   │                                │
   │                                │
   │ Password confirmation:         │
   │                                │
   │ *******_______________________ │
   │                                │
   │     <Ok>         <Cancel>      │
   │                                │
   └────────────────────────────────┘
Ensure the bundler gem is installed
$ sudo gem update
$ sudo gem install bundler
СОЗДАНИЕ БАЗЫ ДАННЫХ MYSQL
Redmine поддерживает MySQL / MariaDB, Microsoft SQL Server, SQLite 3 и PostgreSQL . В этом уроке мы будем использовать MariaDB в качестве базы данных.
Войдите в оболочку MySQL, введя следующую команду:
YAML
sudo mysql
| 1 | sudomysql |
В оболочке MySQL выполните следующую инструкцию SQL, чтобы создать новую базу данных :
YAML
CREATE DATABASE redmine CHARACTER SET utf8;
| 1 | CREATEDATABASEredmineCHARACTERSETutf8; |
Затем создайте учетную запись пользователя MySQL и предоставьте доступ к базе данных :
YAML
GRANT ALL ON redmine.* TO ‘redmine’@’localhost’ IDENTIFIED BY ‘change-with-strong-password’;
| 1 | GRANTALLONredmine.*TO’redmine’@’localhost’IDENTIFIEDBY’change-with-strong-password’; |
Убедитесь, что вы изменили с надежным паролем.
После завершения выйдите из оболочки mysql, набрав:
YAML
EXIT;
| 1 | EXIT; |
Configure MySQL
MySQL needs to be configured so that Redmine can store data. You can log in to the root account of your database using the password that you set when you installed .
-
After logging in, create a new database and database user:
Install Ruby
Redmine requires Ruby to run. Use the Ruby Version Manager (RVM) to install Ruby 2.2.3.
-
Curl the latest version of RVM.
-
Users of RVM must be in the group. Create this group, add a user, log out, and log back in:
-
Check the requirements for the install, and install Ruby (version 2.2.3):
Install Passenger and NGINX
Passenger is an application server that runs your web application then communicates with the web server. The project has well-written
documentation on installing Passenger and NGINX on Ubuntu 16.04 with an apt repository.
-
Install the Passenger PGP key and HTTPS support for the package manager:
-
Add the Passenger APT repository:
-
Install Passenger and NGINX
Configure NGINX
Passenger has now installed NGINX with Passenger compiled in. You have to configure NGINX to make sure it uses Passenger correctly:
-
Uncomment the line in . Edit your config file to resemble the one below:
- File: /etc/nginx/nginx.conf
-
-
Copy the default nginx site configuration file. The working configuration file in this guide will be :
-
Change the directory for the website, and add additional Passenger configurations. To do this, add these lines to the block of the file:
- File: /etc/nginx/sites-available/default
-
-
In the same file, comment out the section:
- File: /etc/ningx/site-available/default
-
-
Change the permissions for :
-
Restart :
-
Validate the installation of Passenger and NGINX:
Press enter when the first option is selected:
-
Finally, check if NGINX has started the Passenger core process:
If Passenger was installed with NGINX correctly, your output should resemble:
Install Redmine
-
Create a user and add the new user to the group:
-
Log in as the user:
-
Download the Redmine tarball as the new user. Extract it and rename the directory to for convenience:
-
Add the database information created earlier to Redmine’s config file. Only complete the section marked “Production,” as you will not be using the development or test environments.
-
-
In the directory, install the Ruby dependencies:
-
After the installation finishes, you need to use Rake to start the server:
-
Restart NGINX, and navigate to your server’s IP address and you will be greeted by the Redmine application:

Configure apache
The next part is to configure Virtualhost in Apache for Redmine to work. Add the following line in /etc/apache2/sites-enabled/000-default
<VirtualHost *:80>
        ServerName www.mywebsite.com
        ProxyPass / http://www.mywebsite.com:3000/
        ProxyPassReverse / http://www.mywebsite.com:3000/
</VirtualHost>
The above lines assume that you want your Redmine installation to be accessible via the www.mywebsite.com address. You can change that to fit your need.
The ProxyPass above requires you to enable the proxy modules in Apache. Run the following command to do that.
sudo a2enmod proxy proxy_http
Configure htaccess
The next step is to configure Apache’s htaccess. Change the file /usr/share/redmine/public/.htaccess to the following
RewriteEngine On
RewriteBase /
RewriteRule ^$ index.html
RewriteRule ^(+)$ $1.html
RewriteCond %{REQUEST_FILENAME} !-f
RewriteRule ^(.*)$ dispatch.cgi
Restart apache
Once everything is configured, Apache needs to be restarted for changes to take effect. Run the following command at the terminal.
sudo /etc/init.d/apache2 restart
RVM and Ruby
- 安裝 rvm
- 安裝 ruby 2.3.x (redmine 4.0 需求)
。
透過 RVM (Ruby Version Manager) 安裝 Ruby。
1234567891011121314151617 |
~$ gpg2 --recv-keys 409B6B1796C275462A1703113804BB82D39DC0E3 7D2BAF1CF37B13E2069D6956105BD0E739499BDB~$ curl -sSL https://get.rvm.io | bash -s stable~$ rvm --versionrvm 1.29.8 (latest) by Michal Papis, Piotr Kuczynski, Wayne E. Seguin [https://rvm.io] |
透過 rvm 安裝 Ruby。
1234567891011121314 |
RUBY_VERSION=2.3.8~$ rvm requirements~$ rvm install ${RUBY_VERSION}~$ rvm use ${RUBY_VERSION} --default~$ ruby --versionruby 2.3.8p459 (2018-10-18 revision 65136)
|
如果發生以下錯誤訊息:
1234567 |
~$ rvm requirementsChecking requirements for ubuntu.Installing requirements for ubuntu.Updating system...Error running 'requirements_debian_update_system ',please read /data/redmine/.rvm/log/1557660154/update_system.logRequirements installation failed with status: 1. |
在 增加一個檔案 ,檔案屬性 ,內容如下:
1 |
redmine ALL=(ALL) NOPASSWD:ALL |
Redmine
The default login and password for Redmine are:
After logging in for the first time, you will be prompted to change your credentials. Replace them with something secure.
Install a Plug-in
Redmine is built to be used with plug-ins. Plug-ins are installed to . This section will demonstrate installing a plug-in by installing
scrum2b, a plug-in for managing a Scrum/Agile workflow.
If not installed, install git or download the plug-in directly through the Github website:
-
Move to and clone the plug-in:
-
Use Bundle to install the plug-in, then restart NGINX:
-
Navigate to Redmine in your browser. Log in, click admin then click plugins
Установка RedHat Codeready Studio на ОС RedHat Enterprise Linux 8.4 (RHEL 8.4)
Red Hat CodeReady Studio — это бесплатная для участников программы RedHat Developer open source интегрированная среда (IDE), предоставляет широкий набор функционала разработки для нескольких платформ Red Hat, которые включают контейнеры CodeReady (развертывание через OpenShift4), Quarkus, JAX-RS, внедрение зависимостей контекстов (CDI) и инструменты Red Hat Fuse. Студия включает последние версии Eclipse и Web Tools Project (WTP), предоставляет инструменты для JEE и веб-разработки, такие как: инструменты Java EE, JSF и JSP; инструменты JPA; серверные инструменты; веб-сервисы и инструменты WSDL; инструменты HTML , CSS и JavaScript; инструменты XML , XML Schema и DTD. Студия Code Ready Studio также поддерживает популярные технологии, такие как Enterprise Application Platform (EAP 7.3) — платформа корпоративных приложений Red Hat, Hibernate и Wildfly 21, и обеспечивает встроенное усиление для Kubernetes, OpenShift (включая S2i), docker и клиента REST для микропрофайлов.
Автозагрузка
Почитать о том, что происходит ниже можно здесь и здесь.
Идем в и создаем файл :
Записываем туда:
Вкратце:
-
PIDFile — , по которому будет отслеживаться жизнь процесса
-
User и Group — юзер и группа, от которых будет производится запуск
-
ExecStart — команда запуска
-
ExecReload — команда перезагрузки
-
ExecStop — команда остановки
-
RestartSec — рестартовать процесс через N времени в случае если процесс отвалился
, , могут быть путями до bash скриптов. Именно так и было мной сделано (потому что прежде выполнения команд старта/перезагрузки необходимо было разворачивать окружение, сделать это в файле конфига не представлялось возможным :))
Создаем файлы скрипты в меняем владельца и группу, и ставим права на запуск:
для запуска unicorn (запускаем , переходим в директорию с redmine — установится нужное окружение, запускаем unicorn):
для остановки сервиса:
для перезапуска сервиса (останавливаем и запускаем):
Теперь просмотрев статус сервиса можно увидеть:
Включаем сервис:
Теперь можно //.
Запустим сервис:
Установка Redmine на Ubuntu 10.04 Server
Ставим необходимые пакеты:
aptitude install redmine redmine-mysql
Инсталяционные скрипты предлагают настроить пакет:
Выбираем с какой СУБД будет работать Redmine:
Вводим пароль администратора MySQL и пароль доступа к БД самого Redmine:


Если после этого сравнение таблиц выставляется в latin1_swedish_ci (или в любую другую кодировку отличную от utf8_general_ci) добавляем в /etc/mysql/my.cfg в секцию mysqld директиву collation-server=utf8_general_ci и character-set-server=utf8. После чего удаляем полностью БД и создаем новую базу Redmine с сравнением utf8_general_ci. Теперь разворачиваем новую базу Redmine:


# cd /usr/share/redmine/
/usr/share/redmine# rake db:migrate RAILS_ENV="production"
После чего у нас будут все таблицы в utf8_general_ci и с кириллицей не будет никаких проблем.
Installing the latest Redmine
—If you are not happy with the older versions of Redmine that are in the official Ubuntu repositories (10.04 is stuck 0.9.x and 12.04 is stuck at 1.3.x while the current version is 2.2), this section is for you. You still need to follow the steps in the other sections but this will get you the newer versions from the PPA/Launchpad here: https://launchpad.net/~ondrej/+archive/redmine
NOTE: If your server is behind a firewall, you will need to export your firewall settings before running add-apt-repository. Otherwise, the command will hang.
Run the following commands to export your proxy settings for both http (port 80) and https (port 443):
Otherwise, proceed to add the PPA to the list of repositories for your machine:
For MySQL: >apt-get install redmine redmine-mysqlFor PostgreSQL: apt-get install redmine redmine-pgsql