
Remove UEFI boot support from ISO
Warning: In the event that UEFI+isohybrid El Torito/MBR really causes problems, it would be better to just UEFI boot using the USB stick instructions in the previous section
Most of the 32-bit EFI Macs and some 64-bit EFI Macs refuse to boot from a UEFI(X64)+BIOS bootable CD/DVD. If one wishes to proceed with the installation using optical media, it might be necessary to remove UEFI support first.
Mount the official installation media and obtain the as shown in the previous section.
Rebuild the ISO using from libisoburn :
$ xorriso -as mkisofs -iso-level 3 \
    -full-iso9660-filenames\
    -volid "ARCH_201212" \
    -appid "Arch Linux CD" \
    -publisher "Arch Linux <https://www.archlinux.org>" \
    -preparer "prepared like a BAWSE" \
    -eltorito-boot isolinux/isolinux.bin \
    -eltorito-catalog isolinux/boot.cat \
    -no-emul-boot -boot-load-size 4 -boot-info-table \
    -isohybrid-mbr "/mnt/iso/isolinux/isohdpfx.bin" \
    -output "~/archiso.iso" "/mnt/iso/"
Burn to optical media and proceed with installation normally.
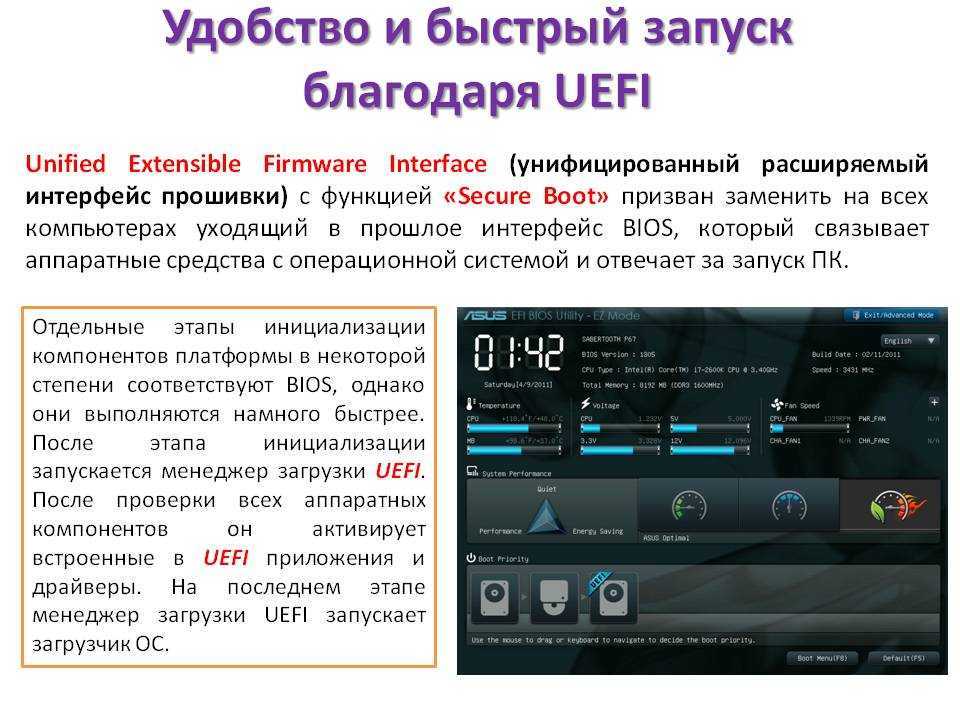
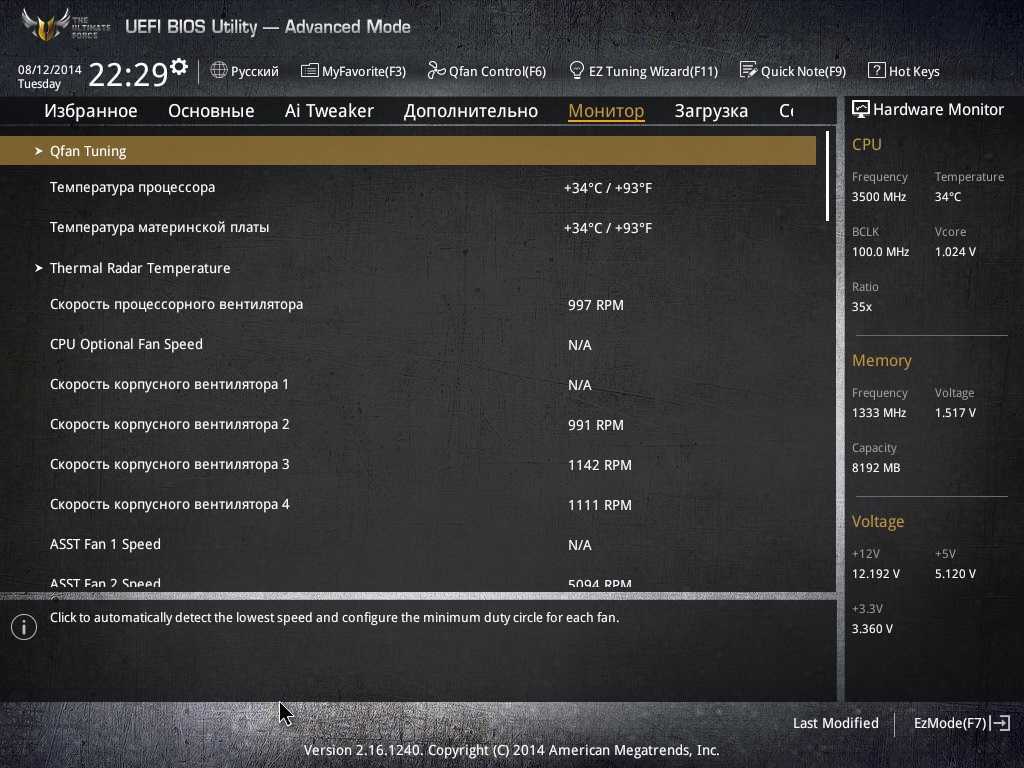
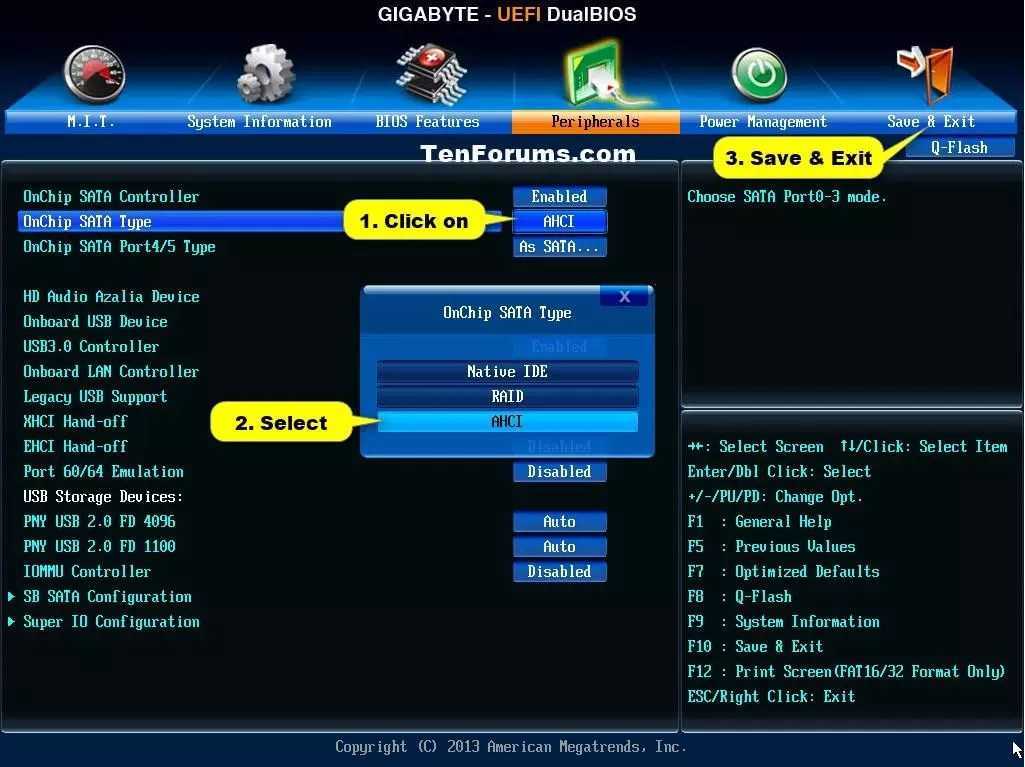
UEFI and BIOS
rEFInd is a boot manager for computers that use EFI/UEFI (Unified Extensible Firmware Interface). If you have a laptop or desktop that was manufactured in the last 10 years, then it uses EFI instead of BIOS. Both EFI and BIOS are low-level software that acts as an interface between the operating system and the firmware on the motherboard. The firmware on your motherboard is another low-level software that controls hardware components.
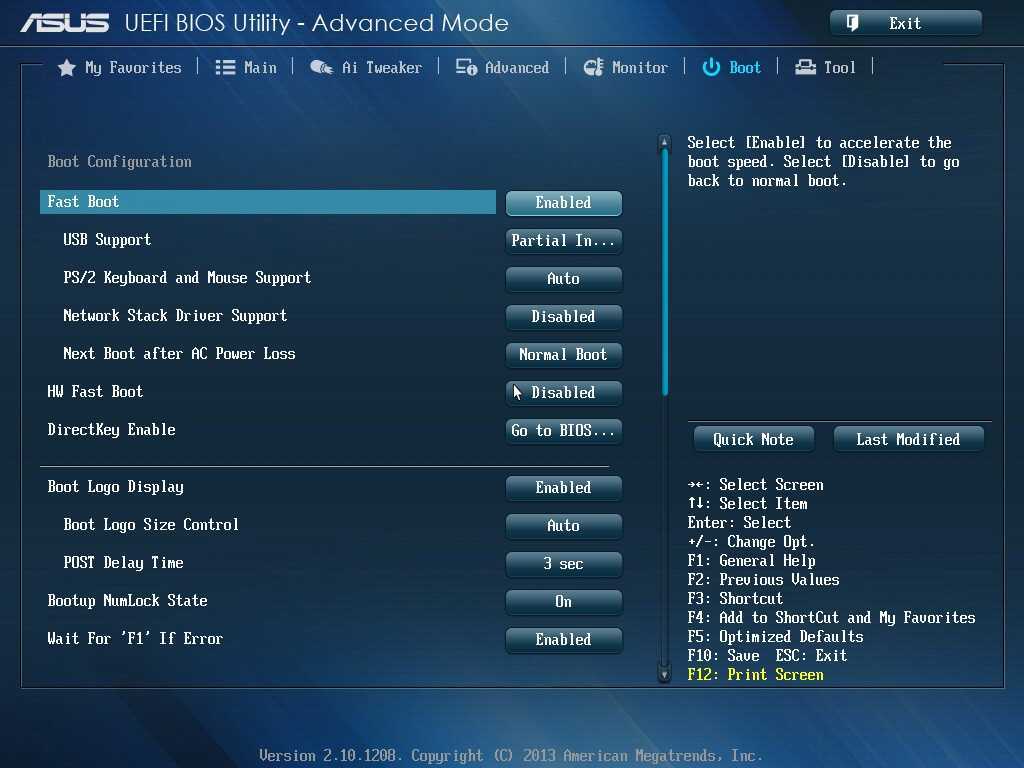
BIOS was developed in the 1970s and was prevalent till the late 2000s when it began to be gradually replaced by EFI. BIOS provides a basic text-based interface. EFI on the other hand can provide a complete graphical environment with support for mouse and graphical controls.
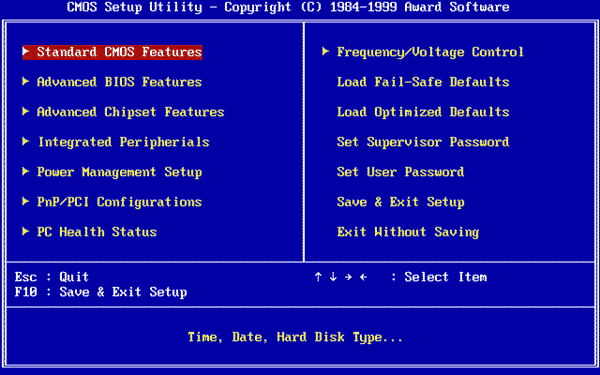
BIOS on an old Intel PC
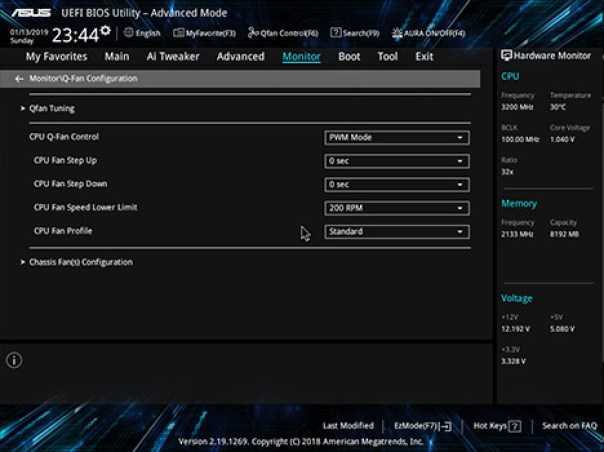
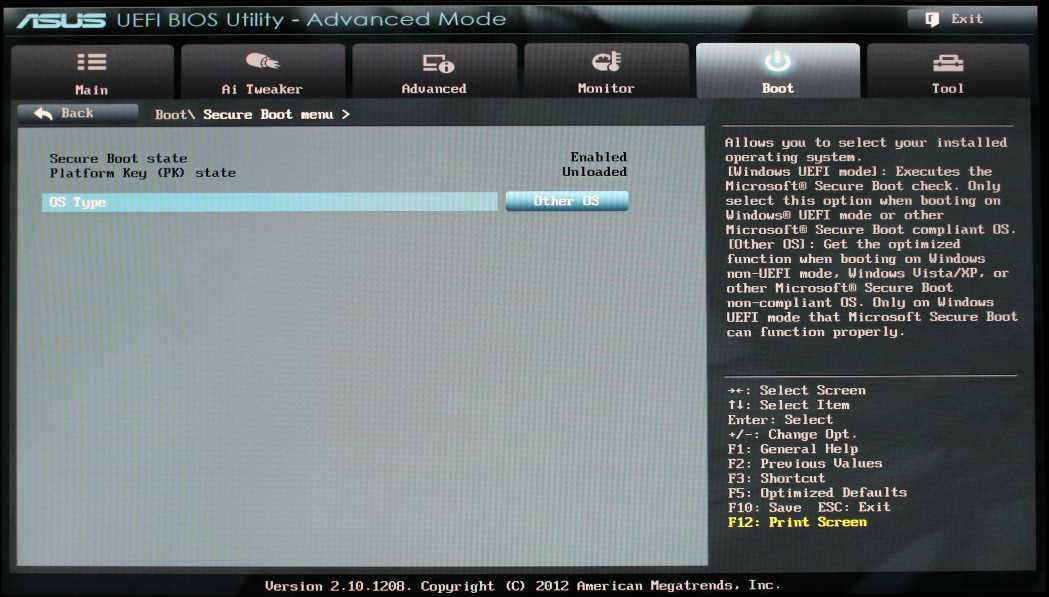
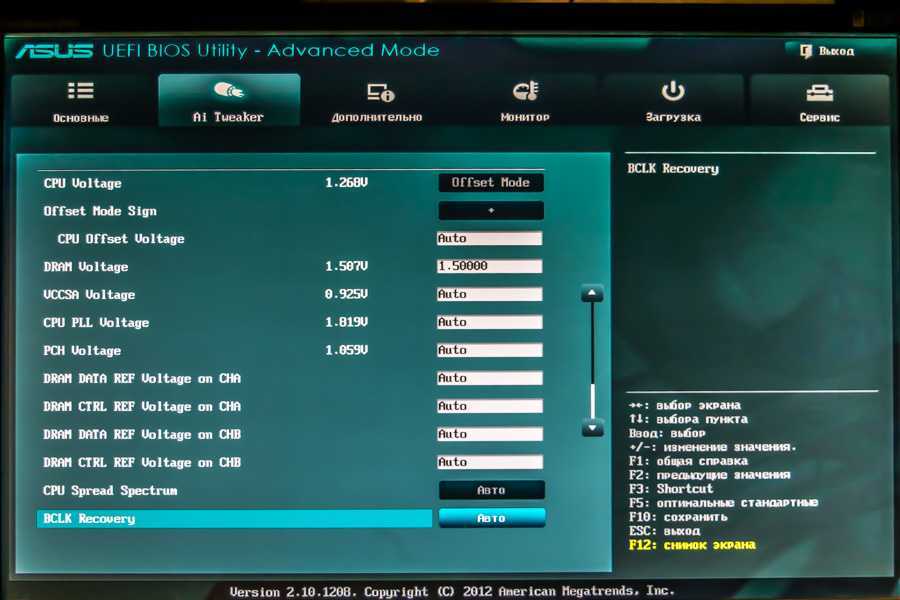
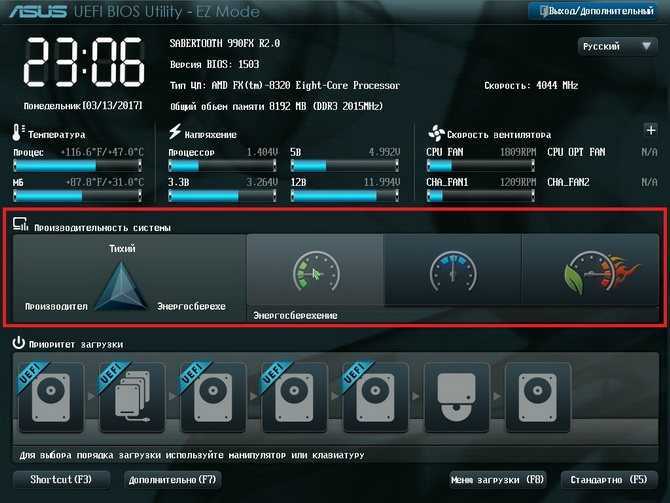
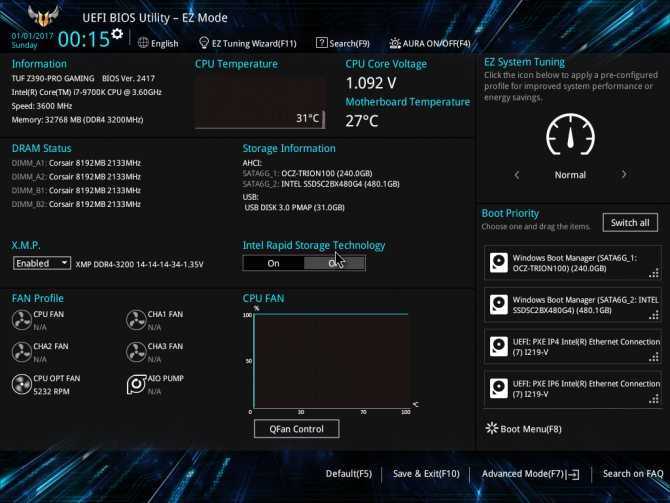
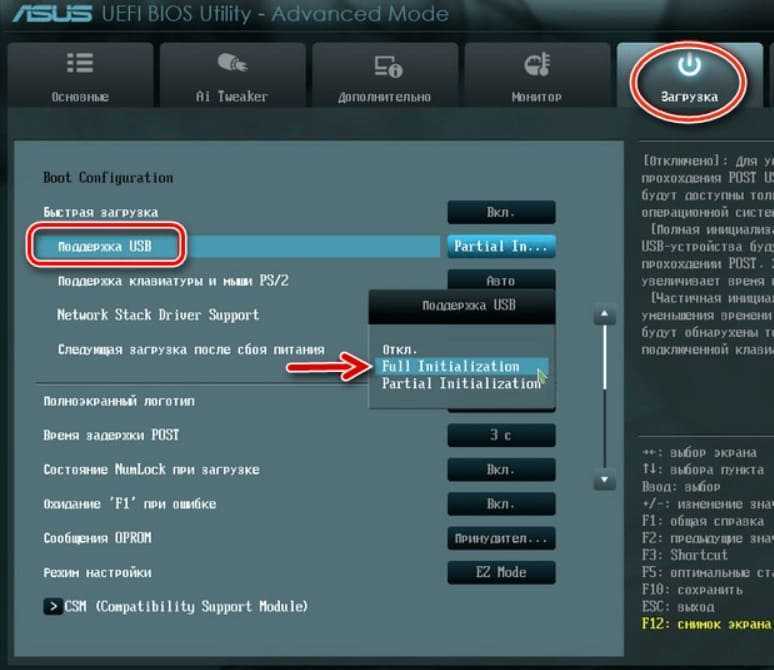
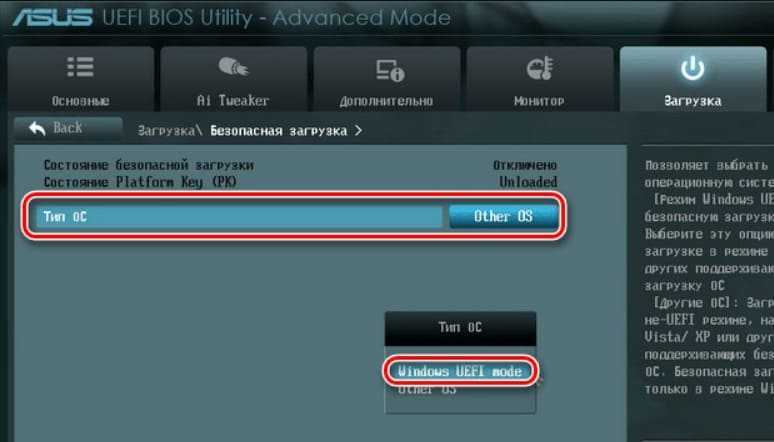
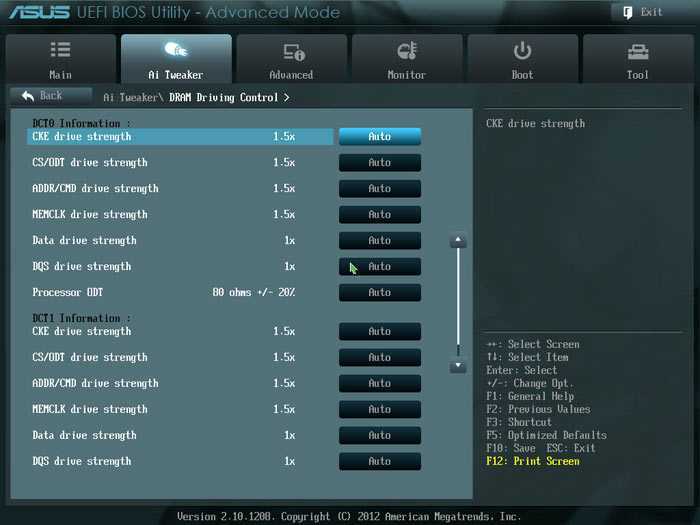
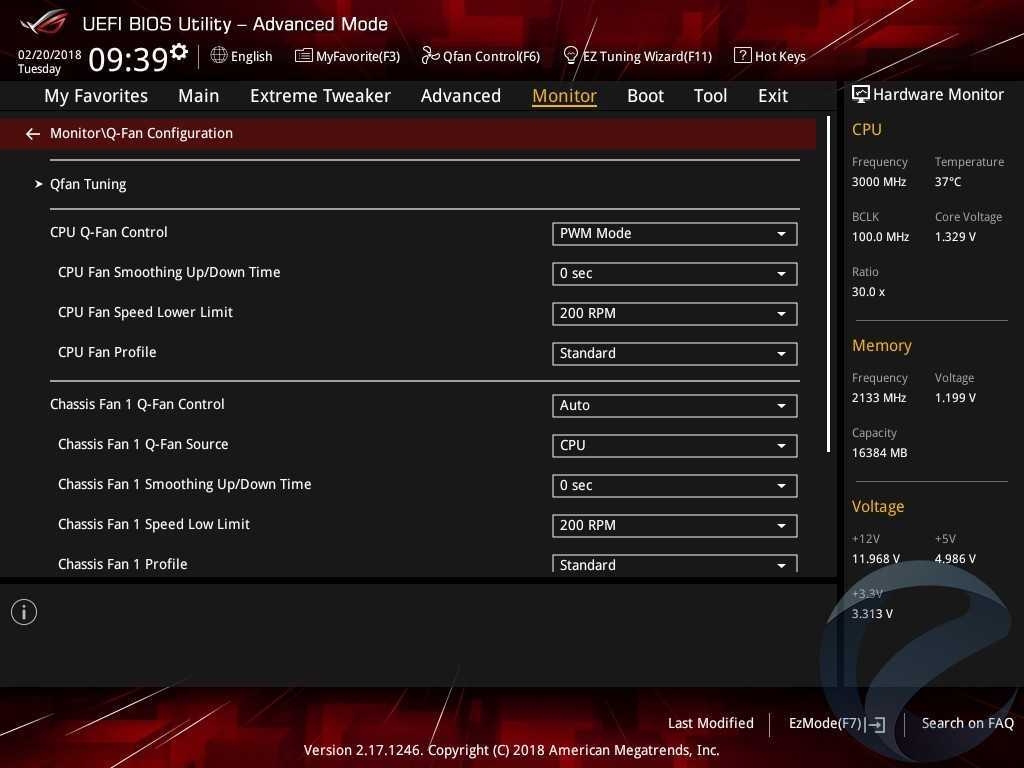
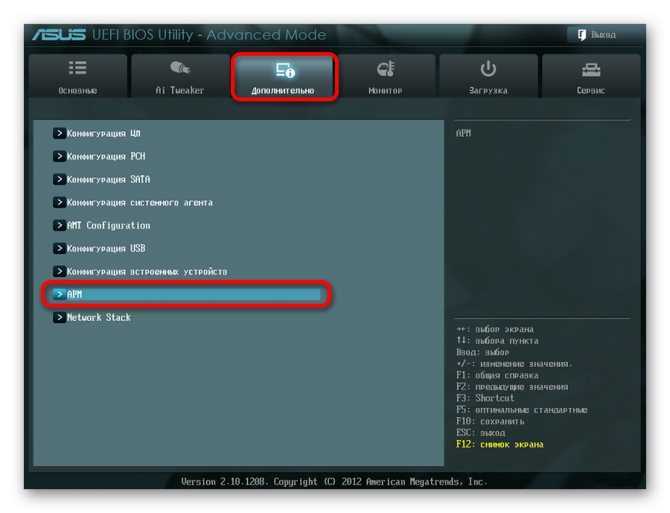
UEFI Configuration Utility on an Asus motherboard
In order to provide backward compatibility, most EFI systems provide a Legacy Boot mode that can be used to boot your computer.
Installation alongside an existing UEFI Windows installation
Note: The usual caveats of Dual boot with Windows apply.
rEFInd is compatible with the EFI system partition created by a UEFI Windows installation, so there is no need to create or format another FAT32 partition when installing Arch alongside Windows. Simply mount the existing ESP and install rEFInd as usual. By default, rEFInd’s autodetection feature should recognize any existing Windows/recovery bootloaders.
Note: In some cases, Windows behaves differently (low resolution boot screen, OEM logo replaced by Windows logo, black screen after boot screen, artifacting). If you face such issues, try setting in or adding to the Windows boot stanza.
Install rEFInd
The boot manager rEFInd is a still developed clone of the dead project rEFIt. I downloaded the binary zip file (v0.7.7) from this page, unzipped it and ran the installation script, after mounting my new partition /dev/sdX1 on /boot/temp-efi as described above:
Because of my old 32-bit Macbook, the rEFInd installer complained that:
- A 32-bit PC with EFI shouldn’t exist
- If this is a Mac, then I should install rEFInd from MacOS
Since my disc containing MacOSX was failing and this was to be its replacement, I simply ignored these warnings and carried on with the installation. rEFInd was nicely installed in on the UEFI partition (sdX1, mounted on /boot/temp-efi, so in my case in /boot/temp-efi/EFI/refind/).
In order to boot this old Macbook, you need to rename the install directory from “refind” to “boot” and the efi file to “boot.efi”:
In addition, you can consider editing , to set the boot delay from 20 to e.g. 3 seconds.
rEFInd should now be installed. If you mounted your disc on another system, put it back into your Macbook. Your Mac should now be able to start rEFInd and boot from a LiveUSB/CD/DVD system, from which you can install Linux on your hard drive.
Install Linux and your bootloader
I decided to install Arch Linux, so I downloaded an ISO image, copied its contents onto a USB flash drive, stuck in into the Macbook and booted from that. You can of course use your own favourite Linux flavour to do something similar. When installing, keep the following in mind:
- Keep the first partition (sdX1) of your hard disc intact — repartitioning or reformatting this part of your disc will erase rEFInd.
- When installing a boot loader (e.g. grub), use (U)EFI rather than BIOS mode, despite the fact that rEFInd is a BIOS emulator.
When installing grub, I issued:
This used mode for my old 32-bit/i386 Macbook in (U)EFI mode to install grub in . This resulted in the warning/error message
which can be ignored when using rEFInd, however fatal they sound — “They’re caused by the fact that you’re booted in BIOS mode, and they’re irrelevant because the task they’re intended to perform will be handled by rEFInd”, according to this rEFInd page (their step 26 “Type sudo grub-install”). The message doesn’t appear anymore when installing grub from my newly installed Linux system, presumably because I now truely booted in UEFI mode. See also the postscript below.


Сначала немного теории
UEFI видит только один специальный ESP-раздел, обычно он имеет размер 100-200 мегабайт и форматирован в FAT32 (бывает в FAT16), в нем содержаться папки с названиями а-ля Boot, Microsoft, Fedora, Ubuntu и т.д. Если вы перепробовали достаточное количество ОС и никогда не форматировали этот раздел, то там могло набраться приличное количество папок. К примеру, у меня было 2 живых оси и лежало около 6 папок.
В самих папках лежат исполняемые файлы .efi которые и выступают в роли загрузчиков ОС. В папке debian вы наверняка обнаружите файл , а в папке Microsoft – .
Большинство Linux-дистрибутивов монтируют ESP-раздел к , то есть загрузчик Debian будет лежать примерно на таком пути:
C директорией разобрались, а что дальше?
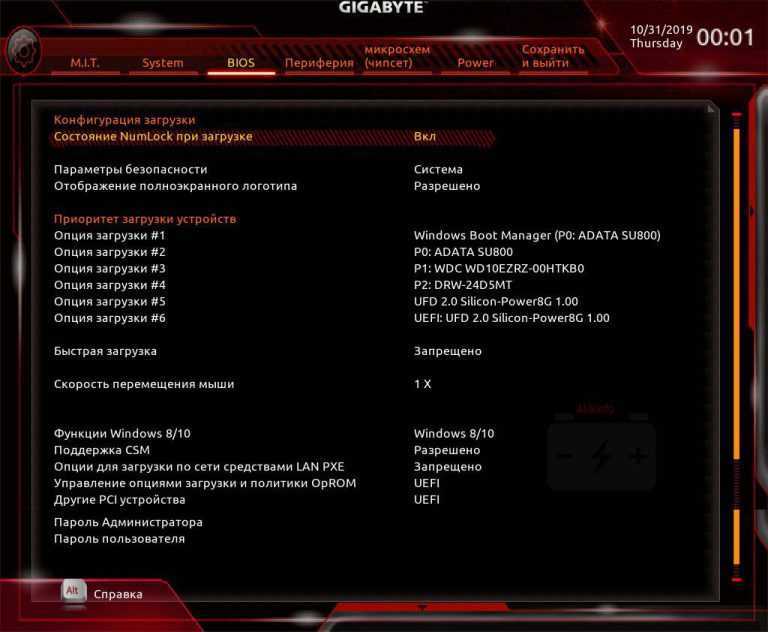
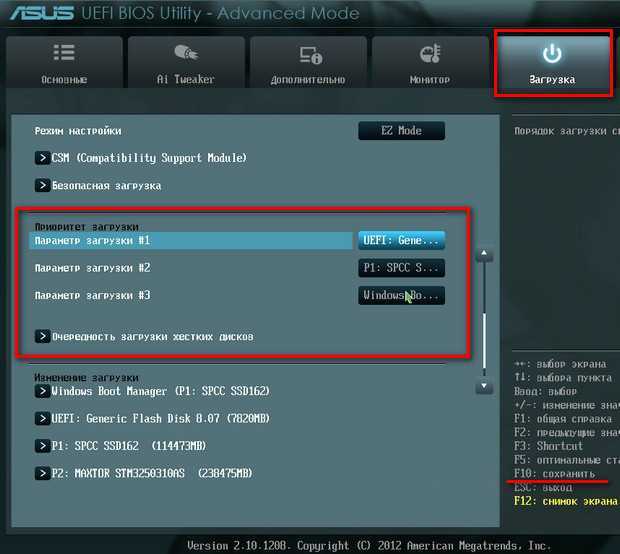
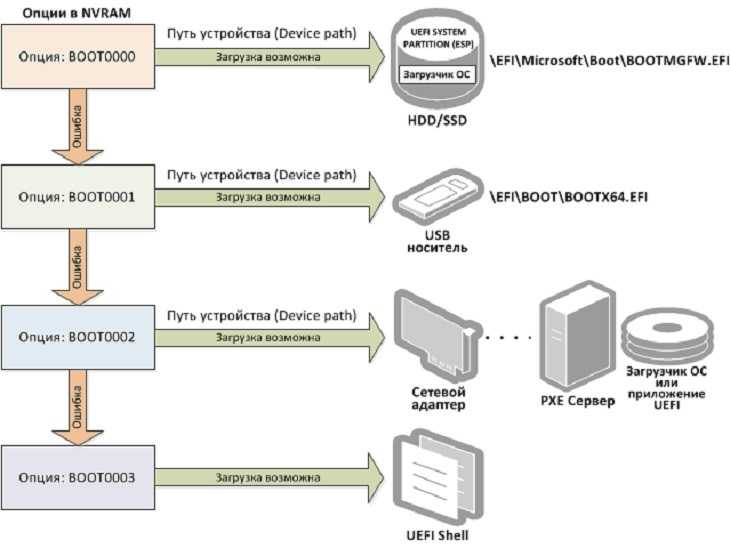
А дальше нужно понимать, что существует ещё порядок загрузки, которым можно руководить с помощью утилиты , если у вас её нет, то можете скачать через свой пакетный менеджер, во всех стандартных репозиториях она присутствует. Для начала можете просто ввести эту команду и увидеть список порядка загрузки, а также все UEFI-записи. Если хотите разобраться с утилитой, то курите ман и читайте интернеты, в целом она весьма простая. Злой Windows как раз-таки тут и затирает наш GRUB и ставит Windows Boot Manager первым приоритетом, поэтому его приходится восстанавливать. Скажу лишь как редактировать записи:
К примеру, означает удалить запись 0.
По факту GRUB можно вообще не трогать, потому что он наверняка так и лежит в папке EFI/<название дистрибутива>, нужно восставить лишь запись и поставить её первым приоритетом, но зачем что-то копать если можно chroot’нуться и ввести ? В большинстве случаев он сделает всё сам.
Кстати, стоит не забывать, что базовым функционалом обладает и сам, собственно, BIOS, он умеет читать эти записи и выстраивать приоритеты. Но сам просматривать ESP-разделы и добавлять новые записи он не умеет, эти обязанности возложены на EFI Shell и операционные системы.
И на последок: Все ваши действия в записываются в NVRAM! В большинстве случае BIOS умеет восстанавливать битый NVRAM каждый раз проверяя его и перезаписывая, в случая неполадок. Однако некоторые недобросовестные производители выпускают сырые прошивки и можно получить самый настоящий кирпич. К примеру ноутбуки с BIOS на базе Phoenix SCT окирпичиваются! Так что перед тем как продолжить читать, удостоверьтесь, что ваша модель материнской карты или ноутбука, устойчива к таким экспериментам.
P.S. Уже после написания большей части статьи я вспомнил про Secure Boot. Обычно UEFI тянет его за собой, но в большинстве случаев его можно весьма просто отключить в настройках BIOS. Многие Linux-дистрибутивы поддерживают его, но я всё же рекомендую его отключить, так как он может потянуть за собой массу проблем.
Базовый экскурс в теорию закончен.
UEFI Shell
The UEFI Shell is a shell/terminal for the firmware which allows launching uefi applications which include uefi bootloaders. Apart from that, the shell can also be used to obtain various other information about the system or the firmware like memory map (memmap), modifying boot manager variables (bcfg), running partitioning programs (diskpart), loading uefi drivers, editing text files (edit), hexedit etc.
UEFI Shell download links
You can download a BSD licensed UEFI Shell from Intel’s Tianocore UDK/EDK2 Sourceforge.net project.
Shell 2.0 works only in UEFI 2.3+ systems and is recommended over Shell 1.0 in those systems. Shell 1.0 should work in all UEFI systems irrespective of the spec. version the firmware follows. More info at ShellPkg and this mail
Launching UEFI Shell
Few Asus and other AMI Aptio x86_64 UEFI firmware based motherboards (from Sandy Bridge onwards) provide an option called . For those motherboards, download the x86_64 UEFI Shell and copy it to your UEFI SYSTEM PARTITION as (mostly ) .
Systems with Phoenix SecureCore Tiano UEFI firmware are known to have embedded UEFI Shell which can be launched using either F6, F11 or F12 key.
Note: If you are unable to launch UEFI Shell from the firmware directly using any of the above mentioned methods, create a FAT32 USB pen drive with Shell.efi copied as (USB)/efi/boot/bootx64.efi . This USB should come up in the firmware boot menu. Launching this option will launch the UEFI Shell for you.
Important UEFI Shell Commands
UEFI Shell commands usually support option which makes output pause after each page. lists recognized filesystems (, ...) and data storage devices (, ...). Run to list available commands.
More info at http://software.intel.com/en-us/articles/efi-shells-and-scripting/
BCFG command is used to modify the UEFI NVRAM entries, which allow the user to change the boot entries or driver options. This command is described in detail in page 83 (Section 5.3) of «UEFI Shell Specification 2.0» pdf document.
Note: Users are recommended to try only if fails to create working boot entries in their system.
Note: UEFI Shell 1.0 does not support command.
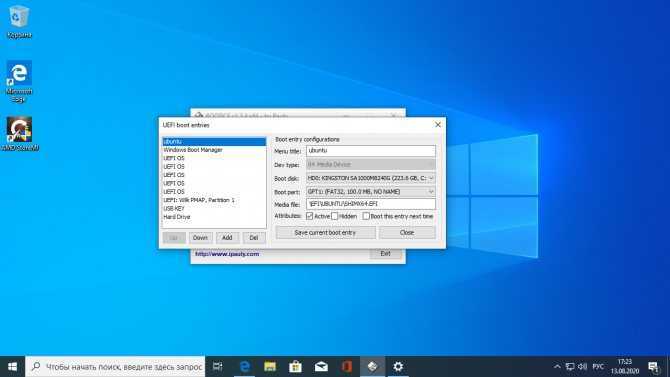
To dump a list of current boot entries —
Shell> bcfg boot dump -v
To add a boot menu entry for rEFInd (for example) as 4th (numbering starts from zero) option in the boot menu
Shell> bcfg boot add 3 fs0:\EFI\arch\refind\refindx64.efi "Arch Linux (rEFInd)"
where fs0: is the mapping corresponding to the UEFI System Partition and \EFI\arch\refind\refindx64.efi is the file to be launched.
To remove the 4th boot option
Shell> bcfg boot rm 3
To move the boot option #3 to #0 (i.e. 1st or the default entry in the UEFI Boot menu)
Shell> bcfg boot mv 3 0
For bcfg help text
Shell> help bcfg -v -b
Shell> bcfg -? -v -b
EDIT command provides a basic text editor with an interface similar to nano text editor, but slightly less functional. It handles UTF-8 encoding and takes care or LF vs CRLF line endings.
To edit, for example rEFInd’s refind.conf in the UEFI System Partition (fs0: in the firmware)
Shell> fs0:
FS0:\> cd \EFI\arch\refind
FS0:\EFI\arch\refind\> edit refind.conf
Type for help.
Разница между UEFI и BIOS
Хотя оба интерфейса выполняют одну задачу, разница между UEFI и BIOS есть — найти отличия не сложнее, чем узнать, как выбрать самый лучший винчестер для своего ПК. Первое и главное отличие, которое стоит вынести отдельно, — это обилие функций UEFI, приближающее эту связку к полноценной операционной системе со своими опциями, дополнениями и расширениями.
Кроме того, UEFI отличается от BIOS:
- Наличием продвинутого, значительно более приятного для глаза интерфейса, в большинстве случаев — с возможностью выбрать русский язык (прошивок БИОС с такой опцией, мягко говоря, мало).
- Поддержкой в качестве средства ввода команд не только клавиатуры, но также мыши и тачпада.
- Способностью свободно и без дополнительных «надстроек» работать с дисковой разметкой GPT вместо MBR, а значит — обслуживать жёсткие диски ёмкостью свыше 2 терабайтов, содержащие неограниченное число разбиений.
- Возможностью запускать операционную систему с носителей, на которых не сформированы загрузочные разделы; так, для старта Windows с флешки достаточно просто скопировать на карту памяти данные и настроить очерёдность обращения к дискам.
- При правильных исходных настройках — большей скоростью загрузки ОС за счёт оптимизации обращений к соответствующим секторам.
- Наличием собственной технологии защиты от атаки вирусов на всех этапах работы — так называемой Secure Boot.
- Возможностью почти мгновенного перехода из работающей операционной системы в UEFI — чтобы включить интерфейс, не придётся думать, как зайти в БИОС, и судорожно нажимать клавиши, пытаясь успеть до загрузки ОС.
Среди не слишком приятных моментов, отличающих UEFI от BIOS, можно отметить:
- Принципиальную невозможность работы оболочки с 32-битными (архитектура х86) операционными системами — как на старых, так и на самых современных компьютерах и ноутбуках.
- Отказ разработчиков от поддержки ОС старше Vista, включая XP, и сильно ограниченные возможности работы с так любимой пользователями «Семёркой».
- Сложности с обслуживанием жёстких дисков с устаревшей разметкой MBR — что в свою очередь создаёт дополнительные проблемы при установке и запуске Windows 7 как второй операционной системы.
Что собой представляет BIOS ?
Это программное решение, встроенное в микросхему на материнской плате. Эта микропрограмма обеспечивает обмен данными между комплектующими элементами компьютера и операционной системой. То есть, за счет BIOS Windows имеет возможность работать с оперативной памятью, материнской платой, процессором, видеокартой и другими компонентами.
BIOS инициализируется намного раньше загрузки Windows. На микропрограмму возлагается задача по проверке всех систем компьютера, которые мы перечислили выше. Кроме того, BIOS задает им нужные параметры функционирования.
В том случае, если во время процедуры POST выявляется неисправный компонент компьютера, то BIOS передаст через маленький динамик кодовую последовательность звуковых сигналов, по которой пользователь может определить, какая именно деталь неисправна.
Пожалуй, всем может пригодиться статья о том, как работать с программой Outlook.
ESP Installation
Once the rEFInd package has been emerged, a second step is needed to install the binaries to the ESP. If an ESP does not exist, one needs to be created. See EFI System Partition.
File system layout
For kernel storage there are multiple options.
- File system root ().
- /boot directory.
- Most of the subdirectories of /EFI. (See example in the section).
Boot partition configuration is quite flexible. For example, choose one of:
- Seperate boot, ESP and root partitions
- Seperate ESP partition with /boot part of the root filesystem. (Provided it is a non-encrypted, non-LVM and one of the above supported filesystems).
- Only ESP partition, with kernels living in /EFI/Gentoo/. This will require some additional steps when installing the kernel.
Installation with NVRAM modification
The rEFInd package comes with the refind-install command. Running it will:
- Looks if the ESP is already mounted. If not, automount the ESP according to
- Install its refind_x64.efi application and other stuff into the ESP
- Call efibootmgr to set itself as the default boot manager.
ShimSource is none
Installing rEFInd on Linux....
ESP was found at /boot using vfat
Copied rEFInd binary files

Copying sample configuration file as refind.conf; edit this file to configure
rEFInd.

Installing it!
rEFInd has been set as the default boot manager.
Creating //boot/refind_linux.conf; edit it to adjust kernel options.

Installation has completed successfully.
/boot
├── EFI
│   ├── refind
│   │   ├── icons
│   │   ├── keys
│   │   ├── refind.conf
│   │   └── refind_x64.efi
│   └── tools
└── refind_linux.conf
Boot000x* rEFInd Boot Manager HD(1,GPT,1729a003-cf0d-4bd4-88c9-cc24d8d418c4,0x800,0x2f000)/File(\EFI\refind\refind_x64.efi)
Boot000x* can vary depending on existing entries.
WarningIf /boot cannot be found in , refind-install will default to using /boot/efi/EFI and even move an existing /boot/EFI to /boot/efi/EFI.
WarningIt is important to manually with rw option or rEFInd won’t be able to set itself as the default boot manager, issuing an error message.


In order to do this, use the following command:
Installation to the EFI Default/Fallback path
rEFInd can be installed to a disk using the default/fallback filename of EFI/BOOT/bootx64.efi. The computer’s NVRAM entries will not be modified when installing in this way. Most EFI and UEFI firmware support a fallback EFI image to boot from if the configured EFI file cannot be found, and some will also override the configured boot selection if the fallback boot image is found. This can be used to boot into EFI mode when doing so otherwise is difficult.
Where /dev/sda is the ESP.
This installation method can be used as either a permanent setup to create a bootable USB flash drive or install rEFInd on a computer that tends to «forget» its NVRAM settings or as a temporary bootstrap to get the system to boot in EFI mode.
Instructions
Manual install
Inside the refind folder (/usr/share/refind), copy the files and folders to-
/boot/efi/EFI/Boot/
noteMy ESP (EFI System Partition) is mounted at /boot/efi.
You need to copy these files to the Boot folder on your EFI partition, and the Boot folder itself will be present inside the EFI folder on the EFI Partition, so take note of it.
You can check which partition is your ESP using Gparted; find which partition is formatted as fat32 and has size around 200mb-1gb.
Can mount it as /boot/efi by
user $ sudo mount /dev/sdXN /boot/efi COPY TO CLIPBOARD
X=a,b,c…
N=1,2,3…
These depend on which partition your ESP is present which can be obtained via Gparted as mentioned earlier.
Now inside the /boot/efi/EFI/Boot/ folder, there should already be a file present-
bootx64.efi
You can rename it as windows.bootx64.efi
Then you can rename refind_x64.efi to bootx64.efi
The bootx64.efi files boot by default, hence rEFInd should now boot by default, and detect grubx64.efi(linux-manjaro) and efibootmgfw.efi (windows) automatically.
noteA folder Manjaro (name could be some other also) containing the file grubx64.efi should also be present in /boot/efi/EFI/ folder, which should contain the grubx64.efi file which will be used by rEFInd to boot Grub.
So it could be like-
/boot/efi/EFI/Manjaro/grubx64.efi
rEFInd would use this file for booting Manjaro.
If you do not have this file or folder, try-
user $ sudo grub-install —target=x86_64-efi —efi-directory=/boot/efi —bootloader-id=Manjaro —recheck COPY TO CLIPBOARD
to create /boot/efi/EFI/Manjaro/grubx64.efi
An alternative: chainloading via GRUB
An entry can be added to
/etc/grub.d/40_custom
menuentry 'Windows8 (UEFI)' {
insmod ntfs
set root=(hd0,gpt4)
chainloader (${root})/EFI/Microsoft/Boot/bootmgfw.efi
boot
}
In this case (hd0,4) or /dev/sda4 is the EFI System partition where the Windows bootloader is present.
After adding the above entry, running sudo update-grub updates the GRUB configuration file so that an entry named Windows8 (UEFI) is added to the GRUB boot menu.
Detecting UEFI Firmware Arch
If you have a non-mac UEFI system, then you have a x86_64 (aka 64-bit) UEFI 2.x firmware.

Some of the known x86_64 UEFI 2.x firmwares are Phoenix SecureCore Tiano, AMI Aptio, Insyde H2O.
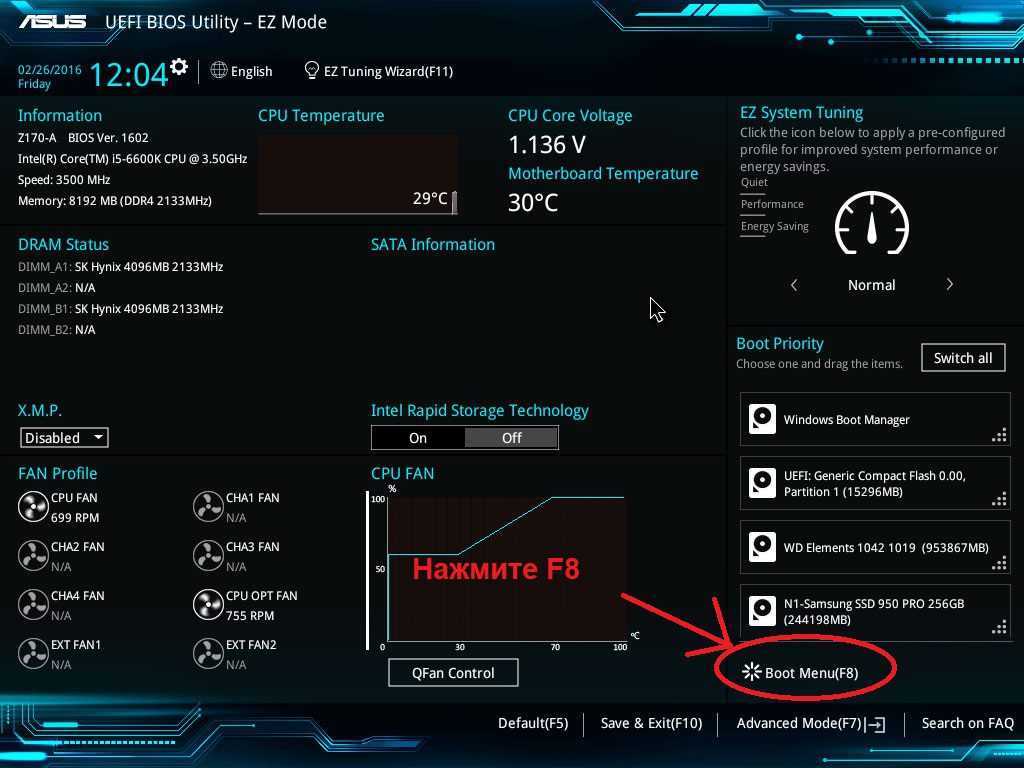
Some of the known systems using these firmwares are Asus EZ Mode BIOS (in Sandy Bridge P67 and H67 motherboards), MSI ClickBIOS, HP EliteBooks, Sony Vaio Z series, many Intel Server and Desktop motherboards
Pre-2008 Macs mostly have i386-efi firmware while >=2008 Macs have mostly x86_64-efi. All macs capable of running Mac OS X Snow Leopard 64-bit Kernel have x86_64 EFI 1.x firmware.
To find out the arch of the efi firmware in a Mac, boot into Mac OS X and type the following command
ioreg -l -p IODeviceTree | grep firmware-abi
If the command returns EFI32 then it is i386 EFI 1.x firmware. If it returns EFI64 then it is x86_64 EFI 1.x firmware. Macs do not have UEFI 2.x firmware as Apple’s EFI implementation is not fully compliant with UEFI Specification.
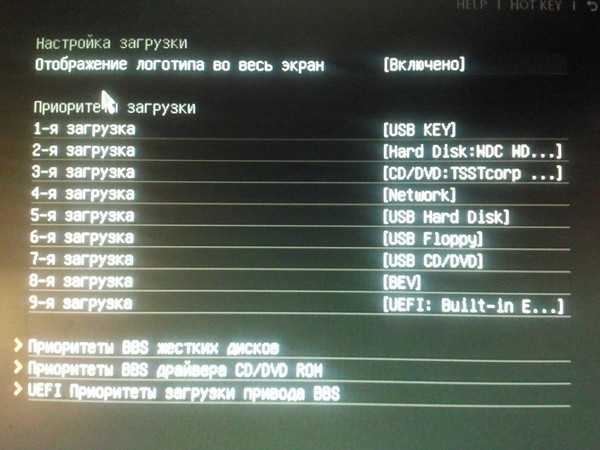
Что такое Legacy Boot?
Устаревшая загрузка относится к процессу загрузки, используемому микропрограммой BIOS для инициализации аппаратных устройств. Legacy режим загрузки содержит набор установленных устройств, которые инициализируются по мере выполнения компьютером POST-ТЕСТА во время процесса загрузки. Устаревшая загрузка будет проверять наличие главной загрузочной записи (MBR) на всех подключенных устройствах, как правило, в первом секторе диска.
Когда он не может найти загрузчик в устройствах, Legacy переключается на следующее устройство в списке и продолжает повторять этот процесс, пока не найдет загрузчик, а если нет, то вернет ошибку.
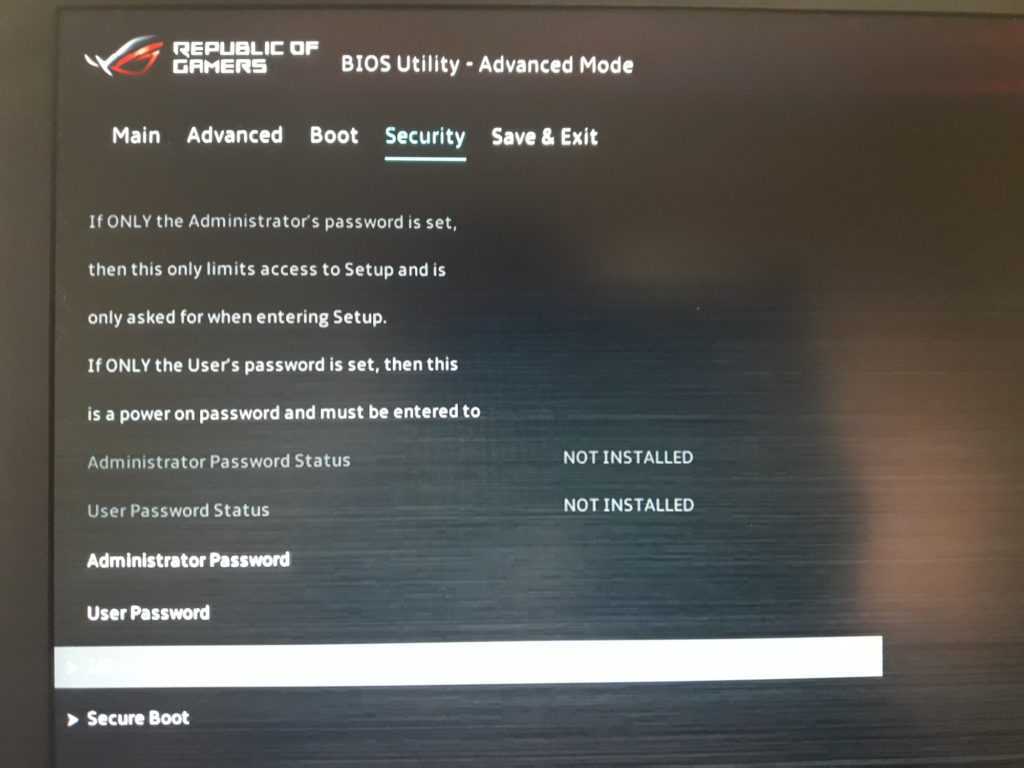
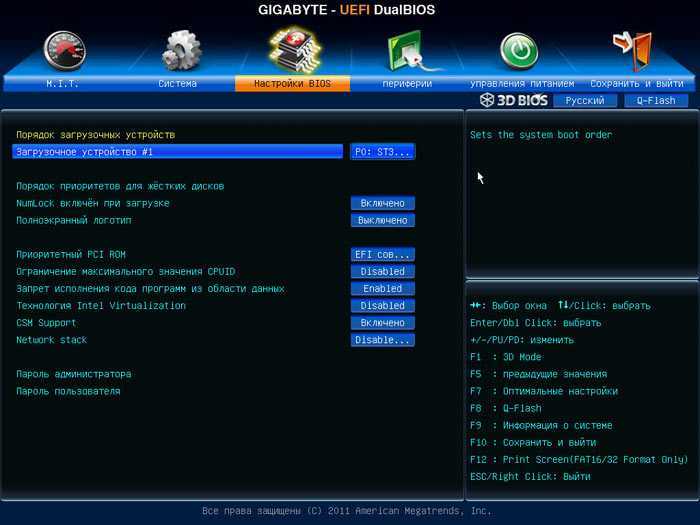
Клавиши для входа в BIOS
BIOS (англ. basic input/output system — «базовая система ввода-вывода») — реализованная в виде микропрограмм часть системного программного обеспечения, которая предназначается для предоставления операционной системе API для доступа к аппаратуре компьютера и подключенным к нему устройствам
При включении питания компьютера, во время начальной загрузки, при помощи программ записанных в BIOS, происходит самопроверка аппаратного обеспечения компьютера — POST (power-on self-test).
В ходе POST BIOS проверяет работоспособность контроллеров на материнской плате, задаёт низкоуровневые параметры их работы (например, частоту шины и параметры центрального микропроцессора, контроллера оперативной памяти, контроллеров шин FSB, AGP, PCI, USB)
Во время прохождения POST в нижней части экрана появляется приглашение: Press DEL to run Setup, — DEl (Delete)это самая распространённая клавиша для входа в BIOS Setup
Вход в BIOS позволяют пользователю конфигурировать различные настройки: включить или отключить устройства или доступные порты, установить приоритет начальной загрузки устройств или их последовательность.
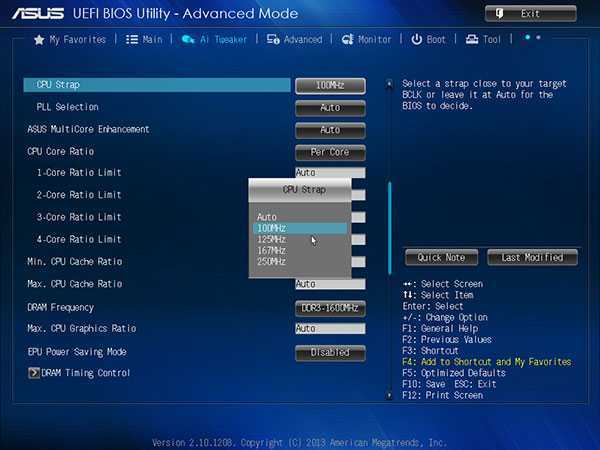
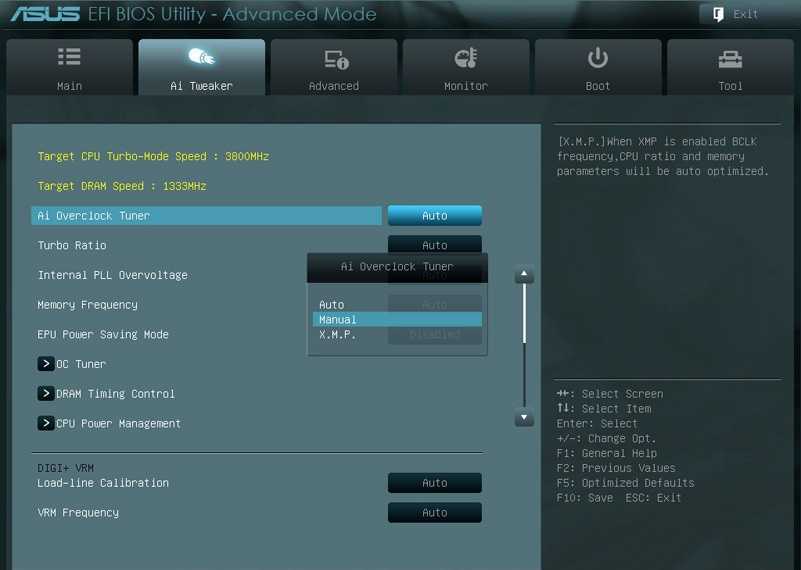
Некоторые расширенные настройки также позволяют пользователю настраивать производительность компьютера, например, множитель тактовой частоты ЦП и частоту системной шины (FSB) для разгона, настройки памяти DRAM, для перепрошивка новых версий BIOS и т.д.
Сочетания клавиш
Для входа в BIOS пользователь должен нажать определенную клавишу или сочетание клавиш во время начального экрана загрузки BIOS. Ниже приводится список производителей PC OEM и клавиша или сочетания клавиш для входа в BIOS
Обратите внимание на то, что у некоторых производителей может быть несколько методов доступа к BIOS в зависимости от того, когда BIOS выпущен
| Производитель компьютеров | Клавиши |
| Acer(Aspire, Power, Veriton, Extensa, Ferrari, TravelMate, Altos) | Del или F1 |
| Acer(Altos 600 Server) | Ctrl+Alt+Esc или F1 |
| Acer(Older PC) | F1 или Ctrl+Alt+Esc |
| ABIT | Del |
| ASUS | Del |
| AMI(American Megatrends AMIBIOS, AMI BIOS) | Del |
| AMI(American Megatrends AMIBIOS, AMI BIOS) – Old Version | F1 или F2 |
| ASRock | Del или F2 |
| Award BIOS(AwardBIOS) | Del |
| Award BIOS(AwardBIOS) – Old Version | Ctrl+Alt+Esc |
| BIOSTAR | Del |
| Compaq(Presario, Prolinea, Deskpro, Systempro, Portable) | F10 |
| Compaq(Older Computers) | F1, F2, F10, или Del |
| Chaintech | Del |
| Cybermax | Esc |
| Dell(XPS, Dimension, Inspiron, Latitude. OptiPlex, Precision, Vostro) | F2 |
| Dell(Older 486 Models) | Ctrl+Alt+Enter |
| Dell Dimension L566cx System | Del |
| Dell(Older Laptop Models) | Fn+Esc или Fn+F1 |
| Dell(Some Models) | Дважды Reset |
| ECS(Elitegroup) | Del или F1 |
| eMachines (eMonster, eTower, eOne, S-Series, T-Series) | Del или Tab |
| eMachine(Some Older Computers) | F2 |
| Fujitsu(LifeBook, Esprimo, Amilo, Tablet, DeskPower) | F2 |
| Gateway Using Phoenix BIOS(DX, FX, One, GM, GT, GX, Profile, Astro) | F1 |
| GIGABYTE | Del |
| Hewlett-Parkard(HP Pavilion, TouchSmart, Vectra, OmniBook, Tablet) | F1 |
| Hewlett-Parkard(HP Alternative) | F2 или Esc |
| Hewlett-Parkard (HP) Tablet PC: | F10 или F12 |
| IBM ThinkPad using Phoenix BIOS | Ctrl+Alt+F11 |
| IBM(Older Computers or Notebooks) | F2 |
| Intel | F2 |
| Lenovo(ThinkPad, IdeaPad, 3000 Series, ThinkCentre, ThinkStation) | F1 или F2 |
| Lenovo(Older Products) | Ctrl+Alt+F3, Ctrl+Alt+Ins или Fn+F1 |
| MSI(Micro-Star) | Del |
| Micron(MPC Computers ClientPro, TransPort) | Del или F1, F2 |
| Microid Research MR BIOS | F1 |
| NEC(PowerMate, Versa, W-Series) | F2 |
| Packard Bell(8900 Series, 9000 Series, Pulsar, Platinum, EasyNote, imedia, iextreme) | Del или F1, F2 |
| Phoenix BIOS(Phoenix-Award BIOS) | Del |
| Phoenix BIOS(Phoenix-Award BIOS) – Old Version | Ctrl+Alt+S, Ctrl+Alt+Esc, Ctrl+Alt+Ins или Ctrl+S |
| Sharp(Notebook Laptops, Actius UltraLite) | F2 |
| Samsung | F2 |
| Sony(VAIO, PCG-Series, VGN-Series) | F1,F2 или F3 |
| Sony Vaio 320 Series | F2 |
| Toshiba(Portégé, Satellite, Tecra) | Esc |
| Toshiba(Portégé, Satellite, Tecra with Phoenix BIOS) | F1 |
| Zenith, Phoenix | Ctrl+Alt+Ins |
What Next
If you got this far then you should still have a working macOS install and in addition you should now be using rEFInd and have one or more other operating systems installed. At this point adding, removing, or changing which OSs you have should be fairly simple and rEFInd should automatically detect them. From time to time installing updates will break you rEFInd configuration but when that happens just follow the instuctions to fix it and everything should be ok. Unfortunately System Integrity Protections are still disabled but if they are enabled again they will make it impossible to fix rEFInd and may break things.
Поддерживаемые операционные системы
К сожалению, далеко не все операционные системы поддерживают работу с UEFI. Как уже говорилось, в основном такая поддержка заявлена для некоторых модификаций Linux и Windows, начиная с восьмой версии.

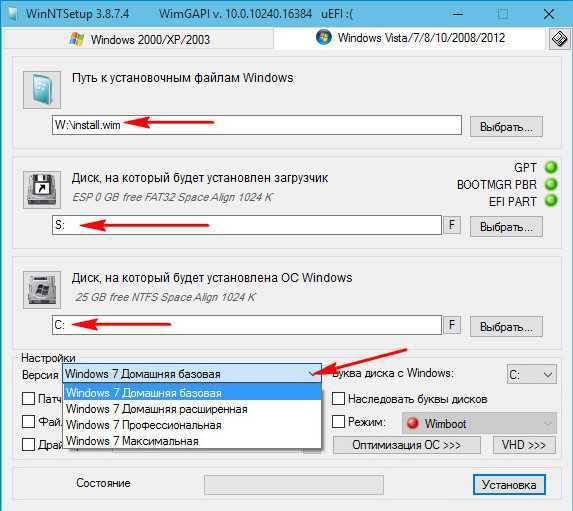
Теоретически можно установить и Windows 7 (UEFI инсталляционный дистрибутив распознает). Но вот полной гарантии, что установка будет завершена успешно, никто не даст. К тому же в случае использования Windows 7 UEFI-интерфейс и все сопутствующие возможности новой системы останутся просто невостребованными (а часто и недоступными). Таким образом, на компьютер или ноутбук с поддержкой UEFI ставить именно эту систему нецелесообразно.
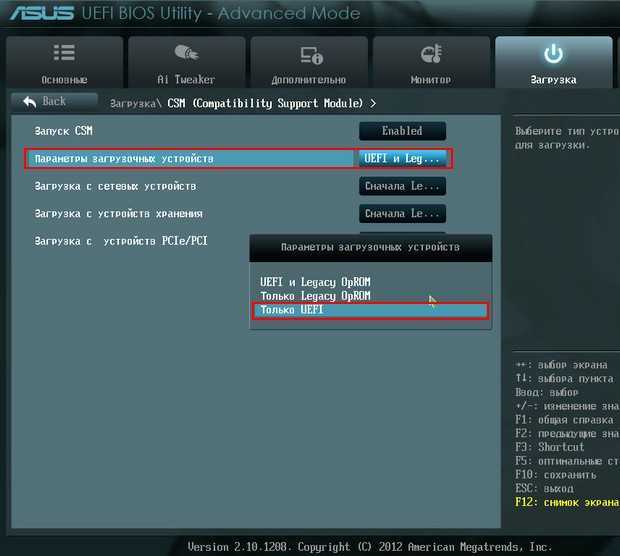
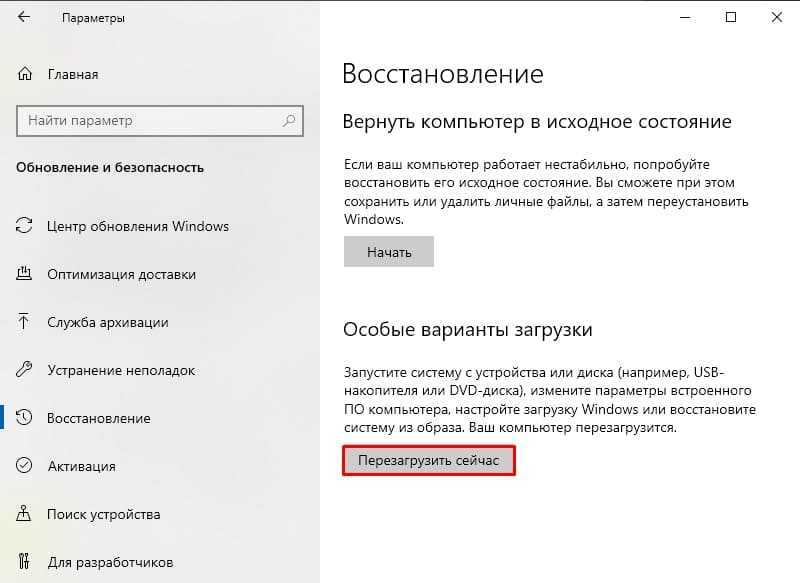
Отключение UEFI
Наконец, посмотрим, как отключить UEFI, например, для случаев, когда загрузка со съемного носителя оказывается невозможной только по причине того, что само устройство не поддерживается.
Сначала нужно зайти в раздел безопасности Security и отключить режим безопасной загрузки Secure Boot (если это возможно), установив для него параметр Disabled. После этого в загрузочном меню Boot в строке приоритета Boot Priority следует выставить значение Legacy First. Далее из списка нужно выбрать устройство, которое будет первым для загрузки (жесткий диск) и выйти из настроек, предварительно сохранив изменения (Exit Saving Changes). Процедура полностью аналогична настройкам BIOS. Вместо команд меню можно использовать клавишу F10.


