Установка
Пакет nginx доступен в прекомпилированном виде для любого дистрибутива. Однако собрав сервер самостоятельно, ты сможешь сделать его более компактным и надежным, а также получишь возможность изменить строку приветствия Web-сервера, чтобы отбить несмышленых скрипт-кидди.
Измени строку приветствия Web-сервера
Скачай исходники nginx, открой файл src/http/ngx_http_header_filter_module.c и найди следующие две строки:
Замени их на что-то вроде этого:
Удали все неиспользуемые тобой nginx-модули
Некоторая часть модулей nginx подключается к Web-серверу прямо во время компиляции, и любой из них таит в себе потенциальную опасность. Возможно, в будущем в одном из них будет найдена уязвимость, и твой сервер окажется под угрозой. Отключив ненужные модули, ты сможешь значительно снизить риск возникновения такой ситуации.
Выполни сборку с помощью следующих команд:
Так ты получишь nginx с заранее отключенными (и в большинстве случаев бесполезными) модулями SSI (Server Side Includes) и Autoindex. Чтобы узнать, какие модули можно безболезненно выбросить из Web-сервера, запусти скрипт configure с флагом ‘—help’.
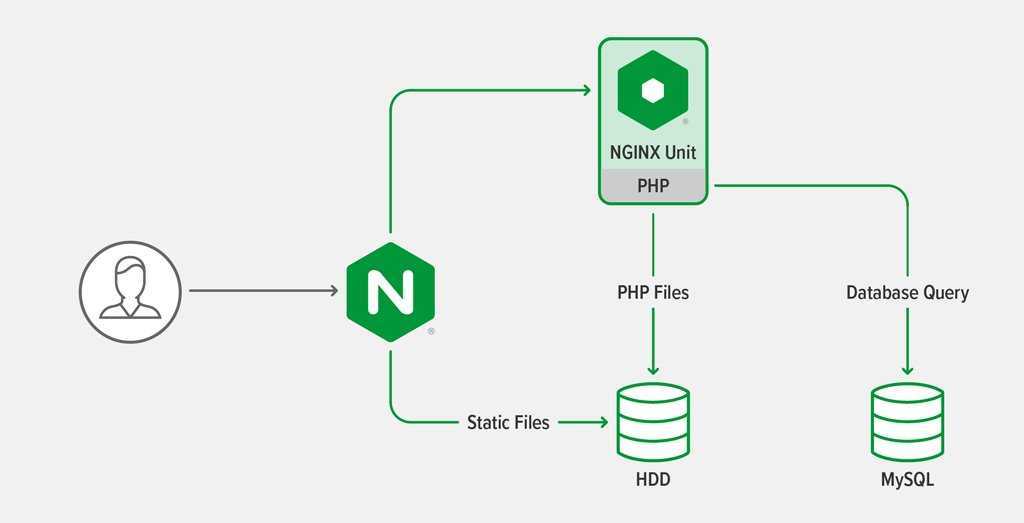
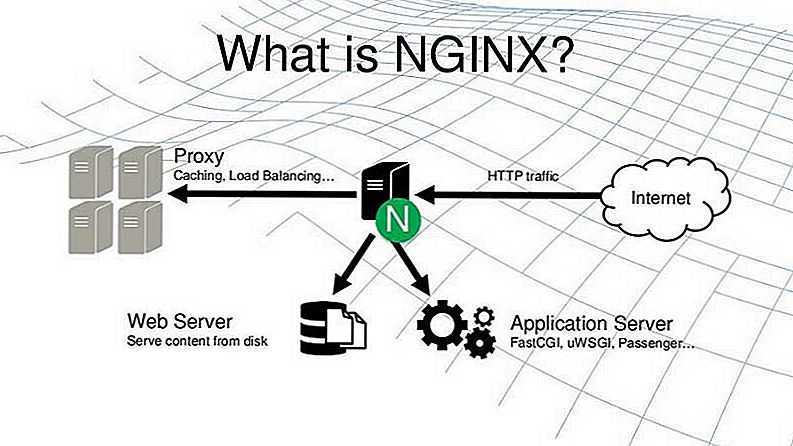
Аутентификация контейнеров
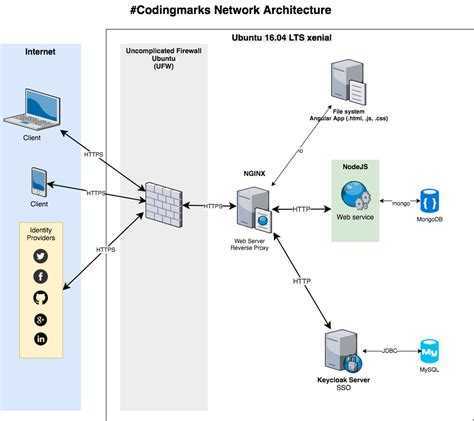
В рамках NAS, сервисы работают в контейнерах, поэтому есть желание сделать так, чтобы возможно было переключать режимы аутентификации, просто установив переменные внутри контейнера.
Такой механизм уже есть в используемом образе ngingx-proxy и реализован он через шаблоны, которые обрабатывает docker-gen.
Он подставляет в шаблон метаданные, которые содержат описание запущенных в данный момент контейнеров Docker.
Таким образом, всё что надо сделать — это доработать шаблон конфигурации обратного прокси так, чтобы при наличии условной переменной в контейнере, было включено перенаправление на сервис сквозной аутентификации, который также работает в контейнере.
Затем, внести соответствующие коррективы в конфигурацию docker-compose.
Configuring nginx
Now, open up the site-specific configuration file with an editor like . If you are using Debian or Ubuntu, the site specific configuration is present in :
sudo nano /etc/nginx/sites-available/default
However, if you use another Linux distribution, it will be in :
sudo nano /etc/nginx/nginx.conf
In either case, go ahead and locate the block. Once you have done so, add a block for the path you would like to protect. Inside this block, you should set the realm name and the htpasswd file path. In the example below, we have restricted access for everything under , and the “realm name” is set to . The realm name is displayed by browsers, and it is used for differentiating between different protected parts of the website.
server {
    # Many lines of configuration...

    location /files {
        auth_basic "Restricted";
        auth_basic_user_file /etc/nginx/htpasswd;
    }
}
Save the file and quit the editor. Then, to bring these changes into effect, you must reload the nginx configuration with:
sudo systemctl reload nginx
If you are on an older, non-systemd distribution, you should run this instead:
sudo service nginx reload
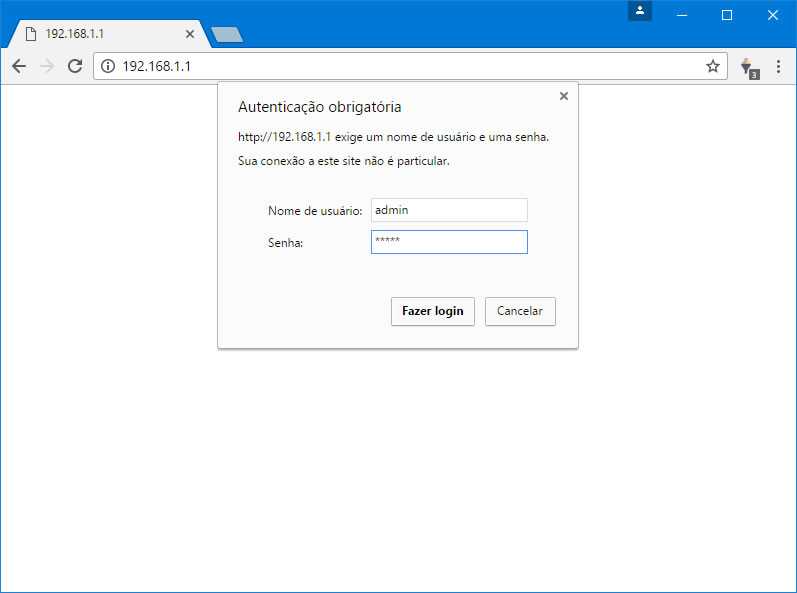
Now, if you use a web browser to access anything under , your browser will prompt for an username and password:
If you want to protect another path, simply add another location block with the same content:
location /photos {
    # ...
}
Keep in mind that you can also use other directives inside these location blocks.
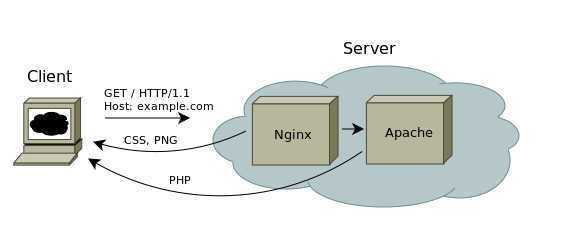
Using the nginx auth_request Module
Enter the nginx module.
This module is shipped with nginx, but requires enabling when you compile nginx. When you download the nginx source and compile, just include the flag along with any others that you use.
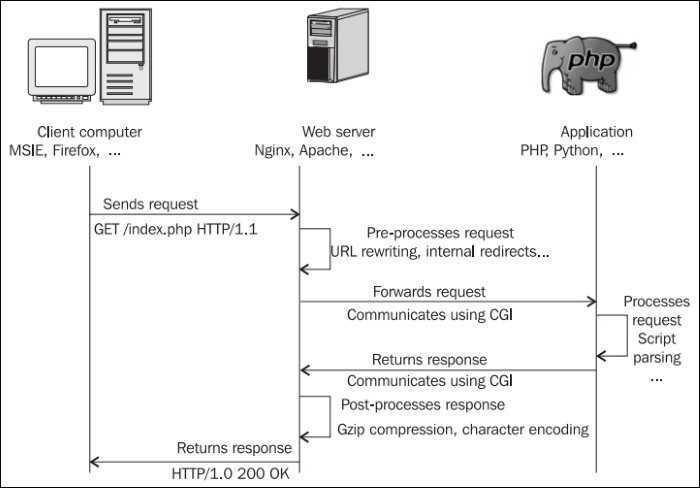

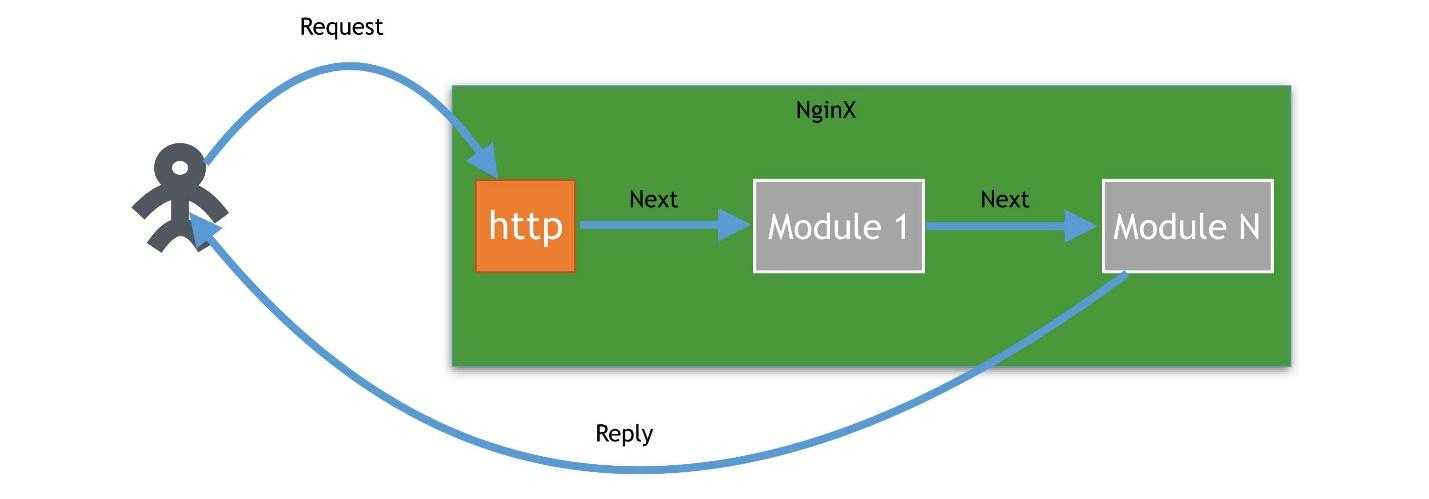
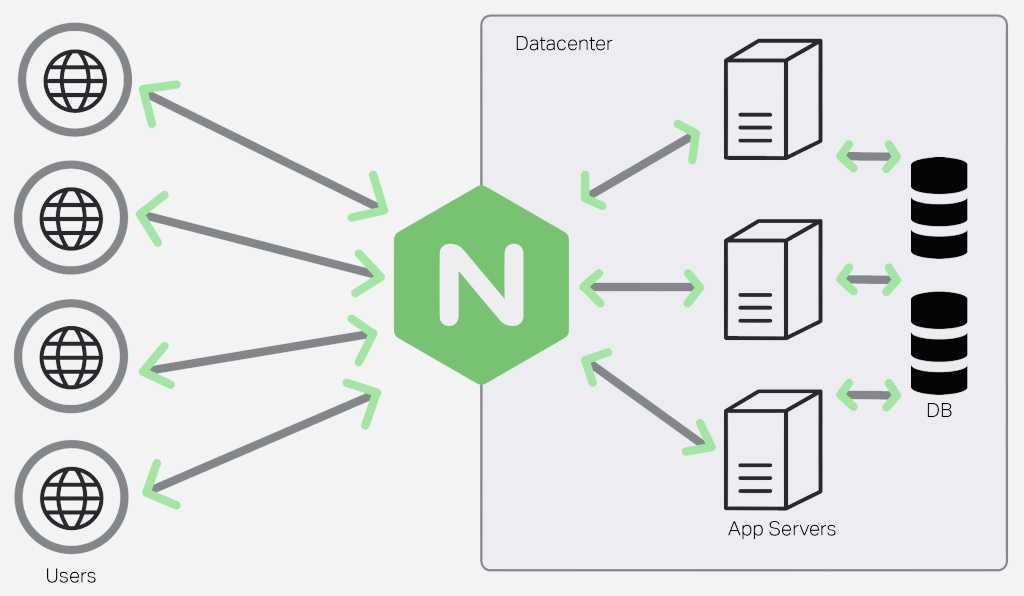
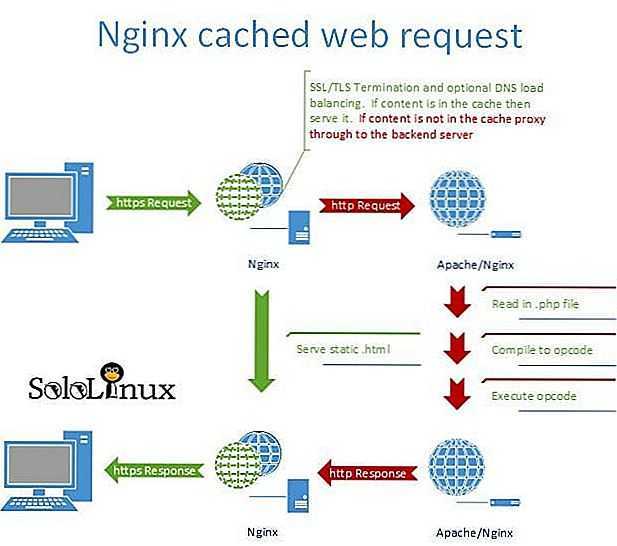
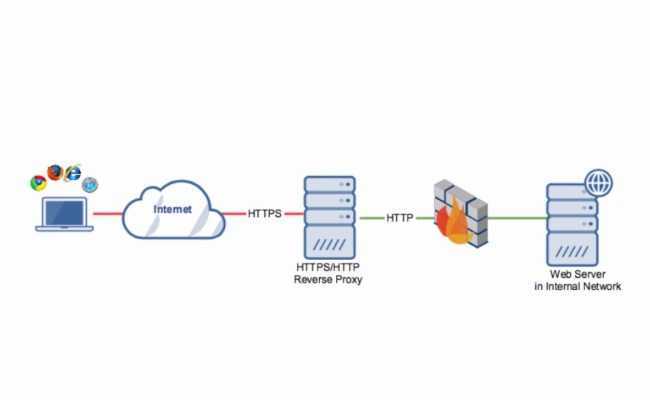
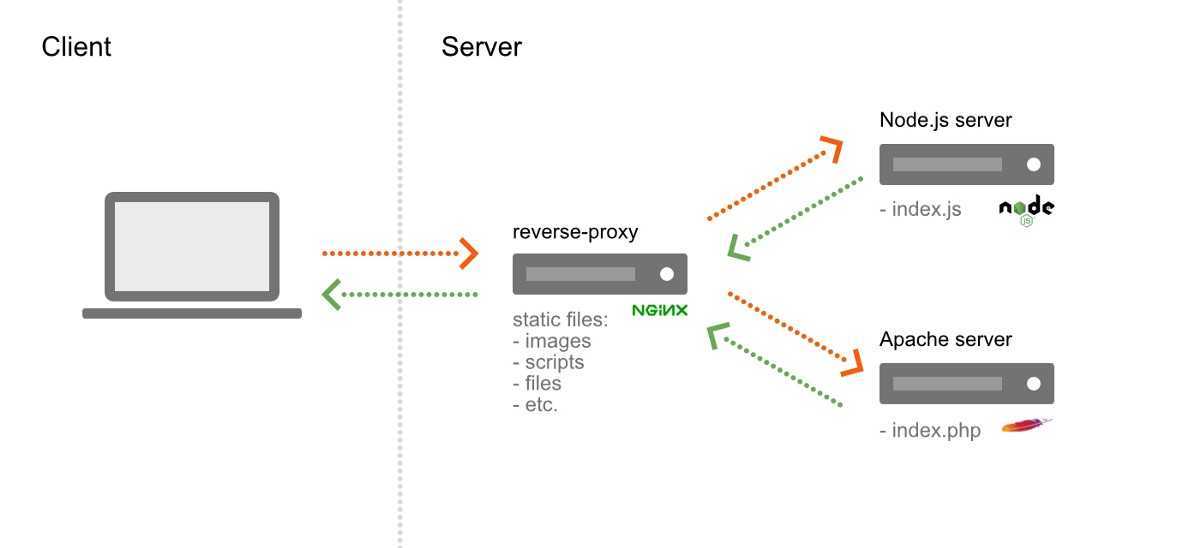
The module sits between the internet and your backend server that nginx passes requests onto, and any time a request comes in, it first forwards the request to a separate server to check whether the user is authenticated, and uses the HTTP response to decide whether to allow the request to continue to the backend.

This diagram illustrates a request that comes in for the server name . First, nginx fires off a sub-request to (1), and if the response (2) to that request returns HTTP 200, it then continues forwarding the request on to the backend
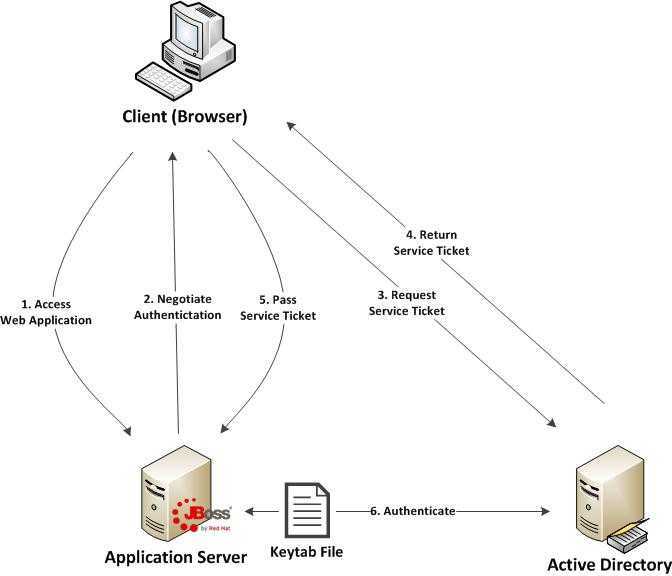
Создание учетной записи в AD и файла keytab
Для подключения к контроллеру домена нам необходимо подтверждать подлинность. Это выполняется с помощью учетной записи в LDAP и файла keytab.
Создание учетной записи
Открываем консоль управления пользователями и добавляем нового со стандартными правами. От этой учетной записи будут выполняться запросы к AD DS.
В своем примере мы создаем пользователя spnego.
Учетная запись должна быть размещена по пути, в котором присутствуют названия только на латинице. Подразделения и контейнеры не должны быть на русском. В противном случае, при выполнении команды ниже мы получим ошибку «Password set failed! 0x00000020».
Создание keytab-файла
В двух словах, данный файл позволяет пройти идентификацию в Kerberos без запроса пароля. Он содержит пары имен субъектов Kerberos и зашифрованные ключи, полученные из пароля Kerberos.
Мы создадим данный файл на контроллере домена и скопируем на сервер NGINX. Для этого на контроллере домена и от имени администратора запускаем Powershell или обычную командную строку. Вводим:
ktpass /princ HTTP/nginx.domain.local@DOMAIN.LOCAL /mapuser spnego@DOMAIN.LOCAL /crypto ALL /ptype KRB5_NT_PRINCIPAL /out C:\spnego.keytab /pass *
* где:
- nginx.domain.local — полное имя нашего nginx-сервера;
- DOMAIN.LOCAL — наш домен;
- spnego@DOMAIN.LOCAL — учетная запись в AD для выполнения запросов (создана на шаге выше);
- pass * — пароль, который будет задан пользователю (должен соответствовать требованию AD). Система запросит его ввод дважды.
* регистр важен.
В нашем примере, после выполнения команды на контроллере домена в корне диска С появится файл spnego.keytab. Его копируем на Linux-сервер, например, при помощи WinSCP.
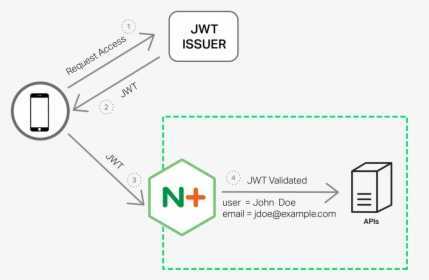
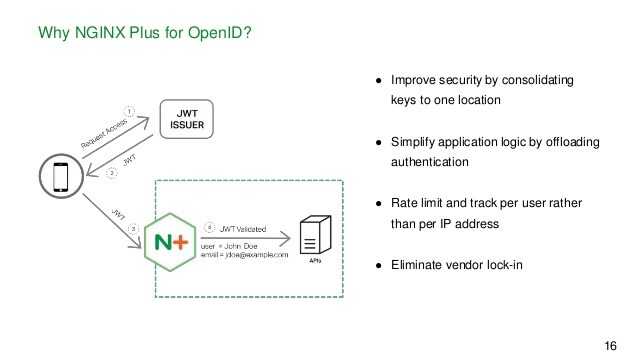
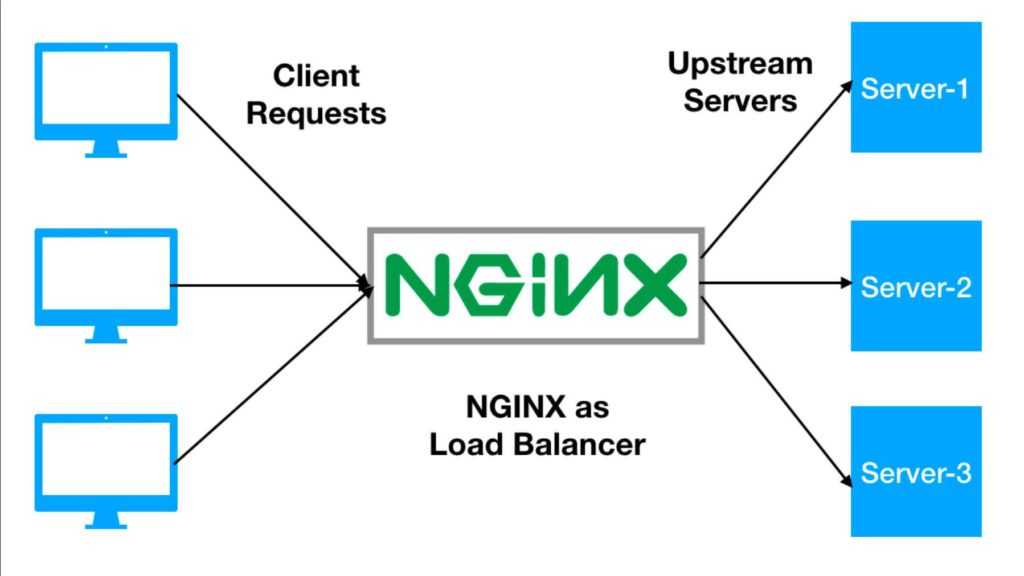
Configuring NGINX Plus to Authenticate API
Let’s assume that NGINX Plus serves as a gateway () to a number of API servers (the block), and requests passed to the API servers should be authenticated:
To implement JWT for authentication:
-
First, it is necessary to create a JWT that will be issued to a client. You can use your identity provider (IdP) or your own service to create JWTs. For testing purposes, you can create your own JWT, see Authenticating API Clients with JWT and NGINX Plus blog post for details.
-
Configure NGINX Plus to accept JWT: specify the directive that enables JWT authentication and also defines the authentication area (or “realm”, “API” in the example):
NGINX Plus can also obtain the JWT from a query string parameter. To configure this, include the parameter to the directive:
-
Specify the type of JWT — (JWS), (JWE) or (Nested JWT) — with the directive. The default value of the directive is , so for JWS, the directive can be omitted.
-
Specify the path to the that will be used to verify JWT signature or decrypt JWT content, depending on what you are using. This can be done with the and/or directives. Specifying both directives at the same time will allow you to specify more than one source for keys. If none of the directives are specified, JWS signature verification will be skipped.
In this scenario, the keys will be taken from two files: the file and the file:
In this scenario, there are also two sources for the keys, but the private keys will be taken from the local file , while the public keys will be taken from the external identity provider service in a :
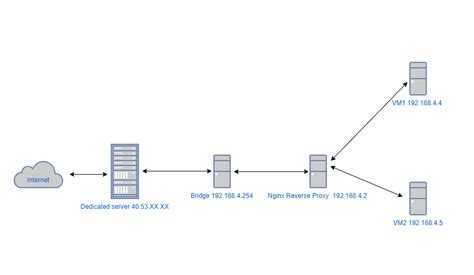
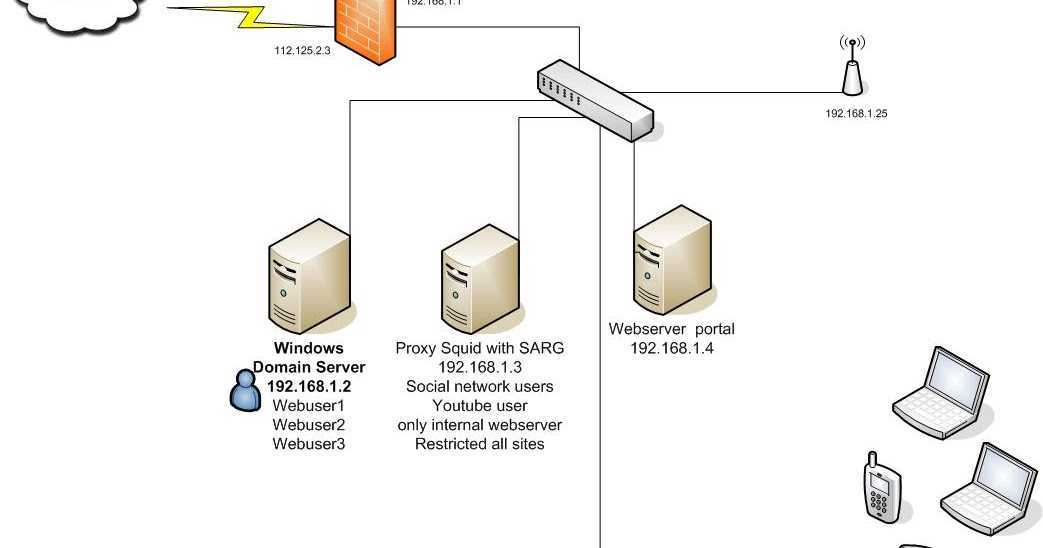
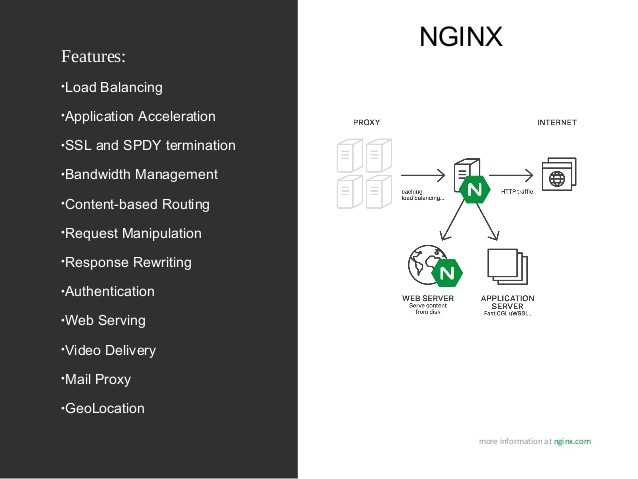
Применение и принцип работы
Необходимость такого решения возникла в результате закрытия всех внутренних ресурсов от посторонних глаз. Но на каждый проект заводить отдельные .htpasswd файлы или делать один общий, а потом где-то хранить логин и пароль не очень хотелось – со временем проектов станет много и администрировать учётки станет не очень удобно. Тут-то на помощь и пришёл вариант использования Nginx с имеющейся Samba в качестве контроллера домена.
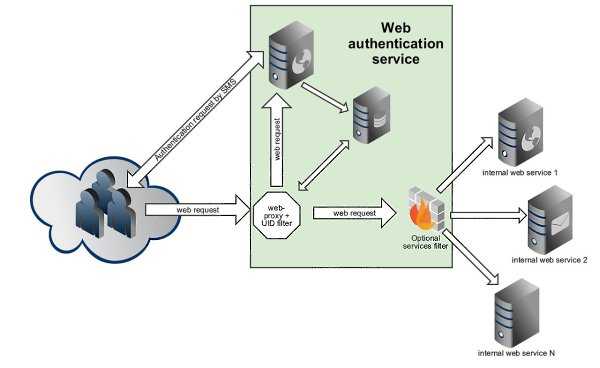
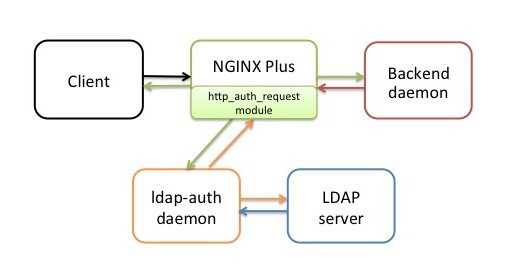
Для Nginx существует модуль ngx_http_auth_request_module.
То есть работа модуля основана на подзапросах к какому-либо стороннему сервису, который обращается к Active Directory, и возвращается к Nginx с ответом. Таковым сервисом является демон, написанный на Python, и называется ldap‑auth daemon. Поддерживает работу Python 2 и 3 версии.

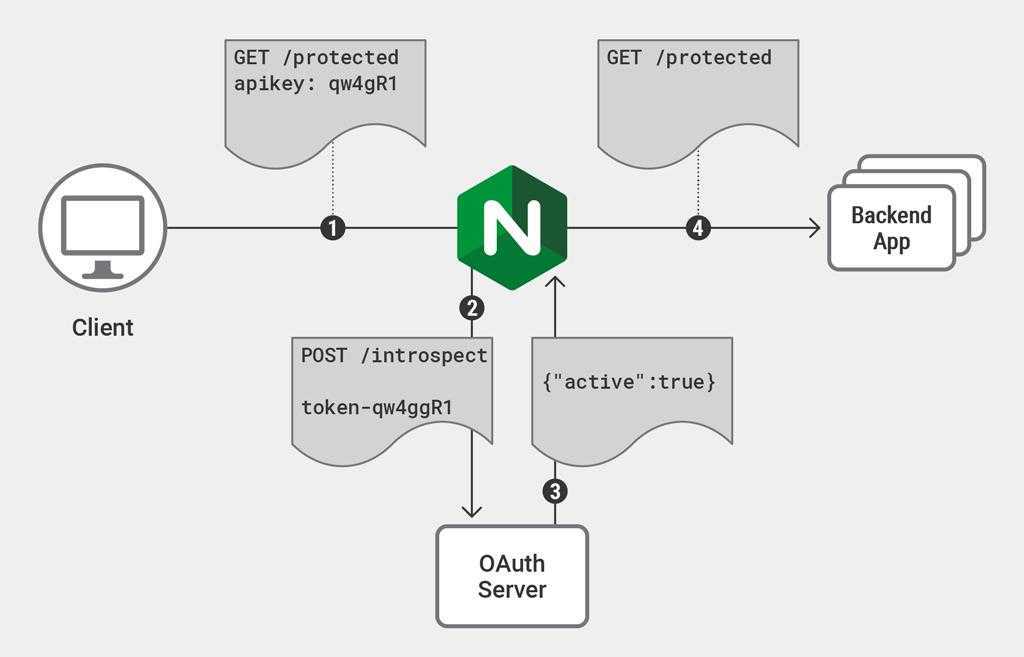
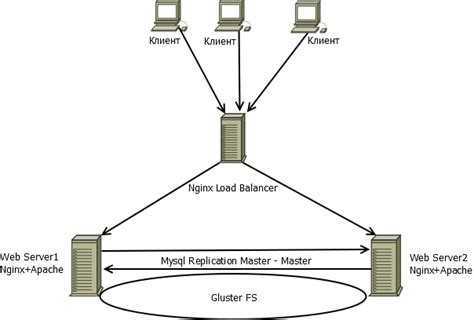
На сайте Nginx изображена схема работы при использовании модуля авторизации и коннектора на Python:

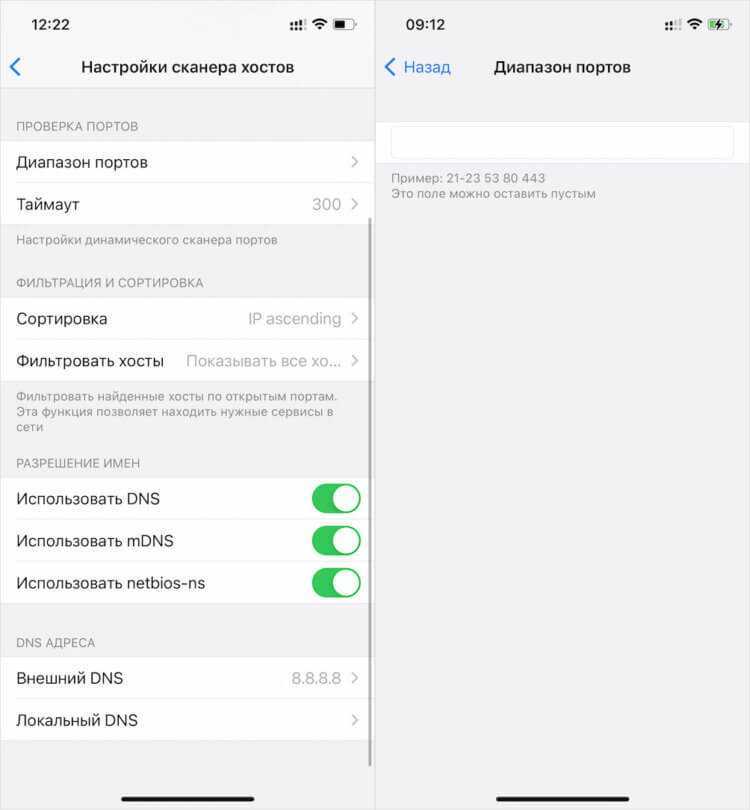
Просканировать локальную сеть

Задать нужный вам метод сканирования можно вручную в настройках
Сканирование сети через ScanNet производится в четырёх режимах:
- Read arp
- ICM Ping
- UDP Ping
- DNS Request
По умолчанию включён режим Read arp. Его отличие состоит в том, что он, во-первых, сканирует в том числе отключенные устройства (так в моём списке оказался выключенный телевизор), а, во-вторых, работает только на локальную сеть. Поэтому, если нужно исключить выключенные устройства или выйти за пределы локальной сети, потребуется выбрать другой режим.
Приложение выдаёт устройства не просто списком, но и позволяет просмотреть информацию о каждом из них во всех подробностях. Тут будет и имя хоста, и показатели пинга, и открытые порты. В общем всё то, что может потребоваться даже профессионалам, а не только рядовым пользователям, которые и про пинг-то скорее всего не слышали, не говоря уже обо всём остальном.
Для продвинутых пользователей ScanNet предлагает широкий инструментарий конфигурации поиска
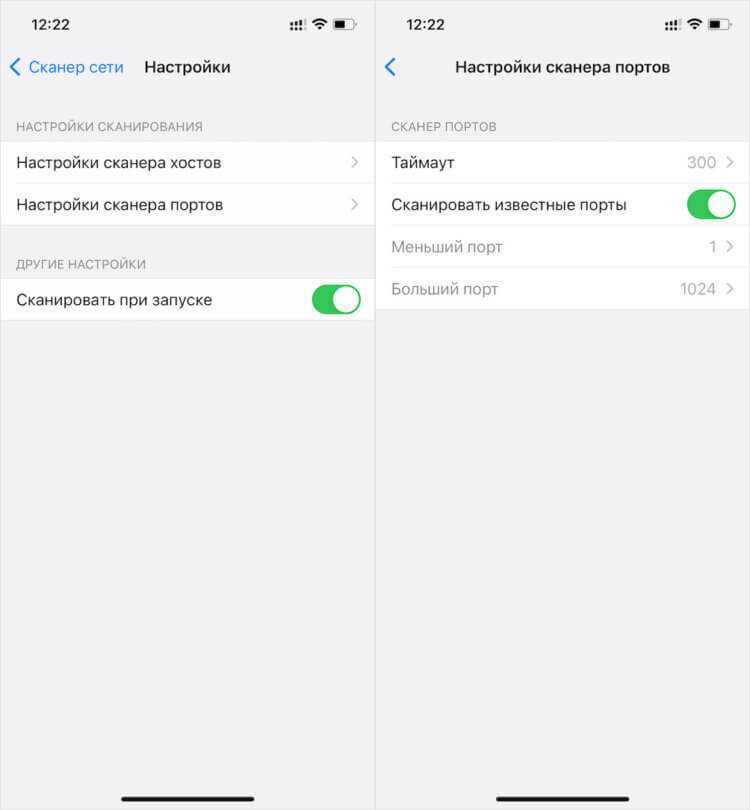
С помощью ScanNet можно просканировать нужные вам сети, порты и найти хосты, подключенные к роутеру
Для продвинутых пользователей ScanNet предлагает довольно широкий спектр настроек. Так, если стандартные установки поиска вас не устраивают, его можно сконфигурировать по своему усмотрению. При необходимости можно просканировать не только домашнюю сеть, но и вообще выбранный диапазон, выставив пределы IP-адресов.
Давайте попробуем просканировать свой диапазон IP:
Откройте приложение ScanNet у себя на iPhone;
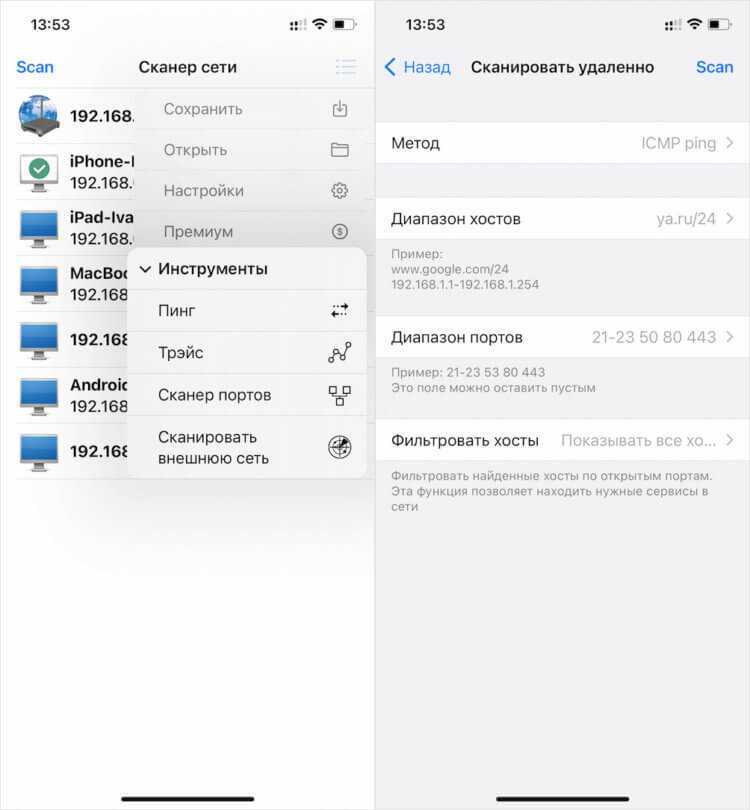
Сканирование внешних сетей — это, скорее, инструмент для просьюмеров и специалистов
- Нажмите на кнопку меню в правом верхнем углу;
- Выберите «Инструменты» — «Сканировать внешнюю сеть»;
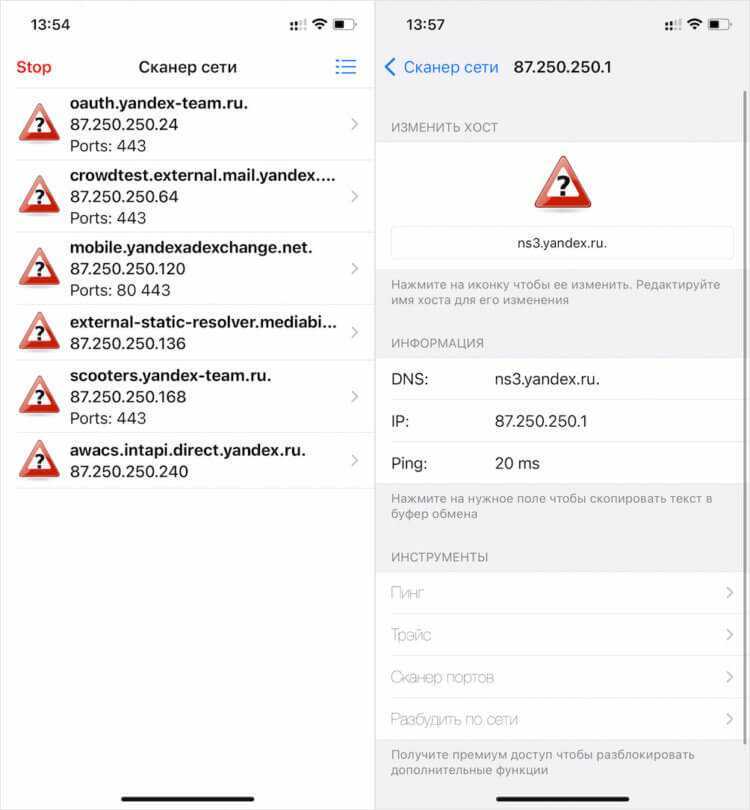
ScanNet предоставит исчерпывающую информацию о искомых вами сетях, открытости портов и т.д.
Задаём метод сканирования, устанавливаем диапазоны и нажимаем Scan.
Установка диапазонов, само собой, — это инструмент для продвинутых пользователей или, я бы даже сказал, для специалистов. Она позволяет найти нужный сервер, провести диагностику и сделать многое другое.
Единственный недостаток — это отсутствие возможности получить MAC-адрес отсканированного устройства. Однако это ограничение не приложения ScanNet, а самой iOS. Вот уже два года Apple блокирует механизмы, получающие эту информацию, запрещая разработчикам встраивать их в свой софт. Поэтому в iOS-версии ScanNet такой возможности нет, а в Android-версии — есть.
Настройка Linux для интеграции с AD
Для интеграции Linux с нашим LDAP (в данном примере, на основе Active Directory) установим необходимые пакеты и настроим Kerberos.
Установка пакетов
Необходимые пакеты ставим из репозиториев.
а) на Ubuntu/Debian:
apt-get install heimdal-clients
б) на Centos:
yum install krb5-workstation
Проверка файла
Переходим в каталог с файлом keytab и выполняем команду:
kinit -kt spnego.keytab HTTP/nginx.domain.local@DOMAIN.LOCAL

* напомним, что spnego.keytab — имя нашего файла; HTTP/nginx.domain.local@DOMAIN.LOCAL — принципал, для которого сгенерирован файл.
Команда нам ничего не должна вернуть. Это значит, что она выполнена корректно.
Теперь выполним:
klist
Мы должны увидеть что-то на подобие:
Credentials cache: FILE:/tmp/krb5cc_0
Principal: HTTP/nginx.domain.local@DOMAIN.LOCAL
Issued Expires Principal
Apr 28 15:04:47 2021 Apr 29 01:04:47 2021 krbtgt/DOMAIN.LOCAL@DOMAIN.LOCAL
В данном ответе мы видим, что нам выдан билет для принципала HTTP/nginx.domain.local@DOMAIN.LOCAL. Идем дальше.
Настройка kerberos
Открываем на редактирование файл:
vi /etc/krb5.conf
Приводим его к виду (остальные строки не трогаем):
…
default_realm = DOMAIN.LOCAL
..
DOMAIN.LOCAL = {
kdc = 192.168.0.15
kdc = 192.168.0.16
kdc = 192.168.0.17
admin_server = domain.local
}
* DOMAIN.LOCAL — наш домен; kdc — перечень контроллеров домена; admin_server — первичный контроллер (в данном примере будет использоваться случайный).
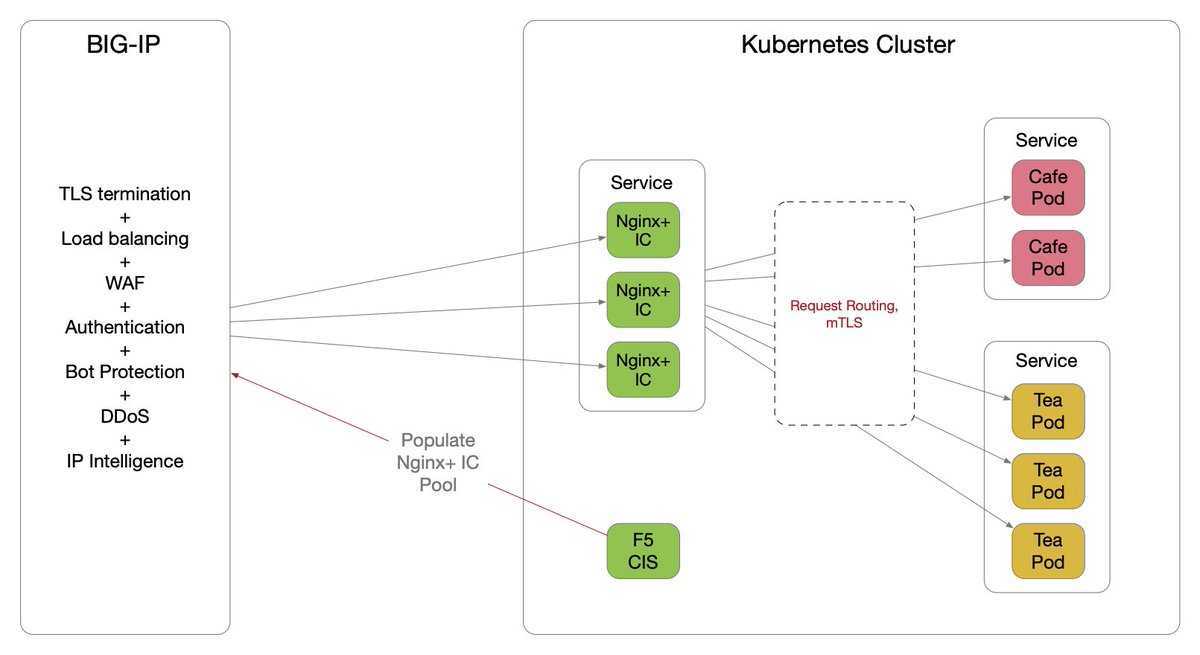
Implementing Authentication
It is unusual to publish APIs without some form of authentication to protect them. NGINX offers several approaches for protecting APIs and authenticating API clients. For information about approaches that also apply to regular HTTP requests, see the documentation for IP address‑based access control lists (ACLs), , and HTTP Basic authentication. Here, we focus on API‑specific authentication methods.
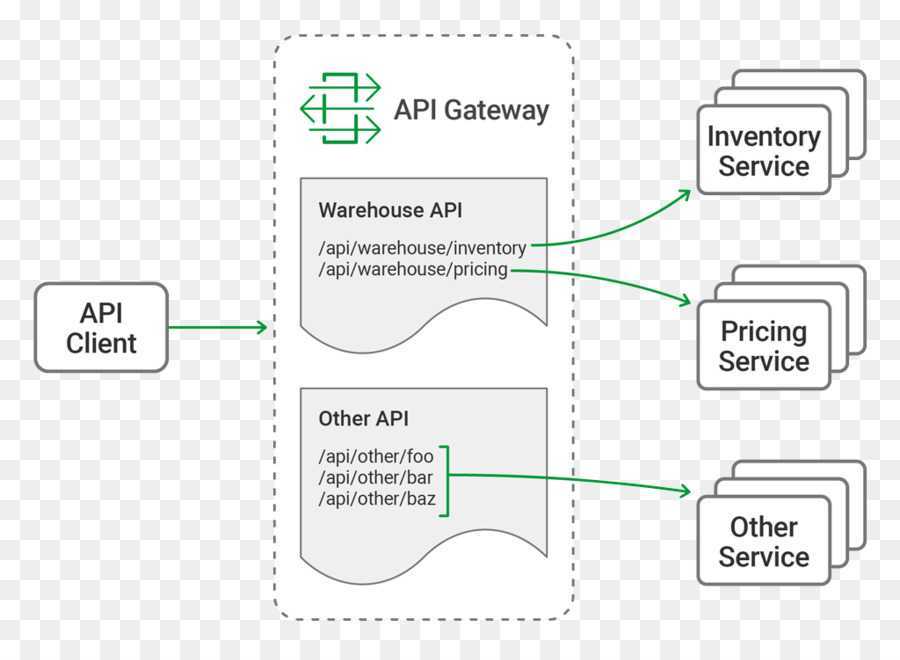
API Key Authentication
API keys are a shared secret known by the client and the API gateway. An API key is essentially a long and complex password issued to the API client as a long‑term credential. Creating API keys is simple – just encode a random number as in this example.
On line 2 of the top‑level API gateway configuration file, , we include a file called api_keys.conf, which contains an API key for each API client, identified by the client’s name or other description. Here are the contents of that file:
The API keys are defined within a block. The directive takes two parameters. The first defines where to find the API key, in this case in the HTTP header of the client request as captured in the variable. The second parameter creates a new variable () and sets it to the value of the second parameter on the line where the first parameter matches the key.
For example, when a client presents the API key , the variable is set to . This variable can be used to check for authenticated clients and included in log entries for more detailed auditing. The format of the block is simple and easy to integrate into automation workflows that generate the api_keys.conf file from an existing credential store.
Here we enable API key authentication by amending the “broad” configuration () to include an directive in the policy section that delegates the authentication decision to a specified location.
With the directive (line 7) we can, for example, have authentication handled by an external authentication server such as OAuth 2.0 token introspection. In this example we instead add the logic for validating API keys to the , in the form of the following block called /_validate_apikey.
The directive on line 30 means that this location cannot be accessed directly by external clients (only by ). Clients are expected to present their API key in the HTTP header. If this header is missing or empty (line 32), we send a response to tell the client that authentication is required. Line 35 handles the case where the API key does not match any of the keys in the block – in which case the parameter on line 2 of sets to an empty string – and we send a response to tell the client that authentication failed. If neither of those conditions match, the API key is valid and the location returns a response.
With this configuration in place, the Warehouse API now implements API key authentication.
JWT Authentication
JSON Web Tokens (JWTs) are increasingly used for API authentication. Native JWT support is exclusive to NGINX Plus, enabling validation of JWTs as described in Authenticating API Clients with JWT and NGINX Plus on our blog. For a sample implementation, see in Part 2.
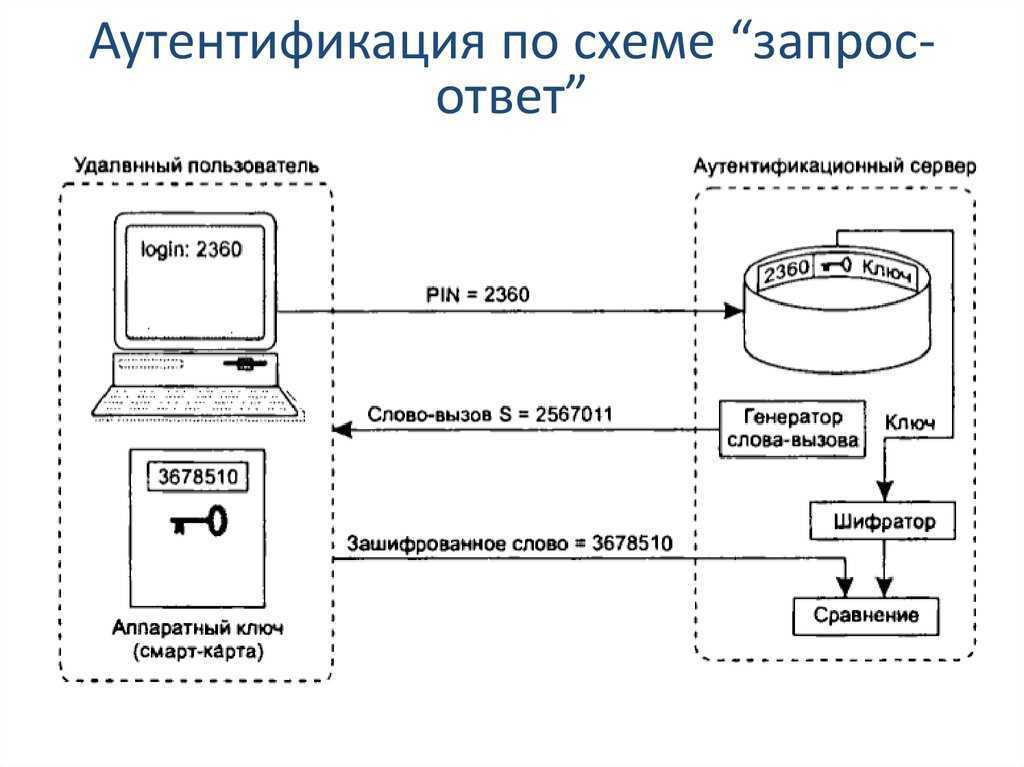
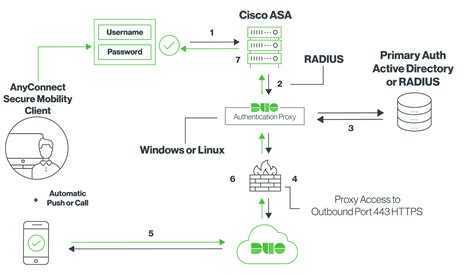
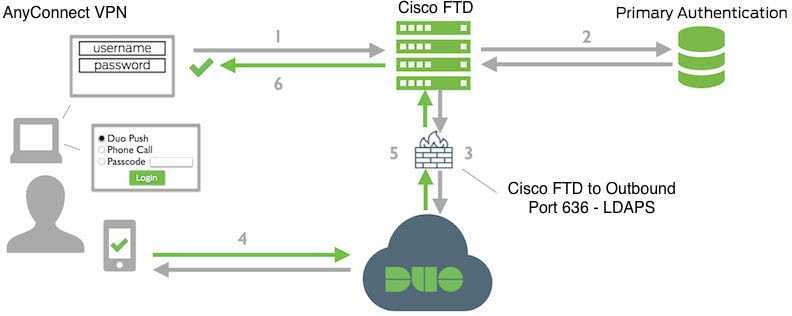
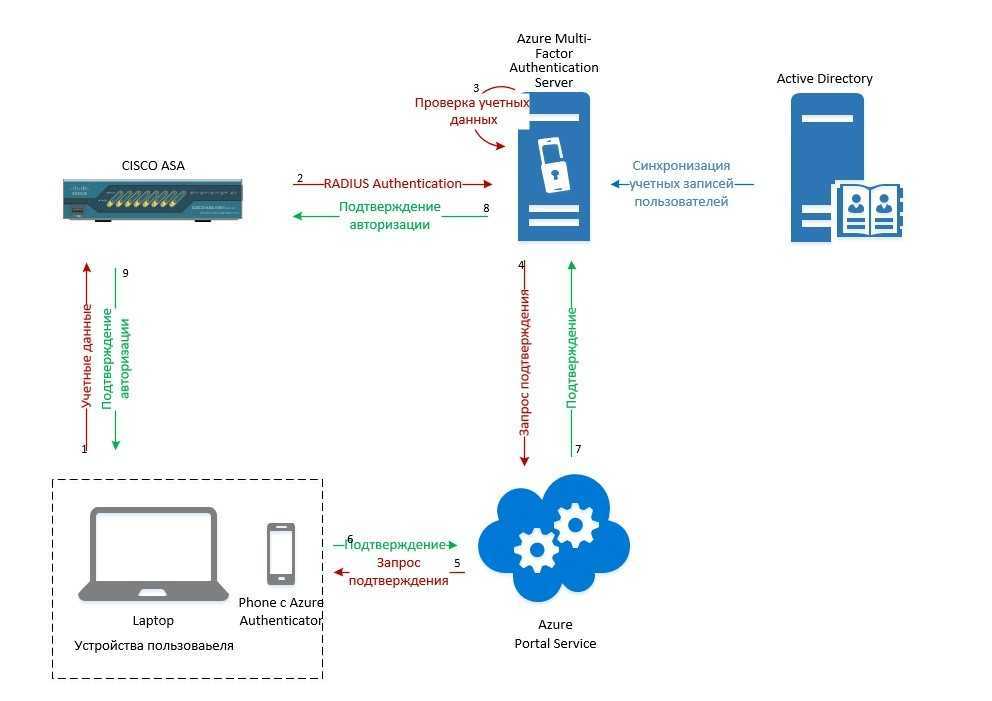
Двухфакторная аутентификация (2FA)
Двухфакторная аутентификация (2FA) улучшает безопасность доступа за счёт использования двух методов (также называемых факторами) проверки личности пользователя. Это разновидность многофакторной аутентификации. Наверное, вам не приходило в голову, но в банкоматах вы проходите двухфакторную аутентификацию: на вашей банковской карте должна быть записана правильная информация, и в дополнение к этому вы вводите PIN. Если кто-то украдёт вашу карту, то без кода он не сможет ею воспользоваться. (Не факт! — Примеч. пер.) То есть в системе двухфакторной аутентификации пользователь получает доступ только после того, как предоставит несколько отдельных частей информации.
Другой знакомый пример — двухфакторная аутентификация Mail.Ru, Google, Facebook и т. д. Если включён этот метод входа, то сначала вам нужно ввести логин и пароль, а затем одноразовый пароль (код проверки), отправляемый по SMS. Если ваш обычный пароль был скомпрометирован, аккаунт останется защищённым, потому что на втором шаге входа злоумышленник не сможет ввести нужный код проверки.

Вместо одноразового пароля в качестве второго фактора могут использоваться отпечатки пальцев или снимок сетчатки.
При двухфакторной аутентификации пользователь должен предоставить два из трёх:
- То, что вы знаете: пароль или PIN.
- То, что у вас есть: физическое устройство (смартфон) или приложение, генерирующее одноразовые пароли.
- Часть вас: биологически уникальное свойство вроде ваших отпечатков пальцев, голоса или снимка сетчатки.
Большинство хакеров охотятся за паролями и PIN-кодами. Гораздо труднее получить доступ к генератору токенов или биологическим свойствам, поэтому сегодня двухфакторка обеспечивает высокую безопасность аккаунтов.
То есть это универсальное решение? Возможно, нет.
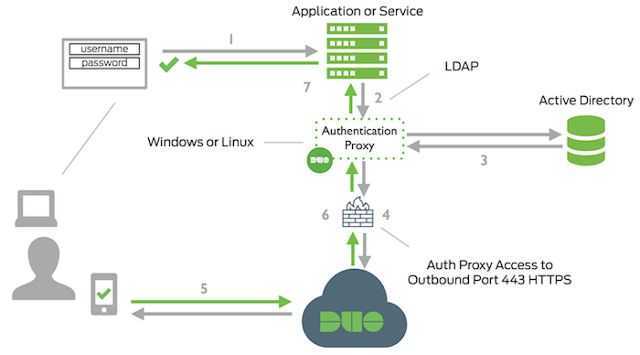
И всё же двухфакторка поможет усилить безопасность аутентификации в вашем приложении. Как реализовать? Возможно, стоит не велосипедить, а воспользоваться существующими решениями вроде Auth0 или Duo.
Prerequisites
- NGINX Plus (R10) for native
- NGINX Plus (R14) for access to
- NGINX Plus (R17) for
- NGINX Plus (R24) for support of encrypted tokens (JWE)
- NGINX Plus (R25) for support of Nested JWT, multiple sources of JSON Web keys, condition-based JWT authentication
- An identity provider (IdP) or service that creates JWT. For manual JWT generation, see “Issuing a JWT to API Clients” section of the Authenticating API Clients with JWT and NGINX Plus blog post.
NGINX Plus supports the following types of JWT:
-
JSON Web Signature (JWS) — JWT content is digitally signed. The following algorithms can be used for signing:
- HS256, HS384, HS512
- RS256, RS384, RS512
- ES256, ES384, ES512
- EdDSA (Ed25519 and Ed448 signatures)
-
JSON Web Encryption (JWE) — the contents of JWT is encrypted. The following content encryption algorithms (the “enc” field of JWE header) are supported:
- A128CBC-HS256, A192CBC-HS384, A256CBC-HS512
- A128GCM, A192GCM, A256GCM
The following key management algorithms (the “alg” field of JWE header) are supported:
- A128KW, A192KW, A256KW
- A128GCMKW, A192GCMKW, A256GCMKW
- dir — direct use of a shared symmetric key as the content encryption key
- RSA-OAEP, RSA-OAEP-256, RSA-OAEP-384, RSA-OAEP-512
-
Nested JWT — support for JWS enclosed into JWE
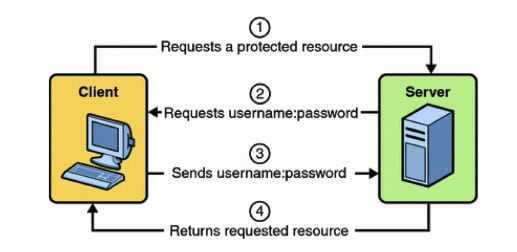
Поиск хостов с Basic и Digest аутентификацией
«Полезной нагрузкой», которая может найти хосты с Basic и Digest аутентификацией, может быть команда вида:
curl -v ХОСТ:ПОРТ 2> >(grep -o -i -E Unauthorized) > /dev/null
Примеры:
curl -v 100.101.7.161:8080 2> >(grep -o -i -E Unauthorized) > /dev/null
curl -v 100.19.18.59 2> >(grep -o -i -E Unauthorized) > /dev/null
Если вы запутались в знаках >, то рекомендую вам разобраться, поскольку здесь используется довольно занимательная конструкция, которая имеет следующий результат:
- стандартный вывод уничтожается (конструкция «> /dev/null»)
- стандартный вывод ошибок stderr перенаправляется для обработки команде grep (конструкция «2> >(grep -o -i -E Unauthorized)»)
Дело в том, что HTTP заголовки команда cURL выводит в stderr, а команда grep не ищет по stderr. Но мы не может сделать просто перенаправление stderr для слияния со стандартным выводом, то есть не можем 2>&1, поскольку текст страницы может содержать слово «Unauthorized» и мы получим ложное срабатывание. Поэтому мы используем указанную выше конструкцию — вывод ошибок обрабатывается, стандартный вывод уничтожается.
Если вы хотите разобраться в этом глубже, то смотрите статью «Операторы перенаправления вывода в Bash: что означает <<, <<<, < <(КОМАНДА), 2>&1 и другие».
Для поиска хостов мы будем использовать конструкцию вида:
if [[ "`timeout 3 curl -v ХОСТ 2> >(grep -o -i -E Unauthorized) > /dev/null`" ]]; then
	echo ХОСТ;
fi
То есть если в заголовках ХОСТА найдена срока «Unauthorized», то выводим адрес этого хоста.
Чтобы сделать эту кастомную полезную нагрузку многопоточной, я буду использовать утилиту Parallel (смотрите «Руководство по использованию GNU Parallel»).
Пример сканирования портов 80 и 8080 диапазона IP адресов 100.101.0.0-100.101.255.255 с выводом данных прямо на экран:
parallel -j250 'if [[ "`timeout 3 curl -v 100.101.{1}.{2}:80 2> >(grep -o -i -E Unauthorized) > /dev/null`" ]]; then echo 100.101.{1}.{2}; fi; if [[ "`timeout 3 curl -v 100.101.{1}.{2}:8080 2> >(grep -o -i -E Unauthorized) > /dev/null`" ]]; then echo 100.101.{1}.{2}:8080; fi' ::: {1..255} ::: {1..255}
Пример сканирования портов 80 и 8080 диапазона IP адресов 100.64.0.0-100.127.255.255 с сохранением данных в файл auth_basic.txt:
parallel -j250 'if [[ "`timeout 3 curl -v 100.{3}.{1}.{2}:80 2> >(grep -o -i -E Unauthorized) > /dev/null`" ]]; then echo 100.{3}.{1}.{2}; fi; if [[ "`timeout 3 curl -v 100.{3}.{1}.{2}:8080 2> >(grep -o -i -E Unauthorized) > /dev/null`" ]]; then echo 100.{3}.{1}.{2}:8080; fi' ::: {1..255} ::: {1..255} ::: {64..127} > auth_basic.txt
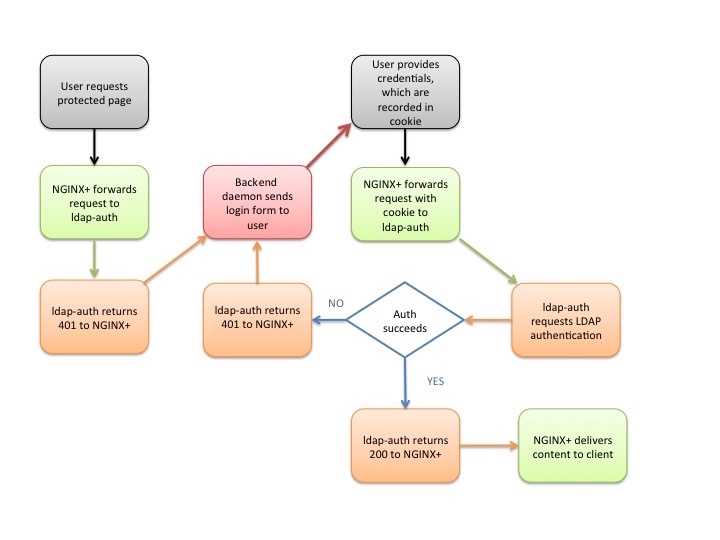
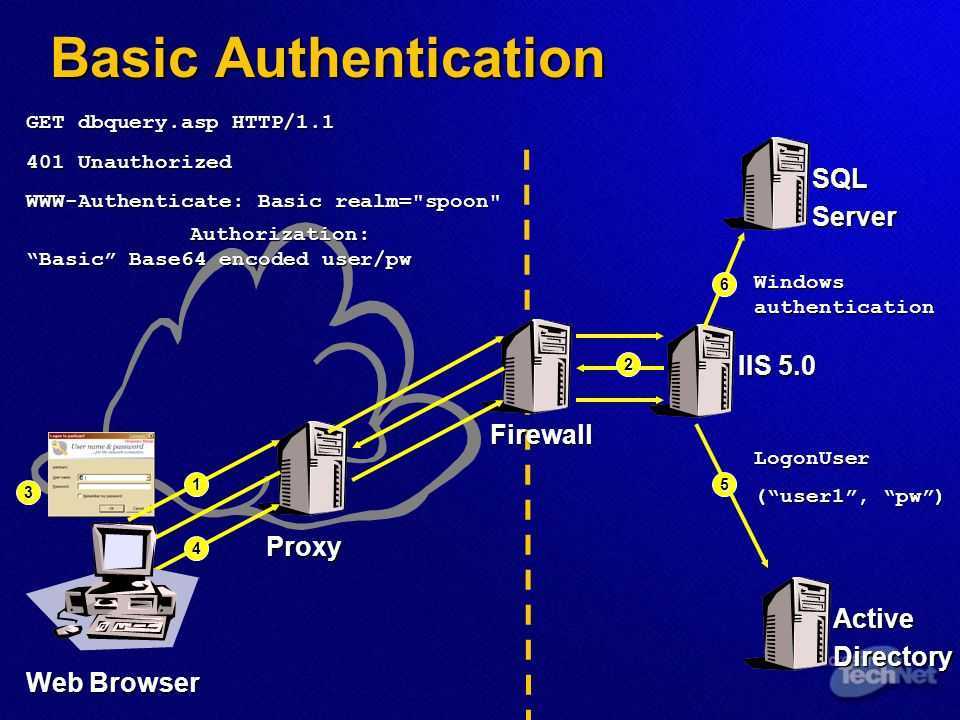
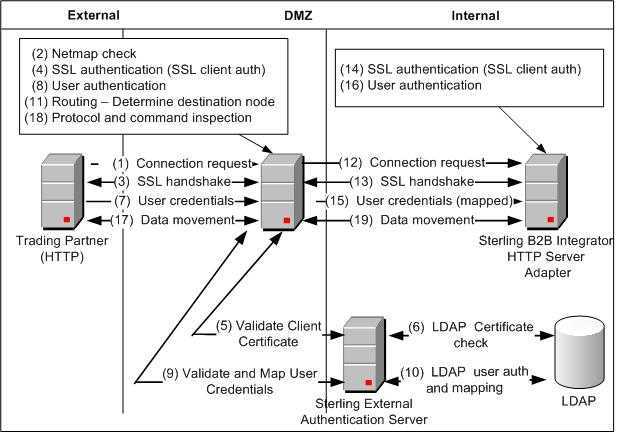
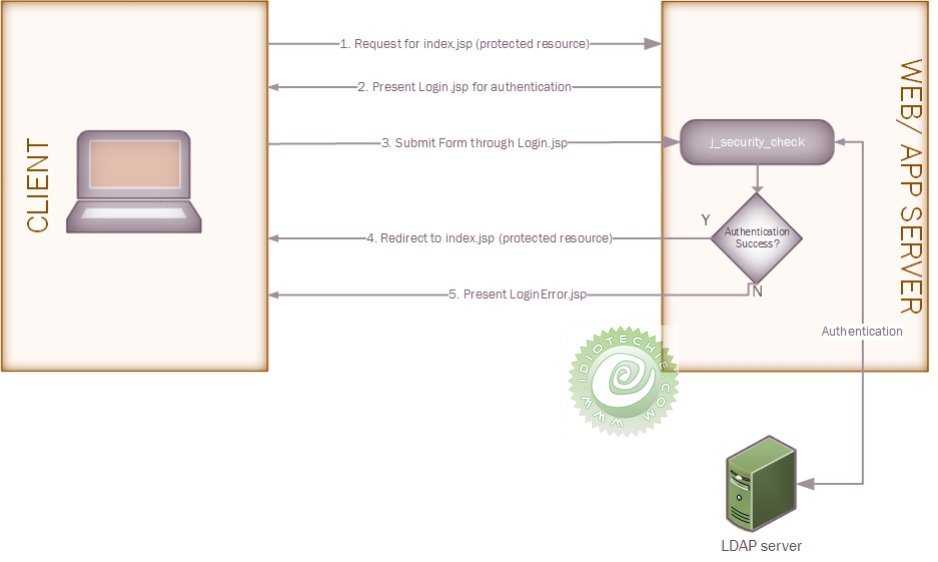
How Authentication Works in the Reference Implementation
To perform authentication, the http_auth_request module makes an HTTP subrequest to the ldap‑auth daemon, which acts as intermediary and interprets the subrequest for the LDAP server – it uses HTTP for communication with NGINX Plus and the appropriate API for communication with the LDAP server.
We assume that if you’re interested in the reference implementation, you already have an application or other resources you want to protect by requiring authentication. To make it easier to test the reference implementation, however, we’re providing a sample backend daemon, also written in Python, which listens on port 9000. It can stand in for an actual HTTP application during testing, by prompting for user credentials and creating a cookie based on them.
Here’s a step‑by‑step description of the authentication process in the reference implementation. The details are determined by settings in the nginx-ldap-auth.conf configuration file; see below. The flowchart below the steps summarizes the process.
-
A client sends an HTTP request for a protected resource hosted on a server for which NGINX Plus is acting as reverse proxy.
-
NGINX Plus (specifically, the http_auth_request module) forwards the request to the ldap‑auth daemon, which responds with HTTP code because no credentials were provided.
-
NGINX Plus forwards the request to http://backend/login, which corresponds to the backend daemon. It writes the original request URI to the header of the forwarded request.
-
The backend daemon sends the client a login form (the form is defined in the Python code for the daemon). As configured by the directive, NGINX sets the HTTP code on the login form to .
-
The user fills in the Username and Password fields on the form and clicks the Login button. Per the code in the form, the client generates an HTTP request directed to /login, which NGINX Plus forwards to the backend daemon.
-
The backend daemon constructs a string of the format , applies Base64 encoding, generates a cookie called nginxauth with its value set to the encoded string, and sends the cookie to the client. It sets the flag to prevent use of JavaScript to read or manipulate the cookie (protecting against the cross‑site scripting vulnerability).
-
The client retransmits its original request (from Step 1), this time including the cookie in the field of the HTTP header. NGINX Plus forwards the request to the ldap‑auth daemon (as in Step 2).
-
The ldap‑auth daemon decodes the cookie, and sends the username and password to the LDAP server in an authentication request.
-
The next action depends on whether the LDAP server successfully authenticates the user:
-
If authentication succeeds, the ldap‑auth daemon sends HTTP code to NGINX Plus. NGINX Plus requests the resource from the backend daemon. In the reference implementation, the backend daemon returns the following text:
The nginx-ldap-auth.conf file includes directives for caching the results of the authentication attempt; to disable caching, see below.
-
If authentication fails, the ldap‑auth daemon sends HTTP code to NGINX Plus. NGINX Plus forwards the request to the backend daemon again (as in Step 3), and the process repeats.
-