
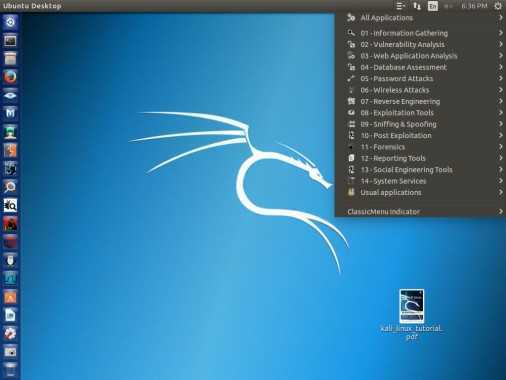
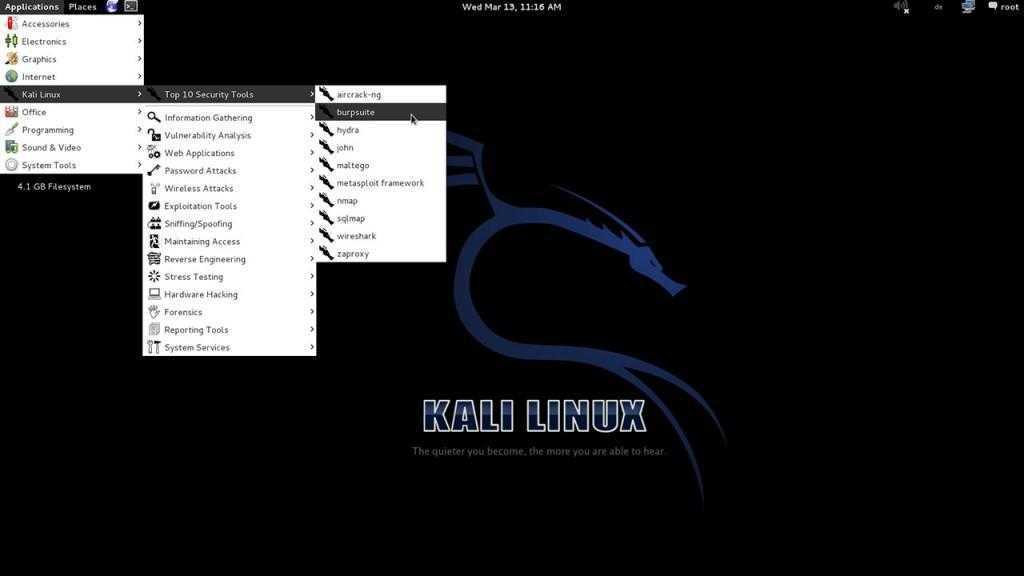
The Step-By-Step Process of Installing Kali Linux on VirtualBox
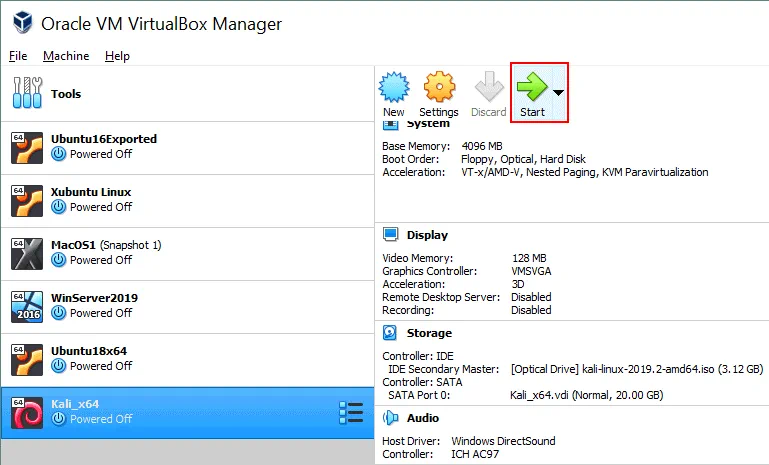
Now you can start your new VM (Kali_x64 in this case) and begin the Kali installation.
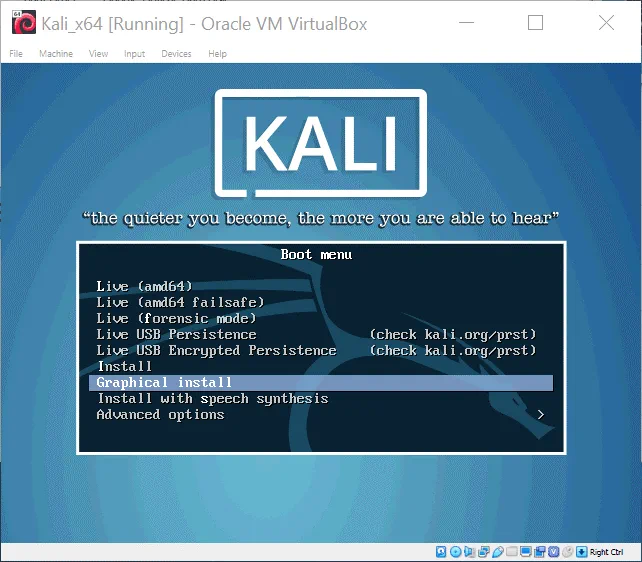
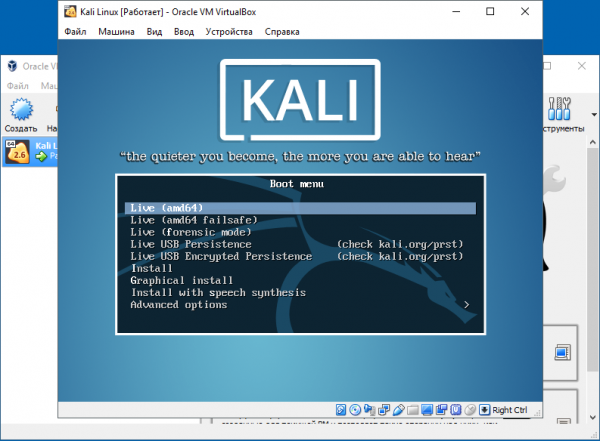
After booting from a virtual DVD, you will see a boot menu where you can select boot options for Kali Linux such as Boot from Live DVD, Install, Graphical Install etc. Let’s select Graphical Install. Press Enter to continue.
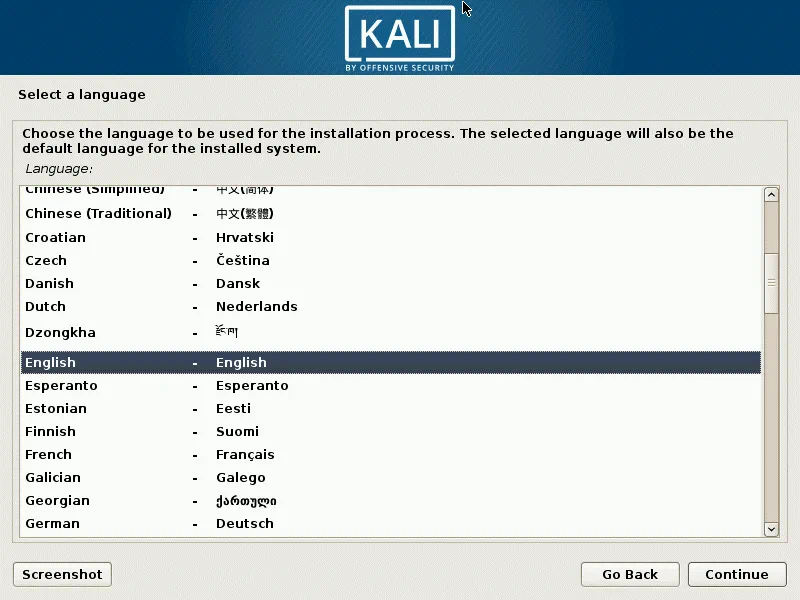
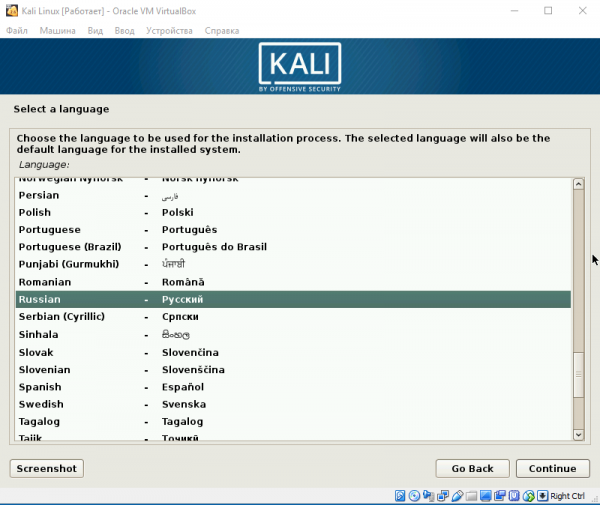
Select a language. Choose the language you wish to use for the installation process and the installed system. English is selected for the current installation. Click the Continue button on each screen to move forward.
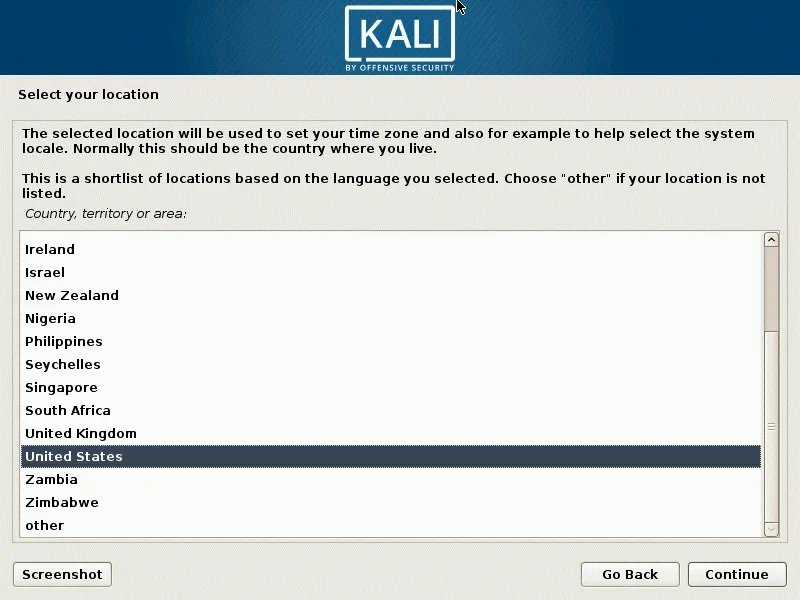
Select your location. This option is used to set your time zone, time format, etc. United States has been selected in the current example.
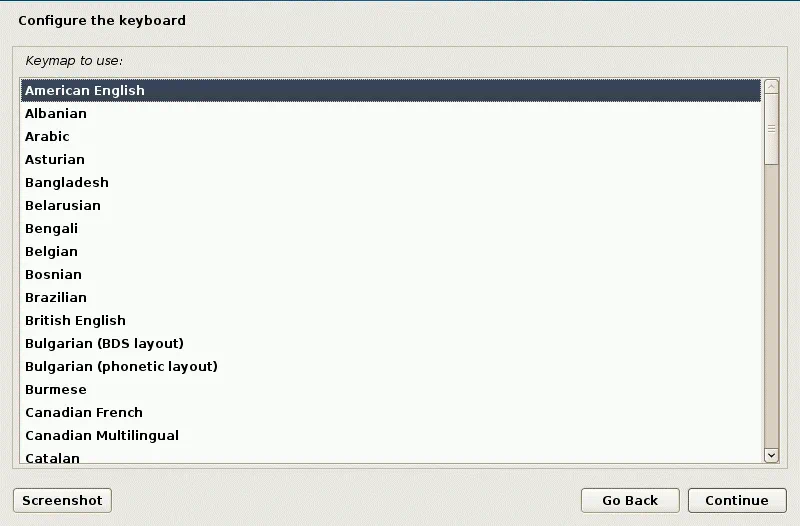
Configure the keyboard. Select your keyboard layout. American English is used for the current installation.
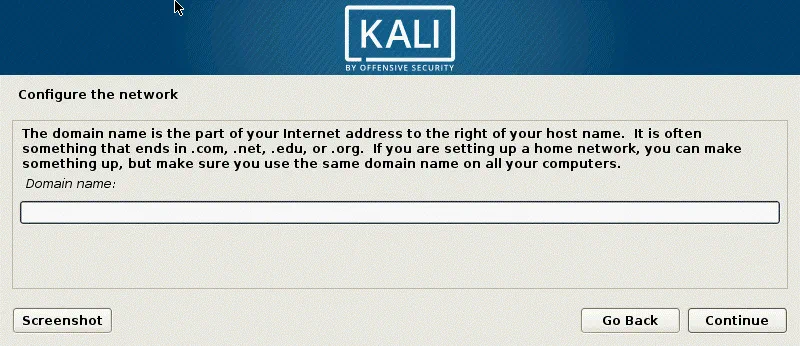
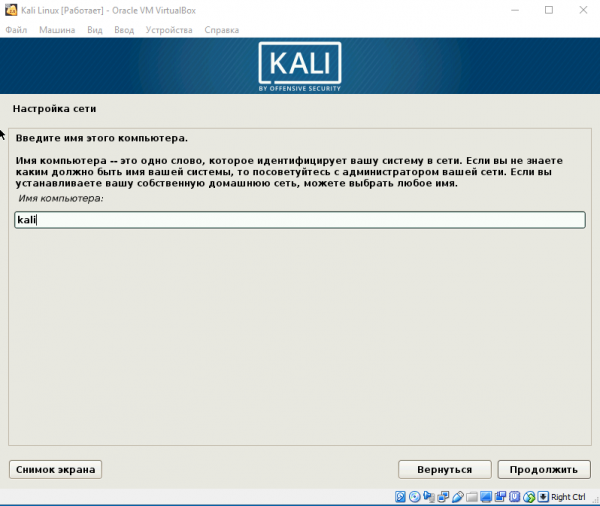
Configure the network. Enter the hostname for your Linux system, for example, kali-virtualbox.

Configure the domain name. If you don’t use a domain in your network, you may leave this field empty.
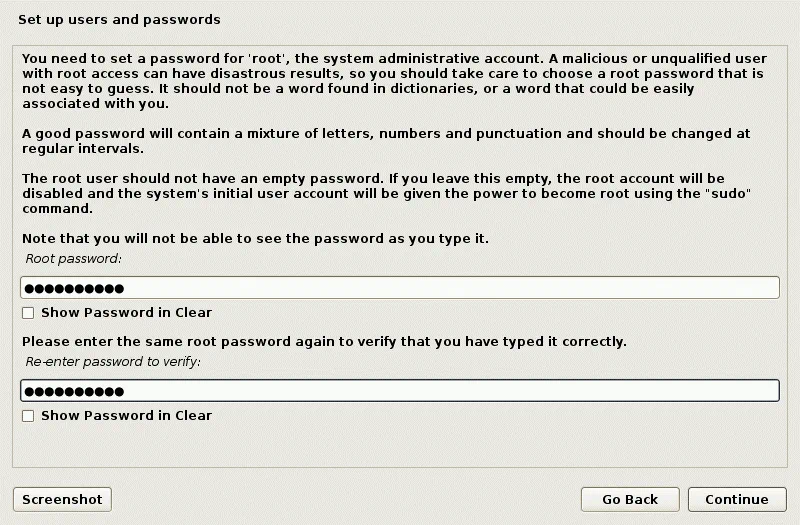
Set up users and passwords. Read the useful tips on this screen and enter the password for root.
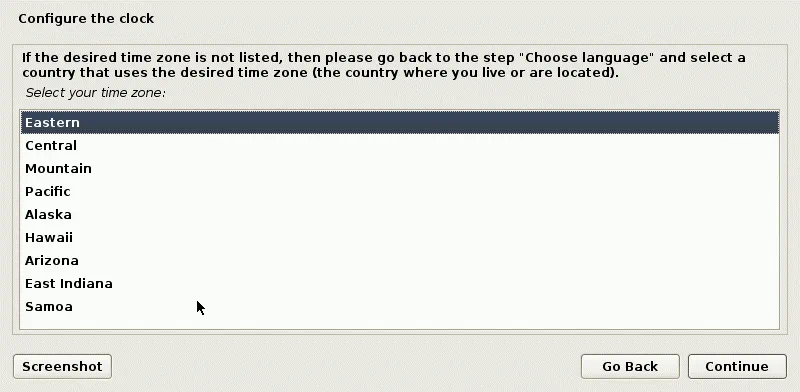
Configure the clock. Now you can select a precise time zone for your country.
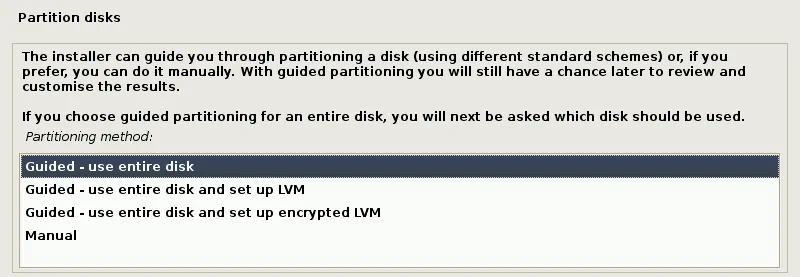
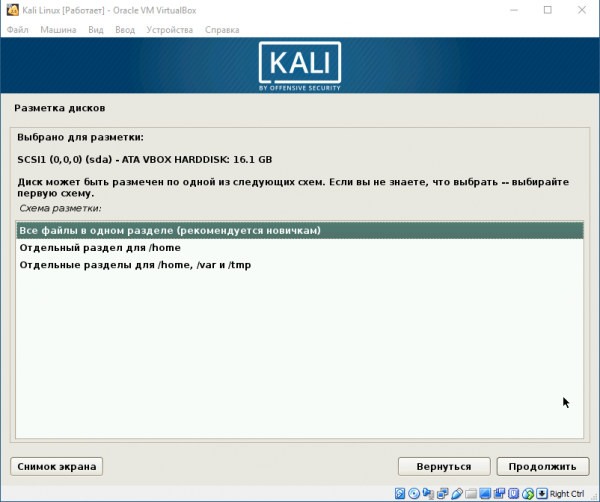
Partition disks. You can use manual and guided partitioning of disks. For the first time, you can select Guided – use entire disk. The entire disk will be used for creating one big partition.
Confirm that you want to erase the disk. There is no reason to worry, as in this case, the empty 20-GB virtual disk is used for partitioning.

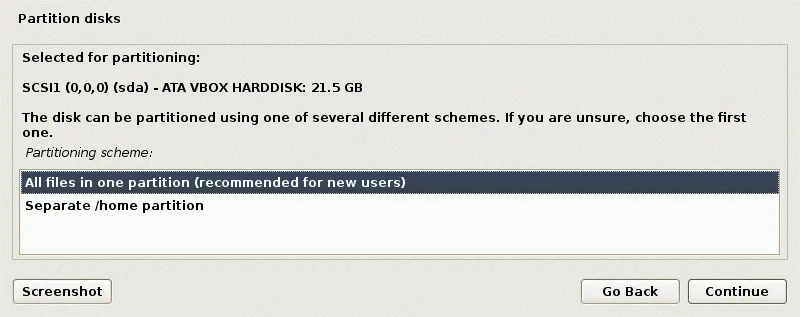
Select a preferred partitioning scheme for your virtual disk. Let’s select All files in one partition.
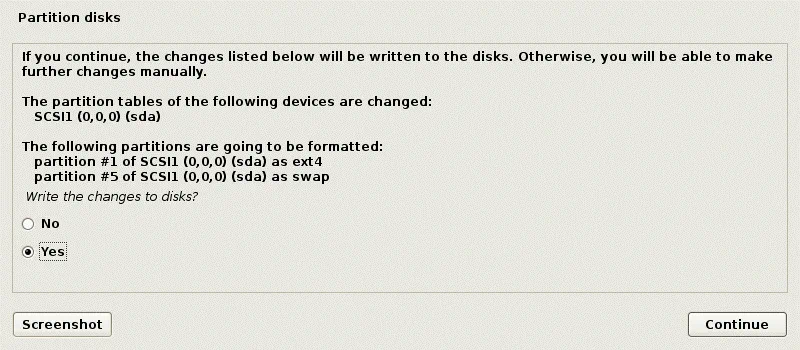
Check the overview and select Finish partitioning and write changes to disk.

Select Yes and confirm that you would like to write changes to the disk.
Wait for the system to be installed. As Kali Linux is being installed, the files are being copied to the virtual disk of the VM.

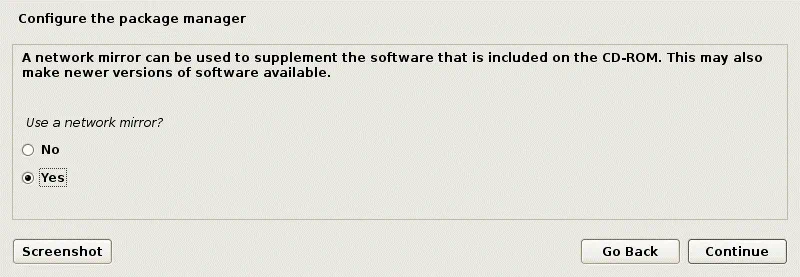
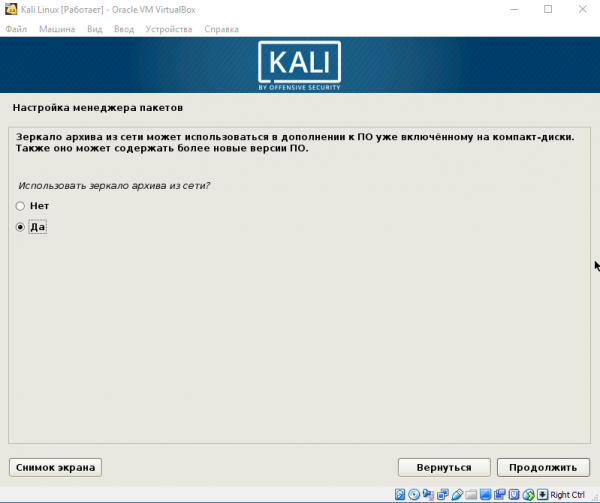
Configure the package manager. Click Yes if you would like to use a network mirror. Selecting this option will allow you to install or update application packages from online software repositories.
Enter the information about your proxy server if you use a proxy server for internet access from your network. There is no proxy server in this example; so this field is left empty.

Install the GRUB boot loader on a hard disk. Since there is no other operating systems and boot loaders on a virtual disk, it is necessary to install GRUB in this case. Select Yes to install GRUB.
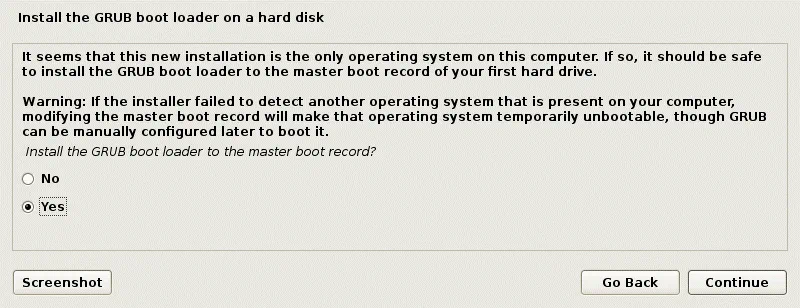
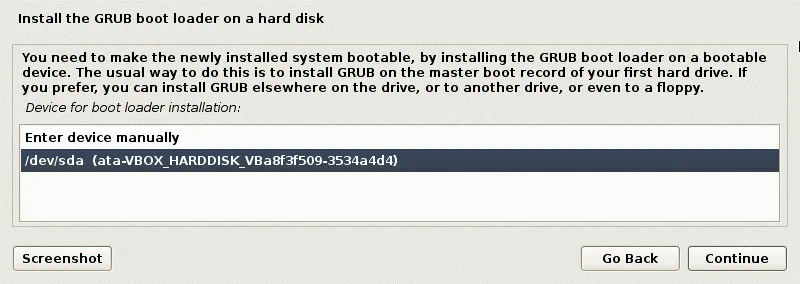
Select a disk to which GRUB must be installed. In this case, /dev/sda is the necessary disk and is the only disk connected to a VM.
Finish the installation. When the installation of Kali Linux on VirtualBox is complete, you will see a notification message. Now you can reboot the virtual machine to boot the Kali Linux installed on the VirtualBox VM.

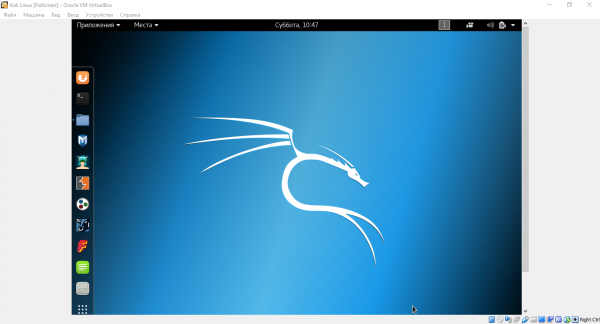
After the reboot, you will see a login screen of Kali Linux. Enter root as a user name, then enter the password set during installing Kali Linux on VirtualBox to sign in.

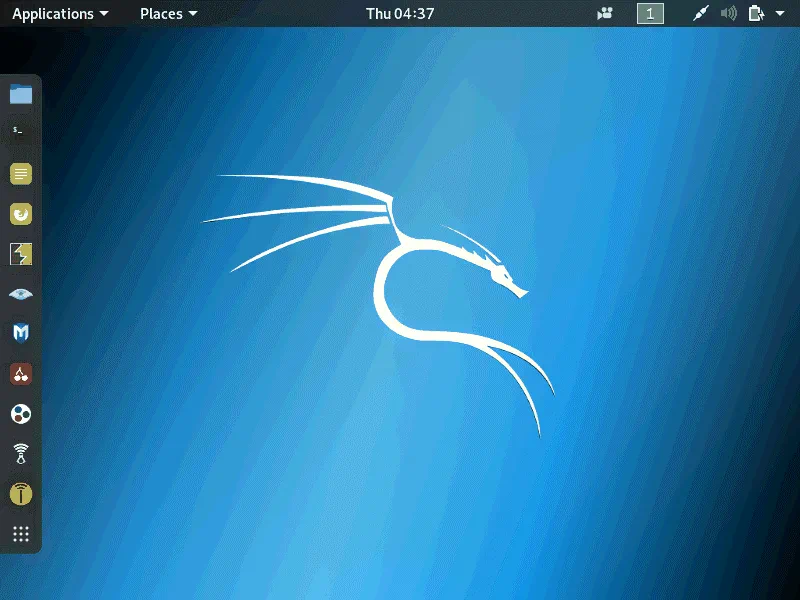
Now you should see the Gnome desktop of Kali Linux installed on your VirtualBox virtual machine.
How to Create a New Virtual Machine?
We have explained in details to create a new virtual machine on VirtualBox. In today’s article, I will do it once again that you should understand it easily. First, you must download the following requirements.
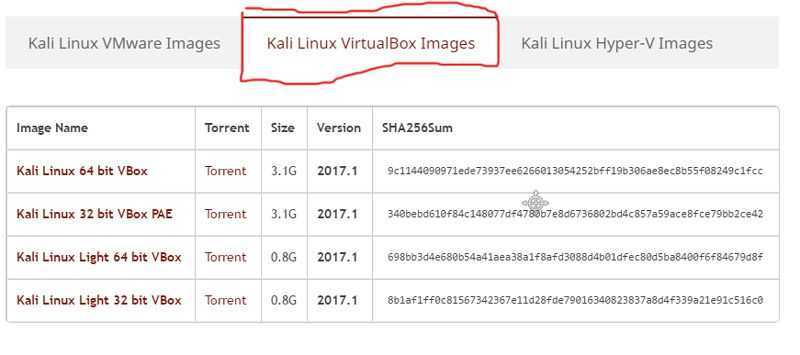
- Download Kali Linux
- Download VirtualBox
Step #1. Once the downloading is completed, install the VirtualBox on your Windows PC. The installation is straightforward and simple. Double-click on the setup then hit continue until it gets finished. Now, open up the VirtualBox then click on the “New” at the upper left-hand side of the window.
A new window will pop up, choose a proper name for Kali Linux. Next, you have to select the type of operating system. When you type the Kali Linux, it’ll automatically set up all the necessary options. If it does not set up, so you have to do it manually. Click “Next” button.
Create a New Virtual Machine
Step #2. Choose at least 2 GB of memory size then hit the “Next” button.
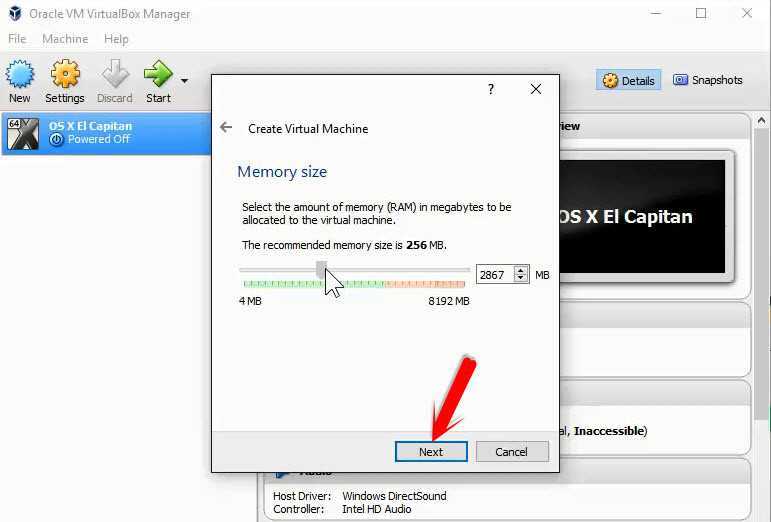
Choose Memory Size
Step #3. Create a new virtual hard disk. Select the second option “Create a new virtual hard disk now“. Hit the “Create” button.
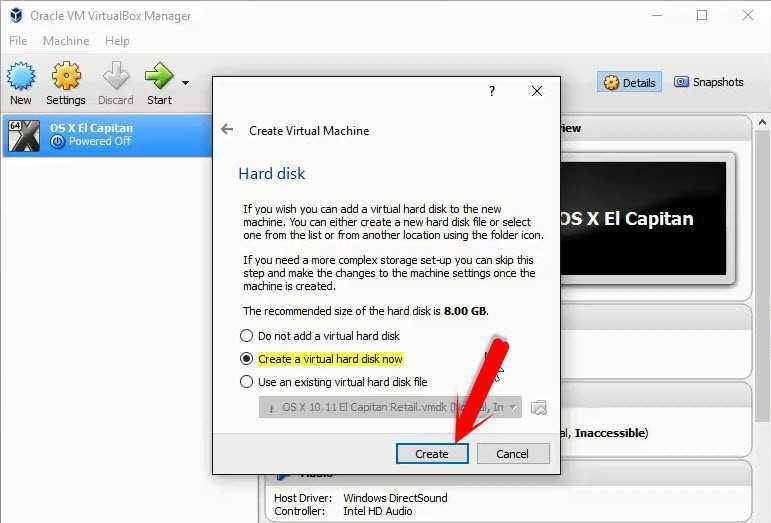
Create a New Virtual Hard Disk Now
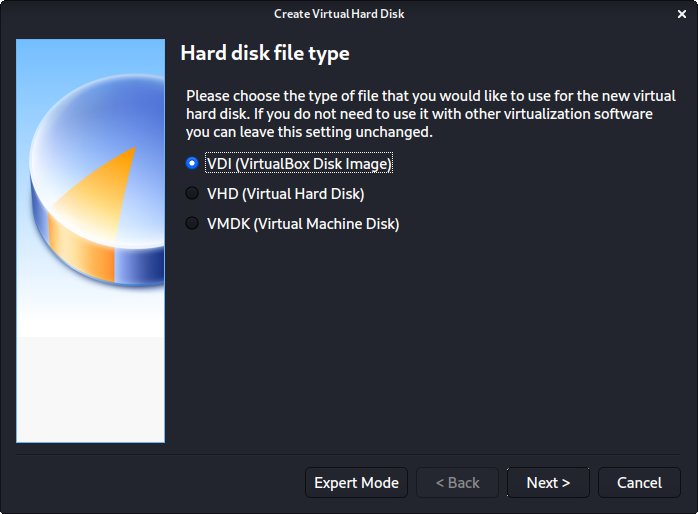
Step #4. A new window will be shown to you and choose the first option “VirtualBox Disk Image” then tap on the “Next” button.

Har Disk File Type
Step #5. Here, you have two options “Dynamic and Fixed Size“. A dynamic allocated hard disk file will only use space on your physical hard disk as it fills up it’ll take space from the main hard drive. If you choose the “Fixed Size“, it’ll cut some space from the physical hard drive when the size is filled. You can’t get space from the physical hard disk. I recommend you to choose the dynamic hard disk.
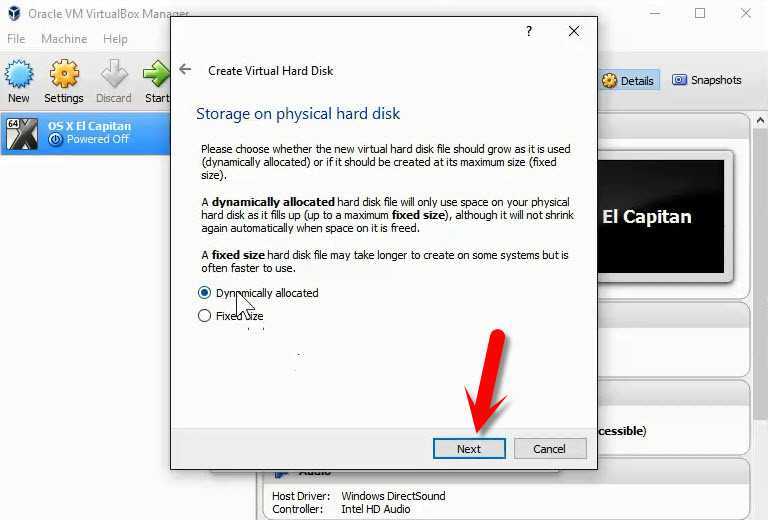
Storage on Physical Har Disk
Step #6. In this step, choose the amount of space for the hard disk. If you’ve selected fixed size hard drive so at least 15 GB, you should select the size of the hard disk.
File Location and Size
Step #7. Now, you’ve successfully created a new virtual machine, but it’s not finished yet. Click on the VirtualBox “Settings“. Navigate to the “Display tab” then increase the “Video Memory“.
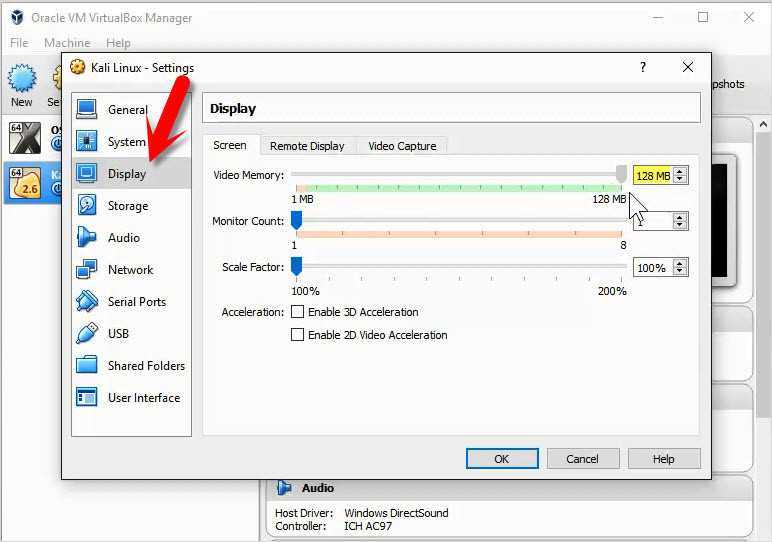
Setting Video Memory
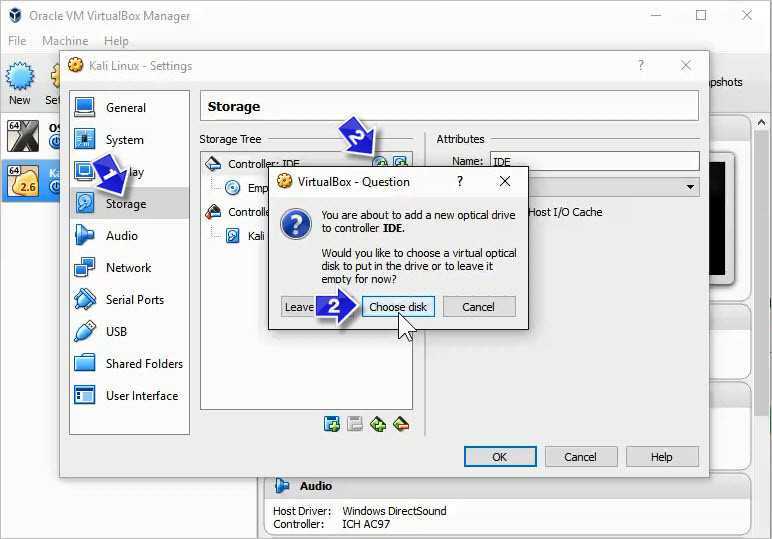
Step #8. Click on the “Storage tab” then tap on DVD icon. A small window will pop, choose “Choose Disk“. Now, Choose the Kali Linux ISO file that you’ve downloaded from its site.
Choose an Operating System
It’s done now. Click the “OK” button to end up the creating a new virtual machine process.
Step 13 – Set User account and password
In this dialog box you will be asked create an account other than the root user. Please note that this is the user other than the root user. Please type your name and click continue
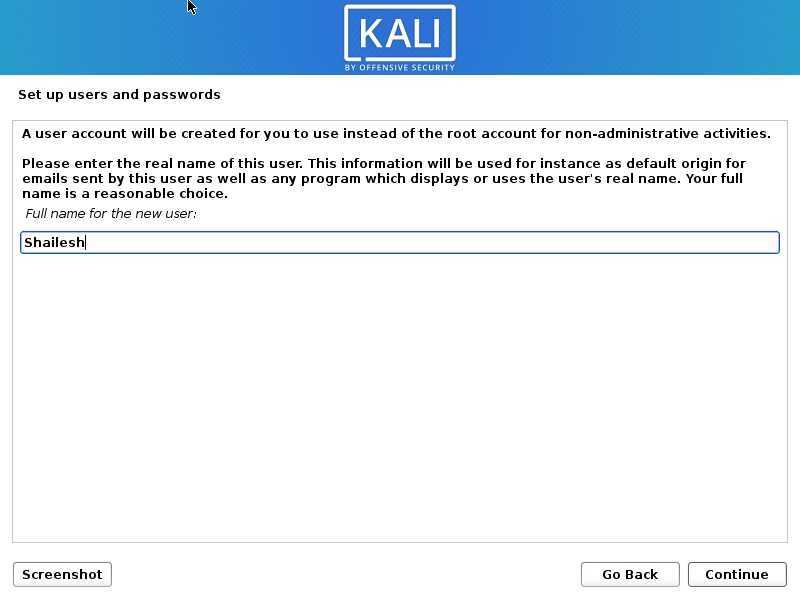
Install Kali Linux 2021 – Set up Users account Screenshot
Now you will be asked to provide the user name again. I use the same name as the account name in the previous screen.

Install Kali Linux 2021 – Set up Users name Screenshot
You will be asked to setup a password of the user you created. Enter the password. We will login with this username and password once the installation completes.

Kali Linux Installation – set user password
Conclusion
I have shown you how to install Kali Linux in VMware Workstation 12. You can also install kali in VMware workstation 15. The steps will be almost the same. You can also install Kali Linux on your mobile device if you don’t have a computer.
You can also install Kali Linux on your main system. But If you don’t have enough storage and RAM or you are using it for the first time then I recommend you to install Kali Linux on Vmware tool because it is quite difficult to operate.
So, you will not be able to do things easily as you do in windows. You will not found some software in Kali Linux as you have in windows. In some of the cases you will find an alternative but not in all cases. Kali Linux is a very powerful Operating system, mainly people use it for learning Kali Linux tools. These tools can help you with testing and ethical hacking.
I would suggest you install Kali on Vmware tools and Use the window as your main operating system.
VMware
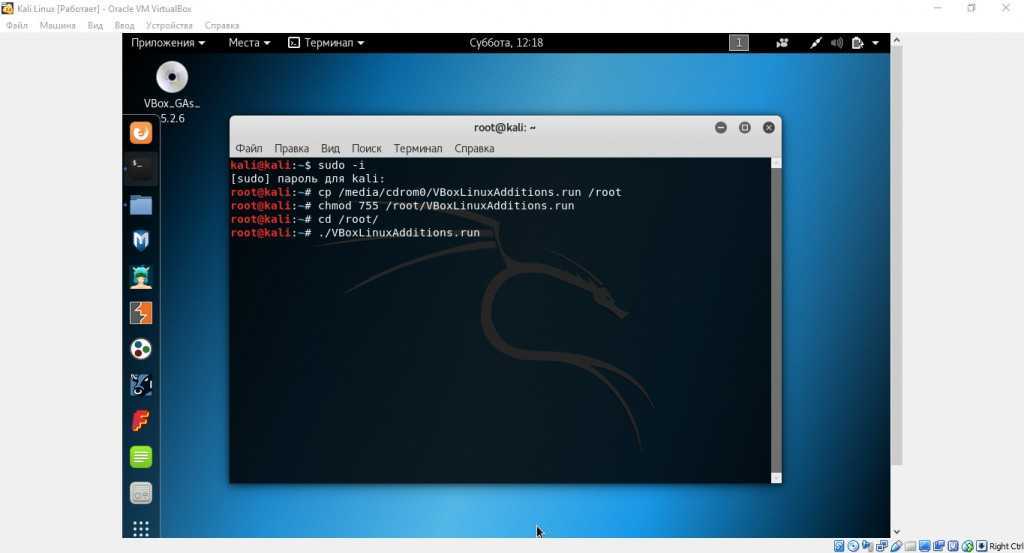
Добавить права администратора пользователю в Debian GNOME
Открываем System Settings -> Administration -> Users (Параметры -> Пользователи), выбираем нашего пользователя и даём права администратора, изменив параметр «Account Type» («Тип учётной записи») на «Administrator» («Администратор»). В GNOME предварительно нужно нажать «Разблокировать» и ввести пароль администратора. Чтобы изменения вступили в силу необходимо перезапустить сеанс, для этого выходим из система, а затем вновь в неё входим.
Устанавка дополнительных пакетов и ядра
- build-essential — информационный список пакетов необходимых для сборки пакетов Debian
- dkms — инфраструктура для поддержки динамически загружаемых модулей ядра, позволяющая обновлять модули ядра без изменения всего ядра. Также позволяет легко пересобирать модули при обновлении ядра.
- linux-headers-$(uname -r) — заголовочный файл ядра, где uname -r — команда для получения версии ядра
Горячая комбинация клавиш для запуска терминала
Параметры -> Клавиатура -> Комбинации клавиш -> Дополнительные комбинации, нажимаем “+” (Добавить). Далее указываем название комбинации, оно может быть любое, и указываем команду /usr/bin/gnome-terminal ( gnome-terminal ), которая будет выполняться при нажатии заданной комбинации. Нажимаем Добавить. После чего нажимаем на появившуюся запись с нашей комбинацией и нажимаем клавиши на клавиатуре, которые будут вызывать её. Удобно установить Ctrl + Alt + t.
Утилиту терминала можно найти, например, с помощью поиска, если заранее не знать, что команда gnome-terminal :
Как установить Kali Linux 2019 на VMware Workstation 15
Технологические достижения по-прежнему дают нам отличные новости и особенно функциональные и практические инструменты, позволяющие выполнять нашу работу намного безопаснее и полнее.
Одной из этих технологий является виртуализация, которая действительно идеально подходит для избежания сбоев безопасности и операционных ошибок, поскольку эта технология дает нам возможность создавать сотни или тысячи виртуальных сред, в которых мы можем тестировать новые операционные системы, новые приложения, конфигурировать среды. сеть, проверка совместимости и многое другое, но без ущерба для реальной жизни или физического оборудования в любое время.
В дополнение к этому мы можем добавить, что еще одним преимуществом использования виртуализации является экономия денег, поскольку достаточно использовать ресурсы нашего физического оборудования (мы рекомендуем иметь хороший процессор, хорошую оперативную память и дисковое пространство) и, таким образом, избегать покупки больше предметов оборудования.
Требования к физическому оборудованию
Одним из преимуществ использования VMware Workstation Player является его несколько физических требований к оборудованию:
1, 3 ГГц процессор или выше
2 ГБ ОЗУ, но рекомендуется 4 ГБ
Дисковое пространство не менее 30 ГБ
Операционные системы хоста поддерживаются
В поддерживаемых операционных системах хоста мы находим:
Ubuntu 15.04 и выше
Red Hat Enterprise Linux 6 и выше
CentOS 7.0 и выше
Oracle Linux 7.0 и выше
openSUSE Leap 42.2 и выше
SUSE Linux 13 и выше
Гостевые операционные системы
Теперь гостевые операционные системы, которые мы можем протестировать и установить:
Windows 10
Windows 8.X
Windows 7
Windows XP
Ubuntu
Красная шапка
SUSE
Oracle Linux
Debian
мягкая фетровая шляпа
OpenSUSE
мятный
CentOS
У нас уже есть платформа виртуализации, и пришло время определить, какую систему мы должны тестировать, для этого случая Solvetic выбрала одну из наиболее идеальных для сред безопасности, таких как Kali Linux.
Что такое Kali Linux?
Kali Linux развивался как дистрибутив, основанный на старом, известном как Debian, но с той разницей, что Kali ориентирован исключительно на расширенные тесты на проникновение и аудит безопасности. Это делает его более чем необходимым решением в тех местах, где вы хотите проверить уязвимости своих сайтов и, таким образом, принять соответствующие меры безопасности.


Инструменты, с которыми поставляется Kali, дадут нам возможность выполнять различные тесты на проникновение, выполнять анализ исследований безопасности или выполнять задачи криминалистических вычислений или обратного инжиниринга, как все профессионалы в этой области.
Особенности Kali Linux
Некоторые особенности использования Kali Linux:
Это абсолютно бесплатно
Он имеет более 600 инструментов для проведения испытаний на проникновение
Это открытый источник, поддерживаемый Git
Совместим с различными беспроводными устройствами
FHS совместимый
Он был разработан в безопасной среде
Ваше ядро можно настроить
Все пакеты и репозитории подписаны GPG, что гарантирует их целостность.
Мультиязычная поддержка
Совместим с ARMEL и ARMHF
Без лишних слов мы узнаем, как установить Kali Linux на VMware Workstation 15.
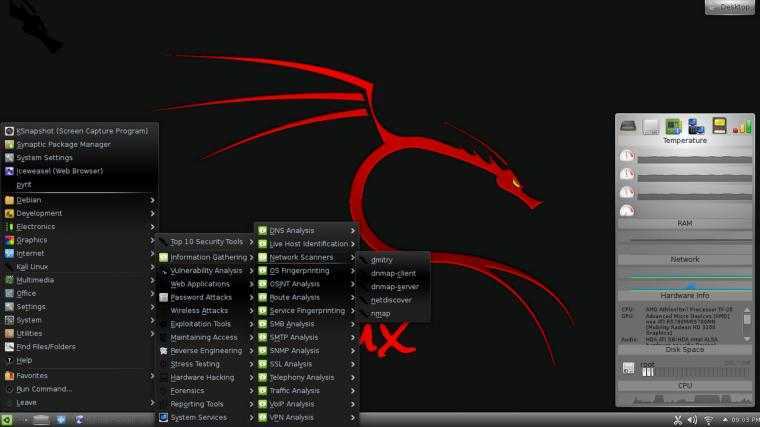
Как установить Kali Linux на виртуальной машине
На этой неделе студенческая вечеринка, чтобы установить Kali Linux на виртуальную машину на виртуальной машине в день (PS. Ранняя весна Xi’an довольно древний рендеринг, я думаю, что я выложу, я буду играть, о ~~ ~), Повернул много учебных пособий и блогов или злоупотреблять много ям … Давайте возьмем свои собственные руки к процессу установки с моим личным опытом (PS. Я не смею претендовать на учебник), надеюсь помочь всем (PS. Spring Tour Plan для этого пузырькового супа), давайте начнем, мяу Меоу мяу ……
Первым шагом, конечно, является изображение Kali Linux на официальном сайте.
(Мой компьютер 64, поэтому я решил загрузить первый. Если машина 32, рекомендуется скачать второй!)
Второй шаг — создать новую виртуальную машину.Во-первых, откройте домашнюю страницу виртуальной машины, нажмите «Создать новую виртуальную машину»
После появления новой виртуальной машины Wizard Pops нажмите «Установить операционную систему позже»
После нажатия «Далее» он будет отображаться, как показано на рисунке.
(Операционная система выбрана для Linux, как для версии, конечно, вы сказали что-то делать … .ps. Разные версии имеют разные пробелы после распределения пространства)
Что касается следующего именования, с личными привычками, советы по дружбе, лучше не иметь китайцев!
Нажмите Далее, пока не появится … ..
Если есть достаточно места, поместите точки памяти больше, например, два ….
После безумия «Далее» следуйте по умолчанию, пока «укажите диалоговое окно« Укажите емкость диска », обратите внимание, что передняя высокая энергия: должна быть больше, чем предлагаемая емкость диска! Обязательно быть больше, чем рекомендуемая емкость диска! ! Обязательно быть больше, чем рекомендуемая емкость диска! Важная вещь три раза ..
Нажмите «Далее», чтобы сделать вашу виртуальную машину сохранить, пока интерфейс не показан на рисунке, ваша задача создана виртуальная машина, очень хорошая.
Третий шаг — установить вашу основную машину Kali Linux, хахаха.
Во-первых, интерфейс, как показано показано.
Выберите стрелку, как показано на рисунке.
Нажмите «ОК», чтобы выбрать «Графическую установку».
Вот чтобы выбрать свой региональный язык и системный язык, системный язык для выбора «китайского упрощенного». Появится интерфейс следующим образом.
Имя хоста и доменное имя по умолчанию.
Установите ваши пользователи и пароли (пароль кратко легко заметить, в конце концов, находится на виртуальной машине)
После завершения настроек часов следующий шаг — настройка раздела диска.
Напишите изменение на диск.
Далее это процесс долгожданного ожидания, чтобы установить систему … (PS. Чистите круг друзей, подождите … ..)


Выберите сетевое изображение без использования его.
Установите Grub Начать загрузочную руководство по основной загрузке
Предполагается, что вы также раздражаете, но, к счастью, весь процесс установки закончился, La La La …….
Install VirtualBox on Windows 10
Virtualbox is used to create a virtual machine inside the core operating system.
When you install Virtualbox a virtualization layer has been created you can install multiple operating systems on this virtualization layer.
In this term you can use multiple operating systems on the same time on single computer without having any problem.
Step 2: Install Oracle VM VirtualBox on Windows 10
I think you are not a spoon-feeding person, So I am not going to explain each and every step for installing it
You can install it by double click on the downloaded executable file, and follow the steps prompted due to the installation process.
Complete Guide for “How to Install VirtualBox on Windows 10“
STEP TWO
Установка Kali Linux на VirtualBox
Шаг 1. Выбор загрузочного образа
В открывшемся окне предлагается выбор загрузочного диска. Выбираем скачанный ранее образ системы.
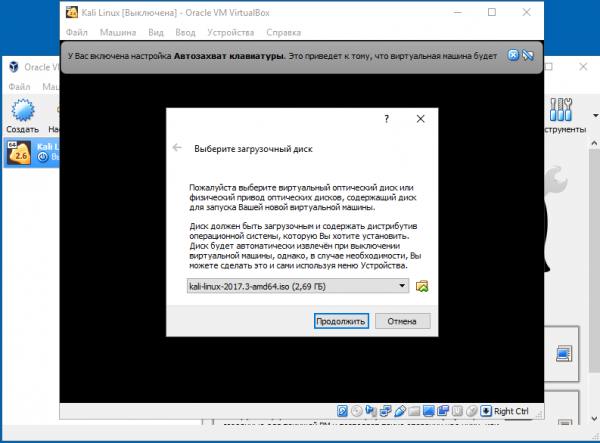
После выбора образа жмем «Продолжить».
Шаг 2. Выбор типа установки системы
Видим, что происходит загрузка системы, после чего открывается меню установки Kali Linux. Здесь необходимо выбрать «Graphics Install». Примечание: при выборе «LiveCD» все данные, сохраненные на системе, удалятся после ее выключения.
Теперь необходимо выбрать язык, который будет сопровождать на вас на протяжении всей установки.
Вводим имя компьютера.
Отталкиваясь от необходимости либо настраиваем домен-сети, либо пропускаем данный шаг.

Шаг 7. Пароль учетной записи
Настраиваем пароль учетной записи. Примечание: следует запомнить, что при вводе пароля в @root консоли, символы отображаться не будут.

Выбираем время, после чего происходит загрузка.
Шаг 8. Разметка дисков
Теперь предстоит выполнить разметку дисков. Так как установка Kali Linux происходит на VirtualBox, то мы используем весь диск.

Разметка диска определяет местонахождение файлов в системе. Так как Linux отличается своей файловой системой от других систем, то на выбор предложено три вариант, содержащие /home /var и /tmp. Теперь подробнее о них:
- /home – здесь находятся все домашние каталоги пользователей;
- /var – здесь система хранит log, cech-файлы, почту и иногда web;
- /tmp – раздел под временные файлы.
Данная функция создана для опытных пользователей, если у вас нет необходимости сортировать файлы, то помещайте все на один раздел.
Далее отображается контекстное меню со списком поделенных томов. В данный момент у нас есть основной раздел и ext4 – журналируемая файловая система.
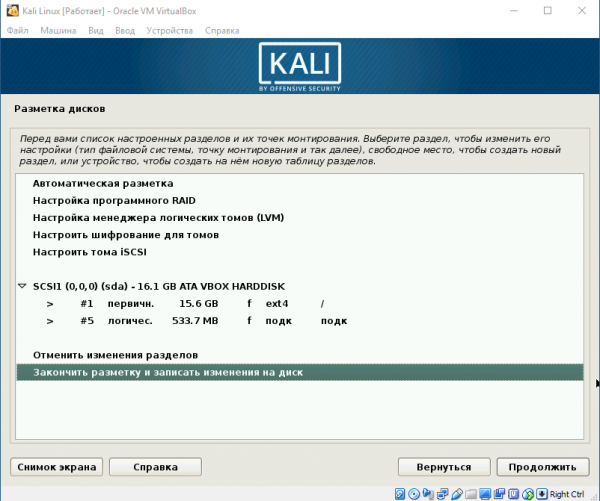
Подтверждаем все изменения и нажимаем «Продолжить».
Шаг 9. Выбор зеркал
Теперь предстоит выбрать зеркало для установки дополнительного ПО. Данная функция доступна только в том случае, если при установке у вас есть активное Интернет-соединение. Если оно отсутствует, то вы всегда можете установить дополнительной ПО в самой системе.
Шаг 10. Установка GRUB
Далее идет установка системного загрузчика GRUB. Оставляем «Да» и продолжаем установку.

Шаг 11. Завершение установки
После того, как вы установите GRUB, система попросит изъять установочные носители и перезагрузить ее. Изымать ничего не надо, нажимаем «Продолжить».
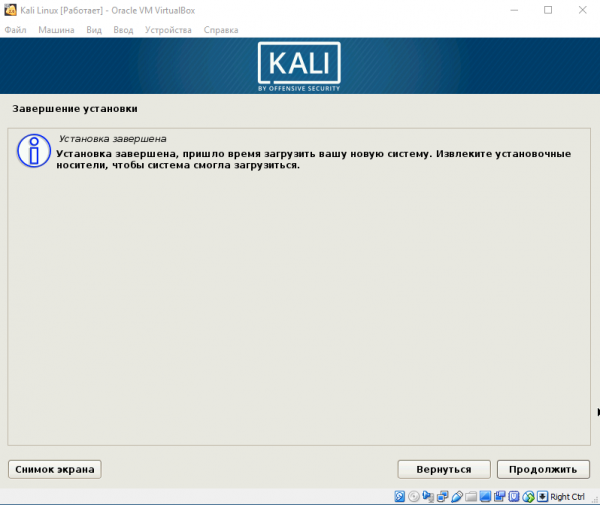
Вы завершили установку системы. Она готова к использованию, теперь осталось вписать имя пользователя и пароль, которые вы ввели при установке.
VMware Benefits:
Before using VMware workstation for installing Kali Linux, you must know the benefits of using VMware.
- If you have less hardware ( i.e RAM, local memory, processor) on your computer and want to operate multiple operating systems simultaneously then go ahead, VMware is for you.
- Virtual machines are completely isolated from the host machine and other virtual machines. If a virtual machine crashes, all others are unaffected.
- You can access more than one operating system at a time.
- Add or remove resources easily.
- It saves costs by running multiple OS on a single machine.
- You can install/reinstall/backup/move your guest OS easily.
- User-friendly.
- Easy to manage things.
- Recovery of the Operating system is also possible ( Using VMDK data recovery tool ).
Also Read
One-Click install Kali Linux on Virtual Box
Offensive Security has generated and uploaded the latest and updated several Kali Linux VMware and VirtualBox images on its official page. They are not providing any type of technical support for contributed kali Linux images.
Step 1: Download Kali Linux VirtualBox Image
You are using VirtualBox for virtualization so download VirtualBox image from the given link below.
Note: Don’t Download Kali Linux VMware images if you are not using VMware.
I am happy to share with you “one-click install Kali Linux on Virtualbox”. Kali Linux’s new version 2017.1 has been released with new features. If you have an older version installed, you can update in a newer version How to update and upgrade Kali Linux to 2019.1 if you are not using before, you can install it on a virtual box and start exploring it.


![How to install kali linux on virtualbox 2021.2 [updated]](https://smartshop124.ru/wp-content/uploads/e/8/6/e86c29962fdb5e5a8eb2d6ca3a3ce020.jpeg)

Perquisites:
- Installed Virtualbox
Now we are one click away to install Kali Linux on Virtualbox, after downloading the VirtualBox image double click on Kali Linux 2019.1 -x-x.ova file. Virtualbox will be open with a new window called appliance settings.
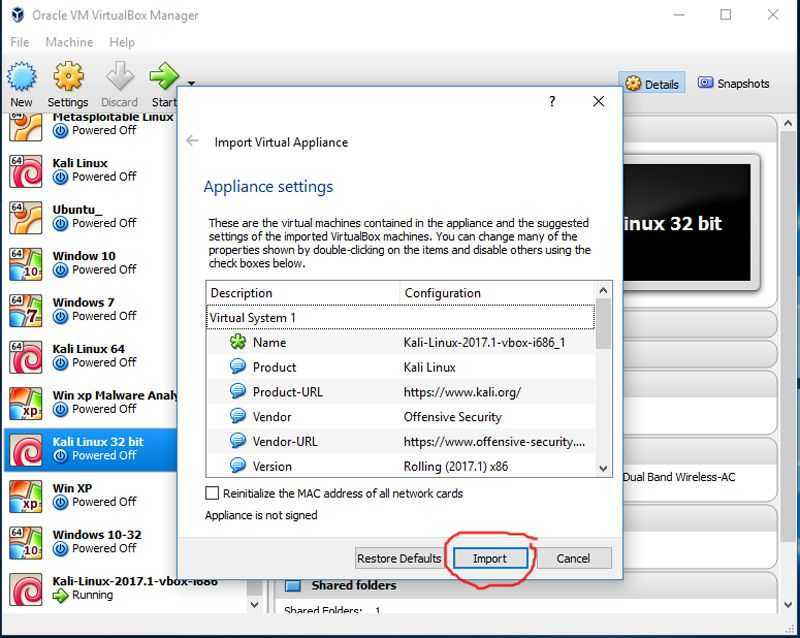
Click on Import, and virtual machine settings will be imported. don’t go for coffee it will not take a long time.
So Kali Linux is ready to use on VirtualBox.
But on the other hand, if you have downloaded ISO image then move to the next step and install it.
Creating a New VM
Once you have downloaded the installation image, you can create a new VM. Open VirtualBox and create a new VM (Machine > New or Ctrl+N) on which Kali Linux will be installed.
Set the following VM parameters:
Name: Kali_x64
Machine Folder: C:\Virtual\VirtualBox (This path is used only for demo purpose. Try not to use a system partition to store VMs).
Type: Linux
Version: Debian (64-bit)
Memory size: 4096 MB. The VM memory size must be large enough to run a guest OS, though you should leave enough unallocated memory to run your host OS. In the current example, a host machine with 16 GB of RAM is used, which provides enough memory left for a host OS.
Hard disk: Create a virtual hard disk now.
Hit Create to continue and configure a new virtual hard disk.

Set the virtual disk file location, for example C:\Virtual\VirtualBox\Kali_x6Kali_x64.vdi
It is recommended that you store virtual disk files in the VM folder (such folder is selected by default).
Set the virtual disk file size. It should be at least 20 GB.
Hard disk file type: VDI. A native VirtualBox format is selected.
Storage on physical disk: Dynamically allocated (the analog of thin provisioning in VMware).
Click Create to finish creating a new VM.
After creating a new VM, some additional settings must be configured. Select your recently created virtual machine and open the VM settings.
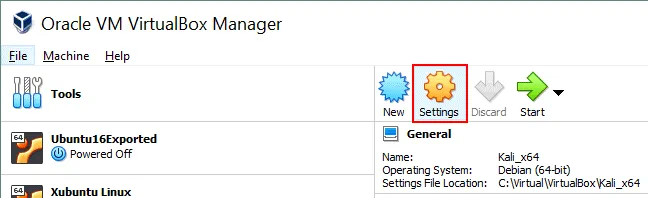
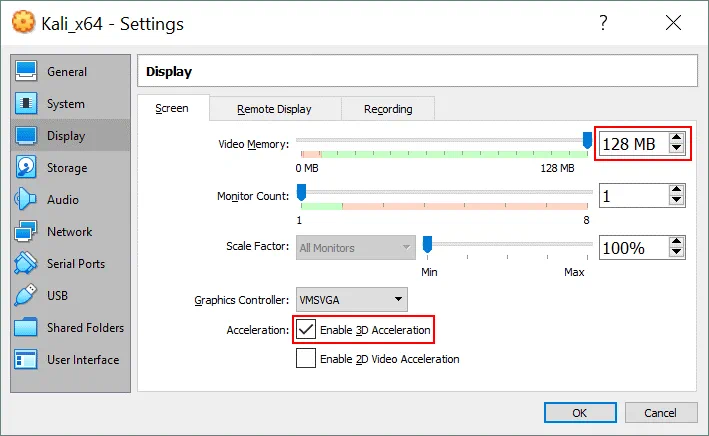
Display options
Go to Display > Screen and set Video Memory to 128 MB. It will prevent installer hanging.
Next, tick the checkbox Enable 3D acceleration (optional). It will be useful for applications that need 3D acceleration.
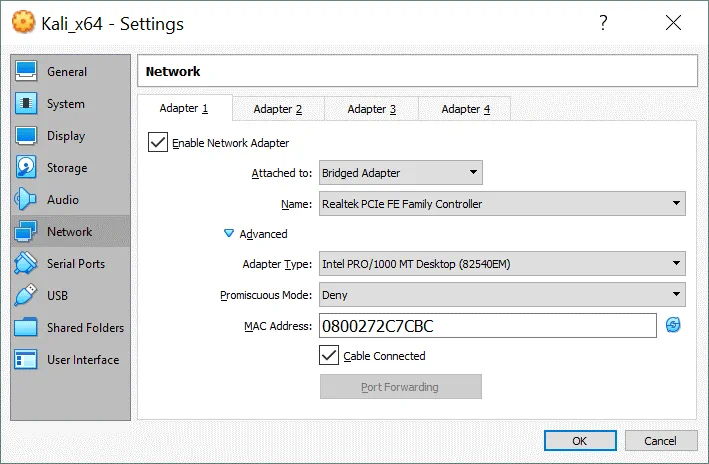
Network options
Next, go to the network settings and select the networking mode of the virtual network adapter of the VM. Let’s select the Bridged mode to use the VM network adapter much as you would for a physical network adapter of the host machine. In this case, the VM network adapter is connected to the same physical network as the host machine. You can set additional options such as network adapter name, type, MAC address etc.
Boot options
You have to insert your virtual ISO DVD image to a virtual DVD drive of the VM and then boot a virtual machine from that ISO disk. In the VM settings, go to Storage, select an IDE controller of your virtual optical drive (it is empty by default). Click the empty status, then click the disc icon near IDE Secondary Master and in the opened menu, select Choose Virtual Optical Disk File. Browse the Kali Linux installation ISO image that you have downloaded from the official site before (kali-linux-2019.2-amd64.iso). Hit OK to save settings.
Kali inside VirtualBox (Guest VM)
This guide is about virtualizing Kali Linux inside of VirtualBox, allowing you to have a Kali VM. This is a great way to use Kali, as it is completely separate from the host, allows you to interact with other VMs (as well as the host machine and other machines on the network), and allows you to revert to snapshots.
You may wish to follow our other guide if you are trying to install VirtualBox on Kali Linux (as a host).
The guide below is what we use to generate our . You may alter this to your needs. We always generate the images using the latest version of VirtualBox.
You may need to enable virtualization in your BIOS/UEFI for (e.g. Intel VT-x/AMD-V)
Wizard
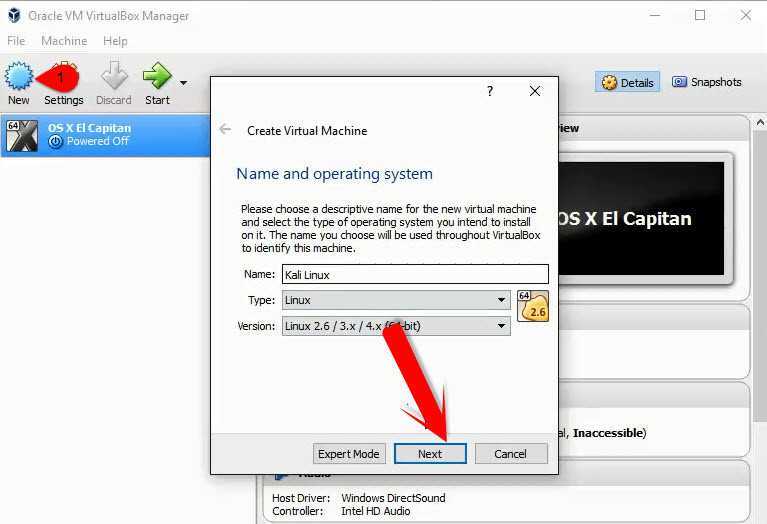
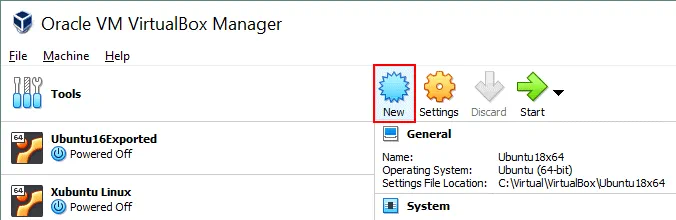
Upon starting up VirtualBox, select “New” (Machine -> New).
The next screen is “Name and operating system” which is where you name the VM. This name is also used in any filenames (such as the configuration, hard disk and snapshot — which isn’t changed from this point).
We are keeping it generic in this guide (as Kali is a rolling distribution, and we update it), however for our releases, we use the version number in the name as it is a fixed release (. Example: ).
For the “Type”, we set it as . For the “Version”, we are going to be using the x64 desktop image, so we are going to select .

“Memory size” is the next section, where we can define how much RAM to use. Again, the higher the amount of RAM, the more applications can be open and at increased performance. Various tools inside of Kali can be demanding of resources. When we make the general VMs, we select (2GB) for RAM, but we often increase this for our personal machines as we have high-performing devices with spare RAM which Kali can utilize.

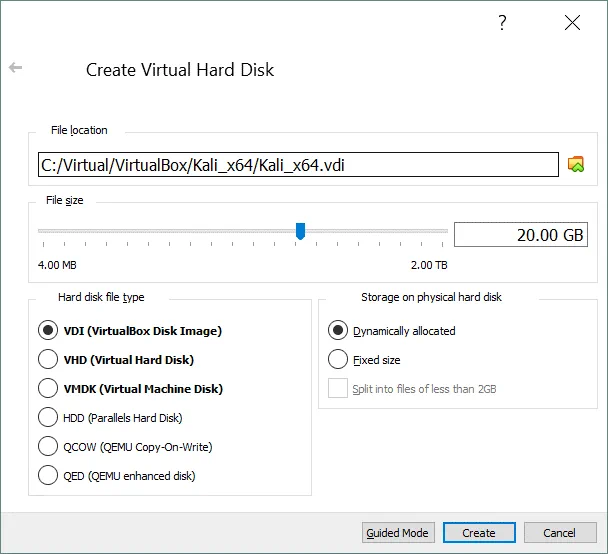
This screen below, “Hard disk”, allows us to .

For the “Hard disk file type”, we select (and its the default option).
For the following screen, “Storage on physical hard disk”, we go with the default option of .

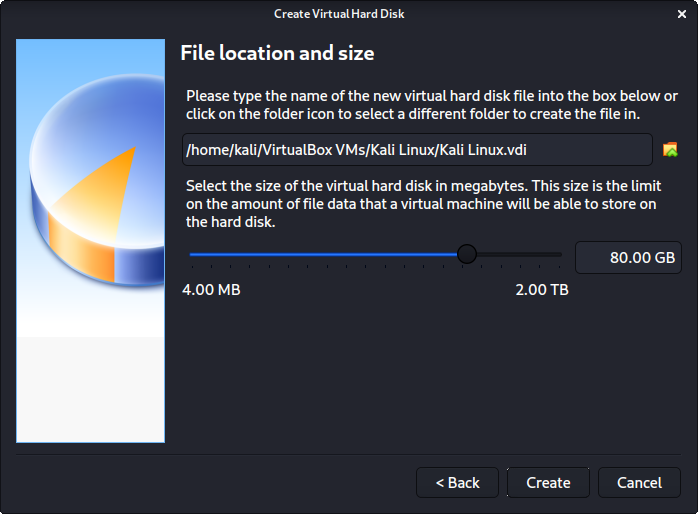
Now with “File location and size”, we can now define how large the virtual hard disk will be. We use for our VMs.


After clicking on “Create”, the wizard is complete.
Now we click on “Settings”, to customize the VM further.
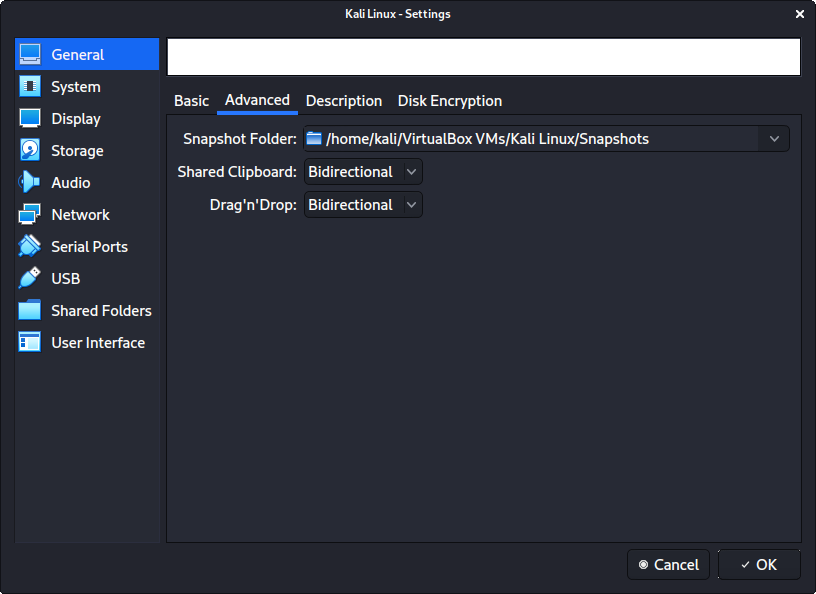
In “General” -> “Advanced”, we make sure to set “Shared Clipboard” to , as well as “Drag’n’Drop” to
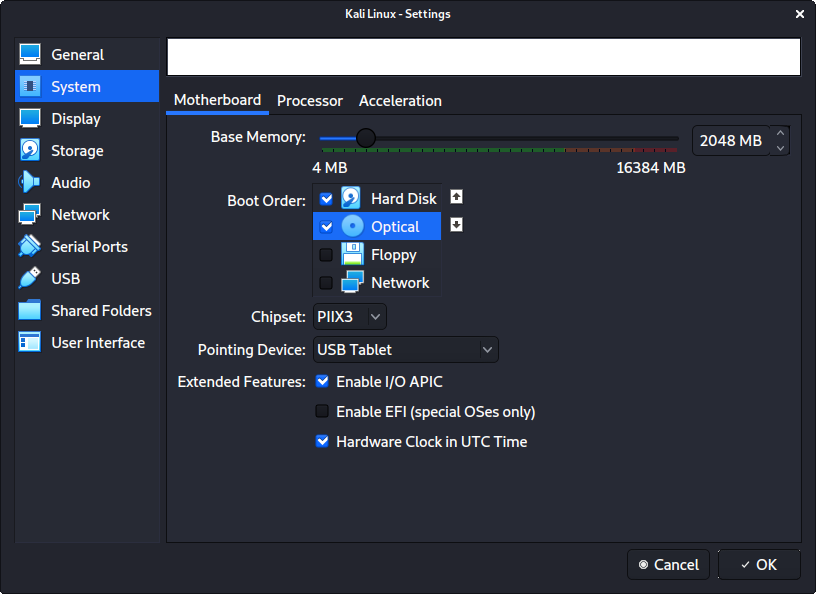
In “System” -> “Motherboard”, we change the “Boot Order” to make sure is top and is the second. Everything else is disabled.
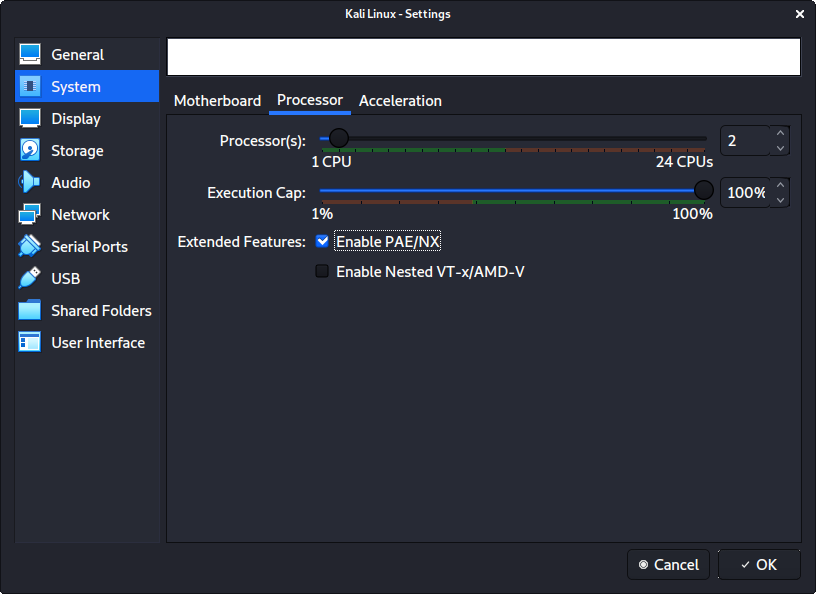
In “System” -> “Processor”, we increase the “Processor(s)” to be .
At the same time, we also enable “Extended Features” for .
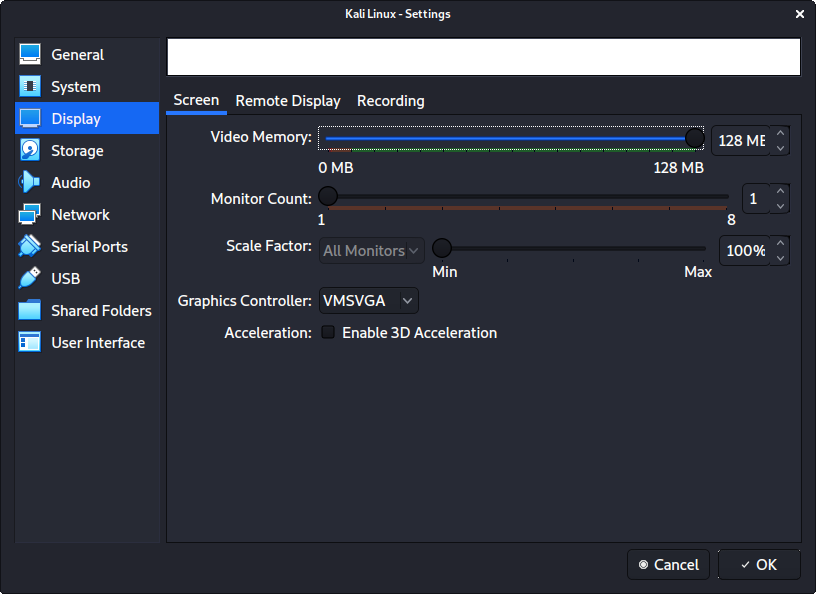
In “Display” -> “Screen”, we make sure to have “Video Memory” set to
Another item to point out is to make sure that “Accelerated 3D graphics” is disabled, as people have reported that causes issues.
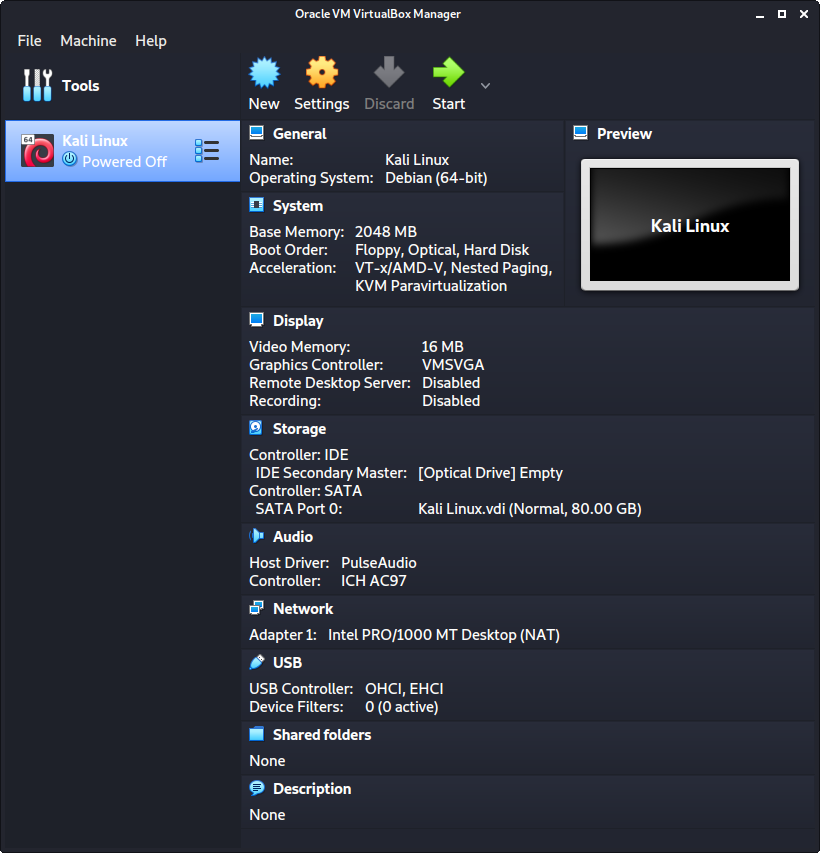
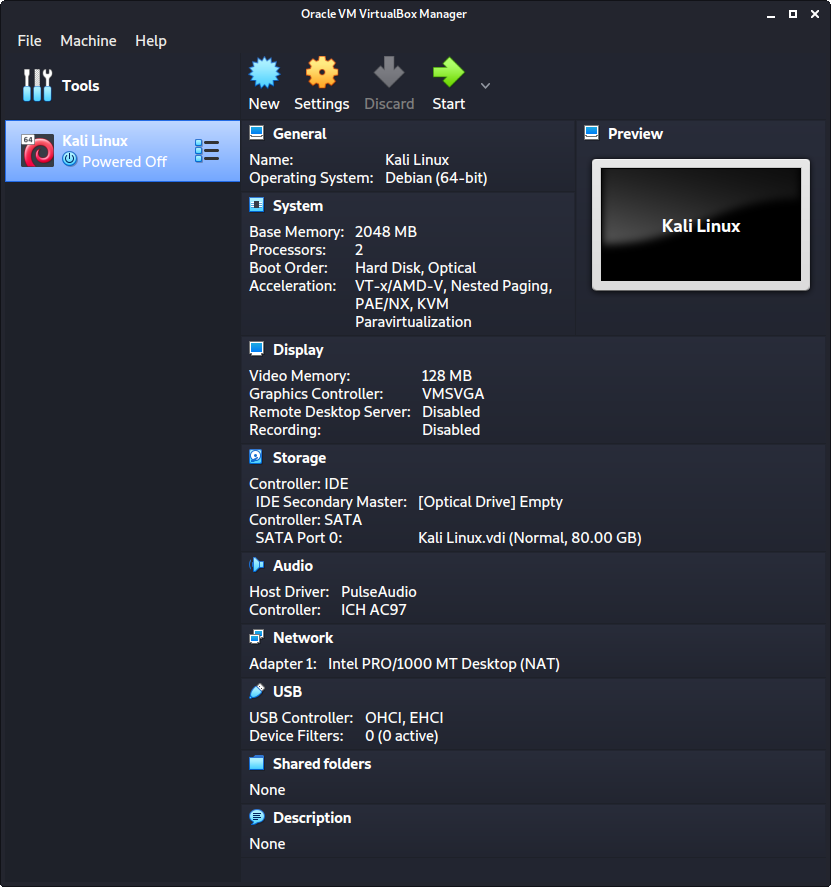
The final settings view looks like the following:
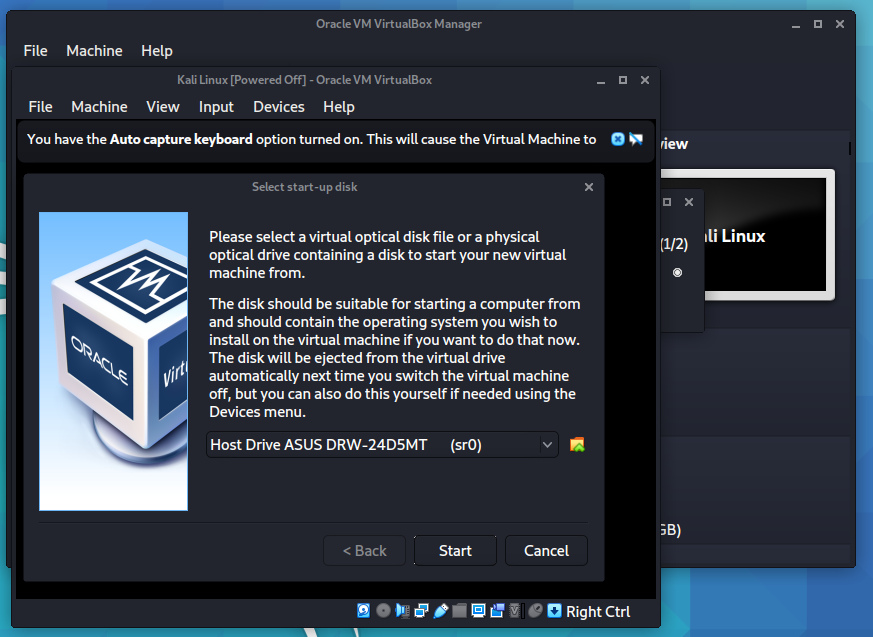
When we are ready to go, press “Start”.
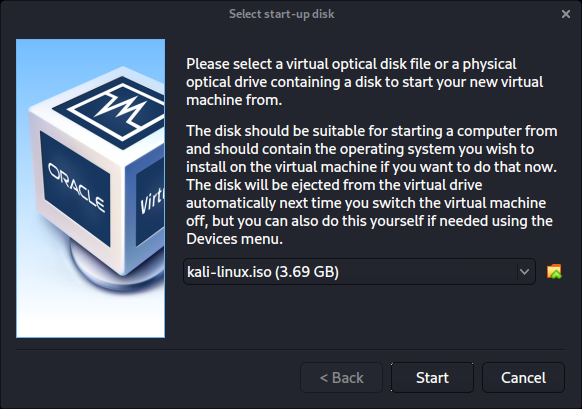
The first time we run it, we will get a prompt saying do we wish to mount an image to use as a “start-up disk”. We want to use our Kali image, rather than a physical drive, so we select the icon to the side of the drop down.
A new pop up will open, “Optical Disk Selector”. We will now press “Add”, then navigate to where our ISO is located.

After pressing “Open”, we can see its been added, so we make sure its selected and press “Choose”.
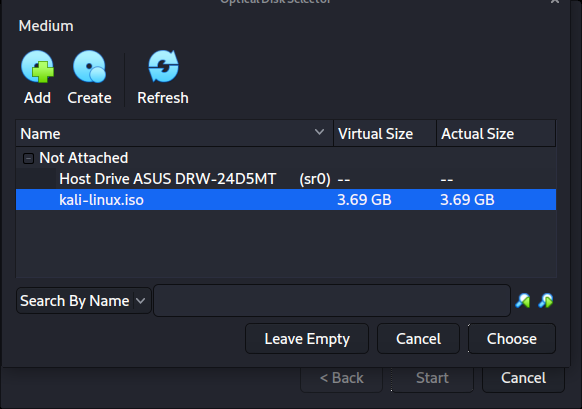
All that is left now to do is press “Start”.
After all this is done, we save, start up the VM, and then continue installing Kali Linux as we normally would for a bare metal install.
During Kali Linux setup process, the install wizard should detect if its inside a VM. If it is, should then automatically install any additional tools (such as ) to give a better user experience. If you want to manually re-install it, you can see our VirtualBox Guest Guide.
Updated on: 2021-Nov-09
Author:
g0tmi1k
Edit this page
Kali inside VMware (Guest VM)
Installing VMware Tools (Guest Tools)


![Installation of clearos [clearos documentation]](http://smartshop124.ru/wp-content/uploads/9/8/d/98d2934d2092f6a91bb623e7c5fbf29a.jpeg)