
Slicing by Bytes
First, let’s see how we can slice the data in a file by byte.
Let’s suppose we have a file of employee records, employee_data.txt:
The individual fields above are separated by the tab character.
To slice by bytes, we’ll use the -b or –bytes option:
This will print the second byte from each line in the file:
Here, we’re not restricted to slicing by a single byte. Consequently, we can select multiple bytes from each line.
For example, we can slice by the 3rd, 5th, and 8th bytes simultaneously using the “,” separator:
We can also specify a range, using the “-“ separator:
It’s worth noting that we can omit the starting position or the ending position while specifying the range. So, “-5” will select all bytes from the first position to the 5th position. And, “5-“ will select all bytes from the 5th position to the end of the line.
As mentioned above, apart from files, we can also pipe output from other Linux commands as input to the cut command:
Examples
cut -c 3 file.txt
Output the third character of every line of the file file.txt, omitting the others.
cut -c 1-3 file.txt
Output the first three characters of every line of the file file.txt, omitting the rest.
cut -c -3 file.txt
Same as the above command. Output the first three characters of every line of file.txt.
cut -c 3- file.txt
Output the third through the last characters of each line of the file file.txt, omitting the first two characters.
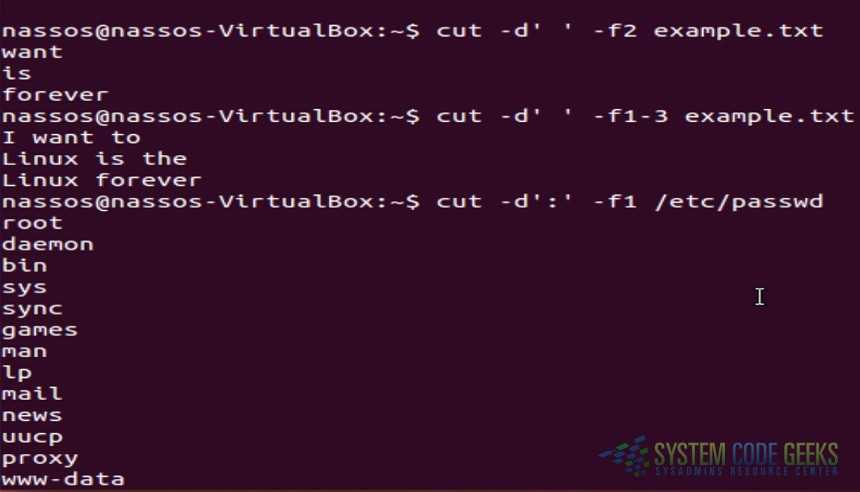
cut -d ':' -f 1 /etc/passwd
Output the first field of the file /etc/passwd, where fields are delimited by a colon (»). The first field of /etc/passwd is the username, so this command outputs every username in the passwd file.
grep '/bin/bash' /etc/passwd | cut -d ':' -f 1,6
Output the first and sixth fields, delimited by a colon, of any entry in the /etc/passwd file which specifies /bin/bash as the login shell. This command outputs the username and home directory of any user whose login shell is /bin/bash.
существительное
- сокращение (прекращение)
- разрез (срез, рана, сечение)
- порез
- покрой
- стрижка
- уменьшение (снижение)
- вырезка
- разрезание
- отрезок
- отруб
- удар
- монтаж
- отрез
- отрезание
- выемка
- зарубка
- профиль
- канал
Множ. число: cuts.
Синонимы: punch, assy, blow, putt, seizure, kick, clip, verberation, tailoring, bobbing, snippet, butt, shearing, outshoot, ancho, recess, nock, hitting, swipe, mowing, pathway, cutout, impingement, lade, buffet, indent, specialization, strike, haircut, nick, shape, montage, length, coulisse, feed, port, spanker, cannelure, segment, trim, whack, ditch, hack, crasher, bash, half-face, contour, thump, section, opening, incision, boo-boo, apoplexy, parting, wap, ball, hollow, undercut, hammering, beat, shortcut, excavation, side-face, leg, clap, tenderloin, snick, yerk, slicing, airfoil, elevation, gouge, passage, impacting, hoick, style, excision, cut-and-paste, score, paste-up, wham, bump.
Открытие файла
Python предоставляет функцию open(), которая принимает два аргумента: имя файла и режим доступа, в котором осуществляется доступ к файлу. Функция возвращает файловый объект, который можно использовать для выполнения различных операций, таких как чтение, запись и т. д.
Синтаксис:
file object = open(<file-name>, <access-mode>, <buffering>)
Доступ к файлам можно получить с помощью различных режимов, таких как чтение, запись или добавление. Ниже приведены подробные сведения о режимах доступа для открытия файла.
| Режим доступа | Описание | |
|---|---|---|
| 1 | r | Он открывает файл в режиме только для чтения. Указатель файла существует в начале. Файл по умолчанию открывается в этом режиме, если не передан режим доступа. |
| 2 | rb | Открывает файл в двоичном формате только для чтения. Указатель файла существует в начале файла. |
| 3 | г + | Открывает для чтения и записи. Указатель файла также существует в начале. |
| 4 | rb + | в двоичном формате. Указатель файла присутствует в начале файла. |
| 5 | w | Только для записи. Он перезаписывает файл, если он существовал ранее, или создает новый, если файл с таким именем не существует. Указатель имеется в начале файла. |
| 6 | wb | Открывает файл для записи только в двоичном формате. Перезаписывает файл, если он существует ранее, или создает новый, если файл не существует. Указатель файла существует в начале файла. |
| 7 | w + | Для записи и чтения обоих. Он отличается от r + в том смысле, что он перезаписывает предыдущий файл, если он существует, тогда как r + не перезаписывает ранее записанный файл. Он создает новый файл, если файл не существует. Указатель файла существует в начале файла. |
| 8 | wb + | Он открывает файл для записи и чтения в двоичном формате. Указатель файла существует в начале файла. |
| 9 | а | В режиме добавления. Указатель файла существует в конце ранее записанного файла, если он существует. Он создает новый файл, если не существует файла с таким же именем. |
| 10 | ab | В режиме добавления в двоичном формате. Указатель существует в конце ранее записанного файла. Он создает новый файл в двоичном формате, если не существует файла с таким же именем. |
| 11 | а + | Он открывает файл для добавления и чтения. Указатель файла остается в конце файла, если файл существует. Он создает новый файл, если не существует файла с таким же именем. |
| 12 | ab + | Открывает файл для добавления и чтения в двоичном формате. Указатель файла остается в конце файла. |
Давайте посмотрим на простой пример, чтобы открыть файл с именем «file.txt»(хранящийся в том же каталоге) в режиме чтения и распечатать его содержимое на консоли.
Пример:
#opens the file file.txt in read mode
fileptr = open("file.txt","r")

if fileptr:
    print("file is opened successfully")
Выход:
<class '_io.TextIOWrapper'>
 file is opened successfully
В приведенном выше коде мы передали filename в качестве первого аргумента и открыли файл в режиме чтения, поскольку мы упомянули r в качестве второго аргумента. Fileptr содержит объект файла, и если файл открывается успешно, он выполнит оператор печати.
Вырезать текст на основе символов
Команда вырезания в Unix позволяет пользователям вырезать раздел текста на основе символов. При обработке больших задач обработки файлов вам придется делать это довольно часто. Попробуйте их и обратите внимание на сходство между символьным и байтовым режимами. 13. Вырезать только один символ из входного потока. 13. Вырезать только один символ из входного потока
13. Вырезать только один символ из входного потока
$ echo "cutting text from input" | cut -c 1
Приведенная выше команда вырезает первый символ из стандартного ввода и отображает его в терминале. В данном случае это « с ». Измените вашу строку на что-то другое, чтобы понять это ясно.


![10+ cut command examples in linux [cheat sheet]](https://smartshop124.ru/wp-content/uploads/c/0/f/c0f4d696d0d864b6e37cb4dd62be916f.jpeg)
14. Вырезать определенные символы из входного поток
$ echo "cutting text from input" | cut -c 1,3
Эта команда обрежет только первый и третий символы входной строки и покажет их. Вы можете попробовать вырезать другие символы, но не забывайте превышать ограничение на количество символов в вашей строке.
15. Вырезать диапазон символов из входного потока
$ echo "cutting text from input" | cut -c 1-12
В случае этой команды «cut» будет вырезать символы в диапазоне от первой позиции до двенадцатой позиции. Результатом будет «cutting text ». Обратите внимание на сходство между этой командой Linux cut и третьей командой. 16. Вырезать только один символ из текстового файла. 16. Вырезать только один символ из текстового файла
16. Вырезать только один символ из текстового файла
$ cut -c 1 test.txt
Эта команда будет отображать только первые символы каждой из пяти строк нашего файла test.txt. Это эквивалентно команде
$ cat test.txt | cut -c 1
и обеспечивает тот же результат, который мы получили бы при использовании байтового флага.
17. Вырезать определенные символы из текстового файла
$ cut -c 7,10 test.txt
Приведенная выше команда вырезает только седьмой и десятый символы из каждых пяти строк. Вы можете указать любые позиции символов, если они попадают в диапазон доступных символов.
18. Вырезать диапазон символов из текстового файла
$ cut -c 1-12 test.txt
Эта команда выведет первый-двенадцатый символ каждой строки в файле test.txt . Команда cut в Unix ведет себя одинаково как при вырезании диапазона символов, так и диапазона байтов.
19. Вырежьте первые 5 символов в алфавитном порядке
$ cut -c 1-5 test.txt | sort
Вы можете предоставить выходные данные команды cut как входные данные для команды sort для вырезания первых пяти байтов каждой строки в алфавитном порядке. Команда сортировки не требует никаких опций при сортировке по алфавиту.
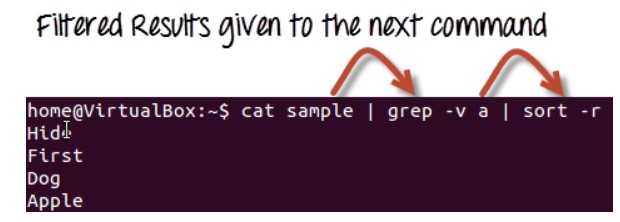
20. Вырежьте первые 5 символов в обратном порядке
$ cut -c 1-5 test.txt | sort -r
Эта команда вырезания обрежет первые пять символов из каждой строки и покажет их после обратной сортировки. Посмотрите, как вывод команды cut передается команде sort с использованием канала.
21. Вырезать из пятого символа до конца входного потока
$ echo "cutting text from input" | cut -c 5-
Приведенная выше команда обрезки обрежет текст, начиная с пятого байта до конца строки. Это может быть полезно, когда вам нужно вырезать из указанной позиции символа до конца входного потока. Просто измените значение после b, сохраняя trailing – on.
22. Вырезать из пятого символа в конец файла
$ cut -c 5- test.txt
Эта команда начнет вырезать каждую из пяти строк файла test.txt с позиции их пятого символа и завершится после достижения конца каждой строки. Конечный дефис (-) является обязательным для этого вида операций.
23. Вырежьте указанное количество символов, начиная с первой позиции
$ echo "cutting text from input" | cut -c -5
Slicing by Fields
Now, let’s see how we can slice file data by field.
Let’s say we want to list only the names of all the employees from the file. We can do this by slicing the file data by the first field in the file using the -f or –fields option:
Here, we’ve used the -f option of the cut command and sliced the input using 1 as the field number:
Above, we’re assuming that the fields in the file are separated using the tab delimiter. But, we can override this behavior by using the -d or –delimiter option to specify a different delimiter:
Here, we’ve used the -d option to specify space as the delimiter. Also, we’re slicing the data using field number 2.


Now, let’s look at the output:
It’s worth noting that the output includes part of the earlier first field and all the rest of the fields. This is because tab is now treated like any other character, and there are no spaces in any of the other fields. Similarly, the first line is blank because it does not contain any spaces.
As with the other options, we can select multiple fields using the “,” separator:
And, we can select a range of fields using the “-“ separator:
The above command will output all fields from the second field onwards.
By default, the cut command prints all lines from the input, even if the delimiter is not present. But, we can alter this behavior using -s or –only-delimited. Using this option, we can tell the cut command not to print the lines that don’t have the delimiter.
What are the minimum system requirements?
Operating system: 32- or 64-bit Windows 7 — 10, Apple macOS 10.10 — 10.15, or
64-bit Linux with at least glibc 2.19.
CPU: x86-64 Intel or AMD; at least one 2 GHz core for SD, 2 cores for
HD, and 4 cores for 4K.
GPU: OpenGL 2.0 that works correctly and is compatible. On Windows, you
can also use a card with good, compatible DirectX 9 or 11 drivers. We do
not have a list.
RAM: At least 4 GB for SD, 8 GB for HD, and 16 GB for 4K.
Hard drive: yes, get one; the bigger, the better
Network: Shotcut does NOT require access to the network to activate,
check a subscription, or send usage analytics. However, some links in
the Help menu do link out to this web site. If you have files on a fast
(at least 1 Gb/s) network share you can access them from there through
your operating system.
Specifying LIST
Each LIST is made up of an integer, a range of integers, or multiple integer ranges separated by commas. Selected input is written in the same order that it is read, and is written to output exactly once. A range consists of:
| N | The Nth byte, character, or field, counted from 1. |
| N— | From the Nth byte, character, or field, to the end of the line. |
| N—M | From the Nth to the Mth byte, character, or field (inclusive). |
| —M | From the first to the Mth byte, character, or field. |
For example, let’s say you have a file named data.txt which contains the following text:
one	two	three	four	five
alpha	beta	gamma	delta	epsilon
In this example, each of these words is separated by a tab character, not spaces. The tab character is the default delimiter of cut, so by default, it considers a field to be anything delimited by a tab.
To «cut» only the third field of each line, use the command:
cut -f 3 data.txt
…which outputs the following:
three
gamma
If instead you want to «cut» only the second-through-fourth field of each line, use the command:
cut -f 2-4 data.txt
…which outputs the following:
two	three	four
beta	gamma	delta
If you want to «cut» only the first-through-second and fourth-through-fifth field of each line (omitting the third field), use the command:
cut -f 1-2,4-5 data.txt
…which outputs the following:
one	two	four	five
alpha	beta	delta	epsilon
Or, let’s say you want the third field and every field after it, omitting the first two fields. In this case, you could use the command:
cut -f 3- data.txt
…which outputs the following:
three	four	five
gamma	delta	epsilon
Specifying a range with LIST also applies to cutting characters (-c) or bytes (-b) from a line. For example, to output only the third-through-twelfth character of every line of data.txt, use the command:
cut -c 3-12 data.txt
…which outputs the following:
e	two	thre
pha	beta	g
Remember that the «space» between each word is actually a single tab character, so both lines of output are displaying ten characters: eight alphanumeric characters and two tab characters. In other words, cut is omitting the first two characters of each line, counting tabs as one character each; outputting characters three through twelve, counting tabs as one character each; and omitting any characters after the twelfth.
Counting bytes instead of characters results in the same output in this case, because in an ASCII-encoded text file, each character is represented by a single byte (eight bits) of data. So the command:
cut -b 3-12 data.txt
…for our file data.txt, produces the same output:


![10+ cut command examples in linux [cheat sheet] | golinuxcloud](https://smartshop124.ru/wp-content/uploads/f/0/9/f091a18038be03a2ad730a4fbea99070.jpeg)


e	two	thre
pha	beta	g
Where are the log, presets, database, and settings stored?
Currently, the database is used to store thumbnail and waveform data,
but it will likely grow to include more things over time.
Windows
The log, database, and presets are stored in
%LOCALAPPDATA%\Meltytech\Shotcut\. In the Explorer location bar, enter
“%LOCALAPPDATA%” and press Enter. Then look for Meltytech\Shotcut.
The settings are
stored in the registry at key
HKEY_CURRENT_USER\Software\Meltytech\Shotcut\.
Linux
The log, database, and presets are stored in
~/.local/share/Meltytech/Shotcut/ where ‘~’ is your home directory, of
course.
The settings are stored in ~/.config/Meltytech/Shotcut.conf, which is a
text file in INI format.
macOS
The log, database, and presets are stored in ~/Library/Application
Support/Meltytech/Shotcut/, where ‘~’ is your home directory, of
course.
The settings are stored in
~/Library/Preferences/com.meltytech.Shotcut.plist, which is a binary
plist
file.
Can I have multiple versions installed at the same time?
Yes. Simply rename your existing program folder to put the version
number in it or move it out-of-the-way to another location.
On Windows, the installer is mostly just a fancy zip extractor that also
adds a start menu item. So, you can install the new version to a
different location, or rename the existing folder to prevent it from
being overwritten. Then, you can just navigate to whichever program
folder you want in Explorer and run shotcut.exe.
On macOS, you do not
need to copy Shotcut to the /Applications folder — that is merely a
suggestion. Simply drag Shotcut out of the .dmg to wherever you like and
rename the app bundle to put the version number into it. Or, rename the
existing version to move it out of the way before copying Shotcut from
the .dmg.
The same concepts apply to Linux, where Shotcut is simply
delivered as a compressed tar archive. However, on Linux, it is
important to understand that the launch icon always looks in
Shotcut.app; so, either version the folder containing the launch icon or
have multiple, versioned Shotcut.app folders and run the launch script
that is inside of it.
Как обрезать по байтам и символам
Прежде чем идти дальше, давайте проведем различие между байтами и символами.
Один байт составляет 8 бит и может представлять 256 различных значений. Когда был установлен стандарт ASCII, он учитывал все буквы, цифры и символы, необходимые для работы с английским языком. Таблица символов ASCII состоит из 128 символов, и каждый символ представлен одним байтом. Когда компьютеры стали доступны во всем мире, технологические компании начали вводить новые кодировки символов для разных языков. Для языков, содержащих более 256 символов, простое сопоставление 1 к 1 было невозможно. Это приводит к различным проблемам, таким как совместное использование документов или просмотр веб-сайтов, и требовался новый стандарт Unicode, который может обрабатывать большинство мировых систем письма. UTF-8 был создан для решения этих проблем. В UTF-8 не все символы представлены 1 байтом. Символы могут быть представлены от 1 до 4 байтов.
Параметр ( ) указывает команде вырезать разделы из каждой строки, указанной в заданных позициях байтов.
В следующих примерах мы используем символ который занимает 2 байта.
Выберите 5-й байт:
Выберите 5-й, 9-й и 13-й байты:
Выберите диапазон от 1-го до 5-го байта:
На момент написания этой статьи версия входящая в состав GNU coreutils, не имела возможности вырезать по символам. При использовании параметра команда ведет себя так же, как и при использовании параметра .
Фразы
cut fingerотрезать палец
cut the piecesвырезать куски
cut crystalрезать кристалл
cut cornersсрезать углы
cut the wingsобрезать крылья
cut the hairстричь волосы
cut the throatперерезать горло
cut the airразрезать воздух
cut woodрубить дерево
cut into ringsнарезать колечками
cut the meatпорезать мясо
cut expensesсокращать затраты
price cutснижать цену
cut down expensesсократить расходы
cut hairподстригать волосы
cut hayкосить сено
cut down treesвалить деревья
cut costsсокращение расходов
mouth cutразрез рта
top cutверхний срез
area of cutплощадь сечения
small cutмаленький порез
fashionable cutмодный покрой
military cutвоенная стрижка
cut ratesснижение ставок
newspaper cutгазетная вырезка
next cutследующий отрезок
final cutокончательный монтаж
cut Syntax
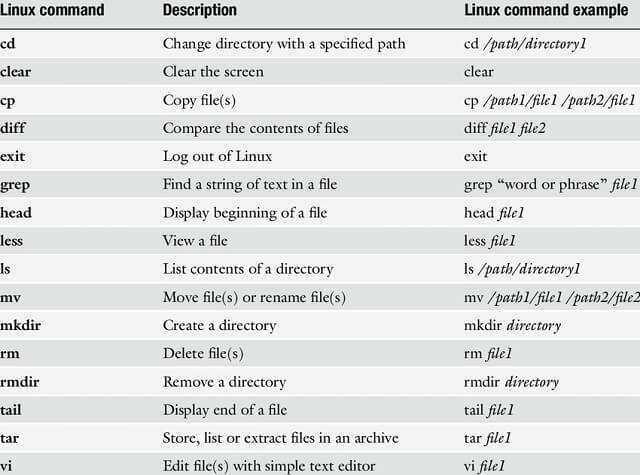
The cut command copies out columns by characters or by fields, based on certain options and their values. It can also copy out rows, but the conditions to copy out rows are limited. It can copy out a set of columns and rows; still the conditions for the rows involved, are limited. Rows are lines. The syntax is:


cut OPTION… FILE…
There can be more than one file. However, this tutorial uses only one file whose name is employee.txt in the user directory, and with the above content. If there is no file argument, cut reads from standard input. cut is a Linux shell command with different possible options. Some options take values.
Column counting begins from 1 and not zero. So, the first character column (left) is column 1; the second character column is column 2; the third character column is column 3, and so on. The first field column (left) is field column 1; the second field column is field column 2; the third field column is field column 3, and so on.
So, the cut command copies out sections from lines in a file, as has been pointed out. It normally prints the result to standard output.
Specifying A Delimiter Other Than Tab
The tab character is the default delimiter that cut uses to determine what constitutes a field. So, if your file’s fields are already delimited by tabs, you don’t need to specify a different delimiter character.
You can specify any character as the delimiter, however. For instance, the file /etc/passwd contains information about each user on the system, one user per line, and each information field is delimited by a colon («»). For example, the line of /etc/passwd for the root user may look like this:
root:x:0:0:root:/root:/bin/bash
These fields contain the following information, in the following order, separated by a colon character:
- Username
- Password (shown as x if encrypted)
- User ID number or UID
- Group ID number or GID
- Comment field (used by the finger command)
- Home Directory
- Shell
The username is the first field on the line, so to display each username on the system, use the command:
cut -f 1 -d ':' /etc/passwd
…which outputs, for example:
root
daemon
bin
sys
chope
(There are many more user accounts on a typical system, including many accounts specific to system services, but for this example, we pretend there are only five users.)
The third field of each line in the /etc/passwd file is the UID (user ID number), so to display each username and user ID number, use the command:
cut -f 1,3 -d ':' /etc/passwd
…which outputs the following, for example:
root:0
daemon:1
bin:2
sys:3
chope:1000
As you can see, the output is delimited, by default, using the same delimiter character specified for the input. In this case, that’s the colon character («»). You can specify a different delimiter for the input and output, however. So, if you want to run the previous command, but have the output delimited by a space, you could use the command:
cut -f 1,3 -d ':' --output-delimiter=' ' /etc/passwd
root 0
daemon 1
bin 2
sys 3
chope 1000
But what if you want the output to be delimited by a tab? Specifying a tab character on the command line is a bit more complicated, because it is an unprintable character. To specify it on the command line, you must «protect» it from the shell. This is done differently depending on which shell you’re using, but in the Linux default shell (bash), you can specify the tab character with $’\t’. So the command:
cut -f 1,3 -d ':' --output-delimiter=$'\t' /etc/passwd
…outputs the following, for example:
root	0
daemon	1
bin	2
sys	3
chope	1000
Запись вывода Python в файлы
В Python есть требования для записи вывода скрипта Python в файл.
Метод check_call() подпроцесса модуля используется для выполнения сценария Python и записи вывода этого сценария в файл.
Следующий пример содержит два сценария Python. Сценарий file1.py выполняет сценарий file.py и записывает свои выходные данные в текстовый файл output.txt.
Пример:
file.py
temperatures=
def c_to_f(c):
    if c< -273.15:
        return "That temperature doesn't make sense!"
    else:
        f=c*9/5+32
        return f
for t in temperatures:
    print(c_to_f(t))
file.py
import subprocess

with open("output.txt", "wb") as f:
    subprocess.check_call(, stdout=f)


![[в закладки] bash для начинающих: 21 полезная команда](http://smartshop124.ru/wp-content/uploads/9/5/9/959a561c0741b52538a2801144dc744e.jpeg)
